Installation en US - rocambille/start-express-react GitHub Wiki
StartER is a web application framework for educational purposes. A web framework provides a structure and starting point for creating an application, allowing you to focus on completing a project. Based on React / Express, StartER strives to provide a seamless and educational development experience while still enabling powerful features.
Whether you are a complete novice or a novice with experience, we will guide you through your first steps with StartER.
There are many tools and frameworks available for building a web application. However, we believe StartER is a good choice for prototyping modern, full-stack web applications while remaining a great learning tool.
If you're new to web development, this guide will help you get familiar with the ins and outs of the tool without feeling overwhelmed.
If you're at a more advanced stage, StartER will provide a solid foundation for deepening your knowledge and a playground for your own experiments.
StartER combines what we believe to be the best packages in the JS ecosystem to build a robust and enjoyable environment. However, we welcome discussions and suggestions. Who knows, maybe you'll join the StartER development team?
Before creating your first StartER application, make sure you have Git, Node.js and Docker Engine installed on your local machine. Additionally, you need a GitHub account to use the StartER repository as a template.
The StartER GitHub repository is a template repository. To use it:
-
On GitHub, go to the StartER main page (https://github.com/rocambille/start-express-react).
-
Above the file list, click Use this template and select Create a new repository.

- Use the Owner drop-down menu to select the account you want to assign the repository to.

- Enter a name for your repository and an optional description.

-
Choose the repository's visibility. For more information, see About repositories.
-
Click Create repository.
Now you can clone your repository.
-
On GitHub, navigate to your repository's main page.
-
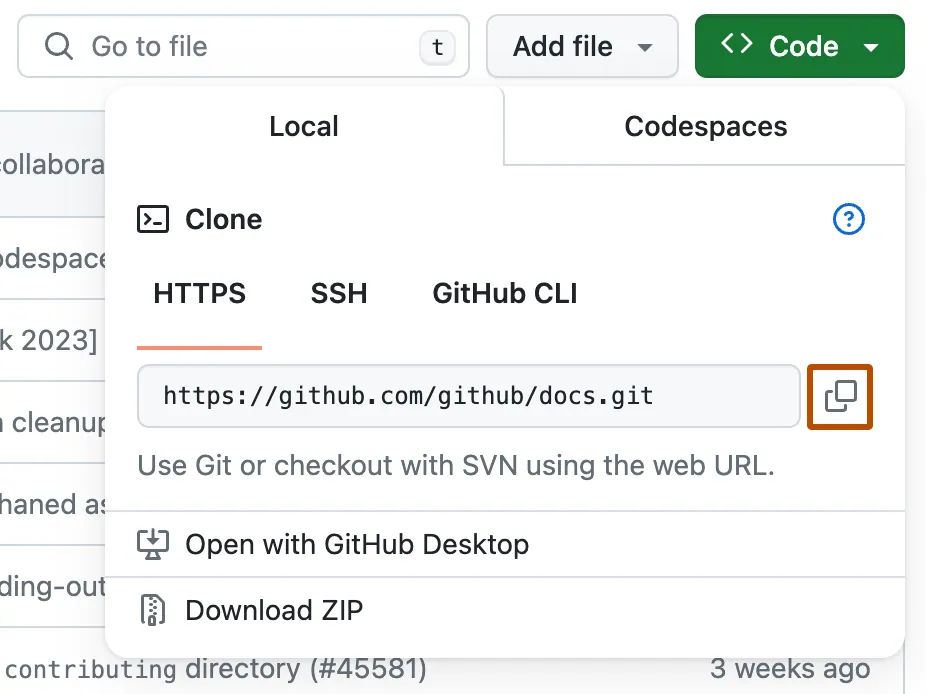
Above the file list, click <> Code.

- Copy the repository URL under "HTTPS", "SSH", or "GitHub CLI", depending on your preference.
-
Open the terminal on your machine.
-
Change the current working directory to the location where you want to clone your repository.
-
Type
git clone, then paste the URL you copied earlier.
git clone [email protected]:YOUR-USERNAME/YOUR-REPOSITORY
- Press Enter to create your local clone.
$ git clone [email protected]:YOUR-USERNAME/YOUR-REPOSITORY
> Cloning into `Spoon-Knife`...
> remote: Counting objects: 10, done.
> remote: Compressing objects: 100% (8/8), done.
> remove: Total 10 (delta 1), reused 10 (delta 1)
> Unpacking objects: 100% (10/10), done.
- Change the current working directory to your local clone.
cd YOUR-REPOSITORY
Now you can install the dependencies into your project's local node_modules directory.
npm install
Depending on the application's runtime environment, you may find it useful to have different configuration values.
To achieve this, StartER uses a .env file to separate environment variables from the code. During a fresh installation of StartER, your application's root directory will contain a .env.sample file that defines the current environment variables. After installing StartER, copy this .env.sample file under the name .env.
cp .env.sample .env
Here are the required variables that you must fill in with your own values:
| Variable | Description |
|---|---|
| APP_PORT | Server port (5173 by default) |
| APP_SECRET | Secret key used to generate the signature for authentication |
| MYSQL_ROOT_PASSWORD | Password for the MySQL root superuser account |
| MYSQL_DATABASE | Name of your application's database |
Keep in mind
-
You can include additional variables in your application's
.env.samplefile. By adding entries to the.env.samplefile, other members of your team can clearly identify the environment variables required to run your application. -
Your
.envfile should never be added in a Git commit, as each workstation (local machine or server) running your application may require a different environment configuration. Furthermore, this would pose a security issue if intruders accessed your repository, as your sensitive credentials would be exposed.
Once the application is built and configured, you can start the development server and other StartER services with docker compose.
docker compose up --build
Once the development server is started, your application will be accessible in your web browser at http://localhost:5173.
Also, the database management tool Adminer will be accessible in your web browser at http://localhost:8080. Log in with the following credentials:
- System: MySQL
- Server: database
- User: root
- Password: (value of
MYSQL_ROOT_PASSWORDin your.envfile) - Database: (value of
MYSQL_DATABASEin your.envfile)
Now that you've created your StartER application, you might be wondering what you need to learn next. We strongly recommend that you familiarize yourself with how StartER works by consulting the following documentation:
- Directory structure (for beginners who enjoy reading)
- First exercises (for beginners who enjoy doing)
- One server (for experienced beginners)
The StartER adventure can begin! Now, choose your learning path and dive into building modern applications.


