RPi3BPreemptRT - rmu75/linuxcnc-wiki GitHub Wiki
17jan2019 got all 3 axis running at 1200mm/min no errors for 4 reps of 3Dchips so far
I saw the on board DRV8825 pololu drivers getting very hot ( losened the glue on heat sinks!)
So i have a fan on them now.
I also saw that X was cooler than Y&Z by a lot.
But thats due to X being used very little in 3Dchips
So I added G10 L2 P0 X0 Y0 Z10 R45 to the program to load X more
Now with fan all drives run cool to touch
I continue repeats of 3Dchips45deg looking for longevity
NB: the DRV8825 has a current limiting pot that needs setting BEFORE hooking up motors for first time
Hahaha the typical very important thing found too late
This current adjustment makes a BIG difference in running
I may have lost a few lives on these cats by not knowing that earlier
14jan2019
got 3 axis cfg running at 5meters per minute :-) 80mm/sec
dunno how fast my drives and machine can handle but this hdwr stepgen works!
got scope shots at 4800mm/min, 12uS pulses at 10Khz (0.0075mm stepsize) CLEAN!
see gallery at bottom pf page
12jan2019
Milestone! I got the picnc board running with SPI comms!
only a simple test so far
but I was able to command 1000 mm move on X axis at 100 scale
I only got the picnc.axis.0.position-fb to respond ( no real hardware yet)
It was hell getting this far but looks like I can get real motion now
A lot of wiring and programming errors were fixed,
mostly due to 'toodamnsmall-and-imgoingblind-itis'
Next, cleanup code and wiring
Dang these SCLK pulses are in the nanoseconds
no wonder the cables have to be as short as possible )
Afterwards, hookup real motors to see if I get faster speeds and higher resolution
( I can get > 2meters/min at full step (.0075mm each) already just bitbanging gpio pins
but I hope for smaller, smoother stepping )
07dec2018
pcbs for PICnc stepgen all built,
but fear set in and i decided to try out some cheap SPI hdwr before using them.
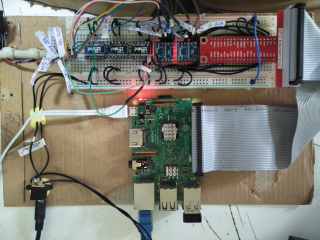
I built dual MCP23S17 boards on ETT protoboards
and they work sweet using a python lib for SPI comms
now i need to write a C driver for them,
then learn about SPI with Linuxcnc, thats all :-)
27 nov 2018 got pcbs from OSHpark and parts from Singapore
couldnt wait for new soldering station so used tiny cheapo gun
its Hakko but still cheapo
update got new Hakko clone, nice to have temp regulation.
pcb looks ok, ohms out ok so far with all SMT on it
see pix at bottom of page
TODONEXT more sockets then testing of SPI link
12 nov 2018 tjtr33
sorry, putting out fires and travelling
repaired tek scope delaminated polarizing filters, and 3ph bridge on ebike bldc controller
but, got in pcbs for PICnc stepgen v3.1 from OSHPark(nice boards)
waiting parts order from rsonline, es.co.th, and thaieasyelec
added complication of mcp23s17(s) to study simple(?) SPI communication
it seems to me that the rpi3b has 2 SPI channels and lots of cheap i/o if a suitable driver existed
also need to solder smt devices to pcbs ( dan small stuff!)
07 oct sep 2018 tjtr33
( * programmed pic32mx150f128 tonight using openocd on rpi3B * )
( * image was picnc.hex for spi controlled hardware stepgen *)
( * programming reported success but no test till OSHpark pcbs arrive * )
( add 84uS latency record, I think its mostly harmless as i've not gotten lcnc rt errs )
( * ..... tried different drives to increase velocity ..... * )
( ..... G540's 10x microstepping is 10x slower than cheap TB6560 Fullstep mode given same step rate ..... )
( * Gecko 540 works well but 10x microstepping severly reduces top velocity * )
( * TB6560 drives were terrible at velocity > 750mm/min, lost steps even with suggested mods * )
( * Now, waiting DRV8825 step[sticks in effort to use 1x microstepping to keep velocity high as possible * )
( * Better, more commercial style drives will be used afterwards with some hardware step generator. * )
( * Later, a final rerun of all on a new card before marking these notes final * )
( * Use at your own risk, "be careful out there" *)
[#top]
|----------------------|------|-------------------|
| running on workbench | http://wiki.linuxcnc.org/uploads/RPi3B-forLCNC-overall.png | 16 September 2018 |
| | https://youtu.be/rR3eeQyH5zY | |
jump to Outline of Steps 1
The result of these instructions:
- a very small , cheap cnc controller.
- featuring stability, free from Realtime errors, low f-error, high uptime
- but, having a maximum 5000 steps / Second
- I hope to get more with future changes
The result will have:
- Raspbian Debian Jessie OS
-
you can use debian repositories - RT-Preempt kernel
-
it's deterministic, you get responses on time - LinuxcCNC
-
you get a world of control system and a community of users and most importantly, developers - hal_gpio module to control hardware using Raspberry Pi gpio lines
-
you get lots of i/o, individually programmable direction, with very low cost interfacing
The hardware used:
-
Raspberry PI 3B with official power supply
-
SD card ( 10x rated )
-
Host computer capable of 'ssh -x' into the RPi3B ( I run 'headless')
-
Ethernet cable connection to LAN.
-
external 5V power Supply for I/O
-
3.3V to 5V bidirectional modules
-
breakout cable and breadboard ( beware of bad connections ! )
-
for initial bootups only:
- HDMI monitor and cable
- usb keyboard and mouse ( I used logitech wireless dongle in single usb port )
*My own system added these components:
- Gecko G540 4 axis stepper driver
- Sable 2015 minI mill
- Palm router for spindle
- hockey puck SSR for Spindle power
possible sources 2
**The good:**
- It's cheap ( in context of cnc controls )
- It's realtime
- It's extensible
- It's tiny
The bad:
*It has a low step rate,
- My particular system has a teeny stepsize of 0.00075mm due to several contstraints. * ( a 1/5mm pitch screw and a 10x microstepping Gecko G540 )
- The PI, as configured here, has a maximum 10000 changes per second
- One _change _ is used to turn a 'step command on, and another change to turn it off
-
since a step needs one on and one off, I got a step rate of 5000 steps per second
- 5000 stepspersecond * 0.00075mm / Step = 3.75mm per second
- 3.75 * 60seconds = 225mm/minute
- SLOW! but this effort is a practice run before trying speedups ( dbl step and PICnc )
- BUT
- If I remove the G540 from the equation, and use my old TB6560 drivers with Full Step,
- Then I can get 37.5 mm / sec or 2250 mm / min , not too bad .
* one more bad thing: * I run headless, and if the 'main' computer turns off, I dont know how to reconnect to the still running RPi * (that happened twice in 3 weeks, the Pi kept running though! maybe it has a big cap? )
Implementation notes: All software compilation done on the Pi
CAVEAT:
This is a long boring recipe,
with LOTS of time to get distracted and you may go watching videos or surfing the net
beware , and pay attention.
one missed step will yield a wasted day!
[#outline]
- Get Base Linux operating system 3
- I used a pre-built desktop image of Raspbian
- Build Realtime kernel 4
- I built RT-Preempt on top of the Raspbian
- Build LinuxCNC 5
- I built a Run In Place installation on top of the above
- Build hal_gpio software module 6
- I built the module with a revised Makefile, 2 header files , and one C source file
- **Create .ini and .hal files ** 7
- Get to know your hardware and tell LinuxCNC about using it back to top 8
[#getbaseimage]
back to outline 1
I used a Raspbian Debian Jessie Full Desktop image,
This avoids building Xwindows et al. some web rumors say stretch has mem leaks.
I did not try stretch or 'pure' debian for arm. This is a "maze of twisty little passages" I do not know all the routes to success. I offer you this one route :-)
create a directory for this project.
cd into it
Issue this command on the HOST system ( you dont have a useable RPI yet )
** wget https://downloads.raspberrypi.org/raspbian/images/raspbian-2017-07-05/2017-07-05-raspbian-jessie.zip **
check the downloaded file
** sha256sum 2017-07-05-raspbian-jessie.zip **
you should see
455cb85fb54c73bad07bd3a44db67755912579cd84ecbd42e2ab49565206b65e 2017-07-05-raspbian-jessie.zip
it _has_ to match, else repeat download and checking until you succeed
decompress the file
** 7z e 2017-07-05-raspbian-jessie.zip ** you want to see
Everything is OkSize: 4661483821 Compressed: 1656816607
now use dd to copy the extracted .img file to an sd card
The command used next is very powerful and can wipe your main drive if miss-used it WILL wipe everything off the SD card as it writes the new information
    the _exact_ command I use is _NOT_ the command you need to use.

    you need to know how to use dd or you can wipe your main harddrive.
** If you do not understand, then DO NOT PROCEED **
    my command was

  <tt> ** dd if=2017-07-05-raspbian-jessie.img of=/dev/sdc bs=1M ** </tt>

    This command takes a _long_ time and has _NO_ visual feedback
    It wil be nerve racking for the newbies, it will be coffee time for the wizards.
Next, do a initial booting of the SD card and do some minor configurations.
- Unplug everything connected to the Pi.
- Plug in the usb keyboard and mouse.
- Plug in both HDMI cable ends.
- Plug in ETH cable to local Lan.
- Plug the SD card into the Pi
Boot the Pi by turning on the power,
Turn on the monitor likewise.
Log in on the PI.
( using the connected keyboard (usb) mouse (usb) and monitor (hdmi) )
It takes almost a full minute ( seems very long )
I do the initial bootup right on the Pi,
I think it is simple and it works.
You will be automatically logged in as user 'pi'
 you will be able to use sudo if neccesary
 your password ( unneeded ) is 'raspberry'
** CONFIGURE SOME BASIC SETTINGS **
Run the raspi-config program.
** raspi-config**
This program is an easy way to configure your Pi.
Please use your own informations and preferences
Using raspi-config, I change these informations
** user password **
use whatever you like, but remember it, you wont get back in without it
the username will remain 'pi'
** boot options | desktop/clI | text console require login ** this removes the automatic entry to the desktop guI , I wont be using it later
** boot options | splash screen | NO ** else messy screen from graphic getting text written over it
** localisation | locale | remove mark on en_GB add en_US UTF-8 UTF-8 ** I chose en_US.UTF-8, you choose what you need
** localisation | time zone | asia bangkok ** I doubt this is your choice
** localisation | keyboard layout | generic 105key intl ** other English (US) Englishv(US) yes twice No ALtGR key No compose key use ^AltBS to kill X? No
** interface options | SSH enable ** YES
** Advanced options | Expand filesystem ** YES you get a message "Root partition has been resized, will be enlarged on next reboot'
** <FINISH> **
you get one more message "reboot now?"
** <yes> **
  The system will reboot,
  The screen will be all text
  The change for 'no splash' seems to fail for me,
    so I just repeat that step and it works
** login: pi **
** Password: whatyousaid **
** pi@raspberrypi: $ **
** Get used to doing clean shutdowns to protect the Pi and SD card **
OK, that was just a test boot, now get a clean shutdown before try using ssh
** sudo halt -n **
NB: __ALWAYS__ shutdown clean, dont pull the power cord or kill the outlet
now wait, this is practice on how to shutdown the PI and not harm it or the SD card.
the screen will blank.
wait longer for no green led flashes.
wait for another green led hiccup
then wait some more, at least 30 seconds after last green led flash.
the red led will stay on, that just means the power supply is on and plugged in.
NOW turn off the power supply and wait another 30 seconds after the red led is off.
** First remote login after clean shutdown, ** ** Pi is powered off and is already prepared for remote use **
Plug in an ethernet cable from your router to the pi
Power the PI back on ( it still has monitor keyboard and mouse )
and wait
When you get login on the terminal screen, just let it sit there
SSH into the Pi from another computer (the HOST) connected to your lan.
Find the IP address of the HOST (not Pi) computer ( I use 'sudo ifconfig')
Find the IP addess of the PI ( I use 'ping' )
Now SSH into the Pi from the HOST.
example ** sudo ssh [email protected]**
if you get
** @@@@@@@@@@@@@@@@@@@@@@@@@@@@@@@@@@@@@@@@@@@@@@@@@@@@@@@@@@@ **
** @ WARNING: REMOTE HOST IDENTIFICATION HAS CHANGED! @ **
** @@@@@@@@@@@@@@@@@@@@@@@@@@@@@@@@@@@@@@@@@@@@@@@@@@@@@@@@@@@ **
** IT IS POSSIBLE THAT SOMEONE IS DOING SOMETHING NASTY! **
this means that the pi is at an address that was known to belong to a different computer
and we need to tell the system that its ok.
(these are not the droids you seek)
so, just delete the file /root/.ssh/known_hosts
then you should get the following message
OR
you had no problem and already got the following message.
(a sort of 'virgin found' message)<br>
The authenticity of host '192.168.1.2 (192.168.1.2)' can't be established.
** ... **
** Are you sure you want to continue connecting (yes/no)? **
say ** yes**
the the system will add the new address to its allowed list after challenging you for the password of user 'pi'
** ... ** Warning: Permanently added '192.168.1.2' (ECDSA) to the list of known hosts. [email protected]'s password:
enter PI's password here
pi@raspberrypi:~ $ <pi's_password>
ok you're now ssh'd into the pi
lets check what the PI is running,
** uname -a**
Linux raspberrypI 4.9.35-v7+ #1014 SMP FrI Jun 30 14:47:43 BST 2017 armv7l GNU/Linux
later, after we add the RT PREEMPT kernel, you'll see it change
so its good to see a before & after report
later, you'll also see these words 'PREEMPT RT'
After a proper shutdown,
you can remove from the Pi:
- monitor,
- hdmi cable,
- keyboard
- mouse
You can remov ethat stuff because we will SSH into the Pi from now on.
If you wish, leave them attached ( I needed the desk space, and am comfortable runnning the Pi 'headless' )
[#buildrealtimekernel]
back to outline 1
there are images that you can use
BUT
unless you BUILD it you dont have the tools or the sources for other , later purposes
so get dirty, build it
** sudo apt-get update**
** sudo apt-get install git bc mc libncurses5-dev **
** git clone --depth=1 https://github.com/raspberrypi/linux -b rpi-4.14.y-rt**
here i'm getting a specific branch, the ONLY realtime branch available on Raspbian (so far)
** cd linux **
** KERNEL=kernel7 **
** make bcm2709_defconfig **
** make menuconfig **
during the 'make menuconfig' you'll get an old school text gui ( a tui )
navigate to
**Kernel features | Preemption Model | mark FULLY PREEMPTABLE KERNEL RT **
** <exit> **
** <exit> **
this step makes sure Fully Preemptble Kernel(RT) is chosen
(mine was ALREADY set, but its good to check )
** make -j4 zImage modules dtbs ** this takes under 2 hrs (it all being done ON the Pi)
** sudo make modules_install **
I wasted DAYS here because it failed with my typo 'sudo make modules install' I had no underscore!
when you get HERE you have built the new RT Prempt Kernel, YAY!
** Install the RT PREEMPT Kernel **
** sudo cp arch/arm/boot/dts/.dtb /boot/ **
** sudo cp arch/arm/boot/dts/overlays/.dtb* /boot/overlays/ **
** sudo cp arch/arm/boot/dts/overlays/README /boot/overlays/ **
** sudo cp arch/arm/boot/zImage /boot/$KERNEL.img **
** sudo reboot -n **
ssh in
then check that youhave an RT kernel running with
** $ uname -a **
** Linux raspberrypI 4.14.66-rt40-v7+ #1 SMP PREEMPT RT Sat Sep 1 16:17:01 +07 2018 armv7l GNU/Linux **
YAY It says PREEMPT RT (your version numbers may vary )
[#beginbuildlcnc]
back to outline 1
** cd **
** git clone git://github.com/linuxcnc/linuxcnc.git linuxcnc-dev **
** sudo apt-get install dpkg-dev **
now find the dependancies ( most of them, )
** cd linuxcnc-dev/debian **
** ./configure uspace **
** cd .. **
** dpkg-checkbuilddeps **
the next cmd will report MOST ofthe missing dependancies for linuxcnc, we'll get the remaining few later
You need to build a shopping list from the result of the command,
the command returns something like this:
pi@raspberrypi:~/linuxcnc-dev $ dpkg-checkbuilddeps
** dpkg-checkbuilddeps: Unmet build dependencies: debhelper (>= 6) tcl8.6-dev tk8.6-dev libreadline-gplv2-dev asciidoc (>= 8.5) dblatex (>= 0.2.12) \ **
** docbook-xsl dvipng ghostscript graphviz groff imagemagick inkscape python-lxml source-highlight texlive-extra-utils texlive-font-utils texlive-fonts-recommended \ **
** texlive-lang-cyrillic texlive-lang-french texlive-lang-german texlive-lang-polish texlive-lang-spanish texlive-latex-recommended w3c-linkchecker xsltproc python-dev \ **
** libxmu-dev libglu1-mesa-dev libgl1-mesa-dev | libgl1-mesa-swx11-dev libgtk2.0-dev gettext intltool libboost-python-dev yapps2 **
then get these deps ( from the report, remove the versions, and pick one mesa )
I copied the output of dpkg-checkbuilddeps and turned it into an apt-get command like this:
** sudo apt-get install debhelper tcl8.6-dev tk8.6-dev libreadline-gplv2-dev asciidoc dblatex docbook-xsl dvipng ghostscript graphviz groff \ **
** imagemagick inkscape python-lxml source-highlight texlive-extra-utils texlive-font-utils texlive-fonts-recommended texlive-lang-cyrillic \ **
** texlive-lang-french texlive-lang-german texlive-lang-polish texlive-lang-spanish texlive-latex-recommended w3c-linkchecker xsltproc \ **
** python-dev libxmu-dev libglu1-mesa-dev libgl1-mesa-dev libgtk2.0-dev gettext intltool libboost-python-dev yapps2 **
some sites may fail, its a LONG list and the interweb can be flaky
If your attempt fails, just doggedly keep trying till it succeeds,
use the same command, so its in your history, available using the UP arrow key
I had to run it up to 3 times to succeed
these files may take a long time to get ( depends on interweb )
and will take a VERY long time to install ( maybe 1 1/2 hours )
if its quick, then its wrong !
after a VERY long time you will get an annoying error
** Errors were encountered while processing: **
** w3c-markup-validator **
** E: Sub-process /usr/bin/dpkg returned an error code (1) **
I dont know how to avoid this error,
I do know how to fix it.
The problem is that there is a file in the apr-get download, that refers to a bad path
That file needs editing and you dont have the file until midway thru the install!
( bite bullet here )
so,
Here's how to edit it
the offending file is /var/lib/dpkg/info/w3c-markup-validator.postinst
change the stanza that MOSTLY looks like this to EXACTLY THIS
** if [ ! -s /etc/$server/conf.d/w3c-markup-validator.conf ]; then **
** ln -s /etc/w3c/httpd.conf \ **
** /etc/$server/conf-enabled/w3c-markup-validator.conf **
** fi **
( you are changing the 3rd line of this stanza FROM "conf.d" TO "conf-enabled" )
run the apt-get command AGAIN...
now you will get ANOTHER message that requires some attention, its simple though...
** Enabling module include. **
** To activate the new configuration, you need to run: **
** service apache2 restart **
** Enabling module rewrite. **
** To activate the new configuration, you need to run: **
** service apache2 restart **
ok, you type:
** sudo service apache2 restart **
next, you need a few more missed deps ( yes STILL missing some )
** sudo apt-get install bwidget libtk-img tclx autoconf **
NOW you finally have all the deps (afaict)
** Build LinuxCNC **
** cd **
** cd linuxcnc-dev/src **
** ./autogen.sh **
** ./configure --with-realtime=uspace **
** make **
for me, the 'make' took just over 1/2 hour
** sudo make setuid **
OK, LinuxCNC is built, and set up for user permissions, now we can test it.
NOTE: We built this as a RIP ( run-in-place ),
Get used to this litany of commands.
Open a new terminal and say the following everytime you use LinuxCNC or Hal etc
** cd **
** cd linuxcnc-dev/ **
** . scripts/rip-environment **
- HEY there's a DOT there , by itself, at the beginning of this command
- ( its geekish shorthand for 'source' )
** Test what you have built **
** scripts/runstests **
during the tests you will see what APPEARS to be a fail
its NOT A FAIL.
its a test that makes sure something fails and you get a message saying that fail happened
( oh the terrors of negative logic )
by golly I think we have it ollie
** Improve the latency and Test the latency **
back to outline 1
do a clean shutdown
then bring it all back up and from the HOST
** sudo ssh -X [email protected].**whatever
This will enable X forwarding and we can see the program window from the PI on the HOST screen.
You will still see just a text terminal output UNTIL we open an xwindows app on the PI.
Now to improve latency before testing latency:
Add to cmdline.txt
It was this:
** dwc_otg.lpm_enable=0 console=serial0,115200 console=tty1 root=PARTUUID=0358fc90-02 rootfstype=ext4 elevator=deadline fsck.repair=yes rootwait **
I added to end of the line :
** quiet splash lapic noxsave acpi_osi= isolcpus=2,3 idle=poll acpi_irq_nobalance noirqbalance vmalloc=32MB clocksource=acpi_pm **
( this 'improve latency' is from notes at https://groups.google.com/forum/#!msg/machinekit/t2eCs09EvrU/r4Ta5GtGDgAJ a discussion of rpI rtpreempt and machinekit)
For testing the realtimey-ness of your new system, you need more.
** sudo apt-get install mesa-utils **
This is for glxgears , used in latency testing to load the cpu.
run
** latency-histogram --base 100000 --servo 1000000 **
A base thread is important for parport type stepping systems using 'double-step'.
We may NOT need it but I plan on implementing double step for hal_gpio .
Once it is running, you can open 4 glxgears ( theres a button )
Let this run overnight or a day or so, I did :-)
I expect you will see the largest reported latency to be near 70 uSec.
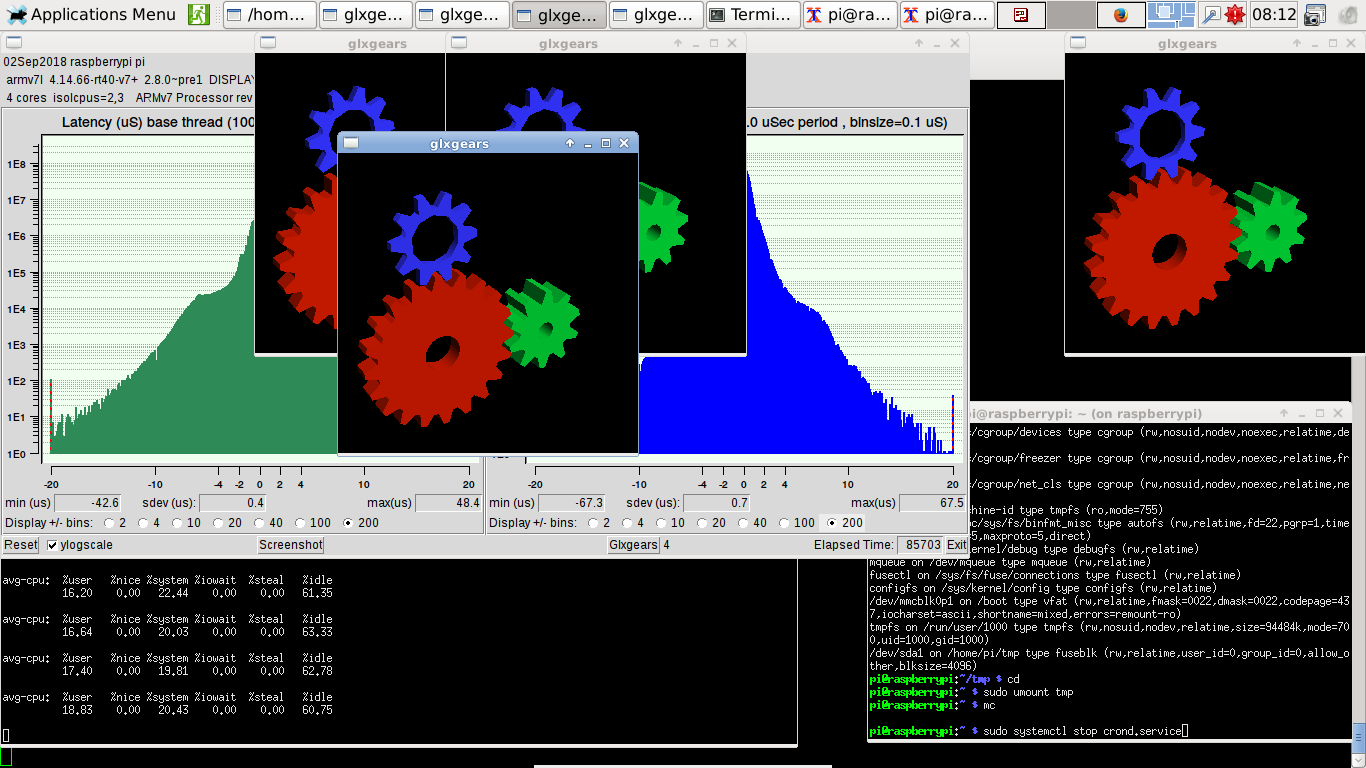
typical screenshot
http://wiki.linuxcnc.org/uploads/card2-lathist-new1-final-85735secs-%2009042018%20-%2008:12:53%20AM.png
update 24sep2018 I saw one latency of 83uS during a 36hr test
https://youtu.be/rLDXlPgqF6A
I have not seen any realtime errors in use of linuxcnc,
so one occurred when it didnt get detected( linuxcnc was not running )
** Clean up , its a mess in here!**
take out the garbage, put out the cat ( yakety yak, dont talk back)!
** sudo apt-get clean **
This gets rid of .deb files in your apt cache, they are un-needed now.
You can clean the 'linux' dir also,
it was used to build the RT PREEMP kernel,
but the goodies have been put away already.
DONT clear the linuxcnc-dev dir.
You need that to run linuxcnc ( and remember the litany! )
[#buildhalgpio]
back to outline 1
get these 4 files: please backup your versions before copying
upload:bcm2835.h
upload:cpuinfo.h
upload:hal_gpio.c
upload:Makefile
copy bcm2835.h , cpuinfo.h and hal_gpio.c files to linuxcnc-dev/src/hal/drivers set owner pi:pi set permissions rwxr-wr-w
copy new Makefile to linuxcnc-dev/src/ The new Makefile has rules to compile and link hal_gpio.c.
execute: ** make modules**
done building stuff, begin using stuff :-) !
[#iniandhal]
back to outline 1
You can edit your .inI file similar to what I did to get similar results
[EMC_MOT] ... BASE_PERIOD = 100000 SERVO_PERIOD = 1000000
Your .inI file BASE_PERIOD value should be slightly larger than... the largest number seen PLUS your .hal file step timing values for stepgen.<chan>.steplen + stepgen.<chan>.stepspace
Be a little generous here, a few additional microseconds is good ( unscientific fudge factor, but good practice )
You will NOT be able to use any step wizardy tools here, you will need to hand edit a file from the wiz or some supplied example. Because the wizards wont work with latencies as large as yours ( if you can get less than 50uS, go for it )
My BASE_PERIOD is 100000 and my RPI runs for weeks now with no Unexpected Reatime Delays. My resultant step rate is 5000
You can ease up the load that AXIS places on the system by increasing the CYCLE_TIME [TASK] ... CYCLE_TIME = 0.010
After this step, and the RPi's strength, Axis is a bit choppy, but there are no 'latency excursions' ( non-rt, TASK related delays ).
Axis is very useable, I can rotate 3D, zoom and pan without pain, it aint fast but it dont crash neither.
Just as examples, here are my .ini and .hal files.
http://wiki.linuxcnc.org/uploads/Geck0-540B3-5-rpi3b-225vel.ini
http://wiki.linuxcnc.org/uploads/Gecko_540B3-4-rpi3b-2250vel.hal
I Almost forgot, but making the masks up for hal_gpio is tough!
I need to write up how to do that or get permissions to use a spreadsheet I saw.
There are some notes in the above .hal file.
You can have uo to 26 i/o pins, or 22 with SPI or less with serial ports or ( theres a lot of ways to use pins on the Pi )
back to outline 1
here is some more info https://groups.google.com/forum/#!msg/machinekit/t2eCs09EvrU/r4Ta5GtGDgAJ
TODO:
Hardware Step Generator:
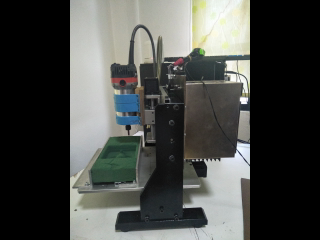
see: <https://github.com/kinsamanka/PICnc-V2/wiki>
Kinsa Manka's PICnc is a hardware step generator that is suited to the RPi
Its hardware and a software module, allowing up to 40kHz pukse rates
Double Step for hal_gpio:
see: <https://emergent.unpythonic.net/01188134101>
There's a trick that Jepler created back in the day, so that a single servo cycle
could produce a high AND a low ( the stepgen module has a kind of soft one-shot timer )
Without this, your step rate is halfed! so it is a _very_ good thing to have
Test TB6560 with FullStep to get 10x faster than G540 ( and 10x coarser ).
Get rid of breadboard and make circuit board. Breadboards have terrible connections!
back to outline 1
|-|-----------|-| | | Sable 2015| | | fairly stiff | http://wiki.linuxcnc.org/uploads/sableFront.png | comparitively cheap | | http://wiki.linuxcnc.org/uploads/SableIsometric.png | 1.5mm pitch screw | http://wiki.linuxcnc.org/uploads/SableRear.png | | tiny workvolume | http://wiki.linuxcnc.org/uploads/SableSide.png | fun for me | | G540, AC entry | http://wiki.linuxcnc.org/uploads/GeckoRear.png | 48V Kelling| | PICnc v2.1 top | | upload:picnc-v21-top.jpg | | upload:picnc-v21-bot.jpg | | PICnc v2.1 bot | | too dang small! | upload:picnc-v21-detail.jpg | too dang small! | | openocdprogrammer | upload:OpenOCDpicProgrammer.jpg | openocdprogrammer | | dual MCP23S17 | upload:DIY-MCP23S17-RPi-SPI.jpg | extra 32 io over SPI | | 12uS step pulses | upload:12uSstep-100usPeriod-10khzFreq-14jan2019.jpg | 10kHz pulse rate |
http://wiki.linuxcnc.org/uploads/BreadboardedControl.png
http://wiki.linuxcnc.org/uploads/RPi-Bob-DB25onCardboard.png
[#bom] parts suppliers ( not an endorsement )
Raspberry PI 3B with official power supply https://www.raspberrypi.org/products/raspberry-pi-3-model-b/
SD card ( 10x rated ) similar to https://www.sparkfun.com/products/14832
3.3V to 5V bidirectional i/o modules similar to https://www.sparkfun.com/products/12009
Gecko G540 4 axis stepper driver https://www.geckodrive.com/g540.html
great drive, but the 10x microstepping is problematic in that it requires 10x higher Step rates
Sable 2015 minI mill http://www.cnc-sable.nl/sable-2015-tafelfrees-p-21.html?language=en
I bought mine direct from mfctr when I was working in Taiwan, great little desktop machine
The 10mm dia 1.5mm pitych screws and round linear rails are ok
The stroke is short but the machine is pretty stiff.
Palm router for spindle similar to Makita cheap line http://makitathailand.com/mt370trimmer
As cheap as you can get, i got one for about 14USD on sale
The single oddball collet gives me .0053" tir,
I will replace as soon as possible with an older German Overarm router with better collets and runout.
hockey puck SSR for Spindle power similar to http://www.crydom.com/en/products/panel-mount/
back to top 8
back to outline 1