HWiNFO Configuration - raiguard/ModernGadgets GitHub Wiki
This guide will give you a rundown on how to configure HWiNFO for use with ModernGadgets. HWiNFO is a free, highly flexible system monitoring tool, which ModernGadgets utilizes to gather CPU temperatures and GPU information. If you have not already done so, click here to download it.
Setting up HWiNFO
Make certain that you are running HWiNFO v7.02 or later
After downloading HWiNFO, run it, then click "settings" on the small window that pops up. If you have already run HWiNFO, right-click on its tray icon, then click settings.
Configure the options as you see here:
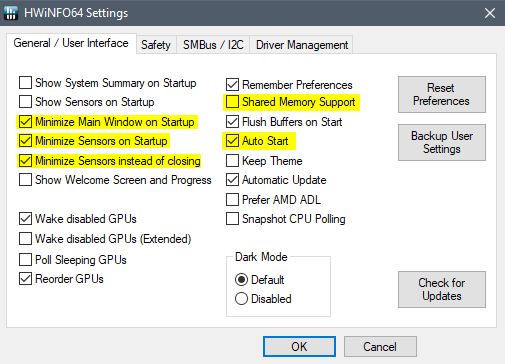
Note: Shared Memory Support is no longer required, please leave it turned off
Click ok, then click Run if it's the first time, or simply restart HWiNFO if it was already running.
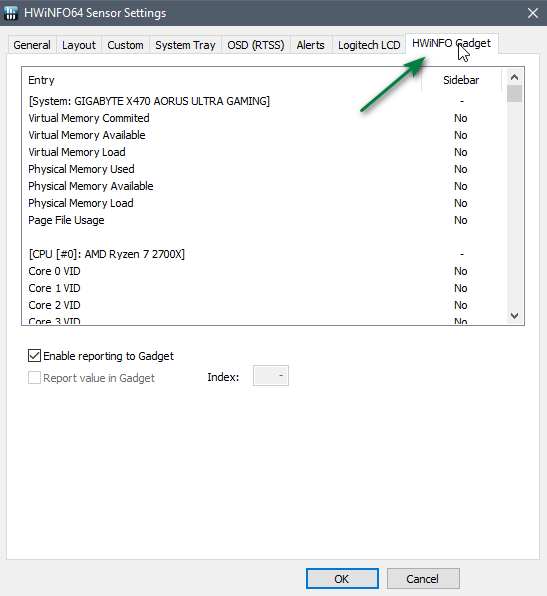
Next, right-click on the HWiNFO tray icon, then click Sensors. Click on the Configure Sensors button:

Select the HWiNFO Gadget tab in the Sensor Settings dialog.
This will list all sensors that HWiNFO is monitoring for your hardware. What is on this list will vary from computer to computer.
First, make sure that the Enable reporting to Gadget checkbox is checked.
Now left-click on the top entry in the list, scroll to the bottom, and shift+click on the bottom entry. This will select all entries in the list. Click on the Report value in Gadget checkbox, and the setting will apply to all of the sensors you selected.
NOTE: If you know what you are doing, you do not need to select all sensors, but only the ones that ModernGadgets needs. Since these vary from computer to computer, we select all sensors to ensure that we have all the ones we require.
Click Ok, and you are finished! You can close the Sensor Status dialog. HWiNFO will minimize to the Windows Notification Area and will continue to run in the background.
Configuring ModernGadgets
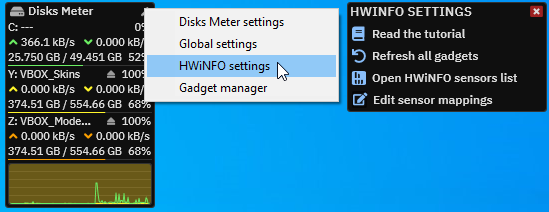
Click on the settings icon on any gadget, the click HWiNFO Settings. This will open the HWiNFO Settings skin:
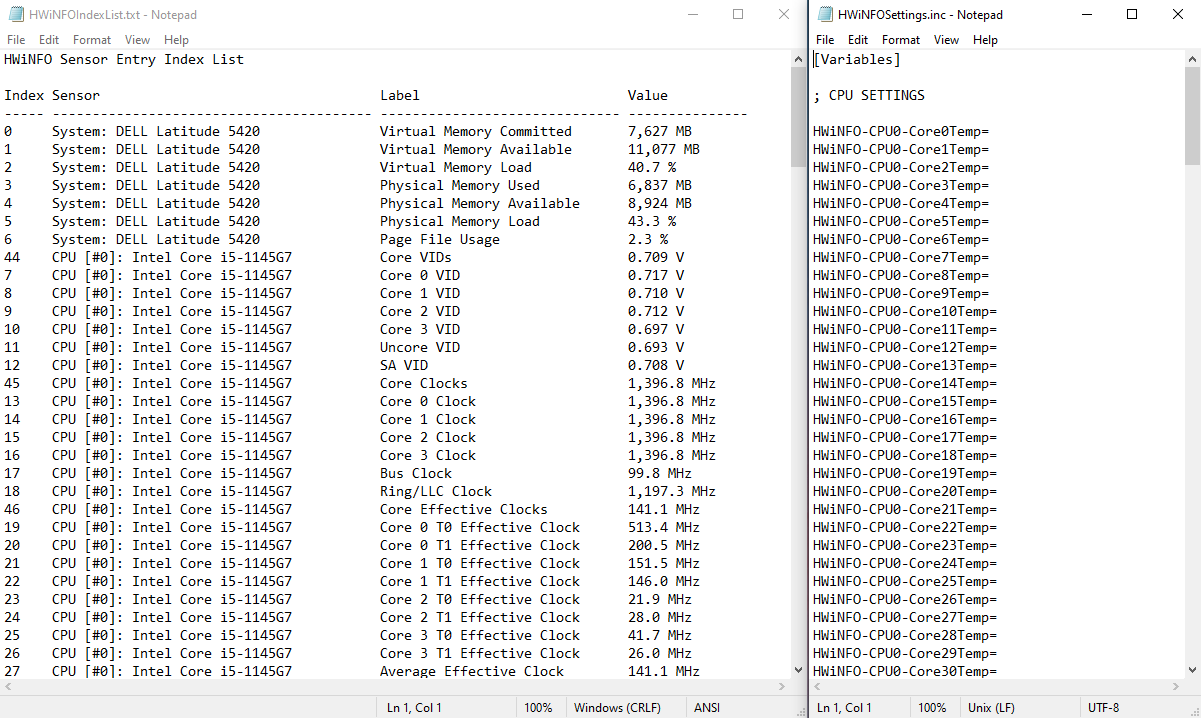
You will want to click the Open HWiNFO sensors list and Edit sensor mappings buttons. You should see something like this:
If your
HWiNFOIndexList.txtshows a communication error, review the previous section and make certain you configured HWiNFO exactly as shown.
What you see on the left is a list of all the sensors that you selected in the previous step, displayed with their sensor indices. You will need to find the correct sensor for each entry in HWiNFOSettings.inc, and copy/paste the index into the settings file.
Once you have found all of the sensors that you have, save the HWiNFOSettings.inc file and click the Refresh all gadgets button in the HWiNFO Settings skin. You should now see your gadgets populate with HWiNFO data!
CPU Meter Cores vs. Threads
CPU Meter supports any number of threads, up to 64, depending on what CPU you have. Because of this, you will need to input a separate entry ID for every physical core. However, most CPUs these days are hyperthreaded, meaning that what shows up in CPU Meter as 2 cores is really only 1 core. Thus, there is a high chance that you will only see half the number of cores that show up in CPU Meter, in the sensors list. This is perfectly normal, and you only need to configure the threads that are in the sensors list.
Other notes
- In computer language, indexes start with 0 instead of 1. What this means is that what is labeled as Core 0 in HWiNFO corresponds to Core 1 in CPU Meter.
- Your PC may not have all the sensors required for ModernGadgets. If you do not have a specific sensor (i.e. CPU Fan Speed), you can leave the sensor index blank and disable that part of the gadget in the gadget's config skin.
- On most laptops, the GPU fan sensor is kept under the motherboard group.