Jenkins CI CD Pipeline jobs scripts - q-uest/notes-doc-k8s-docker-jenkins-all-else GitHub Wiki
CI/CD pipeline script: Dev branch@ https://github.com/q-uest/tesst-appointme/blob/dev/jenkinsfile
Interesting article about Plugins for Pull Request builder & Merge chanages -
https://docs.cloudbees.com/docs/admin-resources/latest/plugins/validated-merge
https://github.com/jenkinsci/github-branch-source-plugin/blob/master/docs/github-app.adoc
Stage 1) Source Code Analysis:
SonarQube Basics
This tool contains two components:
1.SonarQube Scanner 2.SonarQube Dashboard.
The sonarQube scanner does the SCA and the results are published in SonarQube Dashboard. Both of these components can be installed separately, the SCA scanner on the build machine and SonarQube (dashboard) on a separate node, if needed.
The SonarQube scanner can be installed or called from Jenkins CI jobs (the version, "sonarqube" for Jenkins gets installed automatically, per the default setup in Jenkins - check it in "Global Tool configuration" of Jenkins) or by executing “mvn sonar:sonar” where it is configured as plug-in in Maven (by default, the SQ scanner is specific to Maven Builds).
Note: There are different versions of SQ scanners available for each language (like PHP or Java and so on) and build tools (for gradle, Maven etc).
https://docs.sonarqube.org/latest/analysis/overview/
This app is written in NodeJS, hence Nodejs needs to be installed on Jenkins master/Agent where ever this job is run. Per the configuration below for the stage, it is going to run on agent labelled "Slave1", hence the NodeJS should be available on the node.
stages {
      stage('SonarQube analysis') {
        environment{
               scannerHome = tool 'sonar-scanner'
          }
	  agent { label 'slave1' }
        steps {
          withSonarQubeEnv('sonarqube') {
            sh "${scannerHome}/bin/sonar-scanner"
           }
        }
     }
      stage("Quality Gate") {
            steps {
              timeout(time: 10, unit: 'MINUTES') {
                waitForQualityGate abortPipeline: true
              }
            }
          }

  }
Disable "abortPipeline" for QualityGate
Setting "abortPipeline" to false will not abort the build even when the SQ gate check has failed and shows it as success only.
waitForQualityGate abortPipeline: false
Build Log (with the QualityGate status with ERROR)
[Pipeline] waitForQualityGate
Checking status of SonarQube task 'AYH4dA_VUgdTbSeFVlBI' on server 'sonarqube'
SonarQube task 'AYH4dA_VUgdTbSeFVlBI' status is 'SUCCESS'
SonarQube task 'AYH4dA_VUgdTbSeFVlBI' completed. Quality gate is 'ERROR'
[Pipeline] }
[Pipeline] // timeout
Post stage
[Pipeline] echo
The Quality Gate Check Successful !!
[Pipeline] }
[Pipeline] // stage
[Pipeline] }
[Pipeline] // withEnv
[Pipeline] }
[Pipeline] // withEnv
[Pipeline] }
[Pipeline] // node
[Pipeline] End of Pipeline
Finished: SUCCESS
Add Post Stage Checks for "Quality Gate" such as Failure, Success, Regression
Note:
The "regression" block will run only if the current Pipeline’s or stage’s run’s status is failure, unstable, or aborted and the previous run was successful.
(****truncated the other part of the pipeline****)

stage("Quality Gate") {
            steps {
              timeout(time: 10, unit: 'MINUTES') {
                waitForQualityGate abortPipeline: true
              }
	}
  post {
		failure {
			echo "The Quality Gate Check failed !!"
		}
		success {
		           echo "The Quality Gate Check Successful !!"
		}
		regression {
		       echo "The QGate regression step....."
		       }

      }

 }
Unit tests/system integration tests are to be performed against the build before the following steps are performed. This project being node.js, needs to figure out the tools to be used to perform such tests.
Deploy-DEV (fired while merging Pull Requests or Direct changes to the main branch)
Pre-requisites:
- Install Docker on the build machine
- Install Nexus on a host or start a Nexus container; Configure a Docker hosted registry there with HTTP connector enabled on a specific port (8082, for example)
- Create a credential called "nexus-secret" (to connect to the Docker repo) on Jenkins Master.
- Install Trivy on build server for security scanning.
- Install kubectl on Jenkins master & copy kubeconfig file. in case of using GKE clusters, follow the document https://github.com/q-uest/notes-doc-k8s-docker-jenkins-all-else/wiki/Configure-Client-Jenkins-Master--node-to-Access-GKE-cluster-over-Internet
Install & Configure Nexus for Docker Repo
Install and Configure Nexus and Docker Registry.pdf
Trivy Installation on Ubuntu
sudo apt-get install wget apt-transport-https gnupg lsb-release
wget -qO - https://aquasecurity.github.io/trivy-repo/deb/public.key | sudo apt-key add -
echo deb https://aquasecurity.github.io/trivy-repo/deb $(lsb_release -sc) main | sudo tee -a /etc/apt/sources.list.d/trivy.list
sudo apt-get update
sudo apt-get install trivy
Install kubectl and Configure Jenkins Master for Kubernetes Deployments
- Install Kubectl:
https://kubernetes.io/docs/tasks/tools/install-kubectl-linux/
sudo apt-get update
sudo apt-get install -y apt-transport-https ca-certificates curl

sudo curl -fsSLo /usr/share/keyrings/kubernetes-archive-keyring.gpg https://packages.cloud.google.com/apt/doc/apt-key.gpg
echo "deb [signed-by=/usr/share/keyrings/kubernetes-archive-keyring.gpg] https://apt.kubernetes.io/ kubernetes-xenial main" | sudo tee /etc/apt/sources.list.d/kubernetes.list

sudo apt-get update
sudo apt-get install -y kubectl
- Configure Jenkins master to access Kubernetes
-
Create a directory .kube @ $HOME/.kube.
-
Copy the file "~/.kube/config" or its contents from K8s master to $HOME/.kube.
-
Create namespace for deployments; each environment can have its own namespace setup in K8s.
kubectl create namespace dev
- Build Docker Image of the Application.
- Copy the image onto Nexus private Repository.
- Perform a Security scan/check against the image with Trivy.
- Deploy the application in Dev environment.
- Change/Update the image tag to include the string "-DEV".
jenkinsfile:
https://github.com/q-uest/tesst-appointme/blob/main/jenkinsfile
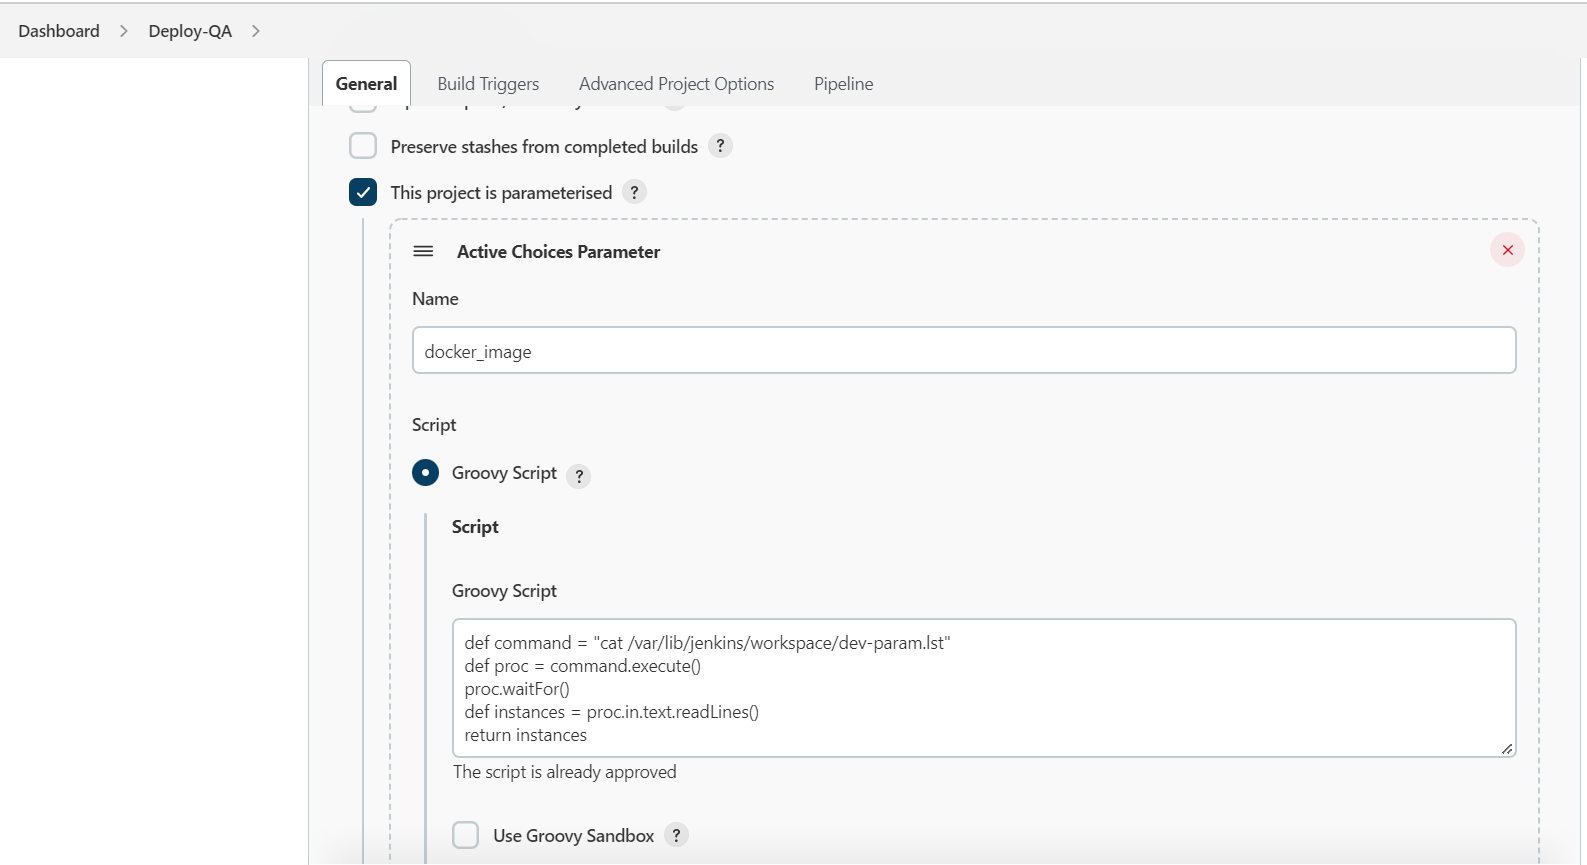
Deploy into QA
Tasks of this job:
- Lists out images (getting it from the text file available at $HOME/workspace/dev-param.lst" which has been generated in the previous step) that have been deployed in DEV and tagged as "-DEV".
- Deploy the selected image into QA.
- Change/update the deployed image's tag with "-QA" string.
- Get the list of images with the tags "-DEV-QA" and write into a file called, ~/workspace/qa-images.lst for the next job for production deployment.
Configuring the Job:
- Used Active/Reactive parameter plugin
- Using the below Groovy script to populate the values to the parameter input.
def command = "cat /var/lib/jenkins/workspace/dev-param.lst"
def proc = command.execute()
proc.waitFor()
def instances = proc.in.text.readLines()
return instances
Pipeline script for Deploy-QA job:
https://github.com/q-uest/tesst-appointme/blob/main/jenkinsfile-qa-deploy