intro_blender - ptabriz/geodesign_with_blender GitHub Wiki
Introduction to Blender interface and 3D modeling basics
Contents
I. Intro II. Basic components of blender interface III. Editors
Required software and materials
- Download and install latest version of Blender from here.
- Download and install Blender GIS addon from here. Installation guide available here.
- Download and unpack data materials from here
I. What is Blender and why using Blender?
Blender is an open-source 3D modeling, rendering and game engine software. You can create photorealistic scenes and life-like animations with it. The feature that makes Blender highly suitable for geospatial visualization is its capability to import various georeferenced data thanks to BlenderGIS addon. Almost every operation done in the blender interface, can be scripted in the Python scripting environment, allowing you to automate or batch process your 3D modeling workflow. Moreover, using Blend4Web or sketchfab addons, you would be able to publish your geospatial models online, so that everyone can interactively explore or download your work.
Learn more about Sketchfab A sample geospatial model in Sketchfab
II. Basic components of the Blender interface
Blender has numerous components and features that, thanks to it open-source capabilities, are growing every day. Covering all aspects of the software itself require several lessons. The purpose of this section is to provide a brief introduction to Blender's graphical user interface and some of its features that are essential for working with geospatial data, and will be used throughout this tutorial. We will specifically introduce the following components: Areas, Editors, Tabs, Headers, Panels
- Browse the workshop materials folder, locate and open interface_introduction.blend
Blender's application window can be flexibly arranged and divided up into a number of Areas. An area contains the workspace for a particular type of editor, like a 3D View Editor, or an Outliner. In figure above you can see the application window is divided into five areas, each assigned to an editor.
Editors are responsible for displaying and modifying different aspects of data. Imagine editors as full-fledge software each specialized for a specific tasks, like changing data properties, image editing, video editing, animation design, game design, and etc. You can assign an area to a specific editor using Editor Type selector , the first button at the left side of a header (figure below, left). Every area in Blender may contain any type of editor and it is also possible to open the same type multiple times.
Tabs are overlapping sections in the user-interface. Tabs can be vertical (Tool Shelf) or horizontal (Properties Editor, User Preferences).
Another common feature is the Header, that contain menus and commonly used tools specific to each editor. It has a small horizontal strip shape with a lighter gray background, which sits either at the top or bottom of the area.
Finally, the smallest organizational unit in the user interface is a Panel. You can usually collapse panels to hide their contents. They are used in the Properties Editor, but also for example in the Tool Shelf and the Properties region. In the image below on the right you can see three panels one of them is expanded and the rest are collapsed.
 Above: Editor type selector (left), A Toolbar with tabs (middle), Toolbar Panels (right)
Below: A Header with tabs
Above: Editor type selector (left), A Toolbar with tabs (middle), Toolbar Panels (right)
Below: A Header with tabs
III. Editors
Now that you have some general ideas about the interface, we will review some of the commonly used editors.
3D view
The 3D View is the visual interface with the 3D data and scene with numerous functionalities for modeling, animation, texture painting, etc. Unlike the 2D environment of GIS software, where you can only navigate in x and y directions, 3D viewport allows full control over our viewing angle, depth, size, etc. You can press and hold down mouse scroll (or middle click) button to change the viewing angle (or orbiting around), shift and drag to pan, and roll to zoom back and forth.
Now note the panel on the left side of the region which is called Tool shelf and it has a variety of the tools for 3D editing. Newly installed addons also appear in this toolbar. Now notice the bottom Header. It includes menus for adding, editing objects as well as viewing and shading options.
 3D view header (retrieved from Blender manual) 3D view header (retrieved from Blender manual) |
|---|
Header's View menu allows you to select a specific viewpoint such as top, left or different perspectives. Each of these commands have a keyboard shortcut ,for example you can press numpad 3 (if you have a full keyboard) to switch to top view.
Add menu provides a list of different types of 2D and 3D object that can be added to a scene
In Object Interaction mode you can different aspect of data. In this tutorial we focus Object mode and Edit mode. Edit mode allows you to access more low-level structures of your object, like faces, and vertices. In the examples that we complete in this tutorial, we will use some of these options to refine the surface model. It is important to get familiar with the 3 core elements, Faces, Edges and Vertex. You can select these elements by clicking on their corresponding icons.
On the right side of the interaction mode, is the viewport Shading mode which you can use to choose the visualization and viewport rendering methods. Solid mode is the default mode and shows objects with solid faces, but without textures and shading. The Texture mode shows the object with textures. Material mode is the fast approximation of the complete material including texture and shading. Rendered mode enables real-time rendering, which computes the near-to-final product on-the-fly as you interact with the object (with accurate materials and lighting).
Basic object selection and interaction
Objects are basically everything that you see in the 3D view. They include 3D objects, lights, cameras and more. You can select any object in the scene using the right-click. Selected objects are highlighted in orange. Use the 3 axes (i.e., handles) to move the object in your preferred direction. To select multiple objects, press and hold control key and right click on objects to add to your selection. To unselect hold shift and right-click on the object. You can move (grab) objects by pressing G, rotate them by pressing R, or scale them using S key. You can constrain any transformation to a specific axis by pressing x, y, z. You can delete the object by selecting it, pressing delete key and selecting ok.
Outliner
As its name suggests, outliner lists and organizes the scene objects. From there you can set the hierarchy, visibility of the 3D objects or lock them if you need. You can also select and activate objects by clicking on their name in the list. Figure below shows Outliner editor that list three objects (Camera, Cube and Lamp) and the Lamp object is selected.
Python console
The Python console is a useful editor for testing and executing short commands, which then can be integrated in larger workflows. The Blender modeling and gaming modules are already loaded in python console so you can you can test your code snippets without extra effort of calling the modules.
 Python console (retrieved from Blender manual) Python console (retrieved from Blender manual) |
|---|
Example 1. Simple object operation using python console.
- Call Cube object and print its location
- Copy and paste the individual command lines in the console and press enter
cubeObj = bpy.data.objects['Cube']
print (cubeObj.location)
- Move cube object to location x = 0 , y = 2 , z = 3
cubeObj.location = (0, 2, 3)
- Move cube object 5 units in positive X direction
cubeObj.location [0] += 5
- Select and delete cube object
## Unselect everything in the scene
bpy.ops.object.select_all(action='DESELECT')
cubeObj.select = True
bpy.ops.object.delete()
Text Editor
Text editor allows you to edit your python script and run it inside Blender. By pressing the + icon you can start a new file and click on Run Script to execute your code. You need to call modeling and gaming modules in text editor.
 Text Editor Text Editor |
|---|
Example 2. Batch processing simple object operations using text editor
- Create a matrix of 20 by 20 Cubes with varied size and location.
- In the text editor click on the + icon to create a new textfile
- Copy and paste the snippet below and click on Run script button
- The results should look like the figure below
import bpy

for x in range(20):
    for y in range(20):
        bpy.ops.mesh.primitive_cube_add(radius = .1 + (x*y*.0005), location=(x, y, (x*y*.02)))
 Cube matrix Cube matrix |
 Monkey and plane Monkey and plane |
|---|
- Delete all cube objects, add a Monkey object, and add a Plane object
- Open a new text window or delete the contents of existing ones (select content with
ctrl + Aand pressdel)
- Open a new text window or delete the contents of existing ones (select content with
import bpy

# unselect object
bpy.ops.object.select_all(action='DESELECT')
## delete all object that have cube in their name ##
for object in bpy.data.objects:
    if "Cube" in object.name:
        object.select = True
        bpy.ops.object.delete()
## add monkey object
bpy.ops.mesh.primitive_monkey_add(location=(0, 0, 0), radius = 3)
## add plane object
bpy.ops.mesh.primitive_plane_add(location=(0, 0, -3), radius = 10)
Properties editor
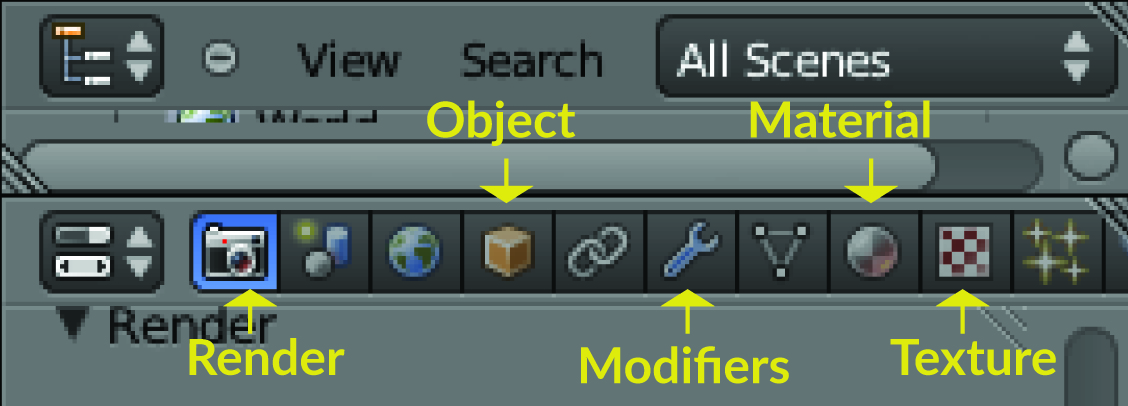
Properties editor allows you to modify the properties of the scene, rendering setting, transforming objects or changing their material or texture properties. The components that we will work with in the following examples are Object, Material and Texture properties.
 Properties panel Properties panel |
|---|
Note: Properties editor's interface is dynamically changing according to the selected object. For example, if you select the light, the little sun icon will appear to set the light properties and similarly you should select camera to be able to see the camera tab and modify the properties.
Object properties tab allows you to transform the location, orientation and scale of the object, along with their display properties. You can use numeric input for transformation parameters.
Example 3. Basic object transformation using properties modifier
- Make sure that Suzanne object is selected. It should be highlighted in outliner
- Go to Properties editor ‣ Object tab ‣ expand the Transform panel
- Type 3, 2, 4 for X, Y, Z parameters, respectively.
- Change Rotation and Scale parameters to see how they affect the object
Materials tab allows you to assign or change an object’s material. You can add and remove material, or use material browser to assign previously created materials to the object. In this tutorial we briefly introduce two basic components of Materials, Shaders and Textures.
Shading (or coloring) allows you to adjust the base color (as modified by the diffusion and specular reflection phenomenon) and the light intensity. You can also assign Texture to the objects, which is called Texture mapping. Texture mapping is often used to add detail to surfaces by projecting images and patterns onto those surfaces. Through the following examples we practice simple shading and texture mapping.
Example 4. Assigning simple Shaders and Textures
- Shaders
- From outlier select object make sure that Suzanne object is selected
- Go to properties editor ‣ object tab ‣ click on the + New button to create a new material
- Double click on the material name (e.g., Material.001) and change it to Mymat
- Expand the preview panel to see a live preview of the material as you are changing it
- Change the color parameter to red
- Go to 3D editor bottom Header ‣ Viewport shading ‣ rendered to see the object render in realtime
- Change the color to yellow
- Click on the Diffuse BSDF field in front of the surface parameter and select Glass BSDF
- Now try Emission BSDF and Glossy BSDF shaders while the viewport shader is on Rendered mode to see the effect on rendering. Your material preview and scene rendering should look like the figure shown below
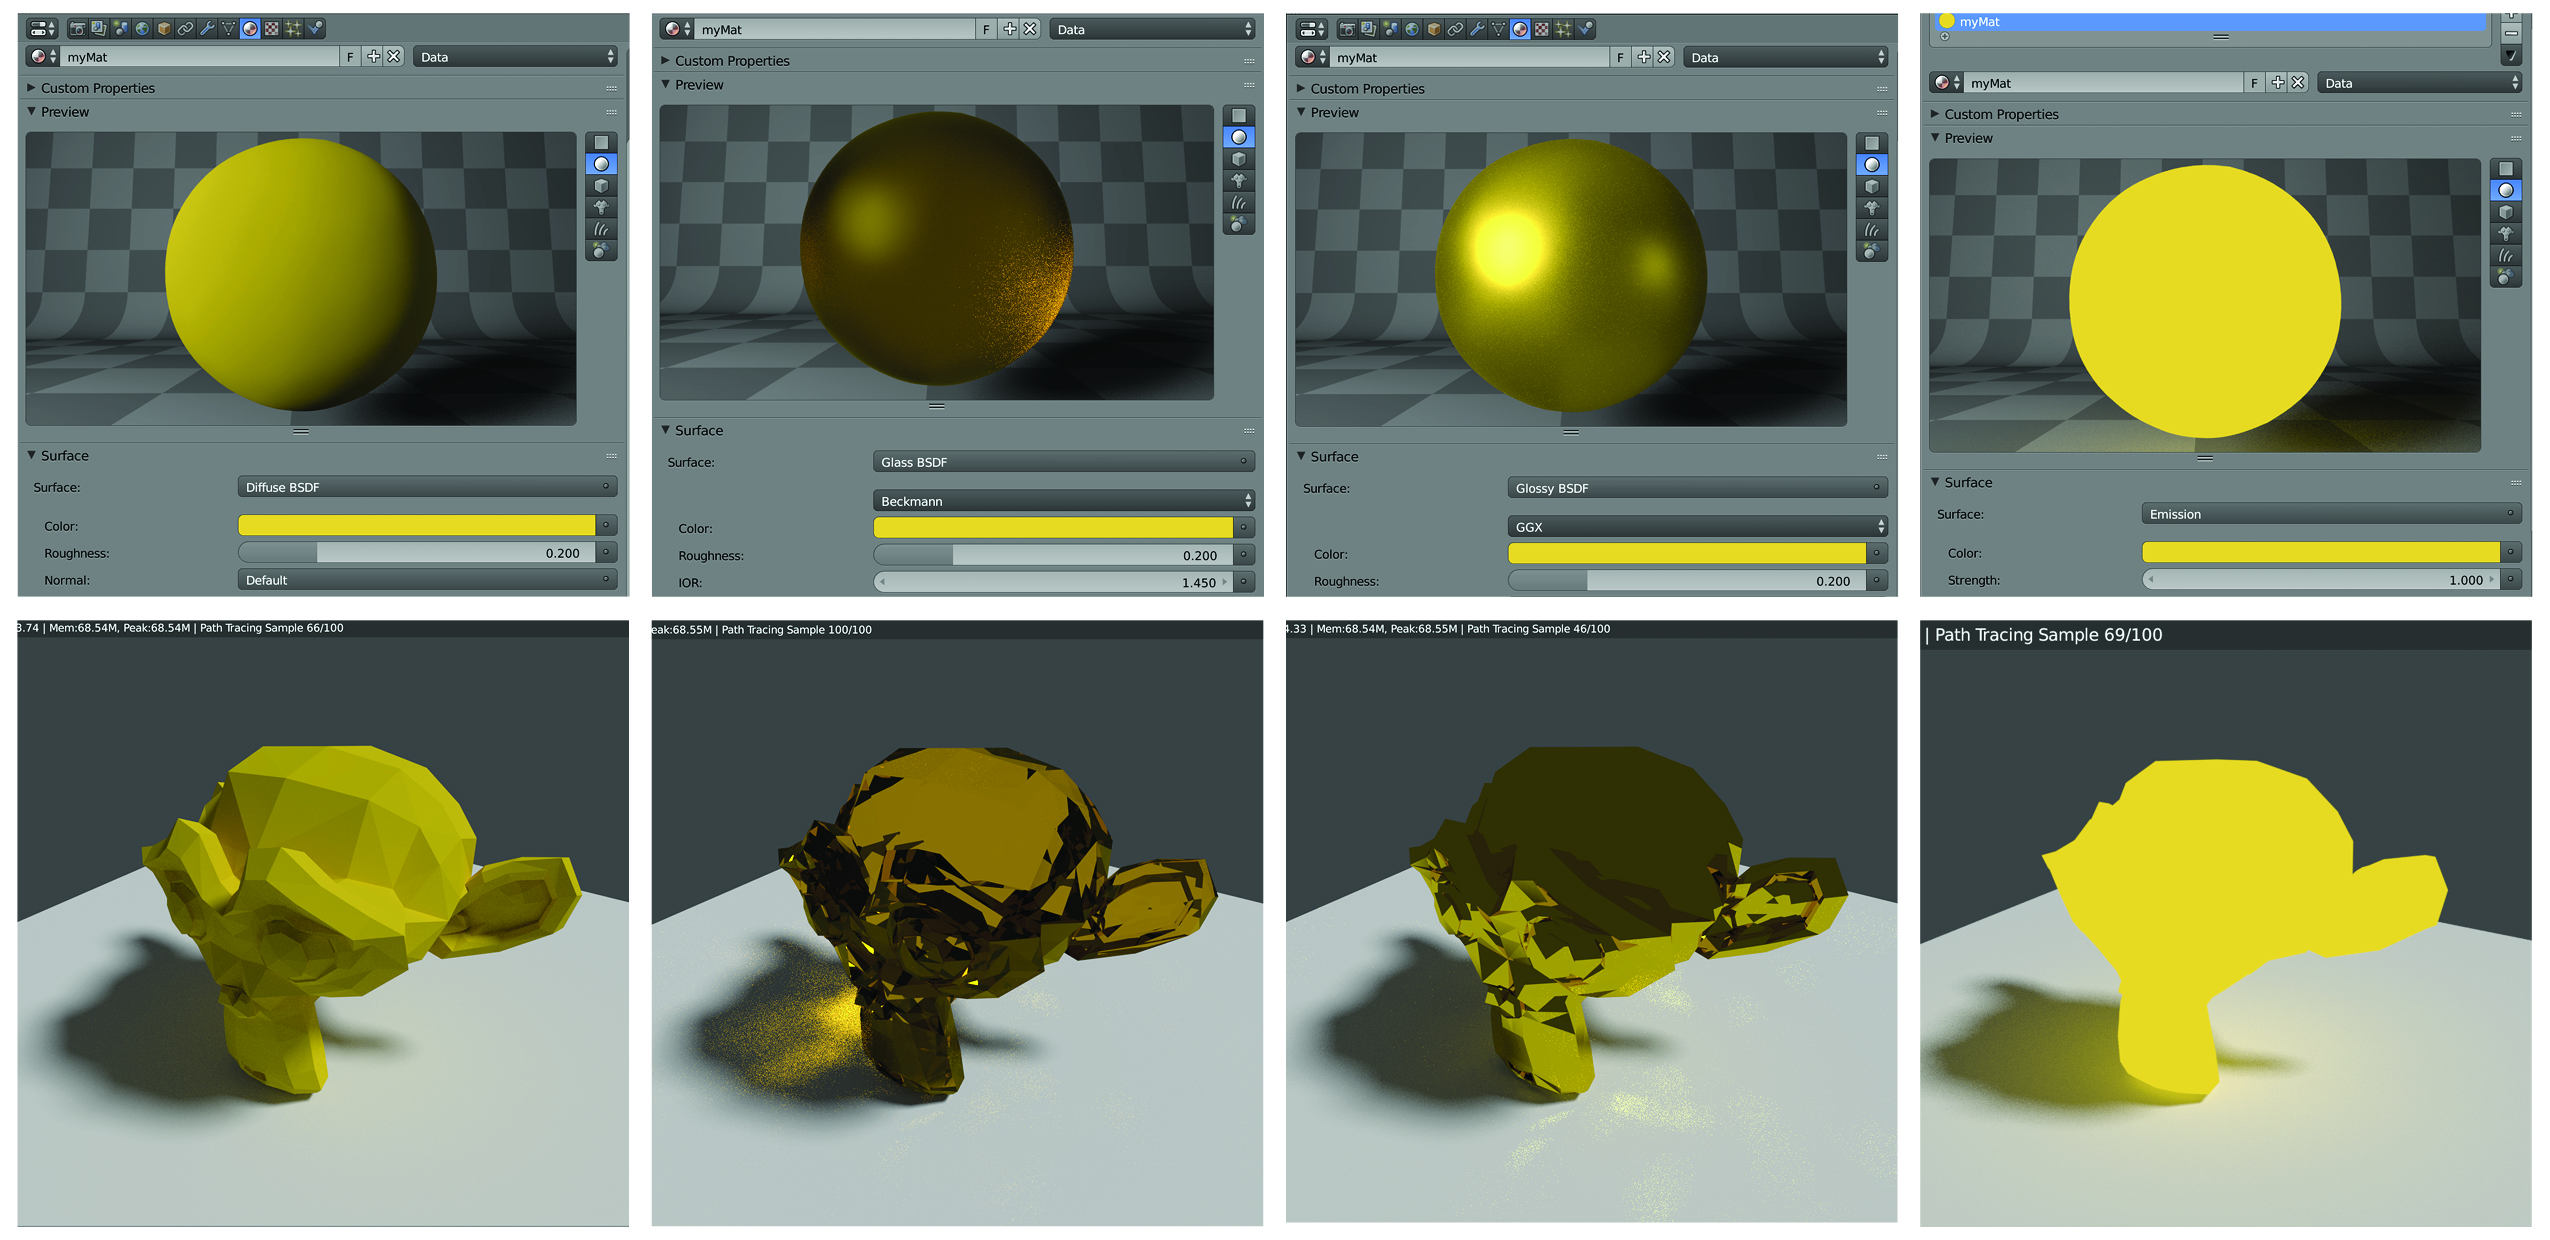 Left to right: Diffuse BSDF , Glass BSDF, Glossy BSDF, Emission
- Textures
- While the shader is still on “Glossy BSDF”, click on the radio button in front of the “Color” parameter. A widget with several columns will appear. From the texture column, select “Voronoi” to see how texture impact the rendering.
- Now try “Gradient” texture. Your material preview and scene rendering should look like the left two columns in the figure below.
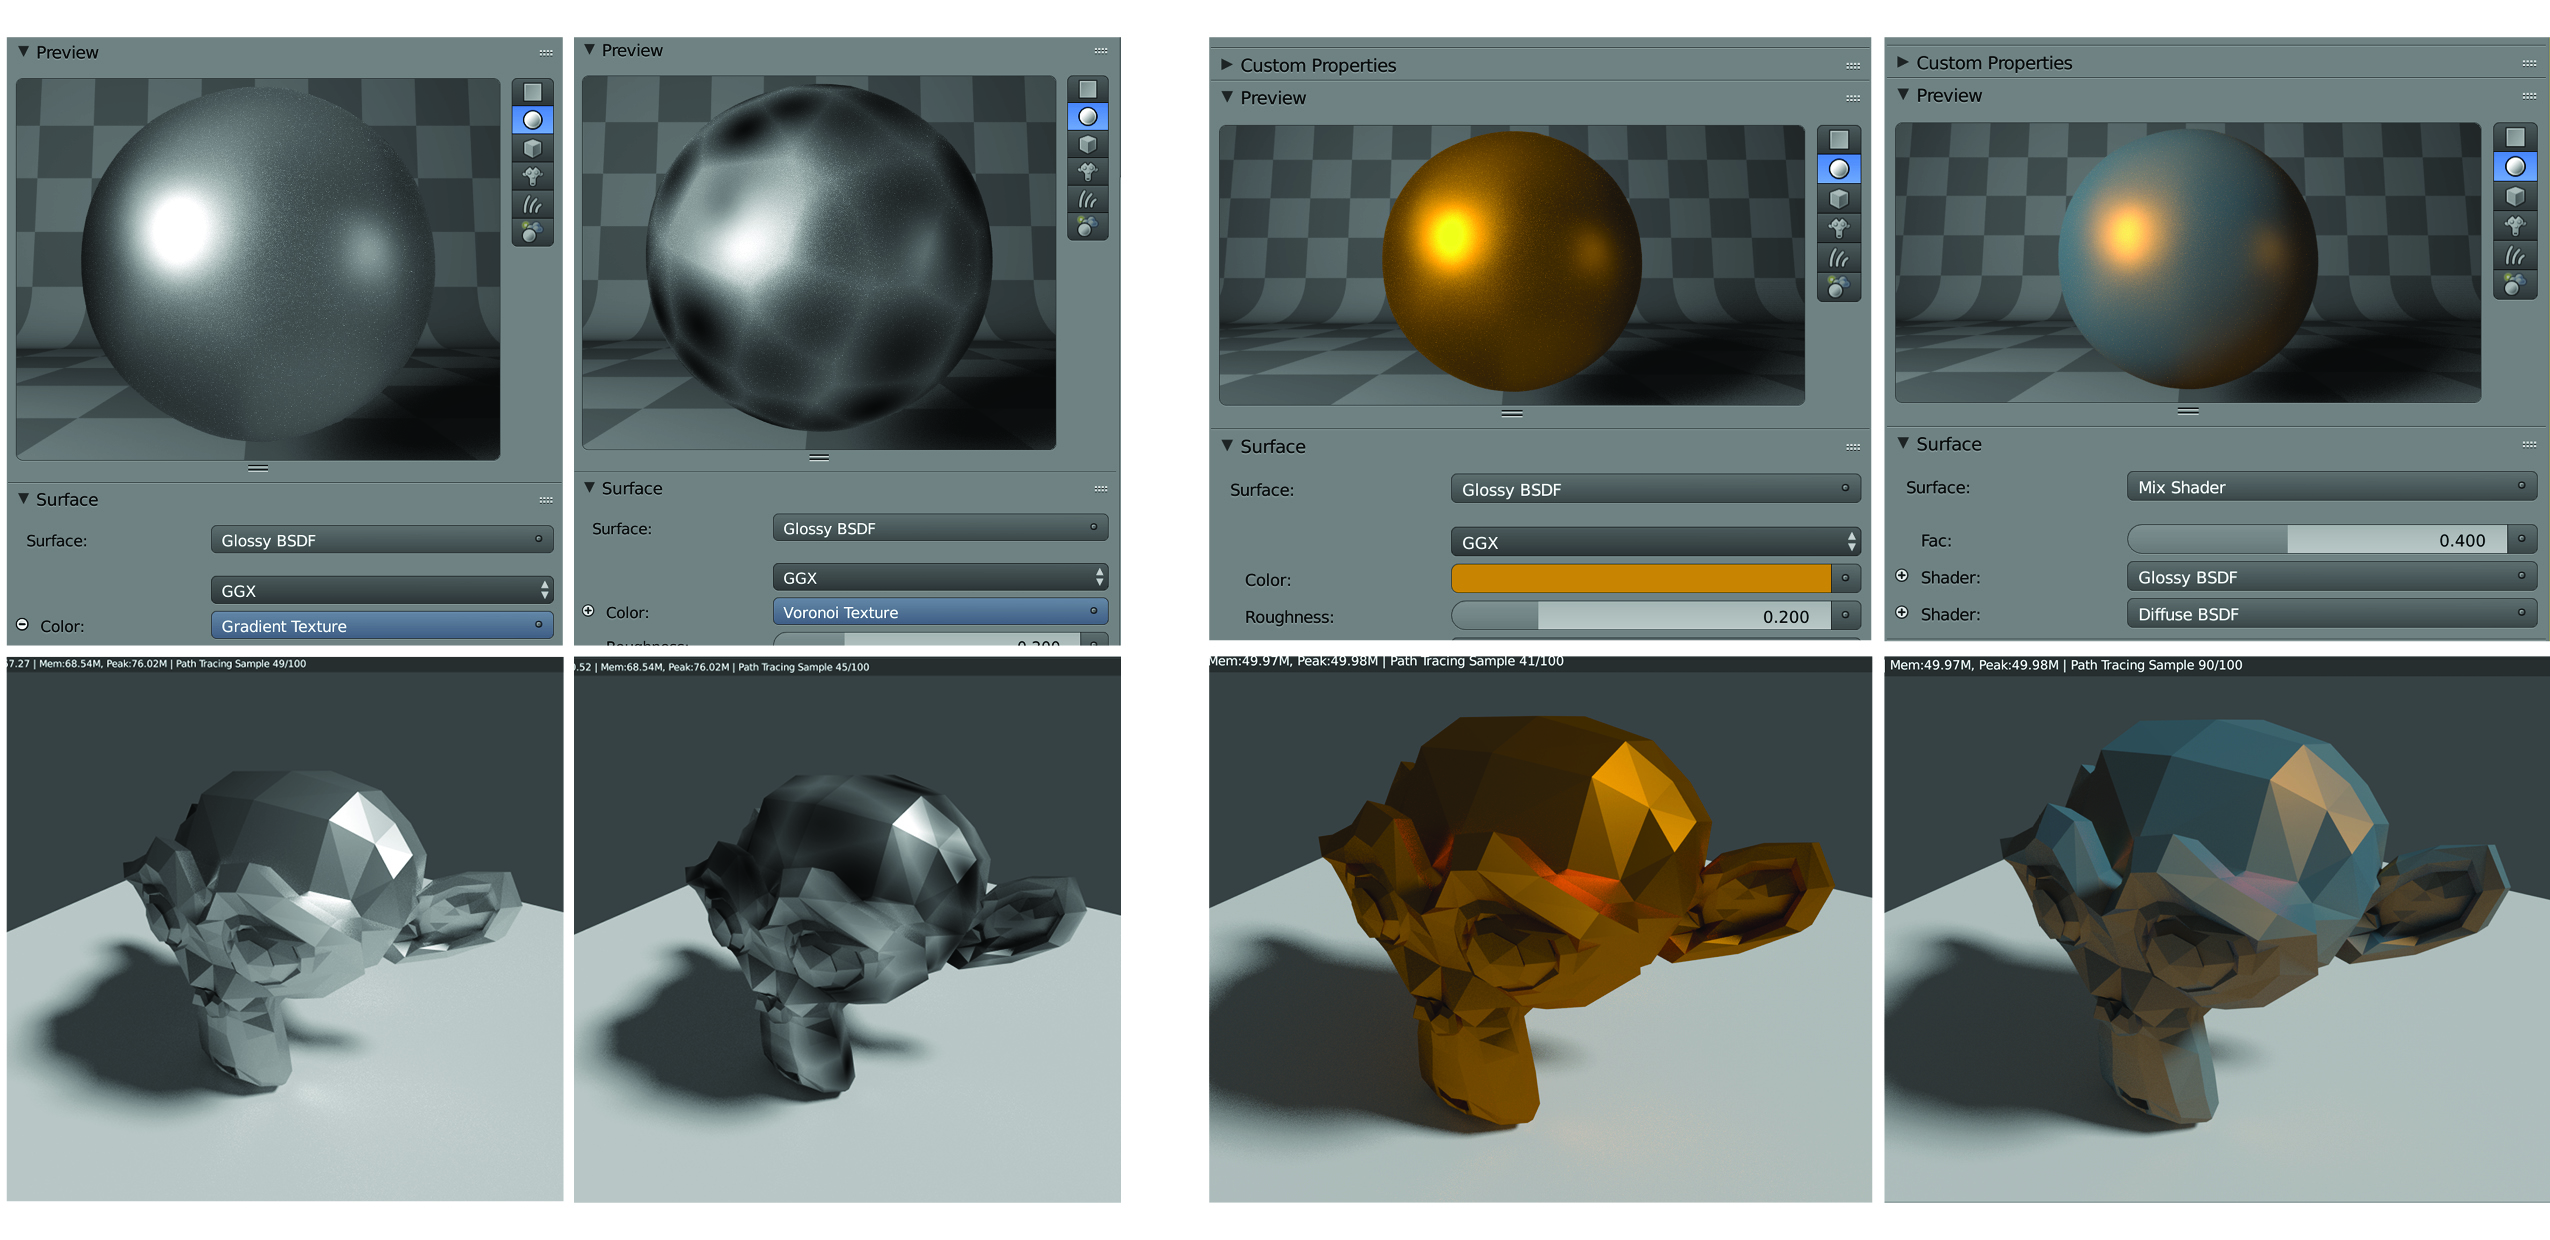 Left to right: Gradient texture, Voronoi texture, Glossy BSDF, Mix Shader
Node Editor (material)
For creating more sophisticated materials you can use Node editor . Node editor is a visual interface for viewing and creating an interconnected network of nodes. In this network, each individual node performs some operation on the material, changing how it will appear when applied to the mesh, and passes it on to the next node. In this way, very complex material appearances can be achieved.
Example 5. Setup a Mix Shader using node editor.
In this example we mix a glossy shader with a diffuse shader to make a composite material.
- Right click on the Monkey object (Suzanne) to select it
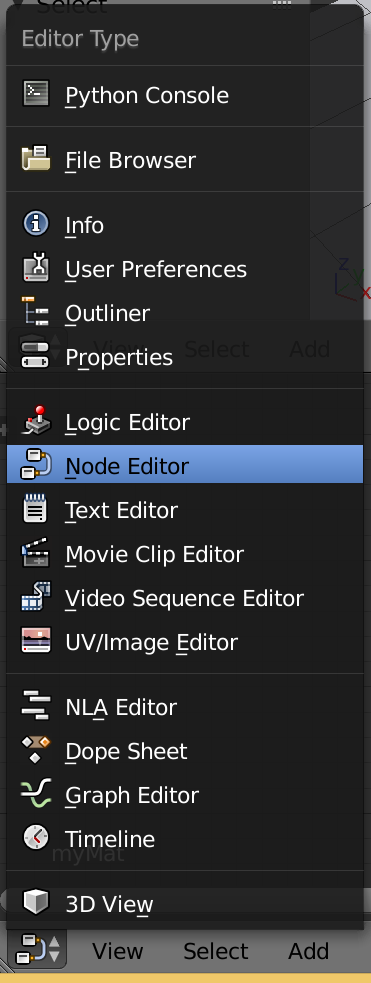
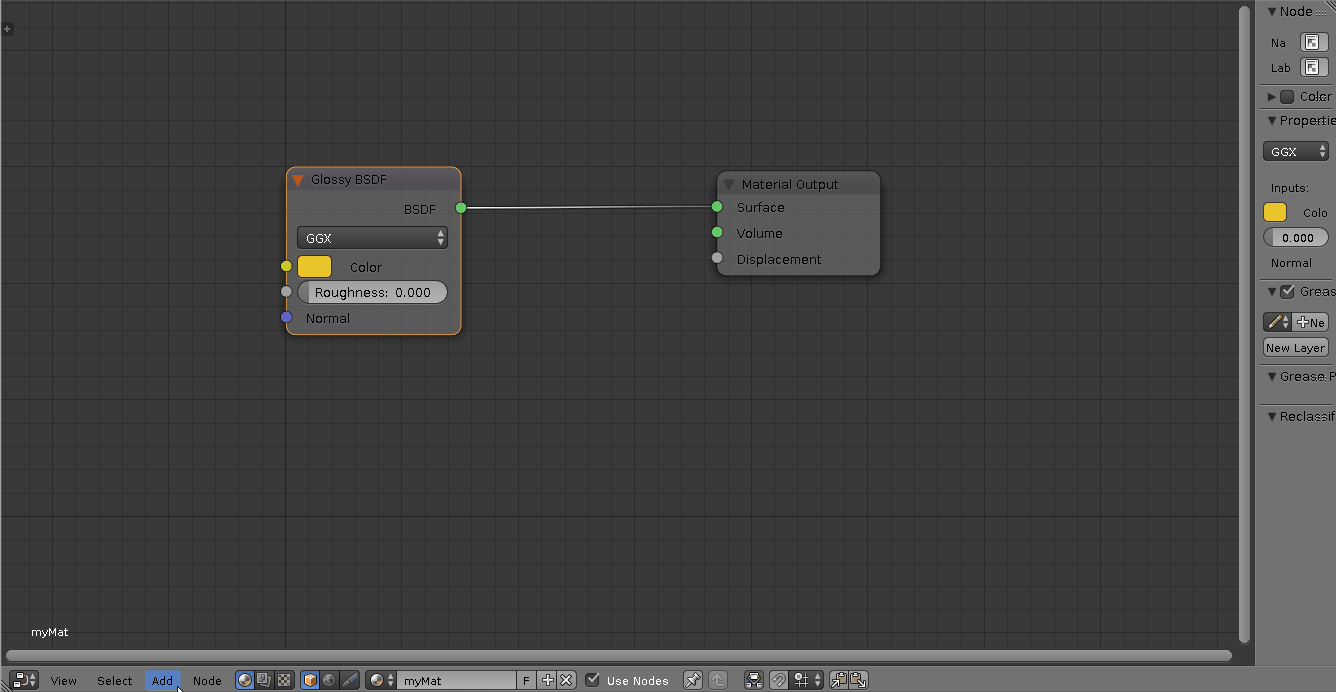
- Switch the python console editor (bottom left area) to Node editor (figure below, left).
- In the node editor You will see the nodes we have already setup. The Glossy node shader’s output is connected to the surface input of the Material output.
We will now add two other shaders, a diffuse shader, and a mix shader. - From the Node Editor’s bottom Header ‣ Add ‣ Shader ‣ Diffuse BSDF
- From the Node Editor’s bottom Header ‣ Add ‣ Shader ‣ Mix shader. You should be able to see both nodes have been added in to your node editor.
- Change the color value of the Diffuse node to R: 0.075 G: 0.35 B: 0.50
- Disconnect the Glossy BSDF input from the surface
- Connect BSDF output of both Diffuse and Glossy shaders to the inputs on the left side of the Mix (Shader)
- Connect Shader output (on the right side) to the Surface input of the Material output nodes (figure below, right).
- With the Fac parameter, you can adjust the mixture level.
- Your material should look like the right column of the above figure learn more about nodes
 |
 Node design with mix shader Node design with mix shader |
|---|
Other Complementary resources for learning blender interface