Edit the Town Map - pret/pokered GitHub Wiki
In Pokémon Red, the Town Map is stored in a more compressed form than Pokémon Crystal.
You can edit it with Tilemap Studio, or to learn more about the compression format, use a hex editor.
Contents
- The tileset
- Editing with Tilemap Studio
- How the compression works
- Editing with a hex editor
- Moving and renaming locations
1. The Tileset
Pokémon Red uses a very simple tileset for the Town Map, made of 16 tiles. It looks like this:

You can edit this tileset in gfx/town_map/town_map.png.
I added those numbers above it in the screenshot to aid in editing the layout.
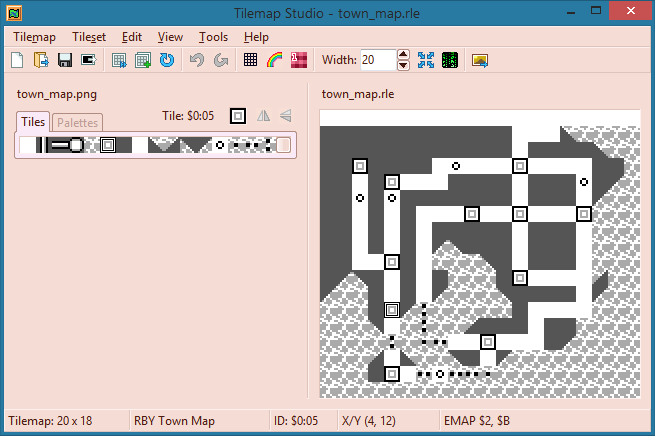
2. Editing with Tilemap Studio
The Town Map tilemap is in gfx/town_map/town_map.rle. The easiest way to edit it is in Tilemap Studio, a program for Windows or Linux that can edit tilemaps in many different formats.
To install Tilemap Studio, just follow the instructions in its INSTALL.md: download install.bat and tilemapstudio.exe from the latest release; run install.bat with admin privileges; and delete the downloaded files, since a shortcut to the installed copy of Tilemap Studio should now exist on your Desktop. If you need help using it, read the documentation in the Help menu.
Anyway, open the gfx/town_map/town_map.rle tilemap, pick the RBY Town Map format, and load the gfx/town_map/town_map.png tileset. Then place the tiles however you want and save the edited Town Map. That's all!
Without a custom program, you would have to know what the compressed bytes in town_map.rle mean. Let's go over that next.
3. How the compression works
Unlike Pokémon Crystal, Pokémon Red's Town Map layout uses a type of encoding called run-length encoding (RLE), which I will explain here.
Open gfx/town_map/town_map.rle in a hex editor. My personal favorite hex editor is FlexHEX, but any hex editor should work.
You should see that it starts with "7F 75 6C". If it doesn't, maybe you've edited this before, or you're looking at the wrong file (or you somehow aren't using your hex editor correctly)!
How RLE compression works is it takes it one byte at a time. We'll take the first one, $7F, for the first example.
First, the first digit in a byte represents the tile to be placed. in this one, it is tile 7, which, as you can see in my image above, is the blank white tile.
The second byte is how many of that tile will be placed in a row. For this byte, that value is $F, or 15 in decimal. That means that the engine will place 15 white tiles in a row, starting on the top-left of the screen. This is visible as the white part on the top of the screen behind where the names of locations are displayed.

The GBC screen is 20 tiles wide, so 5 more white tiles would need to be placed after this for the white line on top of the screen, and this is accomplished by the second byte, which is $75. Two bytes were needed for one type of tile because the highest number you can have using one digit of hex is 15. You can see that the rest of the code fits the rest of the map using the same method. Keep in mind that when the placement of tiles reaches the right-hand side of the screen, it will continue to place them on the left-hand side, one row down.
4. Editing with a hex editor
Now, editing the layout shouldn't be that hard, provided you've been paying attention so far. It might be easier to start with a mockup of your map, and then converting that information into RLE code.
All you have to do here is take the number of the tile you want to be placed next, then how many of them you want in a row (as a hexadecimal number). Remember, you can only place 15 tiles in a row with one byte. In order to add more, simply use the next byte for the same tile. Also, it is important to note that you should put $00 at the end of this to tell the game that you're done.
The beauty of the disassembly is that the data for the new tile map can be larger than the original, without tedious repointing. If you run out of room, you can simply make the file larger, and it will still compile perfectly.
After you're done with this, save the .rle file, compile the ROM, and that's it! Done with the map!
However, if you moved towns and routes into different places, or plan on giving them different names, you will need to fix that. Lucky for you, that is a very simple process.
5. Moving and renaming locations
First, open up data/maps/names.asm, and add or remove map names as desired, following the layout already there. It might go something like this:
+.NewCityName:
+	db "NEW CITY@"
You can put new names in any order you want. Don't forget that the names can be a maximum of 15 characters long, and they must end with a "@", which means the end of a text string, internally.
Next, open up data/maps/town_map_entries.asm, and add the correct codes for your new locations. Now, you might see that there are some numbers listed before the names, and those represent the coordinates of the area. You can use this image as a guide:
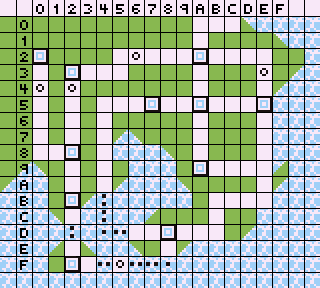
These are the same numbers you see in the Tilemap Studio status bar when you hover over a location.
If you scroll down, you will see another section of code labeled InternalMapEntries which should be updated with map info as well.
Last, open up data/maps/town_map_order.asm. This is the order which you scroll through the names in the map. You can sort these using the names given in the InternalMapEntries in data/maps/town_map_entries.asm.
As for making it correspond to an overworld map, that's beyond this tutorial. I may add a tutorial for this some time.
If you've done all of this correctly, the game should compile, and you should see your beautiful custom Town Map there!