How to write your first recipe for Pollination - pollination/pollination-dsl GitHub Wiki
Introduction
This document will walk you through the steps that are required to create your first “hello world” recipe for Pollination. We will cover different concepts and provide sample codes for each part.
Tools
It will be easier to follow these guides if you have a few tools installed on your computer.
- A Code Editor (we like VSCode but you can use whatever you want of course!)
- Python 3.7 installation. You can check your installation using
python --versionin the command line. - Pollination-DSL. Use
pip install pollination-dsl -Uto install pollination-dsl. To test the installation try:pollination dsl --help
Usage: pollination dsl [OPTIONS] COMMAND [ARGS]...
  interact with pollination python DSL packages.
Options:
  --version       Show the version and exit.
  --help     Show this message and exit.
Commands:
  push       Push a pollination dsl recipe or plugin to Pollination.
  run            Execute a recipe against a project folder.
  translate      Translate a Pollination recipe to a Queenbee recipe or a Luigi…
What is Pollination?
Pollination is a collaborative platform for environmental building simulation. It leverages the use of reusable workflows by creating functions and recipes. These functions and recipes are written in Queenbee workflow language.
What is Queenbee?
Queenbee is a Workflow language to build complex workflows described as inter-related tasks. For more information see Queenbee source code and Queenbee documentation.
Once you develop a Queenbee recipe they can be executed on both Pollination or desktop.
Why do you need to use pollination-dsl?
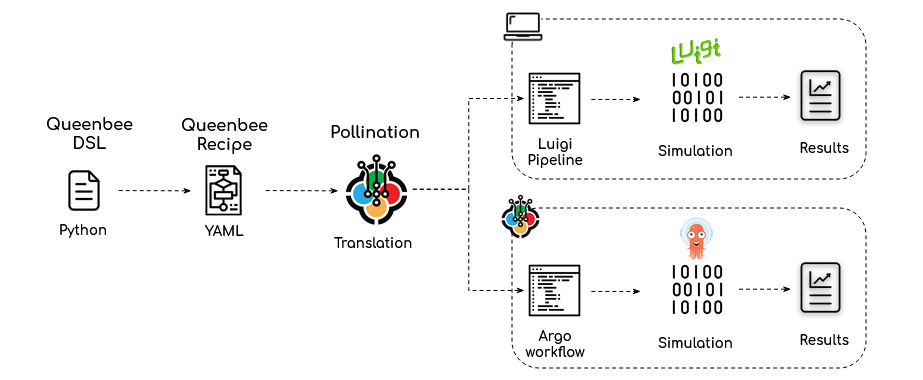
In theory, and if you feel comfortable writing the full recipe in YAML format, you don’t need to use pollination-dsl. You can just write everything in YAML and follow Queenbee documentation. In practice, it is usually very challenging to write and maintain complex workflows in YAML. That’s why we developed a Domain Specific Language (DSL) in Python to make it easier for you to develop recipes using Python.
We use Python toolset to both develop the recipes and package them and deploy them to Pollination. Pollination-dsl also provides functionalities to write Queenbee YAML Recipes which can be translated to Luigi pipelines or Argo workflows for execution on a Desktop or execution on Cloud.
How to start writing a new recipe
Before we get to a step by step tutorial we need to understand a few concepts in pollination-dsl: Function, Plugin, Task, DAG and Recipe. These concepts are borrowed from Queenbee and we talk about them more in this section. As we explained earlier pollination-dsl is just an interface to make it easier to work with these objects.
1. Prepare list of commands
The first step is to prepare the list of commands that you want to execute from the command line. The output of each command should be stored in a file or folder which will be passed to the next command as an input.
For this example if we want to run a point in time illuminance study for a Radiance model under a sunny sky with two grids of sensors the commands will be:
Generate a sunny sky for a location at a certain datetime. We will use Radiance’s gensky for this step.
Create an octree from the sky and the input scene. We will use Radiance’s oconv command for this step.
Run raytracing using the octree and input sensor grids. The command will run it for one sensor grid at a time. We will use Radiance’s rtrace for this step.
Assuming the input radiance file is called scene.rad and the sensor grids are called room_1.pts and room2.pts the commands will look like this.
gensky [options] > sky.rad
oconv scene.rad sky.rad > scene.oct
rtrace [options] scene.oct < room_1.pts > room_1.res
rtrace [options] scene.oct < room_2.pts > room_2.res
Note:
Since Pollination only supports shell commands, at least for now, if you have written your code as a script you need to create a Command Line Interface (CLI) for executing the scripts. Every programming language provides different libraries to build a CLI. If you are using Python we recommend using Click or Typer.
2. Create Functions for each command
The second step is to wrap each command in Functions. A function makes a command reusable. It also declares the outputs that will be available after the execution of the command. This will allow you to refer to this output in the next step when writing a recipe. In addition, a function can help to make a command more approachable for more users. For instance most users don’t know what -n option in oconv does but they are familiar with the concept of maximum surface size in an octree.
Here is a function that wraps Radiance’s oconv command for creating an octree.
from dataclasses import dataclass
from pollination_dsl.function import Function, command, Inputs, Outputs

@dataclass
class CreateOctree(Function):
    """A function to generate a Radiance Octree file."""

    sky_file = Inputs.file(
        description='Input Radiance sky.',
        path='sky.rad'  # input sky file will be copied as sky.rad before executing the command
    )

    rad_file = Inputs.file(
        description='Input Radiance scene as a rad file.',
        path='scene.rad'  # input rad file will be copied as scene.rad before executing the command
    )

    max_srf_size = Inputs.int(
        description='The max_srf_size option specifies the maximum surface set size for each '
        'voxel. Larger numbers result in quicker octree generation, but potentially '
        'slower rendering. Smaller values may or may not produce faster renderings, '
        'since the default number (6) is close to optimal for most scenes.',
        default=6,  # default value for input - a default value makes the input optional
        spec={'type': 'integer', 'minimum': 1}  # optional input validation using JSONSchema
    )

    @command
    def create_octree(self):
        return 'oconv -f -n {{self.max_srf_size}} sky.rad scene.rad > scene.oct'

    octree = Outputs.file(
        description='Output Octree file.',
        path='scene.oct'  # Path to the generated octree file after executing the command
    )
In this example we have two input from type file (sky_file and rad_file) and one integer input (max_srf_size ).
For files and folders we specify what they should be renamed to in the context of the function. This is important because that’s what makes the Function reusable. The command will use the path file names instead of the input file names. That means that the command will run correctly regardless of the name of the input file.
For other object types we use {{ }} to template the command. In this case {{self.max_srf_size}} will be replaced with the value of max_srf_size. We can also provide default values for these parameters which will make them optional.
Finally, we have to expose the outputs from a function. In an output path indicates where the file should be accessed from after the execution of the command. To make the command reusable the output file should always be generated in the same place and with the same name. In case the output file name will be different based on the input values you should template the output. Here is an example with templated output:
from dataclasses import dataclass
from pollination_dsl.function import Function, command, Inputs, Outputs

@dataclass
class MergeFiles(Function):
    """Merge several files with similar starting name into one."""


    name = Inputs.str(
        description='Base name for files to be merged.',
        default='grid'
    )


    extension = Inputs.str(
        description='File extension including the . before the extension (e.g. .res, '
        '.ill)'
    )


    folder = Inputs.folder(
        description='Target folder with the input files.',
        path='input_folder'
    )


    @command
    def merge_files(self):
        return 'honeybee-radiance grid merge input_folder grid {{self.extension}} --name {{self.name}}'


    result_file = Outputs.file(
        description='Output result file.', path='{{self.name}}{{self.extension}}'
    )
3. Package Functions as a Plugin
To be able to distribute the Functions you should wrap them up in a package. A pollination-dsl plugin is a standard Python’s namespace package with some additional information that needs to be provided inside the __init__.py file. The main additional information for a Plugin is the container information where the commands should be executed.
For the commands above we can use the ladybugtools/honeybee-radaince:1.38.20 Docker image which is available publicly and already includes Radiance.
I will not write a full package here and refer you to [honeybee-radiance](https://github.com/pollination/honeybee-radiance) repository for a Plugin example. In particular, pay attention to setup.py and __init__.py file.
Once the Plugin is ready you can simply install it using pip install .. You should be able to check if the plugin is installed correctly using pip show <pollination-plugin-name>
4. Write a recipe
Once you have the functions ready you are ready to start writing the Recipe. A Recipe is a collection of Directed Acyclic Graphs (DAG) and a DAG is a collection of Tasks. Each Task uses a Function as a template.
Similar to a Plugin, a Recipe is also a Python package. In this case it depends on the Plugins. You can structure each DAG in a separate module or include all of them in the same module. You can also name them as you wish as long as the names are not duplicated.
Similar to a Plugin you can clarify most of the package information in setup.py file. The only extra input is the entry point DAG which should be clarified in the __init__.py file. See daylight_factor recipe as an example.
from .entry import DaylightFactorEntryPoint

__pollination__ = {
    'entry_point': DaylightFactorEntryPoint
}
There are already several recipes available on GitHub that you can use as a reference. To get started see the annual energy use recipe. It is created from three tasks which run after one another. For a simple example with for loop and parallelization see the daylight factor recipe.
You will notice that we use decorators to decorate each task. Here is a simple task borrowed from the daylight factor recipe.
    @task(
        template=CreateOctreeWithSky, needs=[generate_sky, create_rad_folder]
    )
    def create_octree(
        self, model=create_rad_folder._outputs.model_folder,
        sky=generate_sky._outputs.sky
    ):
        """Create octree from radiance folder and sky."""
        return [
            {
                'from': CreateOctreeWithSky()._outputs.scene_file,
                'to': 'resources/scene.oct'
            }
        ]
Testing
For testing Functions you can use the _try method. It takes a dictionary of inputs and an optional target folder and executes the command inside that folder. For example, to test the CreateOctree function which we wrote above we can try the code below.
create_octree = CreateOctree()
create_octree._try({sky_file: 'cie_sky.rad', rad_file: 'model.rad'}, folder='.')
In order to test a recipe locally during the development you can use pollination dsl run command.
This command needs you to set the QB_POLLINATION_TOKEN to a valid token which you can create from your Pollination profile page.
Deployment
To deploy your plugins and recipes to Pollination you can use pollination dsl push command. For example this is the line that pushes the daylight-factor recipe to Pollination.
pollination dsl push pollination-daylight-factor -e https://api.pollination.cloud -src https://api.pollination.cloud/registries --push-dependencies
--push-dependencies flag ensures that the dependencies for the recipe will also be pushed to Pollination if they are not already pushed to the platform.