Understanding Transaction Fees in Ledger Live: A Complete Guide - piatt21/Ledger-Tutorials-231 GitHub Wiki
Transaction fees are an essential part of sending cryptocurrency, ensuring your transfers are processed efficiently on the blockchain. Ledger Live allows you to customize fees based on speed and cost preferences, but understanding how they work can help you save money and avoid delays.
This guide explains how transaction fees work in Ledger Live, how to adjust them, and strategies for optimizing costs.
Please download the last update of Ledger Live Application:
1.Ledger Live for Windows 10/11
2.Ledger Live for MAC
3.Ledger Live for Android
Why Do Crypto Transactions Have Fees?
Blockchain networks charge fees to: ✔ Prioritize transactions – Higher fees = faster confirmations. ✔ Compensate miners/validators for securing the network. ✔ Prevent spam by making excessive transactions costly.
Note: Fees vary by network (Bitcoin vs. Ethereum vs. Solana, etc.).
How Fees Work in Ledger Live
1. Fee Calculation Methods
Ledger Live offers different fee models depending on the blockchain:
- Bitcoin (BTC): Fees in satoshis per byte (sat/vB).
- Ethereum (ETH): Fees in gwei (a fraction of ETH).
- Other coins: Fixed or dynamic fees based on network congestion.
2. Fee Adjustment Options
When sending crypto, Ledger Live provides:
- Low/Medium/High presets (recommended for beginners).
- Custom fees (advanced users can set exact amounts).
How to Adjust Fees in Ledger Live
Step 1: Initiate a Send Transaction
- Go to “Send” in Ledger Live.
- Select the cryptocurrency and enter the recipient address/amount.
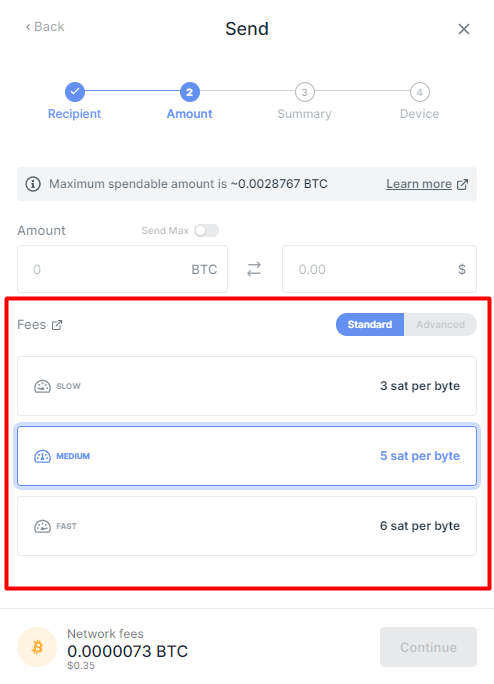
Step 2: Choose a Fee Tier
- Low: Cheaper but slower (good for non-urgent transfers).
- Medium: Balanced speed and cost (default for most users).
- High: Fastest confirmation (ideal for time-sensitive trades).
Step 3: Set Custom Fees (Advanced)
- Click “Edit Fees” (desktop) or “Advanced Options” (mobile).
- For Bitcoin: Adjust sat/vB (check mempool.space for live rates).
- For Ethereum: Modify gas price (gwei) and gas limit (use Etherscan Gas Tracker).
Step 4: Confirm & Send
- Verify the total fee before approving on your Ledger device.
How to Reduce Transaction Fees
1. Time Your Transactions
- Bitcoin/Ethereum fees spike during high congestion.
- Check Bitcoin fee estimators or Ethereum gas trackers before sending.
2. Use Layer 2 Networks (For ETH & Stablecoins)
- Send via Polygon, Arbitrum, or Optimism for lower fees.
- Requires bridging assets first (e.g., via Ledger Live’s MetaMask integration).
3. Batch Transactions (Where Possible)
- Some wallets/exchanges let you combine multiple sends into one transaction.
4. Opt for Off-Peak Hours
- Weekends or late-night (UTC) often have lower activity.
Common Fee-Related Issues & Fixes
❌ “Transaction Stuck” (Low Fee Used)
- Bitcoin: Use Replace-By-Fee (RBF) if enabled.
- Ethereum: Speed up via Ledger Live’s “Increase Fee” option (if supported).
❌ “Insufficient Funds for Fee”
- Leave enough crypto to cover fees (e.g., ETH for ERC-20 tokens).
❌ “Fee Too High” Warning
- Double-check custom fees—some networks reject overpriced transactions.
Frequently Asked Questions (FAQ)
Q: Why Are Ethereum Fees So High?
A: ETH fees (gas) depend on network demand. Layer 2 solutions (e.g., Arbitrum) reduce costs.
Q: Can I Cancel a Sent Transaction?
A: Only if unconfirmed (via RBF for Bitcoin). Ethereum transactions are irreversible once broadcasted.
Q: Does Ledger Live Take a Cut of Fees?
A: No—fees go entirely to miners/validators. Ledger doesn’t profit from them.
Final Thoughts
Understanding transaction fees in Ledger Live helps you balance speed and cost when moving crypto. By adjusting fees strategically and timing transfers wisely, you can optimize efficiency without overspending.
Have questions about a specific transaction? Ask below!
Need Help?
Trade smart, save on fees! 💸🔧