Tracking Camera Start Guide - person-in-hangang/HanRiver GitHub Wiki
Real time object detection & tracking in Android application using OpenCV 4.1 and YOLO.

YOLO: https://pjreddie.com/darknet/yolo/
1. Install Android Studio on your computer.
2. Prepare Android device to run application.
3. Dowload OpenCV SDK from here
https://sourceforge.net/projects/opencvlibrary/files/4.1.0/opencv-4.1.0-android-sdk.zip/download
4. Open Android Studio and import this project & build.
5. From AndroidStudio top-menù select New -> Import Module and select your path to OpenCV sdk folder (i.e /where_opencv_saved/OpenCV-android-sdk/sdk) and rename module as OpenCV.
6. After load OpenCV module, re-build project.
After OpenCV module import:
1. From AndroidStudio top-menù select File -> Project Structure
2. Navigate to Dependencies and click on app. On the right panel there's a plus button + for add Dependency. Click on it and choose Module Dependecy.
3. Select OpenCV module loaded before.
4. Click Ok and Apply changes & Build project.
This activity is the core of application and it implements org.opencv.android.CameraBridgeViewBase.CvCameraViewListener2. It has 2 main private instance variable: a net (org.opencv.dnn.Net) and a cameraView (org.opencv.android.CameraBridgeViewBase). Basically has three main features:
a) Load Network
Load convolutional net from *.cfg and *.weights files and read labels name (COCO Dataset)
in assets folder when calls onCameraViewStarted() using Dnn.readNetFromDarknet(String path_cfg, String path_weights).
NOTE: this repo doesn't contain weights file. You have to download it from YOLO site.
b) Detection from camera preview
Iteratively generate a frame from CameraBridgeViewBase preview and analize it as an image.
Real time detection and the frames flow generation is managed by onCameraFrame(CvCameraViewFrame inputFrame).
Preview frame is translate in a Mat matrix and set as input for Dnn.blobFromImage(frame, scaleFactor, frame_size, mean, true, false) to preprocess frames.
Note that frame_size is 416x416 for YOLO Model (you can find input dimension in *.cfg file).
We can change the size by adding or subtracting by a factor of 32.
Reducing the framesize increases the performance but worsens the accuracy.
The detection phase is implemented by net.forward(List<Mat> results, List<String> outNames) that runs forward pass to compute output of layer with name outName.
In results the method writes all detections in preview frame as Mat objects.
Theese Mat instances contain all information such as positions and labels of detected objects.
Tracking detected person and draw trajectory
We'll follow the tracking in order of the following.

1. Attach detector to tracking technology
2. Detector detecting person →  Get Bounding Box
3. Insert the box coordinates into the tracker
4. Tracker Start tracking a person
5. Stop tracking until person is drown
6. Send Information To Server  using socket
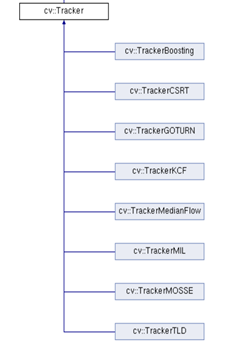
We have gone through several experiments and found that CSRT tracker is the most suitable tracker for our project. The following is a list of trackers provided by OpenCT.

more detail for CSRT tracker is in API page.

This is a connection operation for socket communication with the server.
- Add the following permission to the manifest.
<uses-permission android:name="android.permission.INTERNET"></uses-permission>
- Enter the IP address and PORT number of the server to be used for the next code on the 464th line.
void connect(){
        mHandler = new Handler(Looper.getMainLooper());
        Log.w("connect","서버연결");
        // 받아오는거
        Thread checkUpdate = new Thread() {
            public void run() {
                // 서버 접속
                String newip = "210.102.181.248";
                int port = 7002;
                try {
                    socket = new Socket(newip, port);
                } catch (IOException e1) {
                    e1.printStackTrace();
                }
See the Firebase API page for more details.
1. Download google-services.json file, and put the file in the path (Project - App) described on the screen.
2. Set build.gradle(Project), Set build.gradle(App), then Sync
When the Firebase is set, the location of the bridge where the current camera is installed is transmitted to the database whenever a projection is detected.
1. Run smartphone application.
2. Place the camera in a place where it is assumed to be under the bridge.
3. Detect & Tracking a person and drawing trajectory of bounding boxs
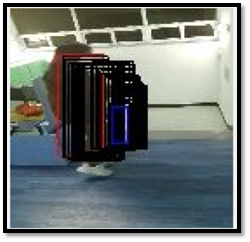
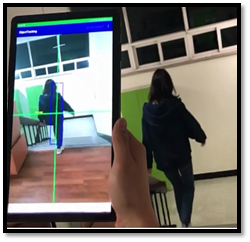
4. Tracking ends when the bounding box is small enough to assume that a person has fallen. The size of this box was arbitrarily determined by experiments with dolls several times.
5. Then, the app sends a picture of trajectory and location information of falling moment to the connected server.
-
This website is guide to install Android Studio.
-
We used Galaxy Tab S4(Tracking).