User Guide - panickspa/SimilarityPlugin GitHub Wiki
Minimum requirement
- QGIS 3.10 A Coruna LTS
Here some steps for installing QGIS
- Download this link main.zip
- Open your QGIS
- Click Plugins menu on Menu Bar

- Click Manage and Install Plugins... menu

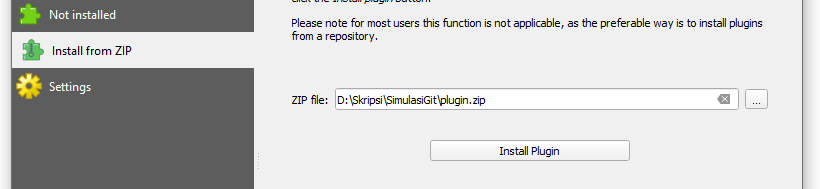
- Select and click the Install from Zip section

-
Click the [...]
 button
 -
Find your plugin installation on step one
-
Click Install Plugin button
- Move to Installed section by clicking it then check the box on the left of Calculate Similarity Map menu

- Plugin ready to use !!!
You can access this plugin on menu Vector > Calculate Similarity Map > Check Similarity

Here some samples for vector based data sample.zip. You can choose the layer on Select Layer 1 combo box and Select Layer 2 combo box in input section. Method can be chosen in method combo box. If you choose Wilkerstat Method, merge center check box will activated. If merge center checked, the calculation process will translate geometry to the center of matching geometry.

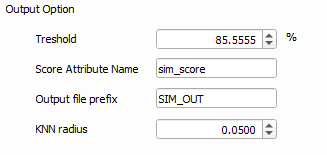
You can edit threshold, KNN Radius (if you using NN Method), attribute name of score in attribute table of result layer, and result layer suffix name in output section. Threshold is defined in percentile.
After you input all option, you can click calculation button. After calculation be done, save button will enabled. You can save your result to layer in QGIS project with clicking save button.

After calculation excecuted you can preview the result in preview section also before save the result into project.

This plugin is open source. You can edit and distribute it freely but cite this plugin and Mapcurve (Hargrove et al. 2006) if you are using it to develop another plugin. PyQGIS and OSGeoW environment must be integrated to your IDE if you want use or develop or build from source. Here some command to integrate that from Command Prompt in Windows.
    @echo off
    path %PATH%;%QGIS_PATH%\bin
    path %PATH%;%QGIS_PATH%\apps\grass\grass-78\lib
    path %PATH%;%QGIS_PATH%\apps\Qt5\bin
    path %PATH%;%QGIS_PATH%\apps\Python36\Scripts

    set PYTHONPATH=%PYTHONPATH%;%QGIS_PATH%\apps\qgis\python
    set PYTHONHOME=%QGIS_PATH%\apps\Python37

    start "VisualStudioCode for QGIS" /B  "%VISUAL_STUDIO_CODE_PATH%\code.exe" %YOUR_PLUGIN_REPOSITORY% %*
or you can configure with Anaconda. (Install QGIS in Anaconda first)
Here some command for integrating terminal with PyQGIS and OSGeoW in Visual Studio Code.
    @echo off
    call "%QGIS_PATH%\bin\o4w_env.bat"
    call "%QGIS_PATH%\qt5_env.bat"
    call "%QGIS_PATH%\py3_env.bat"
    call "%OSGeo4W64_PATH%\bin\o4w_env.bat"
    call "%OSGeo4W64_PATH%\bin\qt5_env.bat"
    call "%OSGeo4W64_PATH%\bin\py3_env.bat"
    call "%OSGeo4W64_PATH%\bin\gdal-dev-env.bat"
    call "%OSGeo4W64_PATH%\bin\gdal-dev-py3-env.bat"
    call "%OSGeo4W64_PATH%\bin\proj-dev-env.bat"

    @echo on
    pyrcc5 -o resources.py resources.qrc
You can deploy the plugin by copying the repository to plugins QGIS folder or you can deploy it with pb_tool with command pb_tool zip. The new plugin can be operated by restarting the QGIS first or using extension called Plugin Reloader. Plugin Reloader available in QGIS Plugin Repository (see https://plugins.qgis.org/plugins/plugin_reloader/).