JupyterLab - padogrid/padogrid GitHub Wiki
JupyterLab is a browser-based IDE for running Python and R programs in Jupyter NoteBook. PadoGrid provides the following commands for integrating PadoGrid workspaces with JupyterLab workspaces.
| Command | Description |
|---|---|
start_jupyter |
Start Jupyter server in the current RWE JupyterLab workspace |
open_jupyter |
Open the current RWE JupyterLab workspace |
show_jupyter |
Display Jupyter server status |
stop_jupyter |
Stop Jupyter server |
-
To install JupyterLab on your local machine, please follow the instructions provided in the following link.
-
To install JupyterLab on AWS EC2, please follow the instructions provided in the following link.
-
To install JupyperLab on Oracle Cloud Infrastructure (OCI), pleae follow the instructions provieded in the following link.
-
To install JupyterLab on Vagran Pod (VM), please follow the instructions provided in the following link.
You can verify the installation by running the jupyter executable. The PadoGrid Jupyter commands will fail if the jupyter executable is not found.
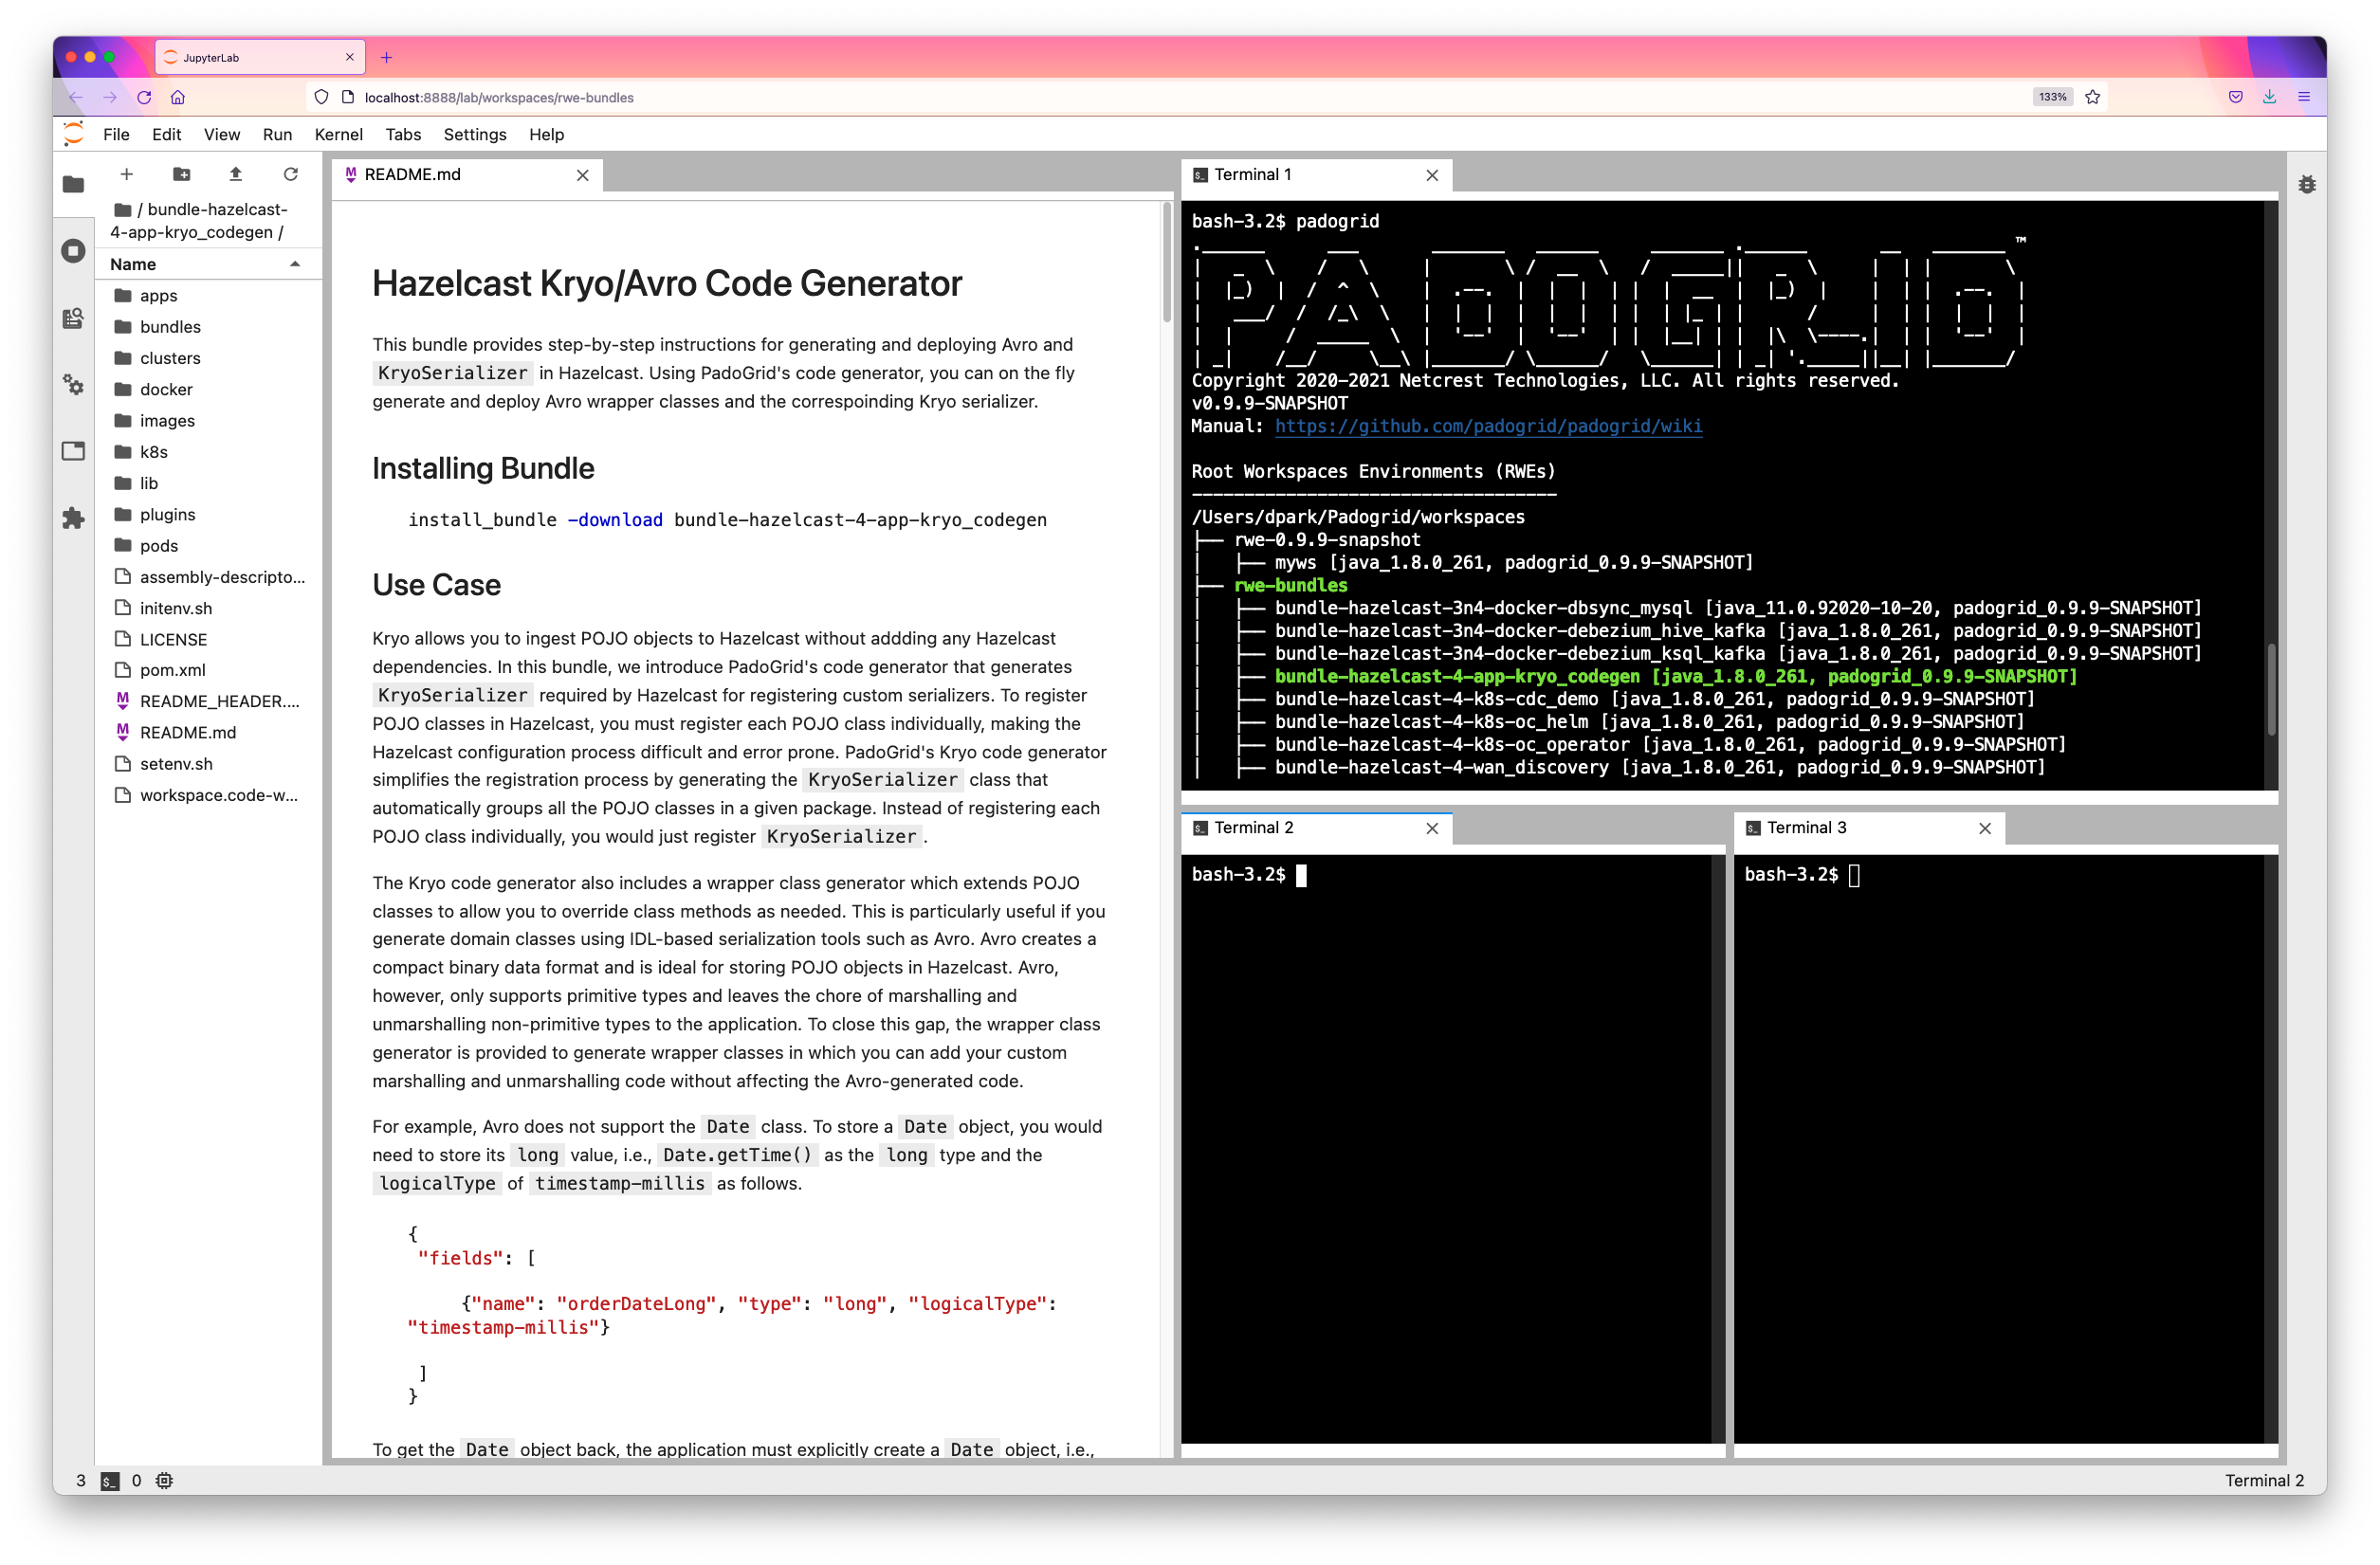
You can run one or more Jupyter servers, each representing a PadoGrid workspace. The workspace dashboard looks similar to the example shown below. The browser display is divided with the workspace's README.md file if exists and three (3) terminals.
You can start a Jupyter server with or without the PadoGrid workspace dashboard as follows.
- With PadoGrid dashboard:
# Start Jupyter server with PadoGrid dashboard on the default port 8888
start_jupyter -dashboard

# Start Jupyter server with PadoGrid dashboard on the specified port
start_jupyter -dashboard -port 8889- Without PadoGrid dashboard:
# Start Jupyter server on the default port 8888
start_jupyter

# Start Jupyter server on the specified port
start_jupyter -port 8889
The Jupyter server URLs can be obtained by running show_jupyter which displays all running servers with their URL information.
show_jupyterOutput:
Currently running servers:
https://padomac.local:8889/ :: /Users/dpark/Padogrid/workspaces/myrwe
https://padomac.local:8888/ :: /Users/dpark/Padogrid/workspaces/rwe-bundles

PadoGrid workspace dashboard(s):
- https://padomac.local:8889/lab/workspaces/myrwe
- https://padomac.local:8888/lab/workspaces/rwe-bundles
Enter the URLs shown in the show_jupyter output in the browser or run open_jupyter to open the browser.
✏️ Starting PadoGrid v0.9.24, open_jupyter no longer automatically starts the Jupyter server due to the JupyterLab's known issue of discarding Ctrl-C when the Jupyter server is started in the background from a script.
# Open the default port, 8888, in the browser
open_jupyter

# Open the port 8889 in the browser
open_jupyter -port 8889
✏️ The start_jupyter command opens each JupyterLab terminal in the current workspace directory but the workspace context is set by the login shell script, i.e., .bashrc or .bash_profile. You must explicitly run the switch_rwe command in each terminal to switch into the current workspace.
You can stop a specific Jupyter server or all servers with stop_jupyter.
# Stop the server running on the default port 8888
stop_jupyter

# Stop the server running on the specified port
stop_jupyter -port 8889

# Stop all servers
stop_jupyter -all
Example Output:
Jupyter notebook server stopped: [8888]You can install JupyterLab on any of PadoGrid installed EC2 instances and remotely manage PadoGrid using your browser. Once you have created a VM workspace with AWS EC2 instances as described in Geode on AWS EC2 and Hazelcast on AWS EC2, follow the instructions below to install and run JupyterLab.
# ssh into one of the EC2 instances
cd_workspace
ssh -i mykey.pem [email protected]
From the EC2 instance install JupyterLab:
# Amazon Linux, Red Hat
sudo yum install python3-pip

# Ubuntu
sudo apt install python3-pip

pip3 install jupyterlab
Create a self-signed certificate to be used for SSL.
switch_workspace ws-aws-hazelcast
openssl req -x509 -nodes -days 365 -newkey rsa:2048 -keyout .mykey.key -out .mycert.pem
chmod 400 .mycert.pem
Encrypt password that you will be using in the browser to login to JupyterLab.
ipython

from IPython.lib import passwd
passwd()

quit()
Output:
Python 3.9.7 (default, Sep 16 2021, 08:50:36)
Type 'copyright', 'credits' or 'license' for more information
IPython 7.29.0 -- An enhanced Interactive Python. Type '?' for help.

In [1]: from IPython.lib import passwd

In [2]: passwd()
Enter password:
Verify password:
Out[2]: 'sha1:75f4df39063f:a7f26527cfb94b5fafba0e11d380b065ea5791b6'

In [3]: quit()
Generate and update a Jupyter server config file. Use the encrypted password for c.ServerApp.password as shown below.
jupyter server --generate-config

cat <<EOF >>  ~/.jupyter/jupyter_server_config.py
c = get_config()
c.ServerApp.certfile = u'/home/ec2-user/Padogrid/workspaces/rwe-hazelcast/ws-aws-hazelcast/.mycert.pem'
c.ServerApp.keyfile = u'/home/ec2-user/Padogrid/workspaces/rwe-hazelcast/ws-aws-hazelcast/.mykey.key'
c.ServerApp.ip = '*'
c.ServerApp.password = u'sha1:75f4df39063f:a7f26527cfb94b5fafba0e11d380b065ea5791b6'
c.ServerApp.port = 8888
EOF
Start JupyterLab
# The '-dashboard' option is introduced in PadoGrid v0.9.22 to import workspace
# dashboards. If this option is not specified then the initial web page defaults
# to a blank page.
start_jupyter -dashboard
Use the public IP address of the EC2 instance to login from your browser. For our example, the public IP address is the IP address we used to ssh into the EC2 instance, i.e., 3.19.14.241.
You can install JupyterLab on any of PadoGrid installed OCI Compute instances and remotely manage PadoGrid using your browser. Once you have created a VM workspace with OCI instances as described in Geode Workspacs on VMs and Hazelcast Workspaces on VMs, follow the instructions below to install and run JupyterLab.
# ssh into one of the OCI instances
cd_workspace
ssh -i private.key [email protected]
✏️ OCI Cloud Free Tier provides the Always Free cloud services that include up to 4 ARM Ampere A1 Compute VM.Standard.A1.Flex Shape instances and up to a total of 24 GB of memory. This is enough to run JupyterLab and other PadoGrid components for creating a development environment.
To install JupyterLab on ARM Ampere A1, we need to install Miniconda as shown below.
wget https://repo.anaconda.com/miniconda/Miniconda3-latest-Linux-aarch64.sh
bash Miniconda3-latest-Linux-aarch64.sh -b -p $(dirname $PADOGRID_HOME)/miniconda3 && rm -f Miniconda3-latest-Linux-aarch64.sh
$(dirname $PADOGRID_HOME)/miniconda3/bin/conda init
. ~/.bashrc
conda install -y pip
conda update -y --all
conda init bash
pip install jupyterlab
Create a self-signed certificate to be used for SSL.
switch_workspace ws-oci-hazelcast
openssl req -x509 -nodes -days 365 -newkey rsa:2048 -keyout .mykey.key -out .mycert.pem
chmod 400 .mycert.pem
Create encrypted password that you will be using in the browser to login to JupyterLab.
jupyter server passwordGenerate and update a Jupyter server config file.
jupyter server --generate-config

cat <<EOF >>  ~/.jupyter/jupyter_server_config.py
c = get_config()
c.ServerApp.certfile = u'/home/opc/Padogrid/workspaces/myrwe/myws/.mycert.pem'
c.ServerApp.keyfile = u'/home/opc/Padogrid/workspaces/myrwe/myws/.mykey.key'
c.ServerApp.ip = '*'
EOF
Start JupyterLab
# The '-dashboard' option is introduced in PadoGrid v0.9.22 to import workspace
# dashboards. If this option is not specified then the initial web page defaults
# to a blank page. The '-default' option is introduced in PadoGrid v0.9.23 to
# set the current workspace as the default JupyterLab workspace which does not
# require the path part in the URL.
start_jupyter -dashboard -default
Add port 8888 to thepublic zone in the firewall.
sudo firewall-cmd --zone=public --add-port=8888/tcpUse the public IP address of the ARM Ampere A1 instance to login from your browser. For our example, the public IP address is the IP address we used to ssh into the OCI instance, i.e., 150.136.180.153. Both of the following open the same workspace dashboard.
- Create a pod with enough memory for the primary node. This example allocates 4 GiB on the
ubuntu/focal64Vagrant box, which has the latest Python3 version installed.
create_pod -quiet -box ubuntu/focal64 -avahi -pod mypod -pm 4096 -dir /Users/dpark/Padogrid/products/linux-
Install Linux products such as Java, GemFire, Hazelcast, Redis, etc. in
/Users/dpark/Padogrid/products. You can download and untar them in that directory. -
Build pod
switch_pod mypod
build_pod-
sshintopnode.local
- From
pnode.local, installpip, install and start JupyterLab
# Install pip
sudo apt install python3-pip

# Install net-tools to view IP addresses
# (start_jupyter uses ifconfig to gather IP addresses for command auto-complete)
sudo apt install net-tools

# Install JupyterLab which requires jinja2>=3.0.3
pip install jinja2==3.1.2
pip install jupyterlab

# Add `/home/vagrant/.local/bin` to `PATH`
echo "export PATH=\"/home/vagrant/.local/bin:\$PATH\"" >> ~/.bashrc
export PATH="/home/vagrant/.local/bin:$PATH"- Generate self-signed certificate
# Generate a self-signed certificate in the workspace directory
switch_workspace
openssl req -x509 -nodes -days 365 -newkey rsa:2048 -keyout .mykey.key -out .mycert.pem- Create encrypted Jupyter server password
jupyter server passwordThe encrypted password is placed in the ~/.jupyter/jupyter_server_config.json file.
- Generate and edit Jupyter server configuration file
# Generate Jupyter server configuration file
jupyter server --generate-config

# Edit the generated configuration file
vi ~/.jupyter/jupyter_server_config.py
Enter the following in the Jupyter server configuration file. The certificate and key files are generated from Step 6 and located in the workspace directory. The password is in the ~/.jupyter/jupyter_server_config.json file.
# The certificate and key files are generated from Step 6 and located in the workspace directory
c.ServerApp.certfile = u'/home/vagrant/rwe-bundles/bundle-geode-1-app-perf_test_sb-cluster-sb/.mycert.pem'
c.ServerApp.keyfile = u'/home/vagrant/rwe-bundles/bundle-geode-1-app-perf_test_sb-cluster-sb/.mykey.key'
# Set ip to '*' to bind on all interfaces (ips) for the public server
c.ServerApp.ip = '*'
# The password is in the '~/.jupyter/jupyter_server_config.json' file
c.ServerApp.password = u'argon2:$argon2id$v=19$m=10240,t=10,p=8$ID3N5a0WB73Pa0JluYUX3Q$IS0zxSGOZNxzQKjEScfjqx7ZVaMpWUQudcQuvzTzwl8'
c.ServerApp.open_browser = False
# Server port set by 'start_jupyter -port 8888'
c.ServerApp.port = 8888- Start JupyterLab
# Specify '-dashboard' and the pnode.local IP address to import the PadoGrid workspace dashboard.
# Your IP address might be different than this example. Hit the tab key to see IP addresses.
start_jupyter -dashboard -ip 192.168.56.10 -port 8888- Enter the URL in the browser
URL: https://pnode.local:8888/lab/workspaces/rwe-bundles
- In the browser, if PadoGrid commands do not work, then you may need to execute
ssh localhostin order to intialize PadoGrid.
# To initialize PadoGrid
ssh localhostIf you want to access JupyterLab from the Internet, then first setup port-forwarding in your router to your local machine [1] and then setup SSH tunneling on your local machine. The following example enables SSH tunneling to forward any address (0.0.0.0) on your machine to forward port 8888 traffic to a remote machine (192.168.56.101:8888) via SSH connection ([email protected]).
ssh -f -N -L 0.0.0.0:8888:192.168.56.101:8888 [email protected]You can find your public IP address from by executing the following (or enter "what is my ip" in your browser):
dig +short myip.opendns.com @resolver1.opendns.comUsing the public IP address, you can now access JupyterLab as shown in the example below.
URL: https://xxx.xxx.xxx.xxx:8888/lab/workspaces/rwe-bundles
If you need to remotely run GUI apps like in the cloud, then you can use configure X11 Forwarding using ssh -X. The following example shows how to run HazelcastDesktop from an OCI instance.
First, install X11 on your local machine if you haven't done so.
# ssh into your remote machine
ssh -i private.key [email protected]

# install xauth
sudo yum install xorg-x11-xauth
To enable X11 forwarding, specify the -X option as follows.
# From your local machine, ssh into the remote machine
ssh -i private.key -X [email protected]

# From the remote machine, run any GUI apps
create_app -product hazelcast -app desktop
cd_app desktop/bin_sh
./desktop
You should see the desktop display on your screen.
JupyterLab by default opens markdown files in the Markdown editor. You can override this default behavior in a couple of ways.
Each user would perform the following steps.
- Select Settings/Advanced Settings Editor
- Select Markdown Viwer from the lef pane
- Select Document Manager from the right pane
- Add the following:
-
markdown:Markdown Preview
-
You can configure the JupyterLab installation to override the default settings which would then apply to all users.
jupyter lab pathOutput:
Application directory:   /opt/padogrid/products/miniconda3/share/jupyter/lab
User Settings directory: /home/padogrid/.jupyter/lab/user-settings
Workspaces directory: /home/padogrid/.jupyter/lab/workspaceIn the Application directory create the settings directory if does not exist.
SETTINGS_DIR="$(jupyter lab path | grep "Application" | sed 's/^.*://' | xargs)/settings"
OVERRIDES_FILE="$SETTINGS_DIR/overrides.json"
if [ ! -d "$SETTINGS_DIR" ]; then
   mkdir $SETTINGS_DIR
fi
Do one of the following:
- Edit
overrides.json
vi "$OVERRIDES_FILE"Enter the following in overrides.json:
{
  "@jupyterlab/docmanager-extension:plugin": {
     "defaultViewers": {
       "markdown": "Markdown Preview"
     }
   }
}- Or create
overrides.jsonif it does not exist
if [ ! -f "$OVERRIDES_FILE" ]; then
cat <<EOF > "$OVERRIDES_FILE"
{
  "@jupyterlab/docmanager-extension:plugin": {
     "defaultViewers": {
       "markdown": "Markdown Preview"
     }
   }
}
EOF
fi- How do I add a custom port forwarding service on my NETGEAR router?, https://kb.netgear.com/24290/How-do-I-add-a-custom-port-forwarding-service-on-my-NETGEAR-router