Push setup - optimove-tech/Optimove-SDK-Cordova GitHub Wiki
Configuration
Optimove SDK provides all functionality to handle push registration & notifications using FCM and APNS.
************** Android **************
To integrate into your Android project, you have to complete the following steps:
Set up a Firebase Project & enable FCM
Set up an FCM project and configure push for your app.
Optimove requires a service account to execute campaigns for your FCM project. This service account should contain a custom role with just one permission - cloudmessaging.messages.create (you can read about custom roles here, about this specific permission here)
Follow these steps to generate this key:
- Go to your Google Cloud Platform console
- Navigate to IAM & Admin
- Navigate to Roles
- Click on "Create Role" at the top
- Fill the fields (As a name you can choose something like 'Optimove FCM')
- Click on "Add Permissions"
- Search for
cloudmessaging.messages.createand choose it - Click create
- Navigate to Service Accounts
- Click on "Create Service Account" at the top
- Select the custom role you created in 8
- Click done
- Click on the service account you generated
- Generate a key to this service account
If you have multiple App projects (for example, one for production and one for staging), you must perform this step for each project.
Please note it is the Google Service Account private key JSON file that needs to be uploaded to your mobile UI, not the Google Services JSON file you include in your app project.
Configure Mobile Push Channel
Access your Optimove dashboard and select 'Settings' then under the 'OptiMobile' section, select 'Mobile Push Config'
Click the cog icon in the row for Android and in the popup when prompted enter the credentials for FCM.
Integrate SDK components with your Android project
- Add
google-services.jsonfile from your Firebase app 'General' settings to the root of your Cordova project. - run
cordova prepare android
************** iOS **************
To integrate into your iOS project, you have to complete the following steps:
Generate credentials
In order to generate a P8 key for Apple services first access your account at https://developer.apple.com/ and select 'Certificates, Identifiers & Profiles', then select 'Keys' on the left.
Select 'Create a Key' and on the form 'Register a New Key' enter a meaningful name such as 'APNS Access Key' and check the 'Enable' checkbox for 'Apple Push Notifications service (APNs)', click 'Continue'.
On the confirmation screen double check the APNs enablement is set then click 'Register'
On the final screen take note of your KeyID and download the key. Note that you can only download the key once, if lost the key must be revoked and re-created.
Downloading the key will save a .p8 file with the access credentials.
You now have all the details to configure your Mobile push channel. Access your Optimove dashboard and select 'Settings' then under the 'OptiMobile' section, select 'Mobile Push Config' and click the cog next to the Apple icon. Select APNs P8 and select your file, enter your other details and click 'Configure'.
Configure your app capabilities and entitlements
In your app project settings use the "+ capability" button to add the Background Modes and Push Notifications capabilities, in Background Modes you should have the "Remote Notifications" mode checked.
Note you must use a real device to test push notifications on iOS because simulators cannot register for push notifications.
Supporting Pictures and Action Buttons in Notifications
When sending a push notification you can attach a picture or action buttons to it. They will show on iOS 10+ devices.
The notification will expand upon swiping the notification on devices supporting 3D Touch. In order to enable this functionality you need to add a Notification Service Extension to your application.
In order to enable Optimove to track the push notifications, you'll need to add a Notification Service Extension to your project for each App-target. This app extension creates a process that handles incoming Push Notifications manipulation. To add this extension to your app please follow the steps below:
-
Select
File > New > Targeton XCode -
Select the Notification Service Extension target from the
iOS > Applicationsection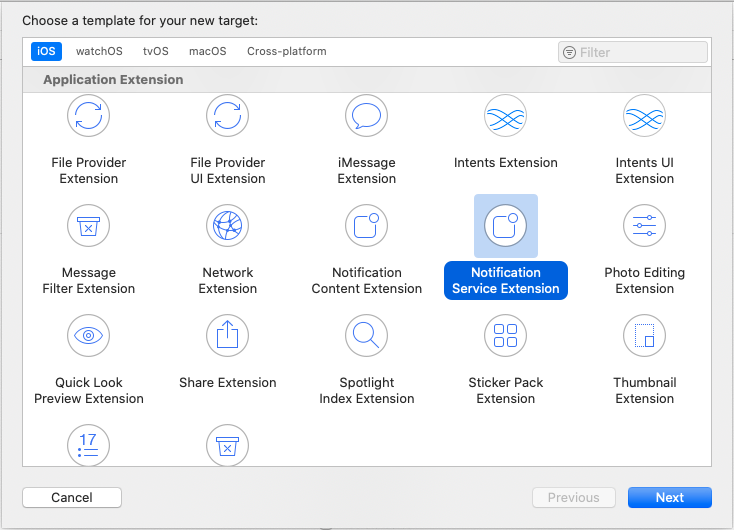
-
Click
Next -
Specify a name for your extension
-
Click
Finish -
In your
Podfileadd a new target matching the extension's name -
Add the
OptimoveNotificationServiceExtensionSDK to the target's dependencies list
If using CocoaPods, add the following to your Podfile and run pod install.
Podfile code snippet
# The Optimove SDK supports iOS version 10 and higher
platform :ios, '10.0'

target 'My Application' do # Your app target
  use_frameworks!
  # added by plugin
  pod 'OptimoveCore', '~> 5.1'
  pod 'OptimoveSDK', '~> 5.1'
end

target 'My Notification Extension' do # Your new extension target
  use_frameworks!
  pod 'OptimoveNotificationServiceExtension', '~> 5.1'
end
Then replace the contents of NotificationService.swift with the following lines:
import UserNotifications
import OptimoveNotificationServiceExtension

class NotificationService: UNNotificationServiceExtension {
    override func didReceive(_ request: UNNotificationRequest, withContentHandler contentHandler: @escaping (UNNotificationContent) -> Void) {
        OptimoveNotificationService.didReceive(request, withContentHandler: contentHandler)
    }
}
Optimove's helper function automatically adds picture attachments and buttons to the notification content. You can modify the content before calling didReceive or replace the implementation with your own.
Supporting push delivery tracking, dismissed tracking and badges
For push delivery tracking, dismissed tracking and badges to work correctly you need to
- Set up a Notification Service Extension as described above
- Add the
App Groupscapability to your App and Notification Service Extension targets - Set group to
group.{your.bundle.identifier}.optimovefor both targets
Note that due to iOS limitations badge is not set when app is in the foreground
Additionally, SDK gives you full control of when to clear the badge. For example, you can clear it when the app enters foreground by modifying your AppDelegte.m like so:
- (void)applicationWillEnterForeground:(UIApplication *)application{
    UIApplication.sharedApplication.applicationIconBadgeNumber = 0;
}
************** Typescript / Javascript **************
To register for push notifications call
Optimove.pushRequestDeviceToken();
The following sample code shows how to use Optimove to handle push notifications.
Optimove.setPushOpenedHandler((push: PushNotification) => {
    // Called when a user taps on a push notification or its action buttons
});

Optimove.setPushReceivedHandler((push: PushNotification) => {
    // Called when a push is received with your app in the foreground
});