Lifecycle Attributes - openmpp/openmpp.github.io GitHub Wiki
Home > Model Development Topics > Lifecycle Attributes
An OpenM++ option can create a pair of built-in attributes,
lifecycle_event and lifecycle_counter,
which can be used to probe events in the entity.
- Activating lifecycle attributes
-
Worked example 1 Activating lifecycle attributes in
RiskPaths - Lifecycle attribute maintenance
- Worked example 2 Event counts
- Worked example 3 Cross-tabulated event counts
- Worked example 4 Statistics at an event
- Worked example 5 Microdata output at an event
- Worked example 6 Event context for microdata output
- Worked example 7 Filtering microdata output by event
The lifecycle attributes are not present by default. They can be created for a specified kind of entity using a statement like
options lifecycle_attributes = Person;
This example assumes that the model has a Person entity.
This statement causes the OpenM++ compiler to create,
for the Person entity,
the built-in attributes lifecycle_event and lifecycle_counter,
and the supporting built-in classification LIFECYCLE_Person.
Lifecycle attributes are activated on an entity-by-entity basis.
For example,
if the model also had a Ticker entity,
lifecycle attributes could be enabled for Ticker entities as well as Person entities by including a second options statement
options lifecycle_attributes = Ticker;
This statement would cause OpenM++ compiler to create,
for the Ticker entity,
the built-in attributes lifecycle_event and lifecycle_counter,
and the supporting built-in classification LIFECYCLE_Ticker.
Model code should not contain clashing explicit declarations of lifecycle attributes or the supporting classification or enumerators. If it does, a build error will occur.
This section shows how to create and examine lifecycle attributes for the RiskPaths model.
RiskPaths contains a single kind of entity, Person.
Request the creation of lifecycle attributes for Person by adding the following statement to ompp_options.ompp, if not already present:
options lifecycle_attributes = Person;
Build the model, open the UI, click the book icon, then click Symbol Reference.
The browser should display:
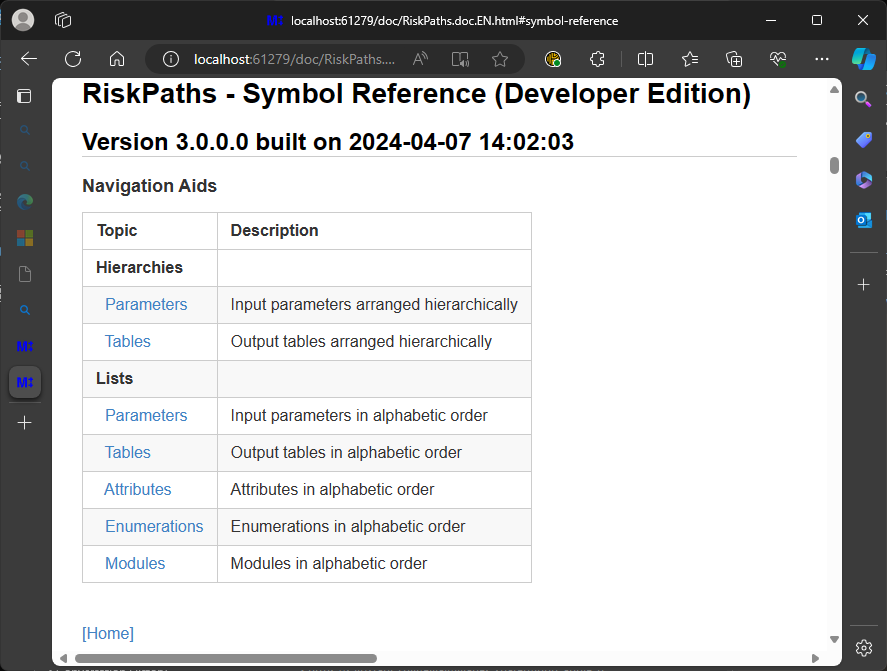
Next, click the Attributes link under Lists.
The browser should display:
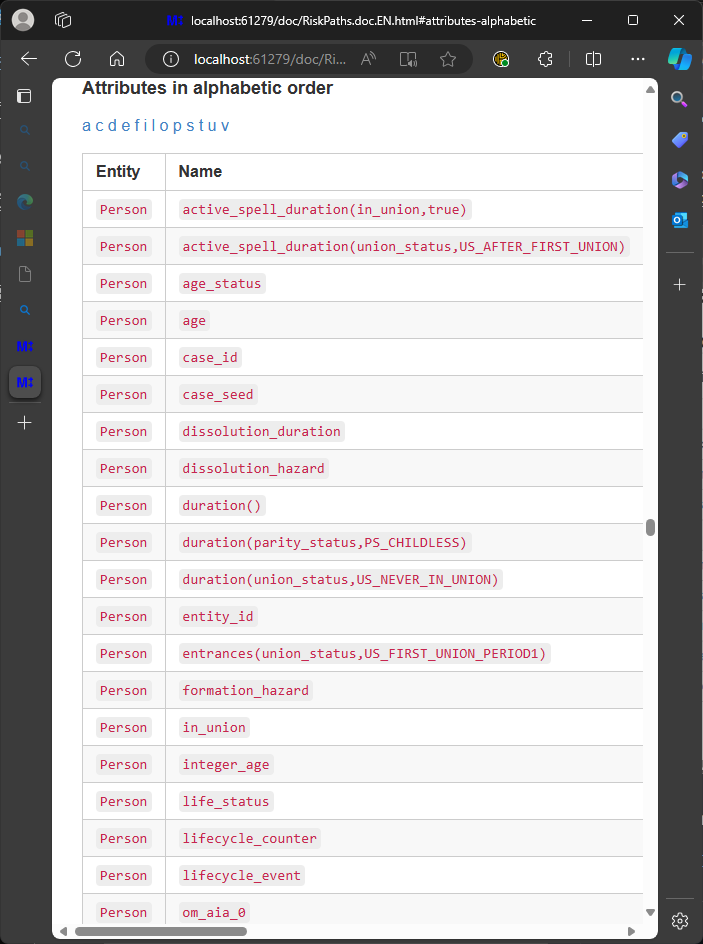
Scroll down if necessary or click the letter 'l' (lower case 'L') at the top of the Attributes list to see the two attributes lifecycle_counter and lifecycle_events.
Click the link for lifecycle_counter.
The browser should display:
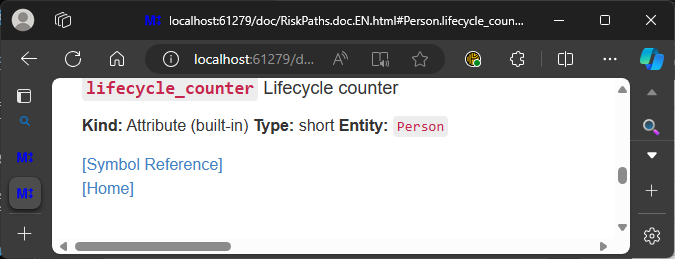
The built-in attribute lifecycle_counter created by the OpenM++ compiler has type short,
which is a C++ integer type.
The Symbol Reference shows that lifecycle_counter is currently unused in RiskPaths model code.
Return to the Attributes list by clicking the browser back button, or by clicking the Symbol Reference link, then the link to the Attributes list as before.
Next, click the link for lifecycle_event.
The browser should display:
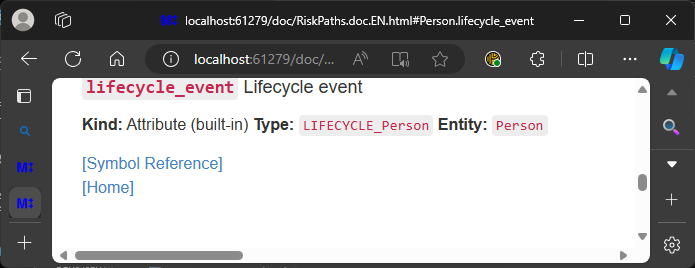
The built-in attribute lifecycle_event created by the OpenM++ compiler has type LIFECYCLE_Person,
which is a classification created by the OpenM++ compiler to support lifecycle_event and its use in model code.
Click the link LIFECYCLE_Person after Type:.
The browser should display:
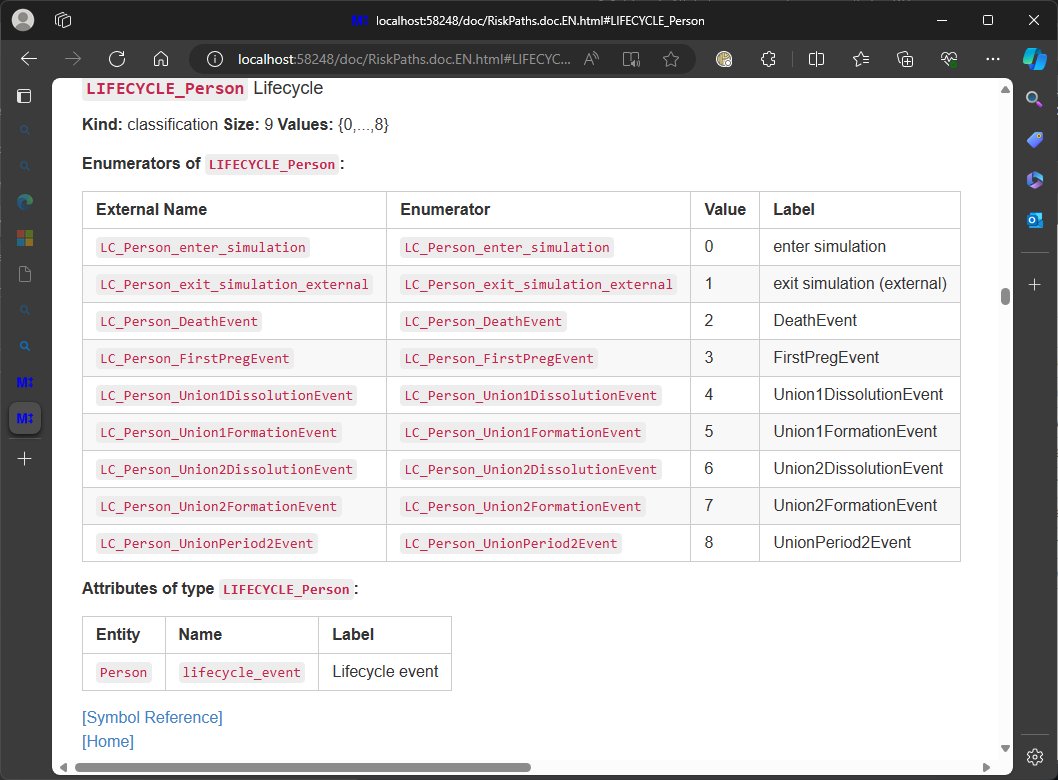
The classification LIFECYCLE_Person created by the OpenM++ compiler has 9 enumerators,
all with the prefix LC_Person_.
This prefix is intended to minimize the chance of a clash with other symbols in model code.
The LC_ portion of the prefix is a mnemonic for 'lifecycle'.
The first enumerator LC_Person_enter_simulation notes when a Person entity enters the simulation.
The second enumerator LC_Person_exit_simulation_external notes when a Person entity exits the simulation not from an event in that Person entity,
for example from an event in some other entity.
The remaining 7 enumerators note the occurrence of the 7 Person events in RiskPaths, in alphabetic order by event name.
This concludes worked example 1.
Worked example 2 involves additional modifications to model code.
To prepare for it,
close the browser window for RiskPaths model documentation,
the browser window for the RiskPaths UI,
and the oms instance which supported the RiskPaths UI, if necessary.
OpenM++ run-time code generated by the OpenM++ compiler maintains lifecycle attributes as follows:
- When an entity is created via
new,lifecycle_counteris0andlifecycle_eventisLC_Person_enter_simulation. - When the entity enters the simulation by a call to
enter_simulation(),life_cycle_eventis assignedLC_Person_enter_simulation(no change), andlifecycle_counteris incremented (so it changes and has the value1). - When an event in the entity occurs,
life_cycle_eventis assigned the corresponding enumerator for the event, andlifecycle_counteris incremented. - Self-scheduling events, e.g.
self_scheduling_int(age)have no effect onlife_cycle_eventorlife_cycle_counter. - When an entity exits the simulation by a call to
exit_simulation()in an event in that entity, the value oflife_cycle_eventandlife_cycle_counterretain the values for that event, as in 3 above. If the call toexit_simulation()comes from elsewhere, for example from an event in some other entity,life_cycle_eventis assignedLC_Person_exit_simulation_externalandlifecycle_counteris incremented.
This means that
-
lifecycle_counteralways changes whenever an event occurs in the entity. -
lifecycle_eventcontains the enumerator corresponding to that event. - When an entity exits the simulation,
lifecycle_eventcontains either the event responsible for the exit, orLC_Person_exit_simulation_externalif the exit was not caused by an event in the entity.
Note that an event can occur with no change to lifecycle_event if the same event occurs in succession.
But even if the same event occurs in succession, lifecycle_counter will change.
So, for example, the self-scheduling derived attribute trigger_changes(lifecycle_counter) is guaranteed to note all events in the entity, whereas trigger_changes(lifecycle_event) may not.
Entity tables process increments only after all attribute changes in an event have completed.
So, attribute values tabulated using lifecycle_counter or lifecycle_event reflect the values of attributes after all event-related model code has executed.
In models with entity links,
an event in entity A can change the attributes of a different entity B.
However, the value of lifecycle_counter and lifecycle_event in entity B do not change due to the event in entity A.
They retain the values they had at the most recent event which occurred in entity B.
This example shows how to tabulate event counts by event.
Ensure that lifecycle attributes are enabled by the following statement in model code:
options lifecycle_attributes = Person;
In RiskPaths, copy/paste the following code to code/Tables.mpp:
table snapshot untransformed Person X01_Events //EN All Events
[ trigger_changes(lifecycle_counter) ]
{
    lifecycle_event //EN Event
  * {
        unit //EN N
    } //EN Statistic
};
Build and run the model, selecting the output table X01_Events.
The browser should display:
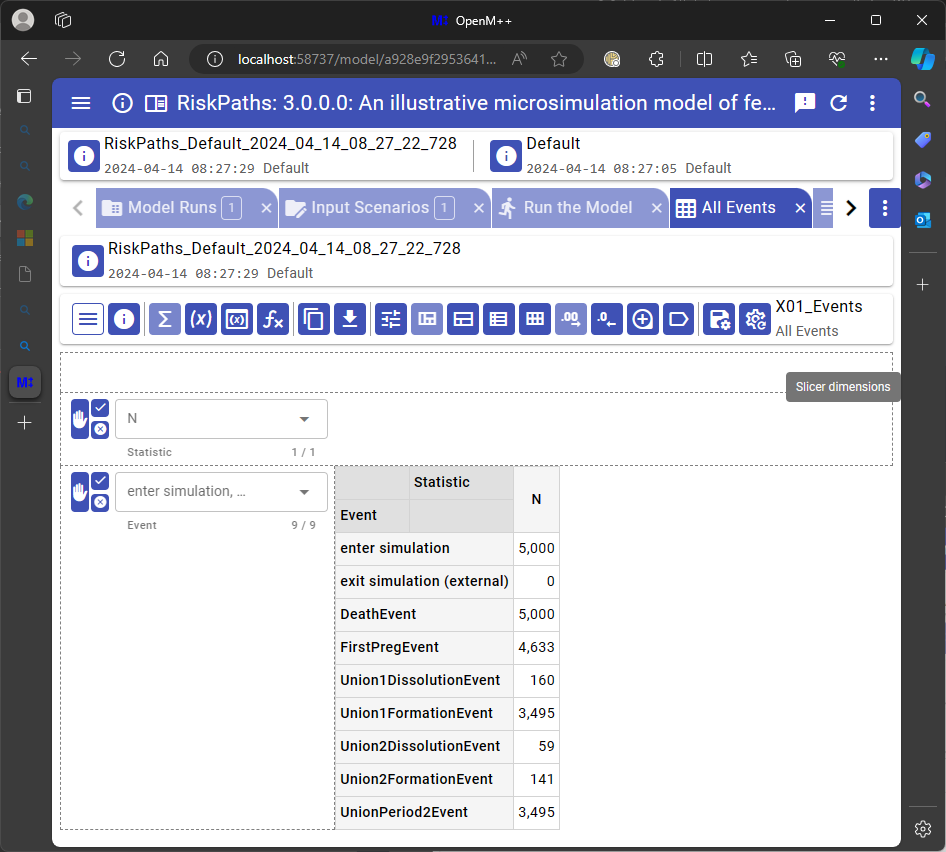
The filter of this snapshot table
trigger_changes(lifecycle_counter)
is instantaneously true when any event occurs, and is false otherwise.
The analysis dimension consists of the single expression unit, which sums increments whose values are always 1.
The table thus counts events by event type.
This example shows how to tabulate event counts by event and another characteristic (integer age).
Ensure that lifecycle attributes are enabled by the following statement in model code:
options lifecycle_attributes = Person;
In RiskPaths, copy/paste the following code to code/Tables.mpp:
table snapshot untransformed Person X02_Events //EN Events by age
[ trigger_changes(lifecycle_counter) ]
{
    {
        unit //EN N
    } //EN Statistic
  * lifecycle_event //EN Event
  * self_scheduling_split(age,AGE_FERTILEYEARS) + //EN Age
};
Build and run the model, selecting the output table X02_Events.
The browser should display (with 7 of 28 age categories selected):
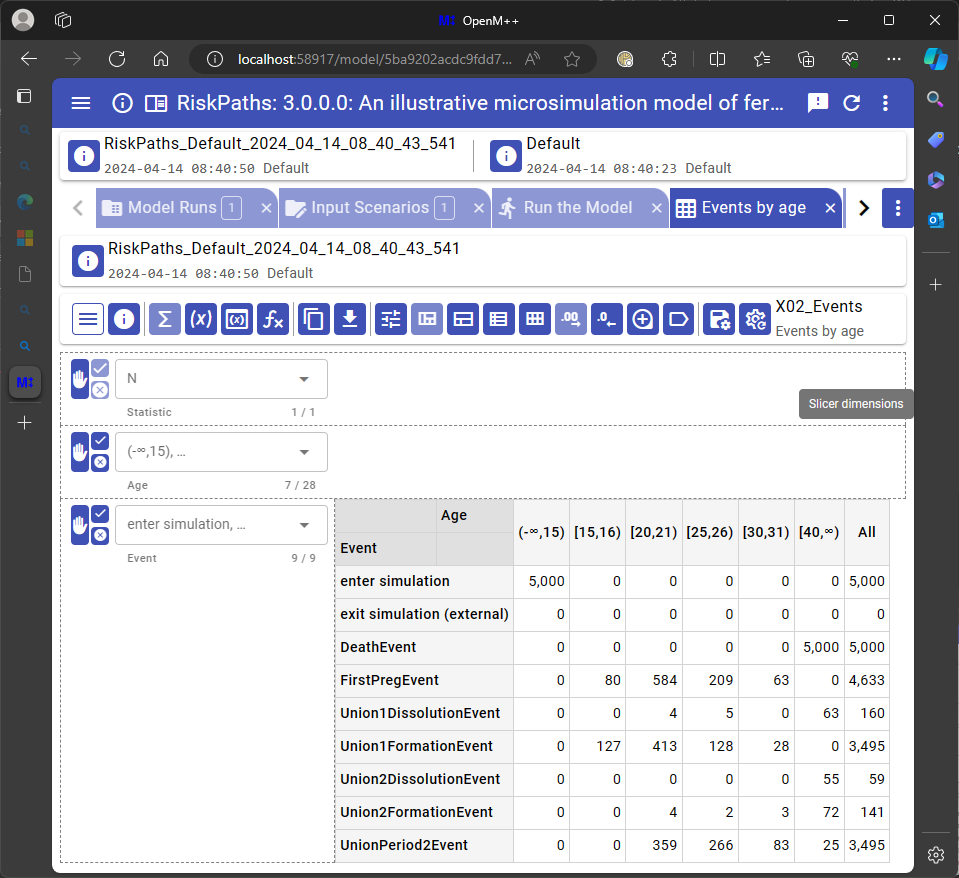
This table is like example 2 except for an additional classification dimension and a minor permutation of dimension order. The table shows the evolution of event frequencies over the life course. As expected, the margin over age has the same total event counts as example 2.
This example shows how to tabulate descriptive statistics for an attribute (age) at occurrences of a specific event (FirstPregEvent).
Ensure that lifecycle attributes are enabled by the following statement in model code:
options lifecycle_attributes = Person;
In RiskPaths, copy/paste the following code to code/Tables.mpp:
table snapshot untransformed Person X03_Events //EN Selected statistics for age at FirstPregEvent
[ trigger_changes(lifecycle_counter) && (lifecycle_event == LC_Person_FirstPregEvent) ]
{
    {
        unit, //EN N
        sum(age) / unit, //EN Mean
        minimum(age), //EN Min
        P5(age),  //EN P5
        P25(age), //EN Q1
        P50(age), //EN Median
        P75(age), //EN Q3
        P95(age), //EN P95
        maximum(age) //EN Max
    } //EN Statistic for age at FirstPregEvent
};
Build and run the model, selecting the output table X03_Events.
The browser should look like this, after moving expressions to rows and reducing display precision to two decimals:
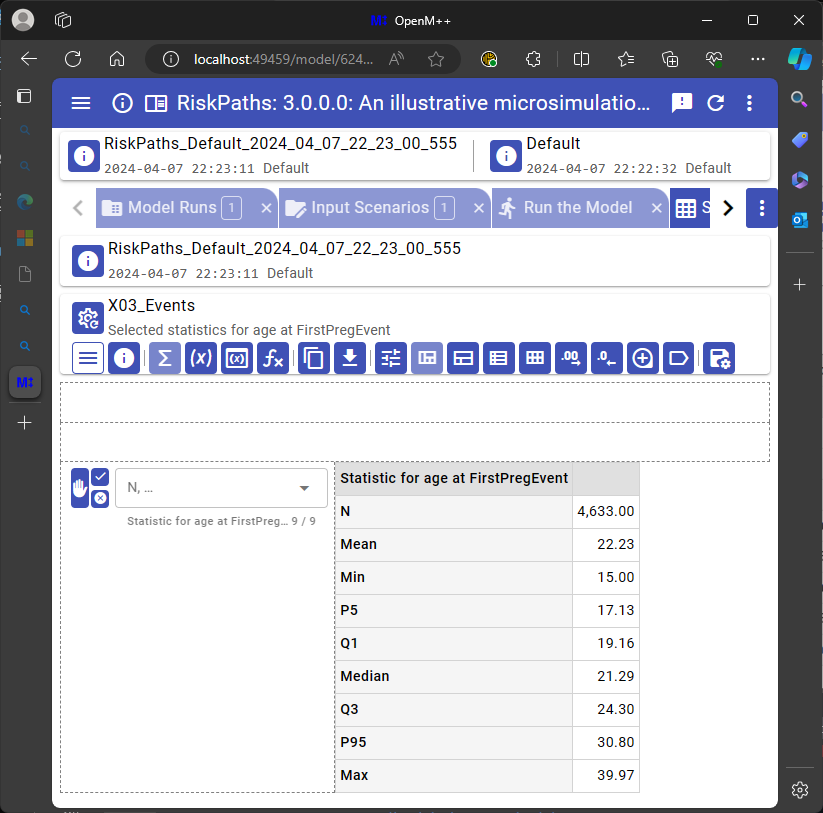
The filter of this snapshot table restricts event snapshots to a specific kind of event, using the C++ && operator.
This same approach could be used to cross-tabulate a population at a specific event.
This example shows how lifecycle attributes can be used to output microdata when an event occurs.
Ensure that lifecycle attributes are enabled by the following statement in model code:
options lifecycle_attributes = Person;
In RiskPaths, copy/paste the following code:
options microdata_output = on;
entity Person
{
    hook write_microdata,
        trigger_entrances(lifecycle_event, LC_Person_Union1DissolutionEvent);
};
This code fragment writes a microdata record when the Union1DissolutionEvent occurs.
Build the model.
In the run model screen, request microdata attributes age and case_id.
Run the model and open the Person microdata tab.
In the drop-down for size, select All.
The browser should display:
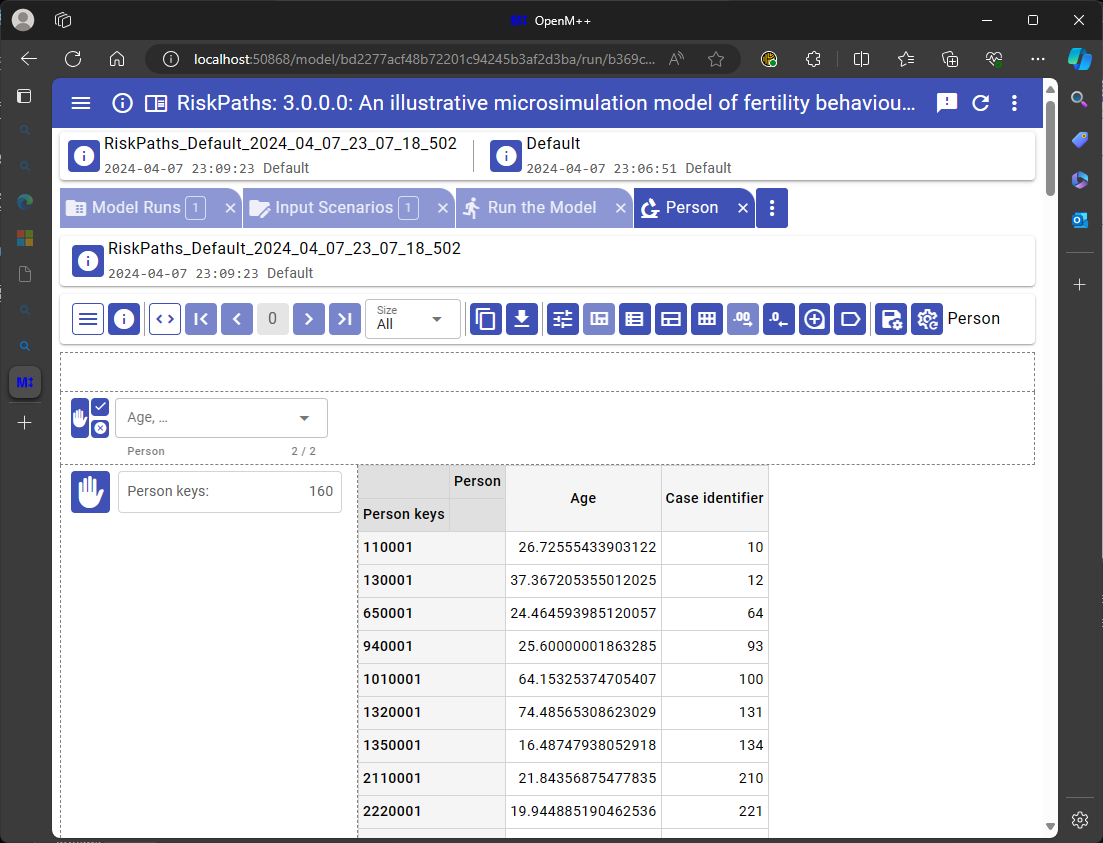
The screenshot shows 160 Person keys, which is the number of microdata records.
This is the same as the number of Union1DissolutionEvent events shown in
example 2.
Microdata can be output by hooking write_microdata() directly to an event implement function.
The approach illustrated in this example can nevertheless be useful if the event implement function has multiple function return paths,
or does not contain the required function call to implement function hooks.
This approach also guarantees that write_microdata() is called only after all model code associated with the event has completed,
which might include other entity functions hooked to the event implement function.
The technique of hooking write_microdata to trigger_entrances does not work for an event which causes the entity to exit the simulation.
That's because once the entity has exited the simulation no further events occur in it,
including the internal self-scheduling event to which write_microdata is hooked.
This example shows how lifecycle attributes can help provide context in microdata output.
Ensure that lifecycle attributes are enabled by the following statement in model code:
options lifecycle_attributes = Person;
In RiskPaths, copy/paste the following code (replacing code in the previous example):
options microdata_output = on;
options microdata_write_on_exit = on;
entity Person
{
    hook write_microdata,
        trigger_changes(lifecycle_counter);
};
This code fragment writes a microdata record on simulation enter and on every event,
and when a Person exits the simulation.
It's purpose in this example is just to produce some arbitrary microdata.
Build the model.
In the run model screen, request microdata attributes age and lifecycle_event.
Run the model and open the Person microdata tab.
Drag Person keys so that it comes first in the row categorical list on the left, just before lifecycle_event (see screenshot below).
Putting Person keys first sorts the microdata records by entity and timeline order.
The browser should display:
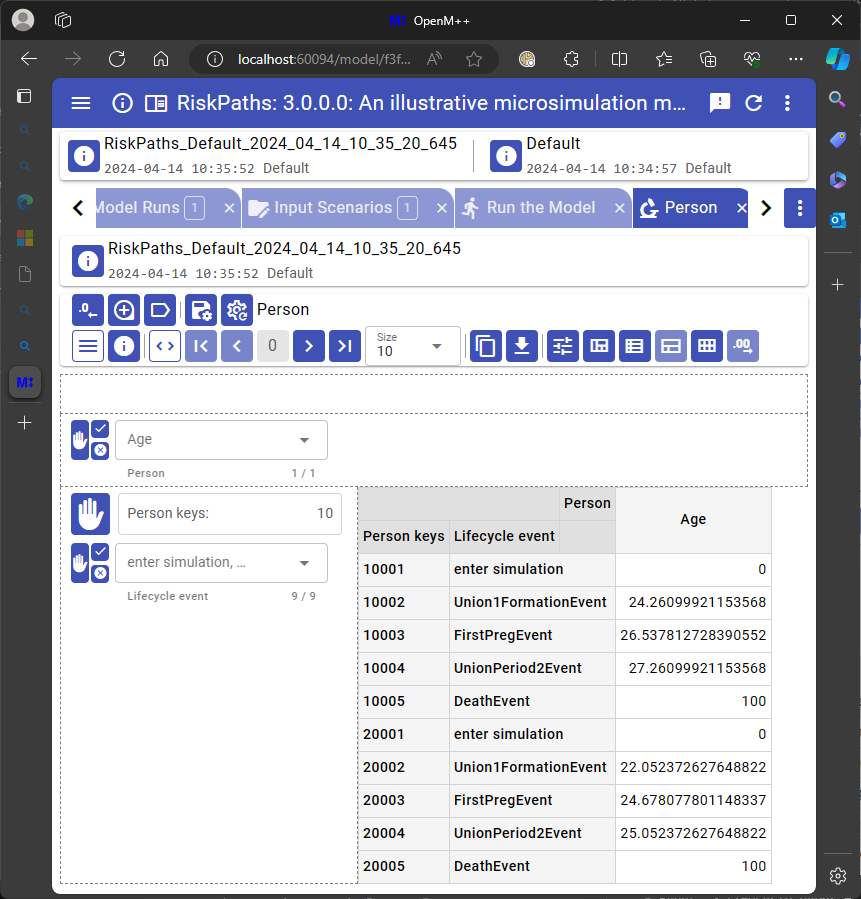
The column lifecycle_event in the display provides context for other microdata attributes (in this example, the age attribute).
The next example continues directly from this one, with no need to modify, rebuild, or rerun RiskPaths.
This example shows how lifecycle attributes can be used to filter microdata output in the UI.
It continues directly from the preceding example.
In the UI microdata viewer,
click the x in the Lifecycle event drop-down to deselect all events,
then open the drop-down and click Union1FormationEvent and Union2FormationEvent to select just them.
Increase the Size to 100.
The browser should display:
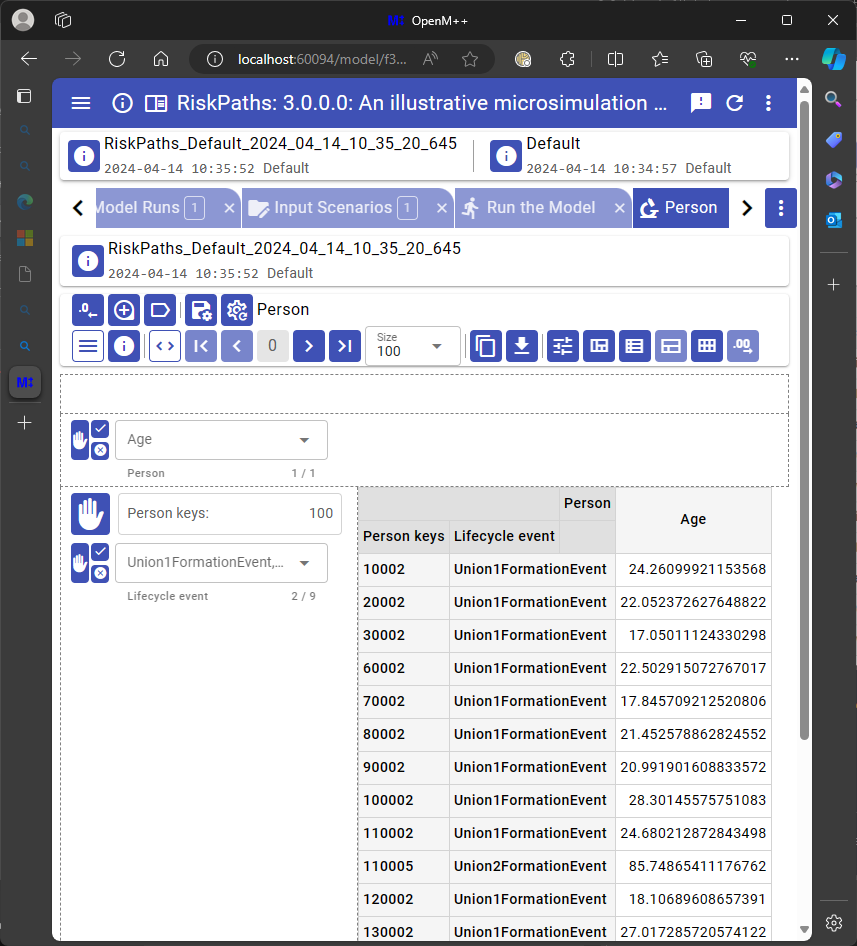
The microdata viewer displays age for all union formation events, in entity and timeline order.