Short Tutorial: Git Driven Deployments On Minishift - ocd-scm/ocd-meta GitHub Wiki
Minishift lets you run OKD on your laptop. In this demo, we will set up git-driven deployments of a prebuilt https://realworld.io ReactJS demo app with everything running on Minishift. Here is what we will set up:
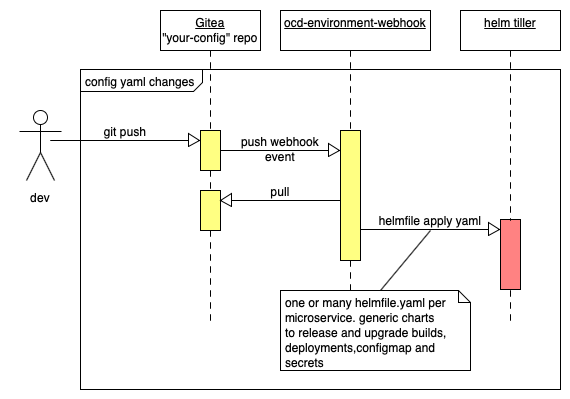
Referring to the above diagram:
- GitHub cannot fire events at Minishift so we will install Gitea an opensource git server that works like GitHub within Minishift. It will fire webhook events to drive installing the configuration.
- We will install an instance of
ocd-environment-webhook. This is a small adnanh/webhook go app that checks out the git repo and searches for helmfile.yaml files to install and upgrade our applications. - The backend is Tiller the Helm server that will use the kubernetes API to install or upgrade any configuration.
Here is the contents of the config git repo we will deploy:
$ tree
.
|____README.md
|____realworld-react-redux
| |____import-images.sh
| |____ocd-pre-apply-hook
| |____helmfile.yaml
We only have a single application in the subfolder realworld-react-redux. The ocd-pre-apply-hook is just a global hook run before the hemlfile is applied as helmfile doesn't have that feature yet. In this case, that hook script simply invokes import-images.sh to load the demo images into openshift. We recommend using ocd-builder to create release builds from a git webhook which is covered by the bigger tutorial. The full helmfile that runs the application is as follows:
repositories:
  - name: ocd-meta
    url: https://ocd-scm.github.io/ocd-meta/charts
releases:
  - name: {{ requiredEnv "ENV_PREFIX" }}-realworld
    labels:
      deployer: {{ requiredEnv "ENV_PREFIX" }}-realworld
    chart: ocd-meta/ocd-deployer
    version: "1.0.0"
    values:
      - name: react-redux-realworld
      - replicas: 2
      - imageStreamTag: "react-redux-realworld:v0.0.1"
      - deploy_env:
        - name: API_ROOT
          value: https://conduit.productionready.io/api
That has a list of releases containing a single release of chart ocd-meta/ocd-deployer. It gives the application the name react-redux-realworld and defines that it has two replicas of the image react-redux-realworld:v0.0.1. The deploy_env sets one environment variable for the application which is a public API for the app to use.
In a real system, we might have many apps or microservices within their own subfolders with their own helmfile. You can also use a top-level secrets folder containing a helmfile that defines many shared secrets as releases of the ocd-secret chart where the secrets are encrypted within git. You can also use a top-level config-map folder with a helmfile defining many shared ocd-configmap releases of shared configuration.
Prerequisites
You need to:
- Install Minishift and get Helm and Tiller running. See these instructions Helm Tiller on Minishift.
- Install Gitea on Minishift. See these instructions Gitea On Minishift
That wiki page also explains how to setup a personal access token which is some uuid like "f64960a3a63f5b6ac17916c9be2dad8dc76c7131" which can be used to push changes without a username and password.
After you have installed Gitea we now need to clone the demo app and load the configuration into Gitea. First create an empty Gitea repo on minishift called ocd-demo-env-short and then push the code into Gitea:
git clone https://github.com/ocd-scm/ocd-demo-env-short.git
cd ocd-demo-env-short
# this should print the gitea url. If it doesn't set it manually
GITEA_URL=$(oc get routes | awk '$1~/gitea/{print $2}')
echo $GITEA_URL
# set this to a access token created in Gitea to avoid having to use a username and password
ACCESS_TOKEN=f64960a3a63f5b6ac17916c9be2dad8dc76c7131
# set this to your username in gitea needed to get the url to your repo below
USER_NAME=simbo1905
# add the gitea repo as a remote
git remote add minishift http://$ACCESS_TOKEN@$GITEA_URL/$USER_NAME/ocd-demo-env-short.git
# push the code into Gitea
git push minishift master
Install ocd-environment-webhook
Create a new project and load the webhook into it:
oc logout ; oc login -u developer -p password
echo use this git repo url http://$ACCESS_TOKEN@$GITEA_URL/$USER_NAME/ocd-demo-env-short.git
# this must match where tiller is installed
export TILLER_NAMESPACE=tiller-namespace
# create a new proje t
export PROJECT=ocd-short-demo
oc new-project $PROJECT
oc project $PROJECT
# upgrade to admin
oc logout ; oc login -u admin -p admin
oc project $PROJECT
pushd /tmp && oc project $PROJECT && curl -L https://github.com/ocd-scm/ocd-environment-webhook/archive/v1.0.1.tar.gz | tar zxf - \
&& cd ocd-environment-webhook-1.0.1 \
&& ./wizard.sh && popd
It will then ask you questions such as what his the git url of the code it will checkout. Here is a transcript of setting up on my laptop:
OCD_PROJECT=ocd-short-demo
OCD_SERVER=192.168.99.100:8443
The git repo url? http://6d42f3eb637f802cf0b2d17411ae2c2d26eefa54@gitea-gitea.192.168.99.100.nip.io/simbo1905/ocd-demo-env-short.git
The project where the images are built and promoted from? ocd-short-demo
Repo name? (default: simbo1905/ocd-demo-env-short):
Branch ref? (default: refs/heads/master):
Chart instance prefix? (default: ocd-short-demo):
Use --insecure-no-tls-verify? (default: false):
Chatbot base64 encoded notify script?
Value of --oc-server: 192.168.99.100:8443
Value of --tiller-namespace: tiller-namespace
Value of --namespace: ocd-short-demo
Value of --insecure-no-tls-verify: false
Value of --git-url: http://6d42f3eb637f802cf0b2d17411ae2c2d26eefa54@gitea-gitea.192.168.99.100.nip.io/simbo1905/ocd-demo-env-short.git
Value of --git-name: simbo1905/ocd-demo-env-short
Value of 'webhook-ref':
Check that it has successfully deployed the release which would look something like:
$ helm list | awk -v PROJECT=$PROJECT '$NF==PROJECT{print $0}'
ocd-short-demo-ocd-webhook	2       	Mon Sep  2 07:14:59 2019	DEPLOYED	ocd-environment-webhook-1.0.1	           	ocd-short-demo
Next setup a webhook on Gitea for the ocd-demo-env-short repo to hit the oc-environment-webhook supplying the secret. We can use oc to generate the webhook URL :
$ oc get route ocd-environment | awk 'NR>1{print "http://" $2 "/hooks/ocd-environment-webhook"}'
That outputs for me "http://ocd-environment-ocd-short-demo.192.168.99.100.nip.io/hooks/ocd-environment-webhook". We also need to know the webhook secret to authenticate the git server to the webhook app. You can look that up with:
oc describe dc ocd-environment-webhook | awk '$1~/WEBHOOK_SECRET:/{print $2}'
That outputs a random 10 char alphanumeric password. Use the gitea console to go to the settings for the repo and set up a webhook of type application-json to push all events to the webhook. Here is what such a webhook looks like on my gitea you will have to set your own details:
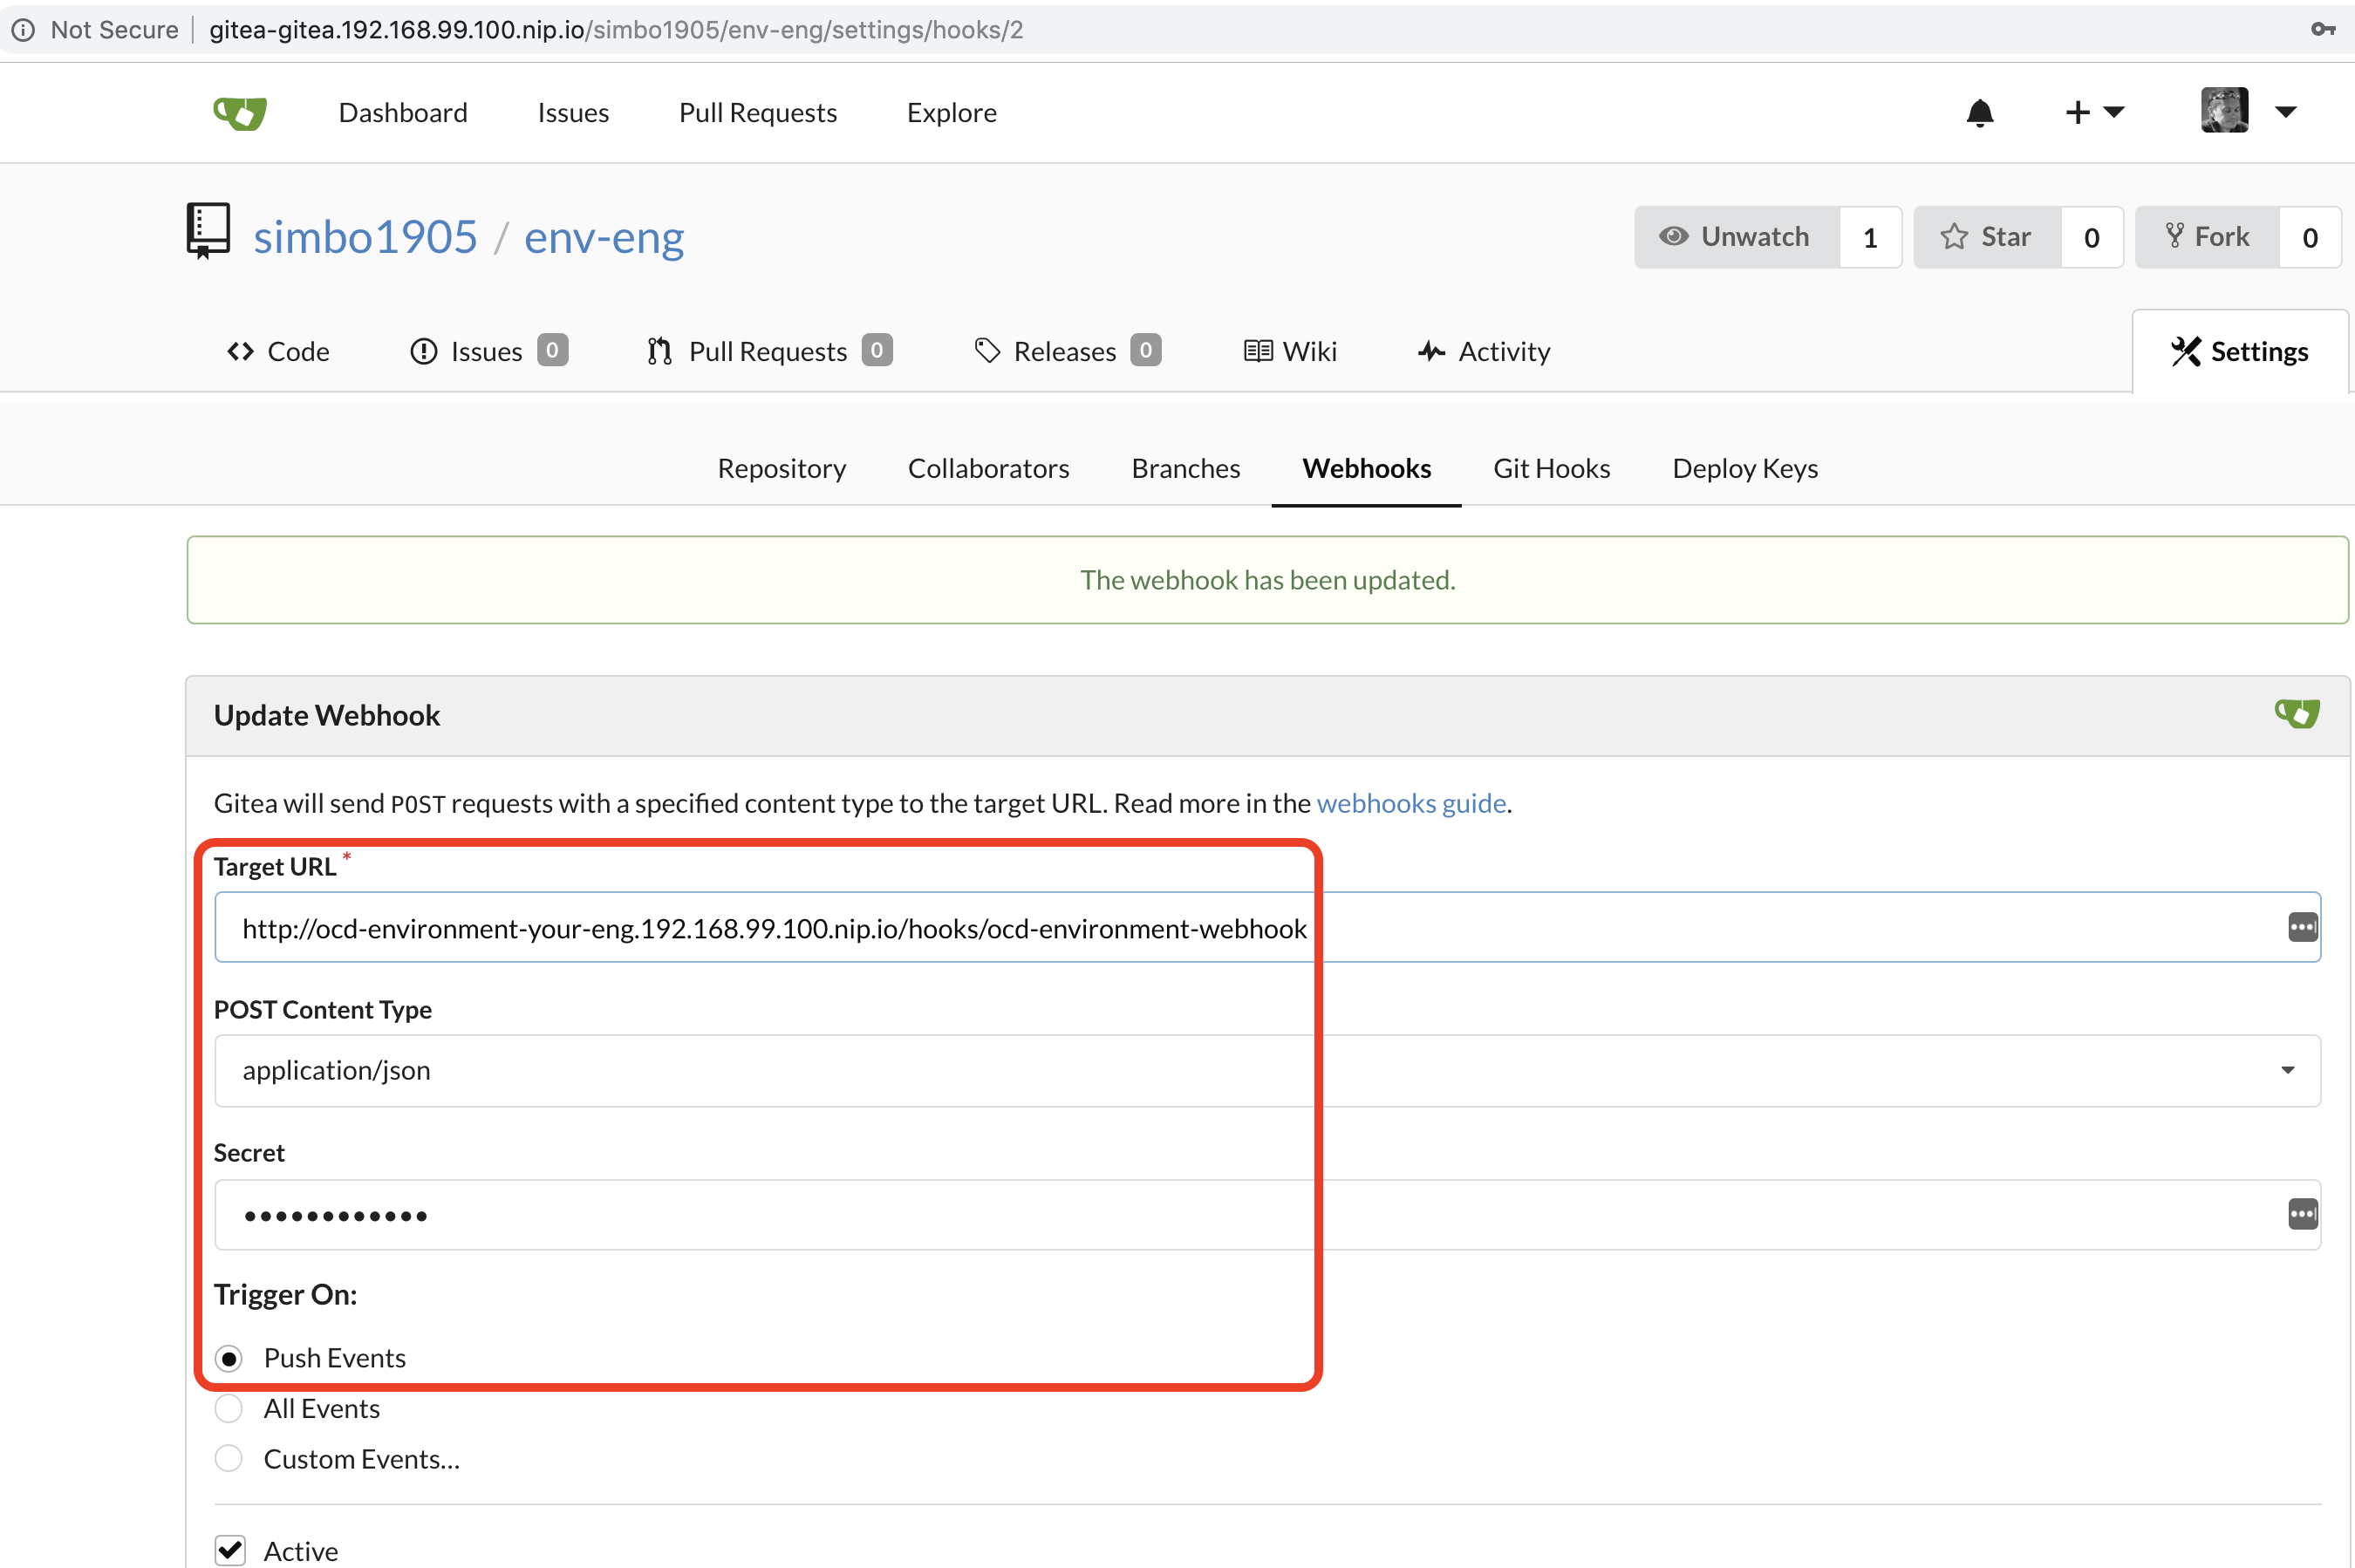
Once the webhook is setup you need to fire it. To do that you can simply use the Gitea web page to edit the README.md to add a blank line. This should fire the webhook and should cause the ocd-environment-webhook to install the application. If you run into issues checkout page about debugging.
Perform Upgrade and Rollback
Once the app is up you can edit the file react-redux-realworld/helmfile.yaml and set the version number of the image at line 13 to be version v0.0.2. You can do that locally and push up to minishift or you can edit the file on the Gitea web console. That will cause the webhook to file and the application to be upgraded with a rolling deployment. Here is a video of that happening
https://www.loom.com/share/a321695dcf2146efa4599cae358d3a4c
Let's say that that was a bad idea and the new version has a crash bug. You can now use helm to perform a rollback to the release 1 of our application:
$ helm rollback ocd-short-demo-realworld 1
Rollback was a success.
Enjoy!