Short Tutorial Part 2: Git Driven Release Builds On Minishift - ocd-scm/ocd-meta GitHub Wiki
This is the second part of a walk through that started with Git Driven Deployments On Minishift. Minishift lets you run OKD on your laptop to test drive OCD. In the first part, we used a generic OCD chart to deploy and update a pre-built images of a realword.io demo app. In this second part, we will install some build infrastructure that responds to Git release webhook events to build and tag release images. This completes the picture of how to do end-to-end build and deployment of code driven only by git commands.
Here is what this tutorial adds to the existing set up:

The reason that it has a lot of moving parts is a secure multi-tenant OpenShift cluster such as OpenShift Online Pro will not enable custom build types. Instead of one custom piece of logic doing everything we need to assemble some off-the-shelf pieces:
- The
realworld-build-envdeployment will be a webhook deployment that simply extracts the tag number for a git release webhook. It then updates a standardBuildConfigto build the new git tag. - The
realworld-build-envbuild configuration will be a standard s2i build that pulls the code and builds an image pushed into the internal docker repo asrealworld-build-env:latest. When first installed it builds the master branch. Whenever there is a git release it is updated to build the release tag. It builds the tagged code and push it into the internal docker repo asrealworld-build-env:latest - The
tag-realworld-build-envbuild configuration is a standard s2i build that has a trigger watching the image tagrealworld-build-env:latest. It responds whenever there are pushes torealworld-build-env:latestas a cascading build. It doesn't actually do any building. The git repo it pulls from only has a script that will tag the image that triggered the cascading build. The script simply inspects the meta-data in the git repo forrealworld-build-env:latestto learn the git tag. It then tags therealworld-build-env:latestimage with the same tag.
Fortunately, it is a single release without a lot of configuration:
repositories:
  - name: ocd-meta
    url: https://ocd-scm.github.io/ocd-meta/charts
releases:
  - name:  {{ requiredEnv "ENV_PREFIX" }}-realworld-build
    labels:
      builder: realworld
    chart: ocd-meta/ocd-release-build
    version: "1.0.0"
    values:
      - name: {{ requiredEnv "ENV_PREFIX" }}-realworld-build
      - s2iimage: nodejs-8-rhel7
      - memory_limit: 1024Mi
      - source_repository_ref: master
      - insecureSkipTlsVerify: true
      - source_repository_url: "{{ requiredEnv "OCD_GIT_REPO" }}"
      - openshiftServer: "{{ requiredEnv "OPENSHIFT_SERVER" }}"
      - project: "{{ requiredEnv "PROJECT" }}"
      - build_env:
        - name: APP_KEY
          value: "{{ requiredEnv "APP_KEY" }}"
      - webhookRepFullname: "{{ requiredEnv "OCD_GIT_PATH" }}"
      - buildNamespace: "{{ requiredEnv "PROJECT" }}"
      - build: realworld
      - deploy_env:
        - name: OPENSHIFT_SERVER
          value: "{{ requiredEnv "OPENSHIFT_SERVER" }}"
Prerequisites
You need to complete the first tutorial which will setup everything you need to deploy the build yaml above. It will also create a demo deployment that can deploy our release builds:
Git Driven Deployments On Minishift.
At the end of that you should have a gitea repo ocd-demo-env-short that created the following releases:
$ oc login https://192.168.99.100:8443/
$ export TILLER_NAMESPACE=tiller-namespace
$ helm list --namespace=ocd-short-demo
NAME                          	REVISION	UPDATED                 	STATUS  	CHART                        	APP VERSION	NAMESPACE
ocd-short-demo-ocd-webhook    	2       	Mon Sep  2 07:14:59 2019	DEPLOYED	ocd-environment-webhook-1.0.1	           	ocd-short-demo
ocd-short-demo-realworld      	5       	Wed Sep  4 21:15:57 2019	DEPLOYED	ocd-deployer-1.0.0           	           	ocd-short-demo
Build Infrastructure Set up
We need to set up a git repo with the ReactJS demo code. As we will create your own git webhook to trigger release builds you need to create your own repo. As it needs to fire the webhook at OCD running in Minishift we need to host the git repo in Minishift. In the first tutorial you set up a Gitea server in Minishift. Create an empty repo within Gitea called realworld-react-redux then use the following to clone the demo code and push it into Gitea:
git clone https://github.com/simbo1905/react-redux-realworld-example-app realworld-react-redux
cd realworld-react-redux
# this should print the gitea url. If it doesn't set it manually:
oc project gitea
GITEA_URL=$(oc get routes | awk '$1~/gitea/{print $2}')
echo $GITEA_URL
# set this to an access token created in Gitea to avoid having to use a username and password
ACCESS_TOKEN=f64960a3a63f5b6ac17916c9be2dad8dc76c7131
# set this to your username in gitea needed to compute the url to your repo below
USER_NAME=simbo1905
# add the gitea repo as a remote
git remote add minishift http://$ACCESS_TOKEN@$GITEA_URL/$USER_NAME/realworld-react-redux.git
# push the code into Gitea
git push minishift master
You will have to change those settings to match your local Gitea set up.
OCD recommend you use a separate git repo to hold your infrastructure-as-code helmfile.yaml. We can reuse the ocd-demo-env-short git repo and OCD webhook from the first short tutorial. If you haven’t yet completed that tutorial do so now.
In the ocd-demo-env-short repo make a new folder with mkdir build-realworld and create a helmfile.yaml holding the yaml above. We then need to define any new environment variables required by the release build. We can look at the environment variables defined on the ocd-environment-webhook to see which environment variables are already supplied for OCD to run. In this case there are three variables we need to define:
APP_KEYwhich is a ReactJS security setting.OCD_GIT_REPOthe git url of the code to pull and build onto a release image. We will need to setup a new git repo in Gitea running on Minishift and use its URL.OCD_GIT_PATHthe path named in the webhook event. We will be reusing the same git repo as we used in the first demo.
We define these setting in an envvars file. You need to use the Git URL that corresponds to you gitea repo holding the ReactJS code.
$ cat build-react/envvars
APP-KEY=changeme
OCD_GIT_REPO=http://8a0b82563b5c93f3b1137dd21be60b6c8c85569e@gitea-gitea.192.168.99.100.nip.io/simbo1905/realworld-react-redux.git
OCD_GIT_PATH=simbo1905/realworld-react-redux
You need to edit the username and repo URLs to match your Gitea install. In the demo above we are using a HTTPS git URL with a personal access token. With real builds, you can use an SSH URL and an SSH deploy key. Also, with a real build, you would use a strong random number generator to create the secret APP_KEY value. As the file contains a secret we should git-secret encrypt the file before committing it into Git. For this demo installed into Minishift won't bother to encrypt this file.
Now we are ready to push the code into git. Before we do that we can tail the logs of the ocd-environment-webook pod to see how it responds to the yaml. In a separate terminal use oc to tail the logs:
# change to the demo project
$ oc project ocd-short-demo
# first lookup the pod name
$ export OCD_POD=$(oc get pods |  awk '$1~/ocd-environment-webhook/{print $1}') && echo $OCD_POD
ocd-environment-webhook-2-46pb7
# tail the logs by pod name
oc logs -f $OCD_POD
Note the name of your pod will include a random string so that command tries to look it up based on a partial name patch. If it doesn't find your pod you should check that it is deployed correctly as per the first tutorial.
Now when you push the helmfile and new envvars file to the git repo you should see fro the logs the pod install the new release build. The logs should show the successful match of the webhook secret setup in the first tutorial:
[webhook] 2019/10/23 18:43:04 [a85aac] ocd-environment-webhook hook triggered successfully
You can check the release is installed correctly using helm. Now we can RSH into that pod with all the tools and look helm release it has installed a new release of type ocd-release-build-1.0.0 in addition to the ocd-deployer-1.0.0 installed by the last tutorial:
$ oc rsh $OCD_POD
sh-4.2$ helm list | grep realworld
helm list | grep realworld
ocd-short-demo-realworld      	9       	Sun Oct 20 15:54:08 2019	DEPLOYED	ocd-deployer-1.0.0           	           	ocd-short-demo
ocd-short-demo-realworld-build	1       	Sun Oct 20 15:53:48 2019	DEPLOYED	ocd-release-build-1.0.0      	           	ocd-short-demo
sh-4.2$
If the release has status FAILED we might have to helm delete --purge ocd-short-demo-realworld-build to blow it way in order to try again.
The release will have kicked off a build of the master branch of our code. This will then trigger the tag build to run which fails to resolve a release tag for the master branch so it fails:
sh-4.2$ oc get buildconfigs
NAME                                 TYPE      FROM         LATEST
ocd-short-demo-realworld-build       Source    Git@master   1
tag-ocd-short-demo-realworld-build   Source    Git          2
sh-4.2$ oc get builds
NAME                                   TYPE      FROM          STATUS                    STARTED         DURATION
ocd-short-demo-realworld-build-1       Source    Git@7a70c41   Complete                  6 minutes ago   3m19s
tag-ocd-short-demo-realworld-build-2   Source    Git@a05db05   Failed (AssembleFailed)   2 minutes ago   7s
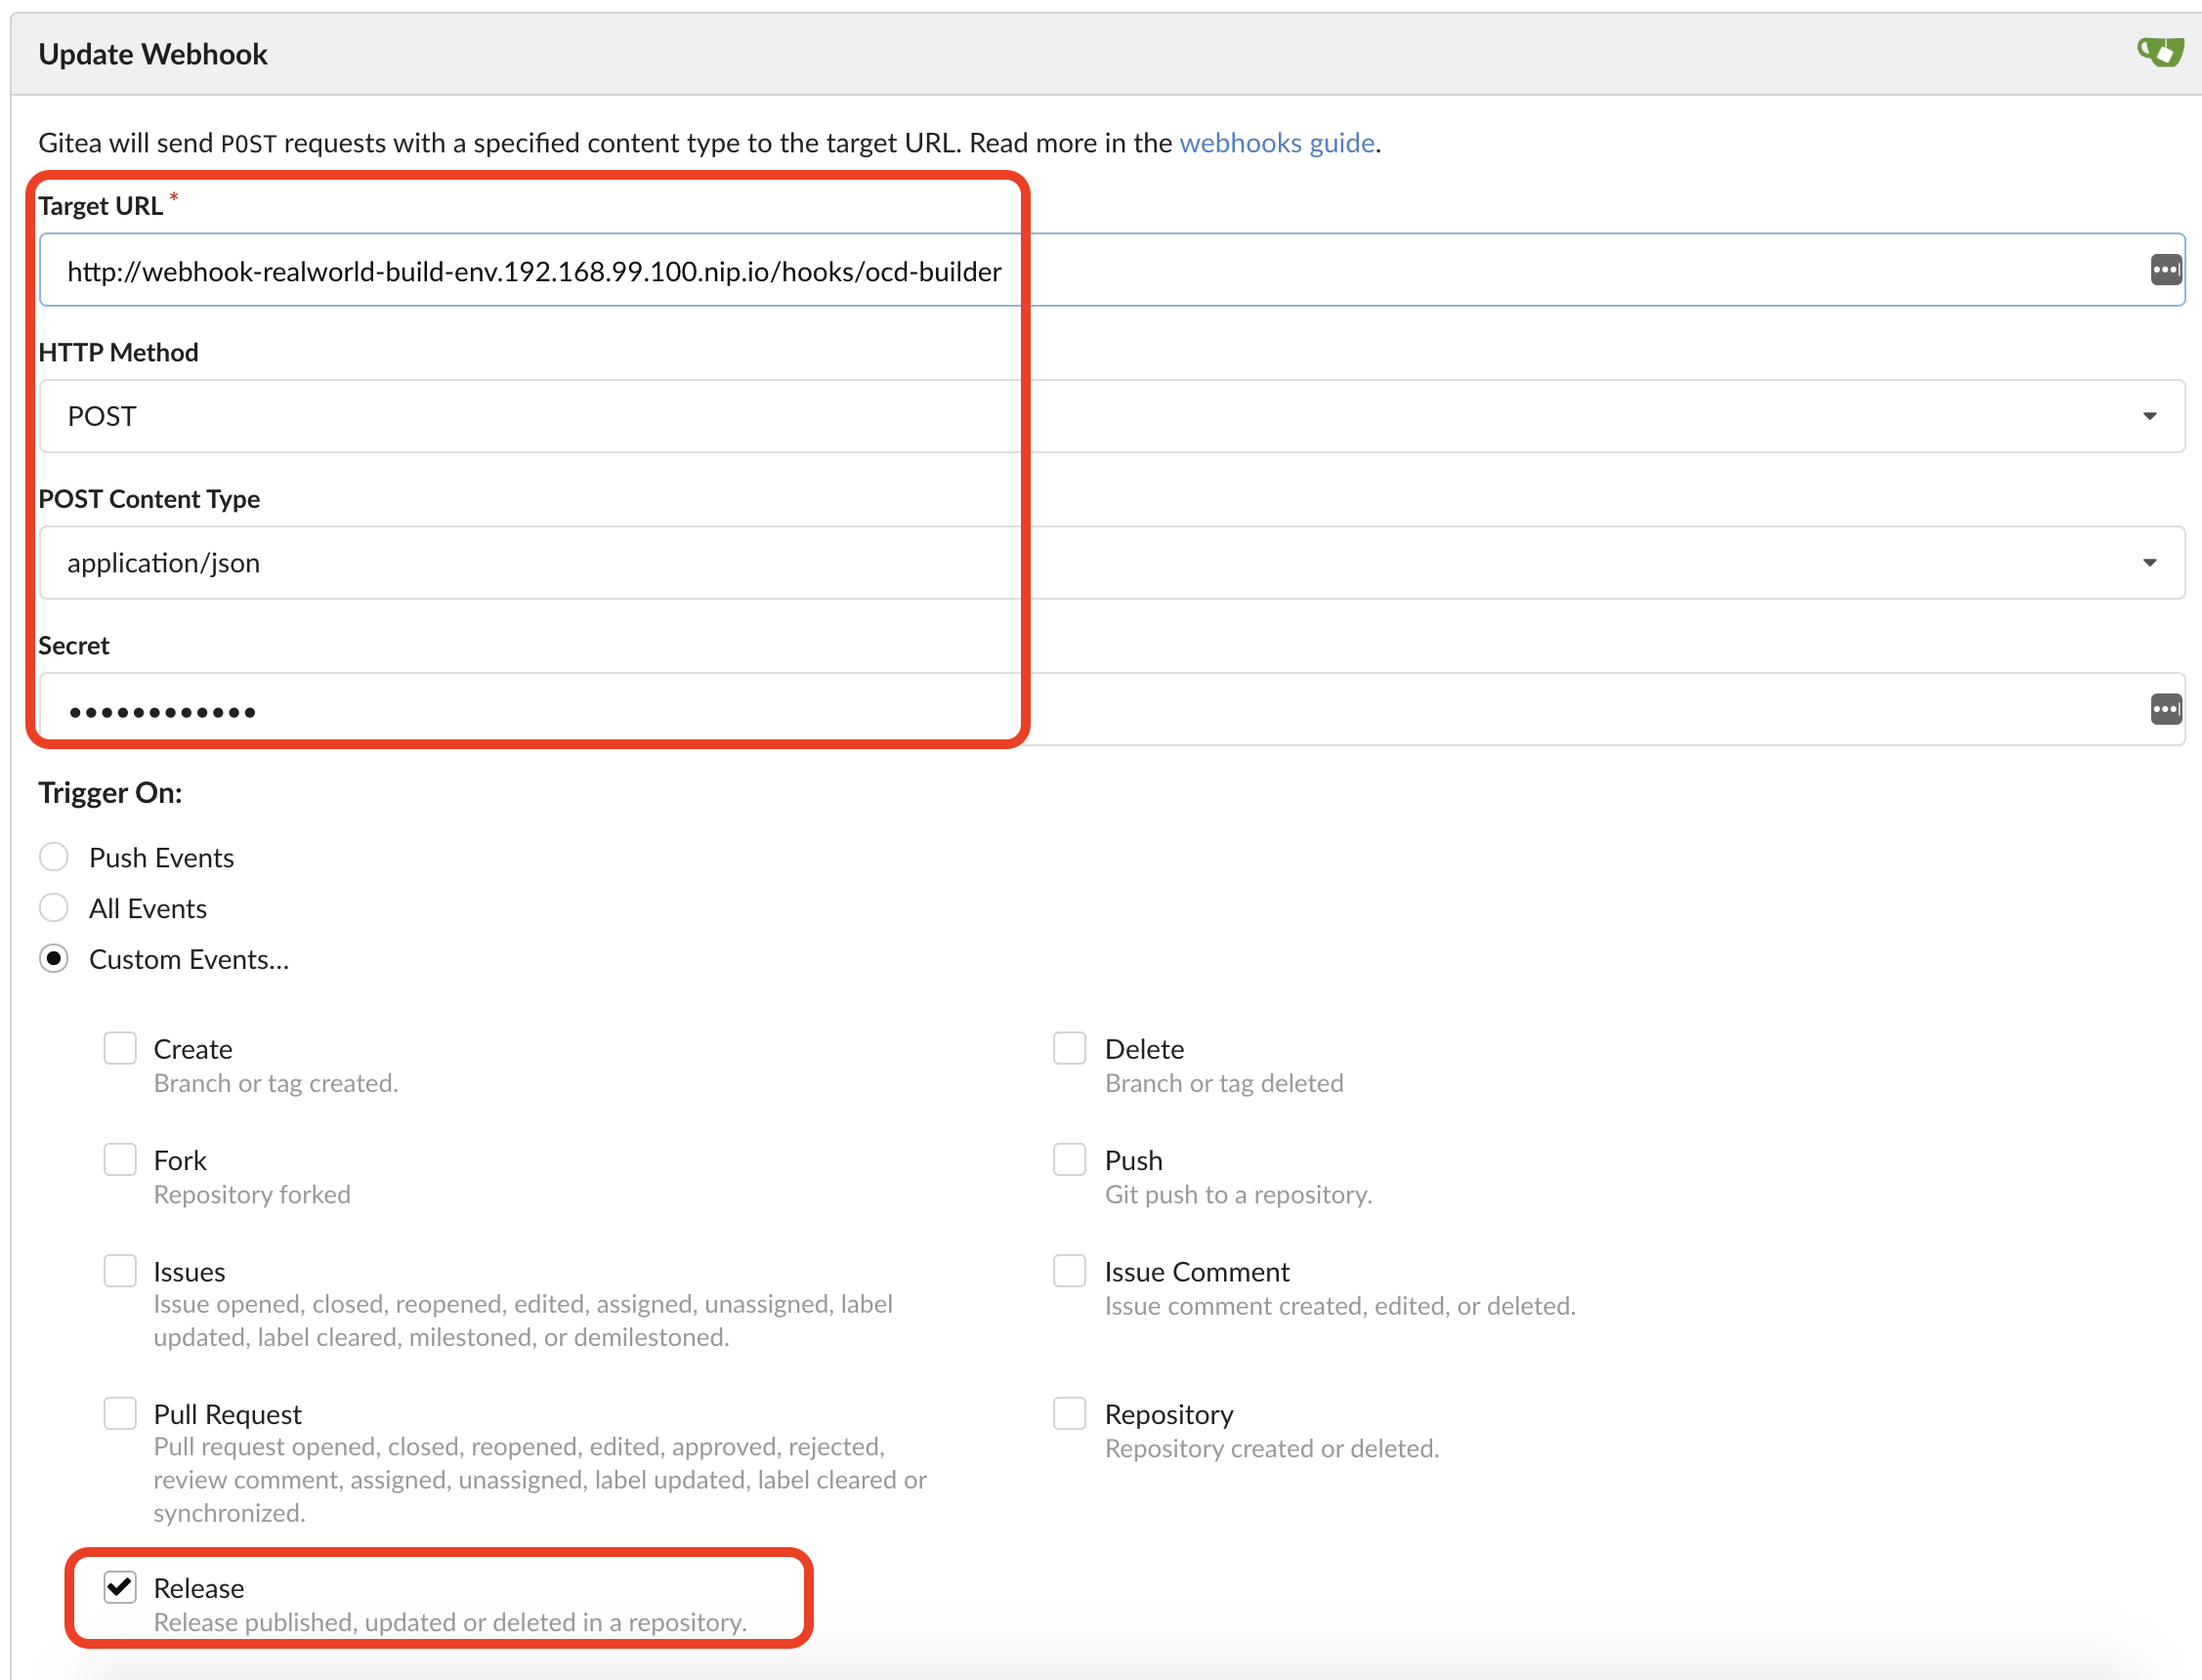
We next need to set up a webhook on Gitea that will respond to releases of the ReactJS code and build a release image. We can lookup the webhook endpoint on the build with:
$  oc get route ocd-short-demo-realworld-build  | awk 'NR>1{print "http://" $2 "/hooks/ocd-builder"}'
http://ocd-short-demo-realworld-build-ocd-short-demo.192.168.99.100.nip.io/hooks/ocd-builder
Then we can look up the build webhook secret with:
$ oc describe dc ocd-short-demo-realworld-build | awk '$1~/WEBHOOK_SECRET:/{print $2}'
AyFGCSykx2
Here is how it looks:
We can now push a release tag into the ReactJS repo in order it to trigger a release build. In the realworld repo push a release tag:
git tag v0.1.0
git push minishift v0.1.0
Then we can go into the web UI and create a new release from this tag:

This will kick off a build that you can see with oc:
$ oc get builds
NAME                                   TYPE      FROM          STATUS                    STARTED          DURATION
ocd-short-demo-realworld-build-2       Source    Git@7a70c41   Running                   24 seconds ago
Now we can remove the lines that we set up in the previous tutorial that downloads images from docker.io:
$ cat realworld-react-redux/ocd-pre-apply-hook
#!/bin/bash
set +x
# import the images for this project which may already exist
"${OCD_CHECKOUT_PATH}/realworld-react-redux/import-images.sh"
$ rm realworld-react-redux/ocd-pre-apply-hook && rm realworld-react-redux/import-images.sh
The images that we will deploy using the previous tutorial can be created by the build infrastructure that was created in this tutorial.
Putting it all together you create a release in the ReactJS repo that creates an image with the same tag. When you are ready to run it you update the deployment configuration.
See Next
The full tutorial shows how to set up everything up with multiple environments running on Minishift with promotion of images between environments. Alternatively, there is a full tutorial about setting up multiple environments on OpenShift Online Pro.