Full Tutorial: OpenShift Online Pro (openshift dot com) - ocd-scm/ocd-meta GitHub Wiki
Overview
This is the long format tutorial that shows how to set up multiple environments on OpenShift Online Pro in a manner that will let you run a business. It is effectively the documentation for how we set up our service using the OCD tools. The free tier of OpenShift Online only lets you set up one project with limited resources whereas this tutorial and demo uses three. That allows for separation between the engineering environment, the production environment, and a staging environment that all run in separate projects that are separate namespaces. There is a separate full tutorial that covers setting up on Minishift on your laptop which is a zero cost way of trying out OCD.
These instructions cover running the OCD demo for Git Driven continuous delivery on openshift dot com (note: the GitHub spam engine takes me offline if I create a link to the service!). The free starter tier on that service doesn't let you setup multiple projects so you cannot run all of the steps below to show promotion of code between projects. You can get a 30 day free trial of Online Pro that will be able to run this full demo. There is another version of this demo that uses minishift on your local laptop to avoid setting up an Online Pro account.
Here is a sequence diagram of the components that we will install into each project that represents a logical environment:
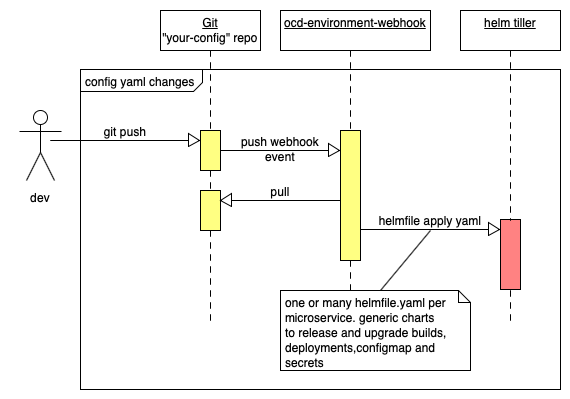
Referring to the above diagram we have a git repo for our config which will contain one more helmfile.yaml files. For example, we might have a folder per microservice that contains a helmfile.yaml that configures a deployment of the microservice, the configmaps that configure it for the environment, and a list of secrets that are encrypted in git that the microservice deployment config will mount as an environment variable to configure our microservice.
This means that we can setup a protected master branch with code reviews and when we merge changes to the helmfile yaml it automatically upgrade all our config within openshift. Note that we use helmfile apply that regenerates all the low level yaml from the chart templates and runs a diff against what is currently released. It then only updates what needs to be changed. So if we only change one encrypted password in one secret in git only that password is update in openshift. Helm will keep a backup of all the prior config and let us rollback or diff config versions. So not only do we have a history of the parameters that drive our chart templates within git we also have a complete history of the full low-level yaml that has been loaded into kubernetes. If you think that sounds like a good idea then please try out the steps below and let us know how you got along.
0. Setup Projects and Git Reps
All projects on the shared openshift clusters must have unique names. These instructions assume that "your-" is the prefix you add to your projects. You should use your own meaningful prefix such as your company name. This demo uses three openshift projects that will be loaded into three separate kubernetes namespaces:
your-eng- The engineering environment. This will hold Tiller the Helm server component, all the container image build configs, and optionally the slackbot.your-staging- The staging environment. This is where pre-live testing of code and configuration occurs.your-live- The live environment. This is the production environment.
You also need a git repo to host the Helmfile configuration that you install into each environment. We recommend a repo per environment, e.g:
env-your-engenv-your-stagingenv-your-live
The reason we recommend separate repos not branches is that environment configuration isn't quite like code. Code does flow between environments so branches make sense. Passwords don't flow between environments. Some config does like the 'shape' of the yaml that runs your apps. Yet Git security is really designed around "per repo" security. This means that we prefer a separate repo for the live production environment even if that means we occasionally need to diff yaml between two repos. This isn't a hard rule if you want to use branches and configure each webook to use a branch other than master. Give it a go and let us know how it goes.
1. Install Tiller
First, make sure that you download a compatible version of helm (we currently run v2.11.0), and install tiller into the engineering project using this script. Here is a shortcut to do that don't forget to change the project name to your company prefix:
# set YOUR to be unique to your company
oc new-project $YOUR-tiller && curl -L https://bit.ly/2GRMjlm  -o /tmp/install-tiller.sh && chmod +x /tmp/install-tiller.sh && /tmp/install-tiller.sh
Ensure that you set the TILLER_NAMESPACE to be the same location and initialize helm (don't forget to change $YOUR to be your company prefix):
export TILLER_NAMESPACE=$YOUR-tiller
helm init --client-only
helm version
You may want to set the TILLER_NAMESPACE via your bash profile.
2. Initialize The Engineering Environment
We need to ensure tiller can setup service accounts and grant them permissions:
oc project $YOUR-staging
oc adm policy add-role-to-user admin "system:serviceaccount:$TILLER_NAMESPACE:tiller"  -n $YOUR-staging
The ocd-environment-webhook chart installs a git webhook receiver that syncs a set of Helmfiles within git into an openshift project. We install the environment webhook into the engineering environment by running the wizard script:
pushd /tmp && oc project $PROJECT && curl -L https://github.com/ocd-scm/ocd-environment-webhook/archive/v1.0.1.tar.gz | tar zxf - \
&& cd ocd-environment-webhook-1.0.1 \
&& ./wizard.sh && popd
The wizard will guess some defaults but let you override them. You need to give it the GIT URL of your env-your-eng it repo. This is where you put your Helmfile configuration that is deployed by the environment webhook. If you have a private repo you may want to use an SSH URL for git else generate a personal access token. Here is an example:
OCD_PROJECT=your-eng
OCD_SERVER=192.168.99.100:8443
The git repo url? https://github.com/$YOUR/env-$YOUR-eng.git
The project where the images are built and promoted from? $YOUR-eng
Repo name? (default: simbo1905/env-eng):
Branch ref? (default: refs/heads/master):
Chart instance prefix? (default: your-eng):
Use --insecure-no-tls-verify? (default: false):
Chatbot base64 encoded notify script?
Value of --oc-server: 192.168.99.100:8443
note that I told it to promote images from the current project. Later when we set up the staging and live environments we will also tell them to promote images from this project that will build the release images.
Once the wizard has run check what it has installed with helm list:
NAME                         	REVISION	UPDATED                 	STATUS  	CHART                        	APP VERSION	NAMESPACE
your-eng-ocd-webhook      	2       	Thu Jan  3 07:34:18 2019	DEPLOYED	ocd-environment-webhook-1.0.1	           	your-eng
The release instance is of type ocd-environment-webhook instance. We will point a GitHub webhook from the env-your-eng at this application. When a GitHub webhook event fires from the env-your-eng repo into this application it will use the secret details to connect to Helm Tiller and have it install the Helmfile from git.
3. Setup Up The Demo Build Infrastructure
We want to set things up to build our demo app when GitHub fires release events:
First fork the demo application repo simbo1905/react-redux-realworld-example-app. You want to create your own fork as you need to configure your own webhook on GitHub to fire at openshift. Later on, we will demo promoting the image with the release tag through the environments.
Next we want to import the demo build environment configuration from ocd-scm/ocd-demo-env-build into you engineering repo env-your-eng. The cleanest way to do that is to extract the latest zip file into your local checkout:
# grab the code
wget https://github.com/ocd-scm/ocd-demo-env-build/archive/v1.0.0-M2.tar.gz && tar zxf v1.0.0-M2.tar.gz
# copy the code into your own local checkout they push to your fork
Now edit ./realworld-react-redux/envars and replace my git URL and name to point to your fork so that you can build the release tags created in your fork repo.
If you want to use a GPG private key for secrets you should load the passphrase for the GPG private key. As there isn't anything actually secret in the public demo application you can go ahead and load the passphrase for the demo application with:
oc project your-eng && oc create -f - <<EOF
apiVersion: v1
kind: Secret
metadata:
  name: openshift-passphrase
stringData:
  passphrase: 026Kwzeu+8OyC6VyfWJM
EOF
Before you push up the changes into git lets configure GitHub to fire a push event at our environment webhook. You can look up the hostname and secret with:
oc get route ocd-environment | awk 'NR>1{print "http://" $2 "/hooks/ocd-environment-webhook"}'
oc describe dc ocd-environment-webhook | grep WEBHOOK_SECRET | awk '{print $2}'
Now in the env-your-eng GitHub settings configure a default GitHub webhook event, of type "application/json", using that secret, points at http://$HOSTNAME/hooks/ocd-environment-webhook:

To see the webhook handler run you can tail its logs:
oc logs $(oc get pods | awk '$1~/ocd-environment-webhook.*/{print $1}') -f
In another terminal if you commit and push your changes to env-your-eng you should see the webhook run:
cd env-your-eng
git add *
git commit -m "initial commit"
git push
It should check out the Hemlfile from the git repo and run it. The checkout might take tens of seconds. At the end you should see cowsay saying its all done:
SECRET_NAME=sa-tag-realworld-token-7mxvw
buildconfig.build.openshift.io/tag-realworld patched
 ___________
< All done! >
 -----------
        \   ^__^
         \  (oo)\_______
            (__)\       )\/\
                ||----w |
                ||     ||
+ popd
/opt/app-root/work
+ read YAML

[webhook] 2019/02/02 10:20:50 [cc99bd] finished handling ocd-environment-webhook
This will install three additional charts:
$ helm list
NAME                         	REVISION	UPDATED                 	STATUS  	CHART                        	APP VERSION	NAMESPACE
your-eng-ocd-webhook         1               Fri Feb  1 21:56:51 2019        DEPLOYED        ocd-environment-webhook-1.0.0                   your-eng
your-eng-realworld           1               Sat Feb  2 10:20:47 2019        DEPLOYED        ocd-builder-1.0.0                               your-eng
your-eng-realworld-webhook   1               Sat Feb  2 10:20:46 2019        DEPLOYED        ocd-builder-webhook-1.0.0                       your-eng
If the two new releases were not installed check for errors on the logs above the cowsay output. We have the env webhook the wizard installed but now also two new releases that were in our helmfile. If we look at the char types one is a builder release and the other is a builder webhook release.
Let's see what deployments and builds are now installed:
$ oc get bc && oc get dc
NAME            TYPE      FROM         LATEST
realworld       Source    Git@master   1
tag-realworld   Source    Git          2
NAME                      REVISION   DESIRED   CURRENT   TRIGGERED BY
ocd-environment-webhook   1          1         1         config,image(ocd-environment-webhook:latest)
webhook-realworld         1          1         1         config,image(webhook-realworld:latest)
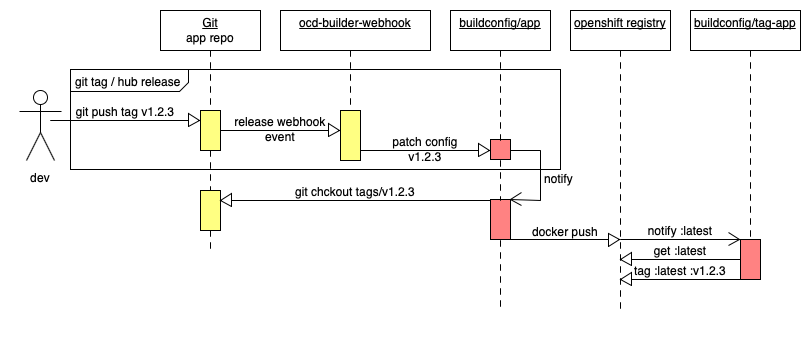
We have two builds. A normal s2i build that will build or realworld app and a tag- build that will apply a container tag to the output of the regular build. We have two deployments. The env webhook that we installed with the wizard but also a webhook that will trigger a build of our realworld app when we apply a git tag or made a github release of our realworld codebase. Note: The builds will run when they are installed but will fail as there are no release tags for them to build. Once you fire a git release of the code at them they should run to completion.
Lets go ahead and configure a GitHub release event webhook. You can look up the hostname with:
$ oc get route/webhook-realworld | awk 'NR>1{print "http://" $2 "/hooks/ocd-builder"}'
webhook-realworld-your-eng.exxf.pro-eu-west-1.openshiftapps.com
You also need the generated webhook secret that you can lookup with:
$ oc get dc/webhook-realworld  -o yaml | grep -A 1 WEBHOOK_SECRET
        - name: WEBHOOK_SECRET
          value: 2lxxxxxx3E
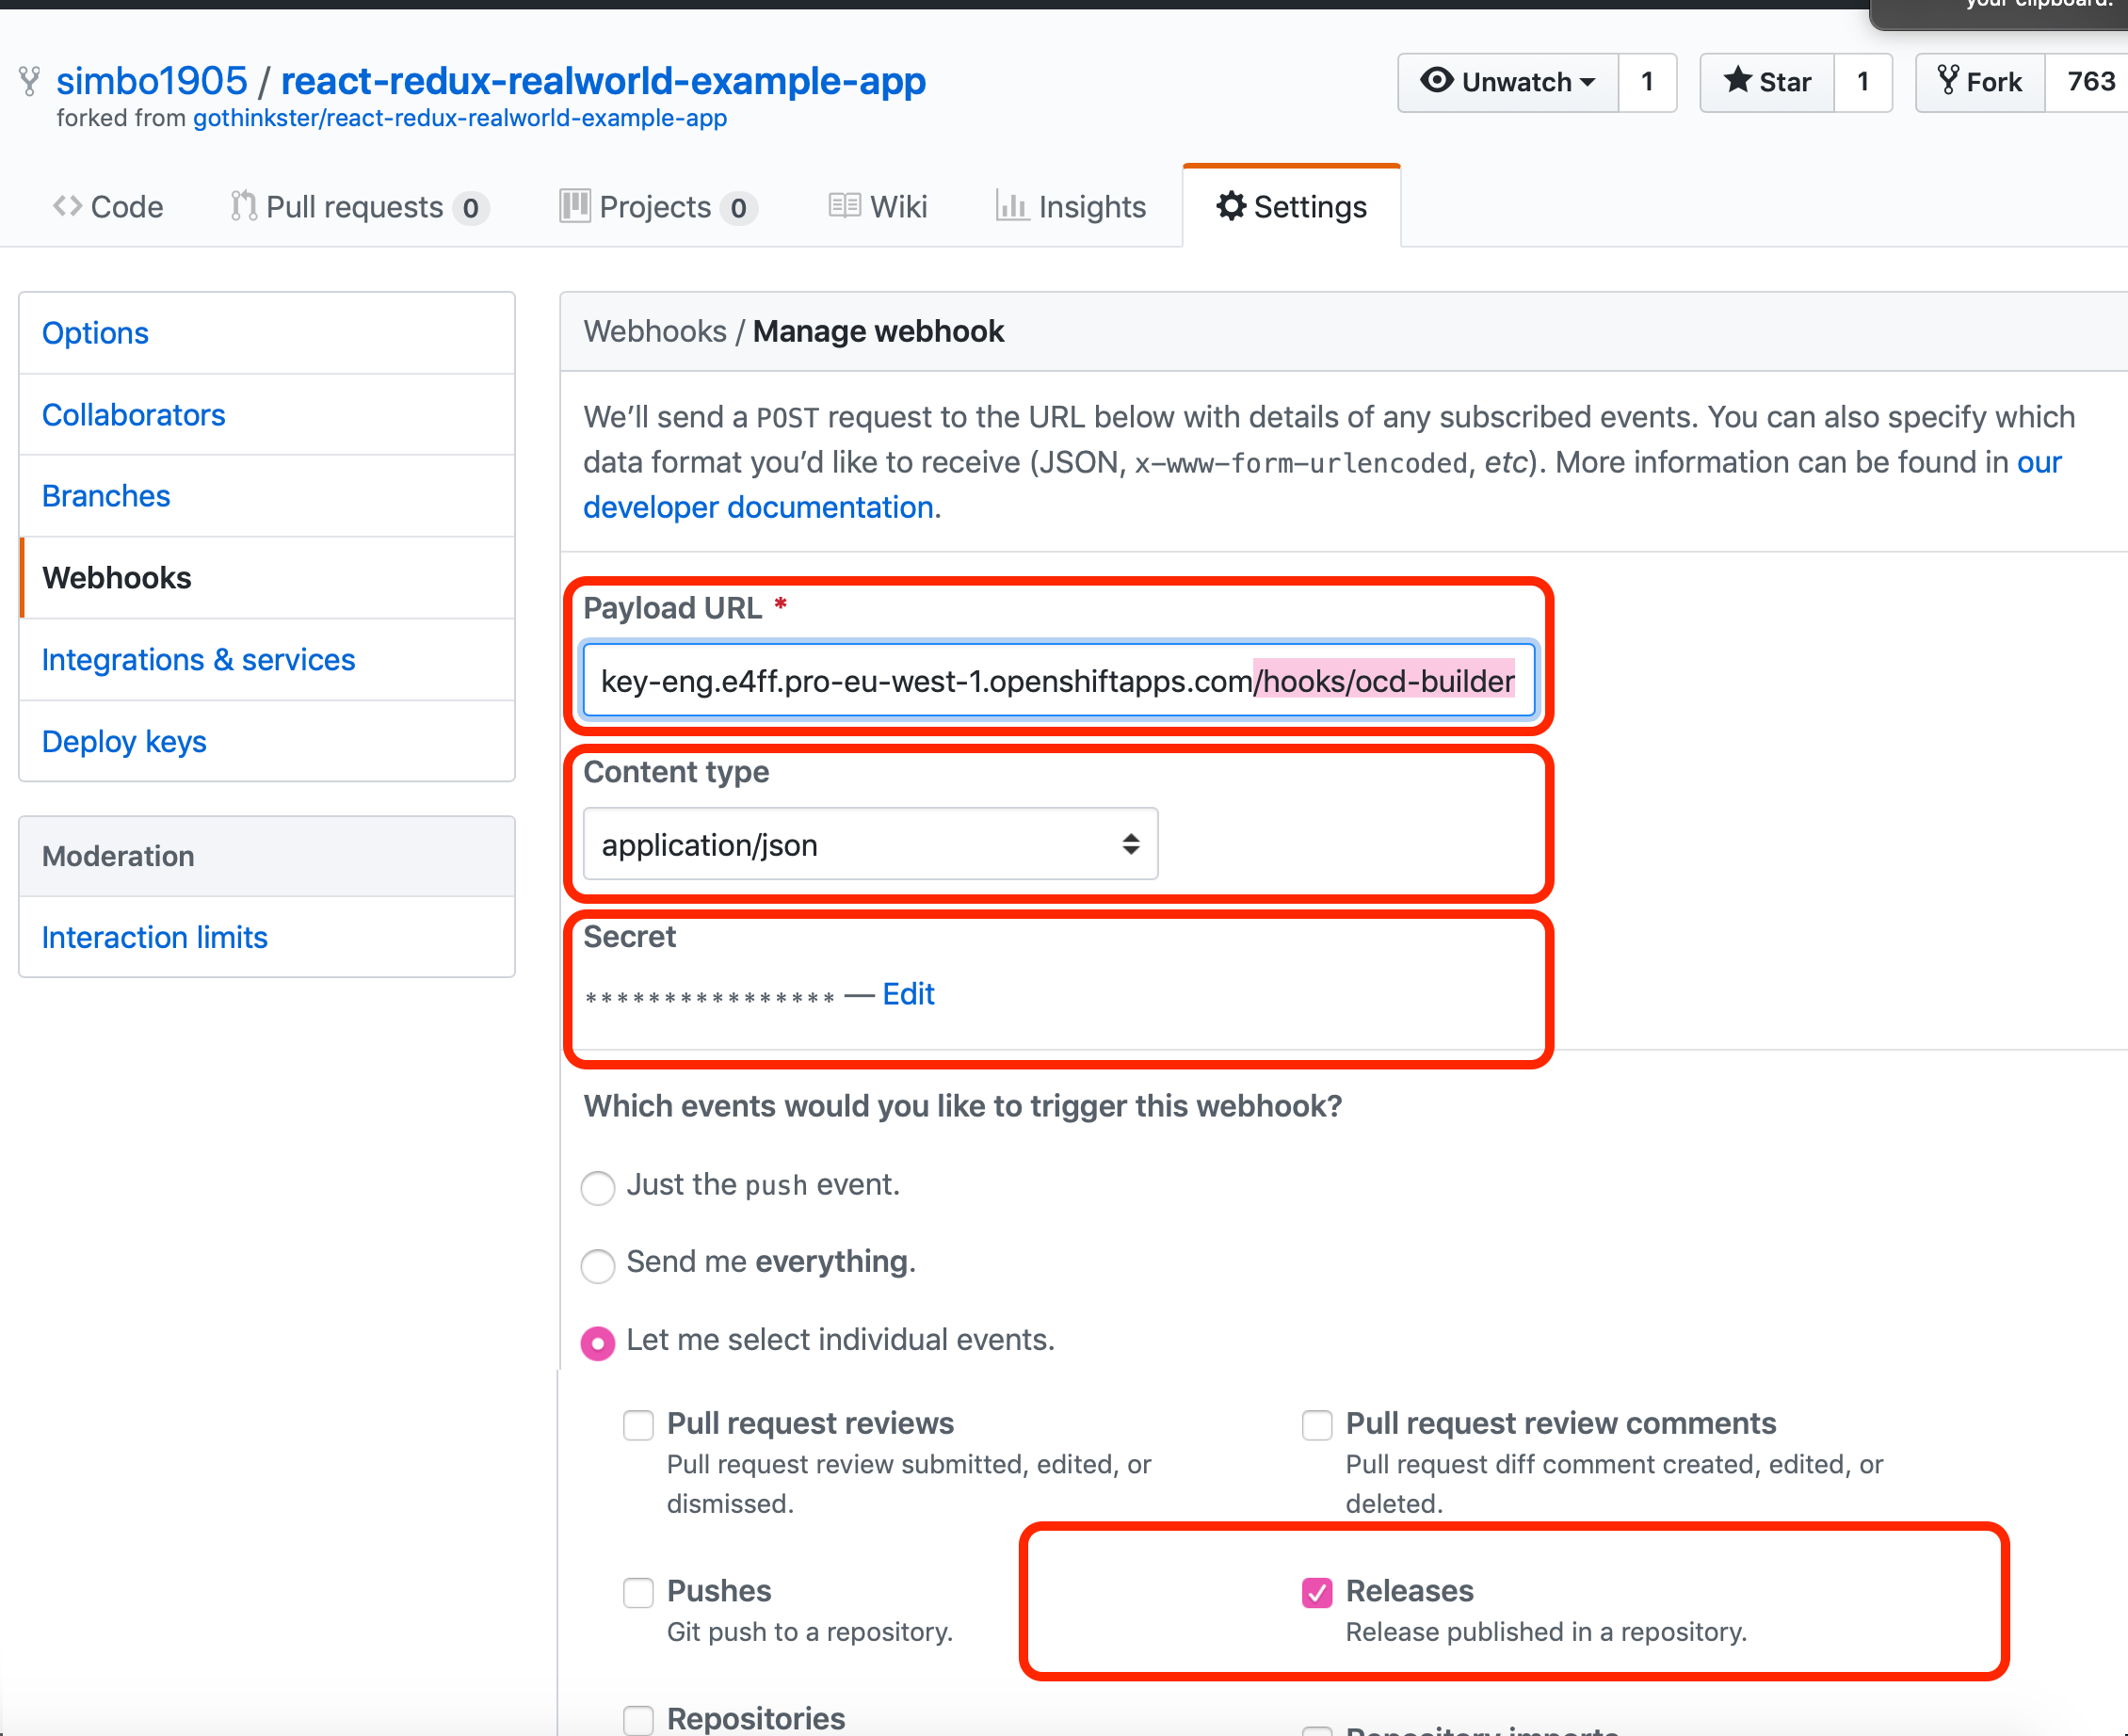
Now in your fork of react-redux-realworld-example-app configure a GitHub webhook release event, of type "application/json", using that secret, points at http://$HOSTNAME/hooks/ocd-builder:
You can now tail the logs of the webhook in one terminal to watch it respond to the GitHub release event:
oc logs $(oc get pods | awk '$1~/webhook-realworld.*/{print $1}') -f
Now we can fire a github release event in any one of three ways:
- Create a tag locally and push it to the server with
git push origin v1.2.3 - We can go into the GitHub "releases" area of repo on GitHub and create a release with tag
v1.2.3. - We can use
hubthe GitHub command line tool that does releases from the commandline or your build pipeline.
Note that the demo matches tags with a regex v.*. You can control this using the the webhookRefRegex value that you can set in the helmfile.yaml to be whatever regex you want.
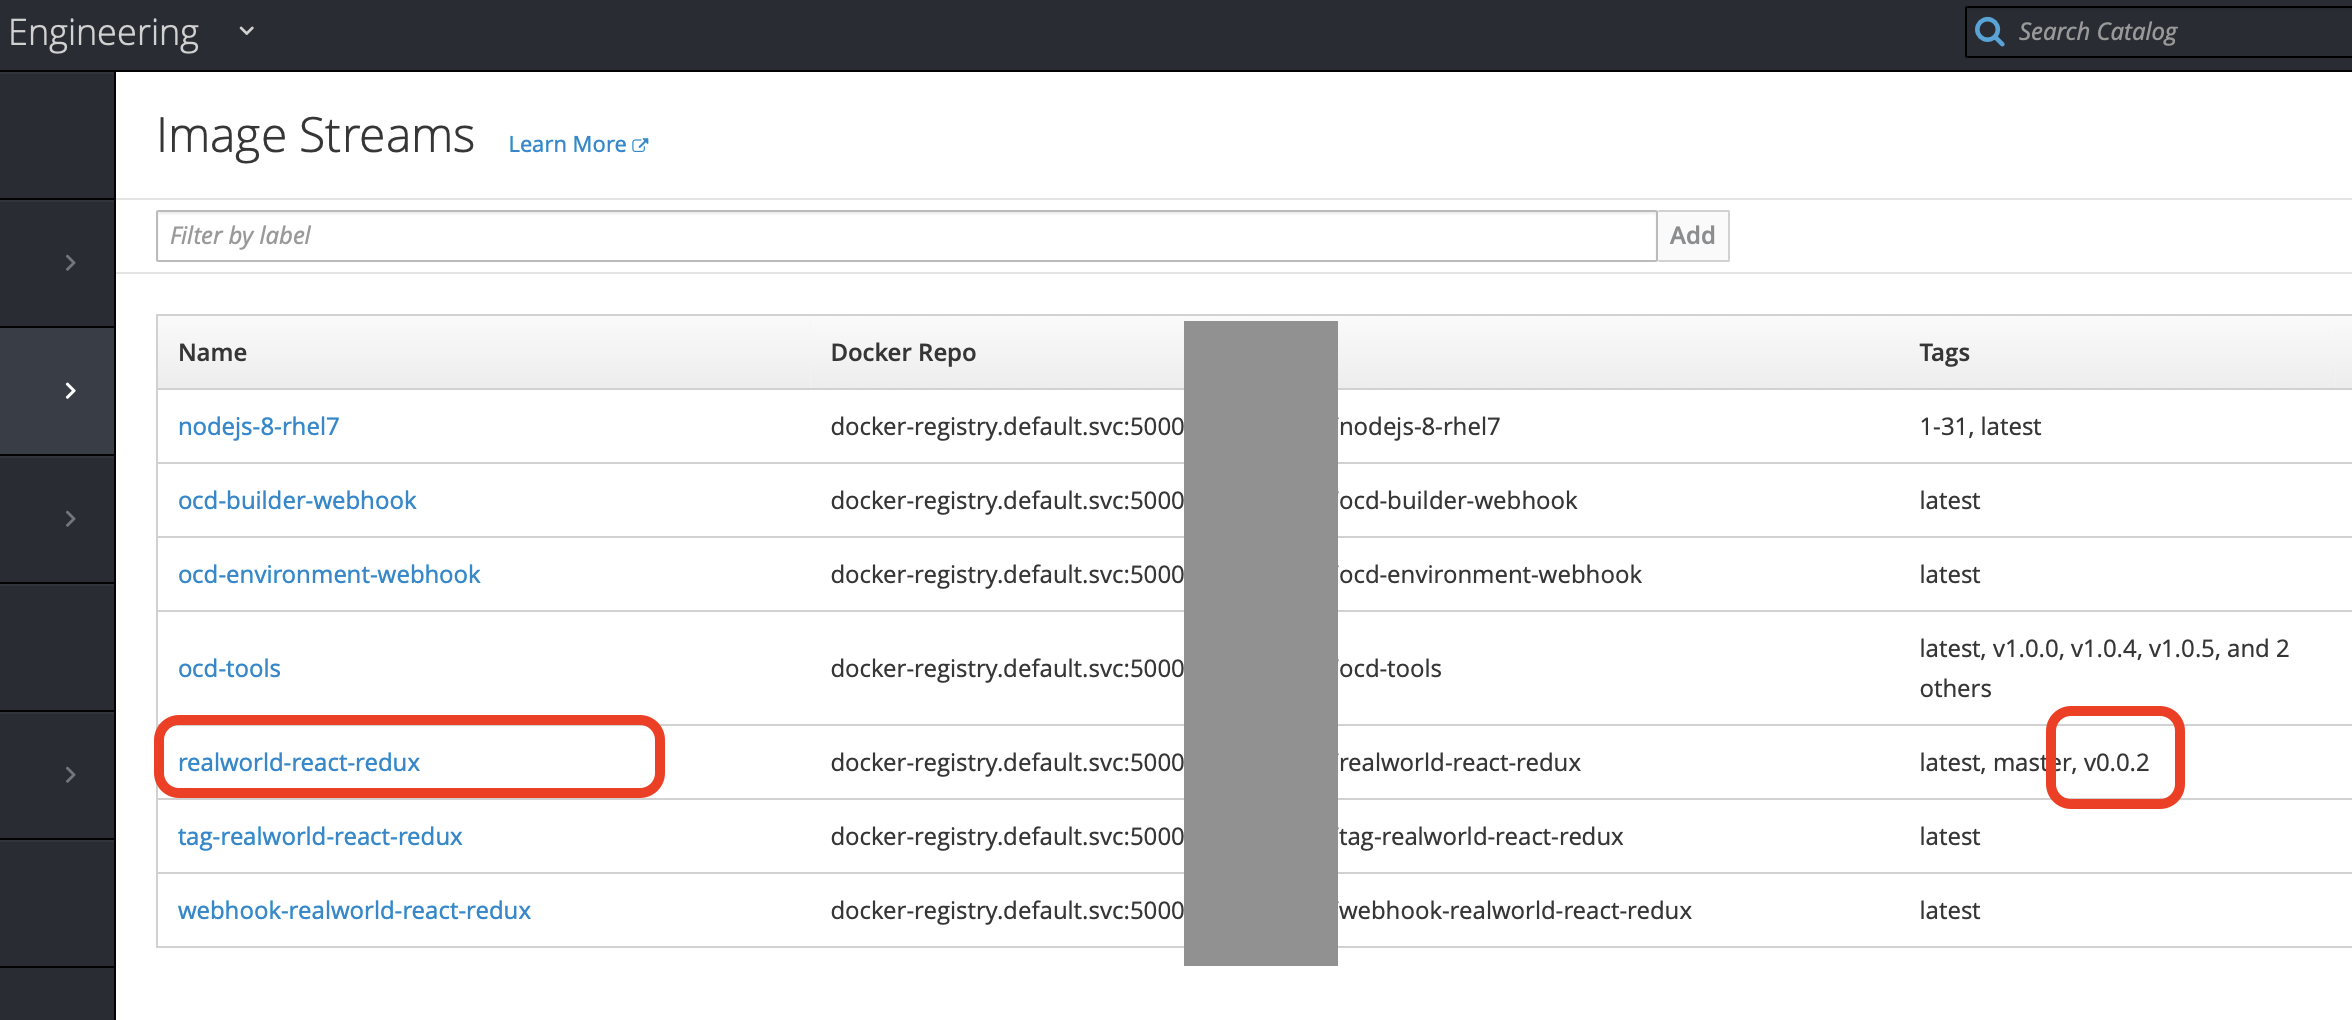
In the demo env the regex is v.* so create a release in your fork of the demo app named v0.0.2 which will create a tag and fire a release events. NOTE: release v0.0.2 is assumed to have been built in the rest of this tutorial so you must see that tag under "Build">"Images" on the openshift web console before going to the next step of this tutorial as shown in this screenshot:
4. Setup Up The Staging Environment
The staging environment will be the your-staging project. First, make tiller an admin so it can both edit config and grant roles to service accounts in the your-staging project:
oc project your-staging
oc adm policy add-role-to-user admin system:serviceaccount:$TILLER_NAMESPACE:tiller -n your-staging
Now run the wizard to have it sync the stating git repo. This is exactly how we initialised the engineering project above but giving it a different git url to sync your-eng:
oc project your-staging
pushd /tmp && curl -L https://github.com/ocd-scm/ocd-environment-webhook/archive/v1.0.0-M1.tar.gz | tar zxf - \
&& cd ocd-environment-webhook-1.0.0-M1 \
&& ./wizard.sh && popd
Here is a sample run:
The git repo url (consider using a person access token)? https://[email protected]/YOUR/your-staging.git
The project wher the images are built and promoted from? your-eng
Repo name? (default: YOUR/your-staging):
Branch ref? (default: refs/heads/master):
Chart instance prefix? (default: your-staging):
Use --insecure-no-tls-verify? (default: false): true
Notice that I had to set a flag to say not to TLS validate.
If you run helm list it should show a new release of ocd-environment-webhook running in the your-staging project namespace with status DEPLOYED.
Next we want to import the staging environment configuration from ocd-scm/ocd-demo-staging-build into you engineering repo env-your-eng. The cleanest way to do that is to extract the latest zip file into your local checkout:
cd your-staging && wget -qO- https://github.com/ocd-scm/ocd-demo-env-staging/archive/v1.0.0-M1.tar.gz | tar zxf - --strip-components=1
We need to make an edit to the line that specifies your project names which is here. In your local copy of realworld-react-redux/helmfile.yaml replace your- with your project prefix.
If you want to use a GPG private key for secrets you should load the passphrase for the GPG private key. As there isn't anything actually secret in the public demo application you can go ahead and load the passphrase for the demo application with:
oc project your-staging && oc create -f - <<EOF
apiVersion: v1
kind: Secret
metadata:
  name: openshift-passphrase
stringData:
  passphrase: 026Kwzeu+8OyC6VyfWJM
EOF
Before we push the new configuration up to GitHub we need to set up a GitHub Webhook to fire a push event to our newly installed release. We can print out the webhook URL and secret with:
# print the URL
oc get route ocd-environment | awk 'NR>1{print "http://" $2 "/hooks/ocd-environment-webhook"}'
# print the webhook secret
oc describe dc ocd-environment-webhook | grep WEBHOOK_SECRET | awk '{print $2}'
Now set up a GitHub webhook (see screenshots above as a guide) of type application\json pointing at something like http://ocd-environment-your-live.exxf.pro-eu-west-1.openshiftapps.com/hooks/ocd-environment-webhook using the secret.
Now when we push to the env-your-staging repo the webhook should fire and deploy the build application. So lets commit and push the code to fire the webhook and deploy the app:
git add * .git* && git commit -m "initial commit" && git push
4. Set Up The Demo Live Environment
We follow an identical process for the your-live live environment. First, make tiller an admin so it can both edit config and grant roles to service accounts in the your-live namespace:
oc project your-live
oc adm policy add-role-to-user admin system:serviceaccount:$TILLER_NAMESPACE:tiller -n your-staging
Now install the ocd-environment-webhook giving it the Git details to deploy from the env-your-live repo:
pushd /tmp && curl -L https://github.com/ocd-scm/ocd-environment-webhook/archive/v1.0.0-M1.tar.gz | tar zxf - \
&& cd ocd-environment-webhook-1.0.0-M1 \
&& ./wizard.sh && popd
Here is what I entered where I use the defaults for half the values:
The git repo url (consider using a person access token)? https://[email protected]/Your/env-your-live.git
The project where the images are built and promoted from? your-eng
Repo name? (default: Your/env-your-live):
Branch ref? (default: refs/heads/master):
Chart instance prefix? (default: your-live):
Use --insecure-no-tls-verify? (default: false): true
Now unzip the demo env project into your local checkout of env-your-live:
cd env-your-live && wget -qO- https://github.com/ocd-scm/ocd-demo-env-live/archive/v1.0.0-M2.tar.gz | tar zxf - --strip-components=1
We need to make an edit to the line that specifies your project names which is here. In your local copy of realworld-react-redux/helmfile.yaml replace your- with your project prefix.
If you want to use a GPG private key for secrets you should load the passphrase for the GPG private key. In a secure system you wouldn't use the same GPG private key nor the same passphrase as staging. Yet in this example as there isn't anything actually secret in the public demo application you can use the same key and passphrase that we load with:
oc project your-live && oc create -f - <<EOF
apiVersion: v1
kind: Secret
metadata:
  name: openshift-passphrase
stringData:
  passphrase: 026Kwzeu+8OyC6VyfWJM
EOF
Print the webhook details with:
# print the URL
oc get route ocd-environment | awk 'NR>1{print "http://" $2 "/hooks/ocd-environment-webhook"}'
# print the webhook secret
oc describe dc ocd-environment-webhook | grep WEBHOOK_SECRET | awk '{print $2}'
Now set up a GitHub webhook (see screenshots above as a guide) of type application\json pointing to that URL and using the secret.
Finally, commit and push the code to fire the webhook and deploy the app:
git add * .git* && git commit -m "initial commit" && git push
5. (Optional) Setup Up The Demo Chatbot
OCD is git driven. So optionally can use a chatbot to create releases or pull requests with git. To release code you tell the chatbot to create an application release with a specific tag in the chat room. To move code into an environment by changing tags tell the chatbot the tag to move into an environment and it creates a PR for this. The idea is that using the chatbot gives better observability to the state of your environment and enhances devops empowerment. How nice would it be if a new develoepr to your team can write their first feature and use the chatbot to push it through test and into live?
We use slack so our demo configures Botkit for slack. Its just running bash scripts and Botkit supports a load of different chat engines so you can send us a PR to extend it to any chat system you use.
To set up a chatbot we recommend another project to host the bot (e.g. your-slackbot) and a git repo (e.g. env-your-slackbot). The demo env with the config to run the slackbot is at https://github.com/ocd-scm/ocd-demo-env-chatbot. As you need real secrets to access the slack api there is no key in the gpg/, no encrypted key passphrase, and no way for you to decrypt ocd-slackbot/secret.yaml.secret. You need to following the instruction on the meta wiki to generate a real GPG key, passphrase, and set it all up. See ocd-slackbot/secret.yaml.example. You will also need to load your new GPG passphrase using a command similar to how you loaded the demo GPG passphrase into the other environments.
oc project your-slackbot
oc adm policy add-role-to-user admin system:serviceaccount:$TILLER_NAMESPACE:tiller -n your-staging
Trouble Shooting
If you don't grant tiller admin rights things get 'stuck' that where helm list shows a failed deployment, so the next deployment cannot helm apply as the diff phase fails as nothing is deployed so nothing happens. The solution is to helm delete --purge the failed deployment once you have granted tiller admin rights.
Production Setup
Helmfile is running with the default log level of info. This will cause helmfile apply to output the diff of any new releases and that might log secrets and passwords. Openshift Online Pro ships your logs to a shared ELK cluster and retains several days of logs. You probably don't want your secrets travelling that far as it presents a low-security risk. It is therefore recommended that you set an environment variable OCD_LOG_LEVEL to be error on all of your ocd-environment-webhook deployments.
What Next?
See the Example Environment Layout for an overview of how to run a more sophisticated set of apps with shared secrets and automate restarts of apps when secrets have been updated.