Installation - ntvmb/debtoo-scripts GitHub Wiki
This is a draft!!
This is a guide for installing Debtoo using the live system booted from an installation medium made from an official installation image.
Any placeholder used to be replaced by the user will be marked in italics
Debtoo should be able to run on any x86_64-compatible machine with a minimum of 512 MiB of RAM, though more memory is needed to boot the live the live system for installation, as well as compiling all needed source packages. A basic installation will use about 7 GiB of disk space. You will also need a working internet connection to install the needed packages retrieved from a remote repository.
For best performance, we recommend you have at least an Intel Core i3-2100 or faster, at least 2 GiB or RAM, and at least 32 GiB of free hard disk space.
Before You Install
Acquire a Debtoo ISO image
Visit the Debtoo Linux download page to acquire an ISO image for installation.
Prepare an installation medium
It is recommended to use a USB flash drive for this process, however, you can burn the ISO image to a DVD if so desired.
USB Flash Drive
Insert the USB flash drive in your computer. From Linux, first identify the disk using lsblk, then write the Debtoo ISO you downloaded to your USB Flash Drive. Warning: Doing so will destroy all data on the drive! As root or via sudo, replacing sdX with the path of your drive, issue the following command:
dd if=path/to/debtoo-version.iso of=/dev/sdX bs=1M status=progress
On macOS, follow the same procedure as above, but use diskutil list to show the devices. Unmount any mounted volumes on the drive, and issue the above dd command via sudo or enter a root shell with sudo -s.
For Windows, we recommend using Rufus to create a bootable medium. Other utilities can also be used, such as balenaEtcher or dd for Windows (provided either through Git or as a separate download).
Boot the live environment
Note: Debtoo installation images do not support Secure Boot. You will need to disable Secure Boot to boot the installation medium.
- Point the current boot device to the one which has the Debtoo installation medium. Typically it is achieved by pressing a key during the POST phase, as indicated on the splash screen. Refer to your motherboard's manual for details.
- When the installation medium's boot loader menu appears, select Debtoo GNU/Linux and press
Enterto enter the installation environment. - If your system supports Wi-Fi, then you will be presented with a prompt asking you to select an interface for wpa_supplicant. Type the name of the interface you want to use shown from a list above.
- Log in to the live environment as root using the password
debtoo.
Verify the boot mode
List the efivars directory:
ls /sys/firmware/efi/efivars
If the directory shows without error, then the system is booted in UEFI mode. Otherwise, the system is booted in Legacy (or CSM) mode. If the system did not boot in the mode you desired, refer to your motherboard's manual.
Connect to the internet
Ensure your network interface is listed and enabled, for example with ls /sys/class/net, then connect to the network:
- Ethernet: plug in the cable
- Wi-Fi: authenticate to the wireless network using wpa_cli. (assuming wpa_supplicant has already been set up)
If your system supports Wi-Fi and you did not select an interface for wpa_supplicant during startup, issue this command to start wpa_supplicant:
wpa_supplicant -B -i INTERFACE -c /etc/wpa_supplicant/wpa_supplicant.conf
Install
From here, you will decide on which method you will use to install Debtoo. debtoo-install is much more straightforward. This guide will cover a manual installation.
Partition the disks
When recognized by the live system, disks are assigned to a block device such as /dev/sda, /dev/nvme0n1, or /dev/mmcblk0. To identify these devices, use lsblk. Results ending in rom, loop, airoot, or nullb/nbd may be ignored.
The following partitions are required for a chosen device:
- One partition for the root directory /.
- For booting in UEFI mode: an EFI system partition. Use parted to modify the partition tables. For example:
parted /dev/the_disk_to_be_partitioned
For reference, here's some example partition tables:
UEFI with GPT:

Recommended partition sizes:
- ESP: At least 300 MiB, no more than 1 GiB
- Swap: At least 512 MiB
- Root partition: Remainder of the device
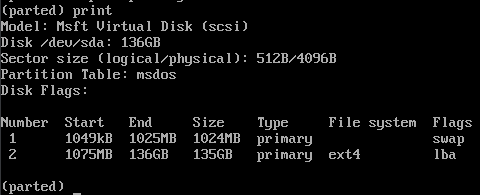
BIOS with MBR:
Format the partitions
Once the partitions have been created, each newly created partition must be formatted with an appropriate file system.
To create an ext4 file system on the root partition, issue this command while replacing root_partition with the root partition you created (for example, /dev/sda1, /dev/mmcblk0p1, or /dev/nvme0n1p1):
mkfs.ext4 /dev/root_partition
If you created a swap partition, run this command, where swap_partition is to be replaced with the swap partition you created.:
mkswap /dev/swap_partition
If you created an EFI system partition, format it to FAT32 with the following command:
Warning: Only format the EFI system partition if you created it during the partitioning step. If there was already an EFI system partition on the disk beforehand, reformatting it can destroy the bootloaders of other installed operating systems.
mkfs.fat -F 32 /dev/efi_system_partition
Mount the file systems
Mount the root partition to /mnt with the following command:
mount /dev/root_partition /mnt
If you created a swap partition, activate it with swapon:
swapon /dev/swap_partition
If you have an EFI system partition, create the mount point and mount it to /mnt/boot:
mkdir /mnt/boot
mount /dev/efi_system_partition /mnt/boot
OR:
mount --mkdir /dev/efi_system_partition /mnt/boot
genfstab will later detect the mounted file systems and swap space.
Install essential packages
Use debootstrap to install the base packages:
debootstrap --variant=minbase CODENAME /mnt
Replace CODENAME with one of these distros from the list below:
- If you're installing Debtoo 1.0 (reimu), replace it with
chimaera. - If you're installing the current testing distro (cirno), replace it with
daedalus. - If you're installing the unstable distro (flandre), replace it with
ceres.
The debootstrap command will not install all tools from the live installation, so installing other packages may be necessary for a fully functional base system. In particular, consider installing:
- userspace utilities for the management of file systems that will be used on the system,
- utilities for accessing RAID or LVM partitions,
- specific firmware for other devices not included in the kernel firmware (which will be installed later),
- software necessary for networking (e.g. dhcpcd5),
- a text editor (e.g. nano),
- packages for accessing documentation in man and info pages:
man-db.
To install other packages, include them in the debootstrap command in a comma-separated list by appending --include=PACKAGES, where PACKAGES is the list of packages to be installed, or use apt while chrooted into the new system. For comparison, you can get a list of packages installed in the live system by issuing these commands:
apt list | grep "installed" > /tmp/pkglist.txt
nano /tmp/pkglist.txt
Build source-based packages
Before chrooting, generate the fstab file:
genfstab -U /mnt >> /mnt/etc/fstab
Check the resulting /mnt/etc/fstab file, and edit it in case of errors.
Copy source-based packages
Copy the Debtoo scripts to the new system:
cp -t /mnt/bin /bin/apt-source-install /bin/update-debtoo /bin/debtoo-dist-upgrade
Copy the source packages located in /usr/src to the new system:
cp -r /usr/src/* /mnt/usr/src
Copy several configuration files from the ISO to the new system:
cp /etc/apt/sources.list /mnt/etc/apt/sources.list
cp /etc/sudoers /mnt/etc/sudoers
cp /etc/default/grub /mnt/etc/default/grub
cp /usr/lib/os-release /mnt/usr/lib/os-release
cp /etc/motd /mnt/etc/motd
cp /etc/issue /mnt/etc/issue
Chroot
Change root into the new system:
arch-chroot /mnt
Dependencies
Update the repositories:
apt update
Get all necessary build dependencies:
apt build-dep linux-signed-amd64
apt install build-essential git fakeroot ncurses-dev xz-utils libssl-dev bc flex libelf-dev bison binutils dwarves jfsutils reiserfsprogs xfsprogs squashfs-tools btrfs-progs dosfstools quota ppp nfs-common procps udev rasdaemon iptables openssl apt-utils kmod zstd
Building
Build and install sysvinit:
cd /usr/src/sysvinit-*
make
make install
Build and install sudo:
cd /usr/src/sudo-*
./configure
make
make install
Install linux-firmware:
cd /usr/src/linux-firmware-*
make install
Building the kernel
Change the working directory to the location of the kernel source code:
cd /usr/src/linux-?.*
Make sure the config is up to date:
make oldconfig
To customize the kernel configuration, run make config. For more information on how to configure the kernel, click here.
Build the kernel:
make
Install kernel modules:
make modules_install
Install the kernel:
make install
Configuration
Make sure you are already chrooted. If not, go back to Chroot.
Time zone
Install tzdata if it is not already installed:
apt install tzdata
To configure the time zone, run dpkg-reconfigure tzdata.
Localization
Install locales if it is not already installed:
apt install locales
Configure locales by running dpkg-reconfigure locales.
Network configuration
Create the /etc/hostname file. The contents of this file will be used to set the system's hostname.
Example:
debtoo
Initramfs
Creating a new initramfs is usually not required, because update-initramfs was run on installation of the kernel. If you absolutely need to regenerate the initramfs, issue this command:
update-initramfs -c -k all
Root password
Set the root password:
passwd
Installing GRUB
For Legacy systems
Install the grub2 package:
apt install grub2
Then run:
grub-install /dev/sdX
For UEFI systems
Install the grub-efi package:
apt install grub-efi
Then run:
grub-install --target=x86_64-efi --efi-directory=/boot --bootloader-id=debtoo
Configuration
Execute the update-grub command:
update-grub
Reboot
Exit the chroot environment by typing exit or pressing Ctrl+d.
Optionally manually unmount all the partitions with umount -R /mnt: this allows noticing any "busy" partitions, and finding the cause with fuser(1).
Finally, restart the machine by typing reboot: any partitions still mounted will be automatically unmounted by sysvinit. Remember to remove the installation medium and then login into the new system with the root account.
Post-installation
See [page not available yet] for system management directions and post-installation tutorials (like creating unprivileged user accounts, setting up a graphical user interface, sound or a touchpad).