PROJECT_FINAL_REPORT - ntihindukkipati/CS5590_Python_DL GitHub Wiki
B2N
MEMBERS:
KOLLURI, NIKHITHA(12)
INAKOLLU, SRI NAGA BHUVANESHWARI(9)
DUKKIPATI, SRI SAI NITHIN CHOWDARY(4)
INTRODUCTION
It is very important for all the countries to perform some tests to know whether their people are suffering from any pandemics. Nowadays the pandemic crisis is progressing rapidly. Unfortunately, the capacity of the testing centers is very low in most of the countries. Usually, pneumonia is caused by viruses, bacteria, and sometimes by microorganisms. We can confirm the diagnosis by taking the chest x-ray or blood cells, so here we are using chest x-rays. It is hard for every person to get the appointment of the doctor due to the evolution of the new virus Covid-19. Through this application, we want to give some mental peace for those who are suspecting whether they suffer from pneumonia or not, and through this, we can also have a chance to predict whether a person is affected by corona or not (as corona mainly affects respiratory system). All this provides us a motivation to choose this dataset and build an application that detects whether a person is suffering from pneumonia or not, as early diagnosis would be an important factor to be treated successfully.
In this project, we will be predicting whether there exists pneumonia in the given image. We do this by taking the x-rays of some healthy persons and compare them with the x-rays of the people who are suffering from pneumonia. Then we train the model and will predict whether the person is suffering from pneumonia or not. In the present world, the doctors are very busy treating people with COVID-19, through this application we provide a computer-aided diagnosis system that would reduce the burden of clinicians. We can also have a chance to say whether a person is suffering from COVID or not because the COVID virus mainly affects the respiratory system. We have opted for CNN motivated deep learning algorithms, since they have been used as the standard and best choice to classify the medical images.
Objectives:
• To train a model in a way, such that it predicts whether the X-ray uploaded has Pneumonia or not.
• To build an angular website that takes in the image as input and communicates with the model which is already built and displays the prediction.
• To deploy the model on some cloud platform so that the website can call the model API.
Features:
• A model that is trained to predict the detection of Pneumonia from the given Chest X-ray.
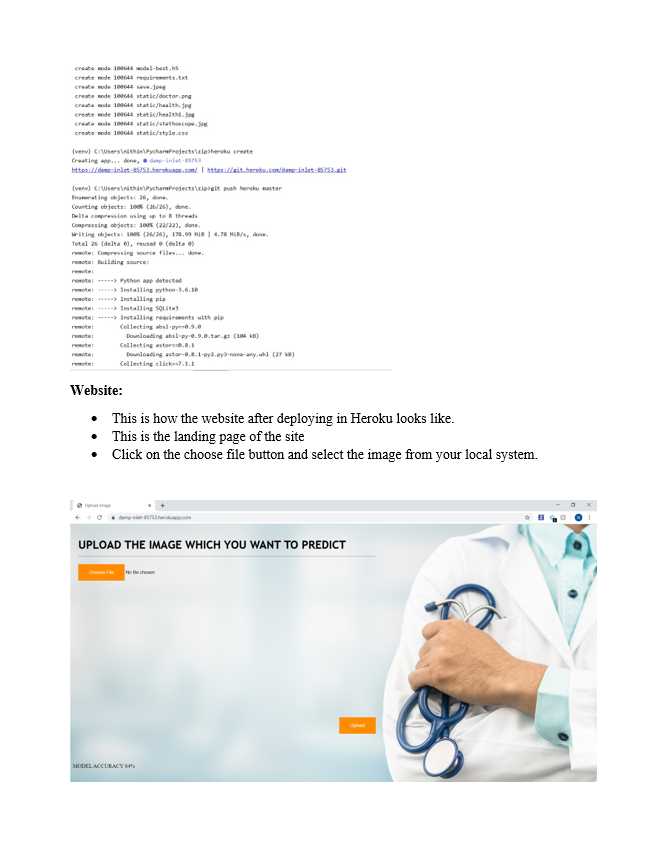
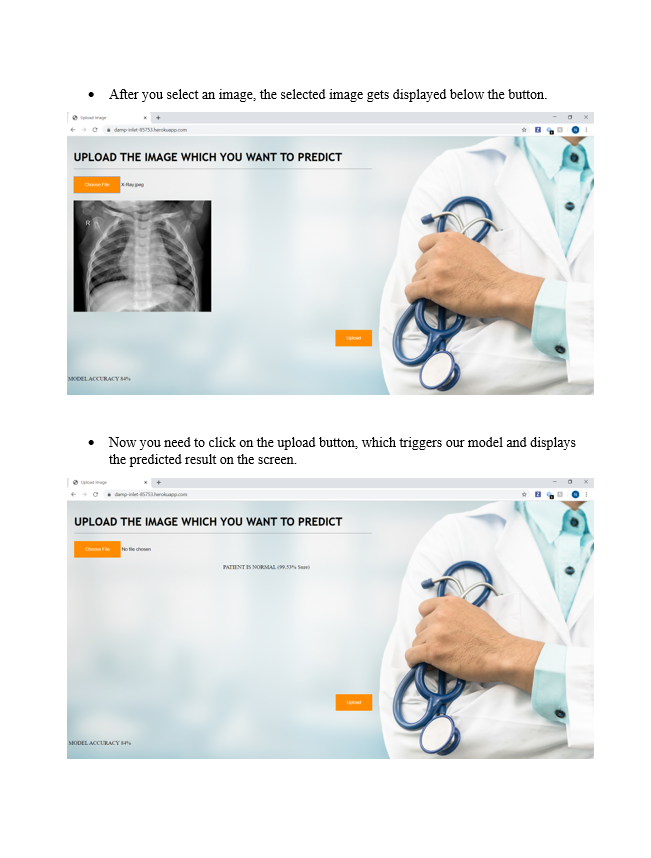
• A website that takes X-rays and displays the predicted results.
GIT Links:
• Model: https://github.com/ntihindukkipati/CS5590_Python_DL.git
• Angular Site: https://github.com/Nikhitha8563/Python_Pro_UI
• Heroku: https://calm-peak-20297.herokuapp.com/handle_form
• Model_v3_final : https://github.com/ntihindukkipati/CS5590_Python_DL.git
• Heroku: final project https://damp-inlet-85753.herokuapp.com/
Technologies Used:
• Python
• Angular
• Node
• Express
Python Concepts Used:
• From Keras
o Convolutional Neural Networks
o Dense
o MaxPooling
o Early Stopping
o Image Generator
• Flask
o Requests
o RenderTemplates
o Request
• OpenCV2
o ImRead
o ImShow
o ImResize
Remaining parts of the projects:
• Establishing a connection between web application and API.
• Decreasing the slug size for deployment in Heroku.
Here we are showing the previous version(Version 1), the mistakes we have done, and the present version(Version 2) where we have corrected the mistakes and compiled a new model.
DATASET:
We have used Kaggle’s data set for Image classification using chest x-ray
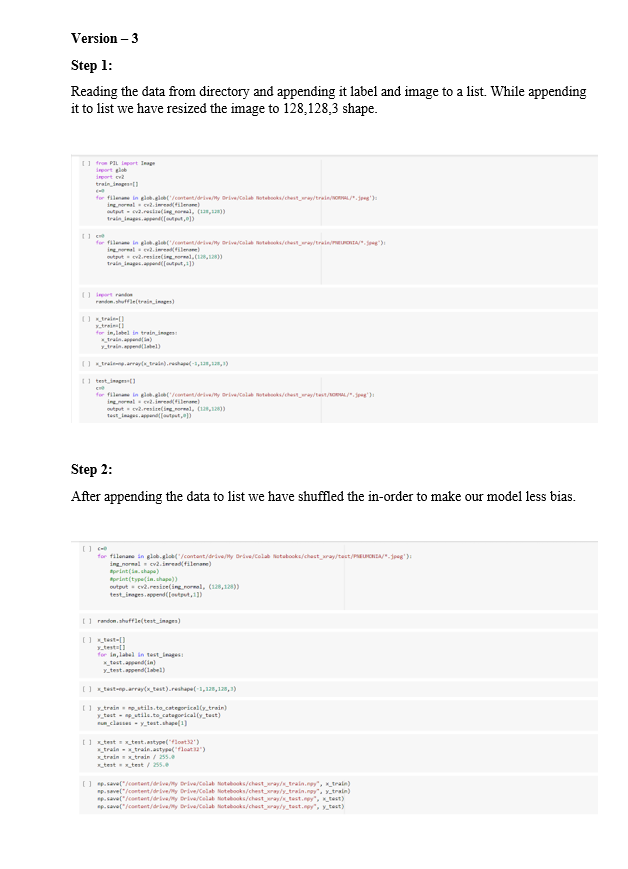
STEP 1: (Reading the data set and pushing into List)
We are building our model in google COLAB so for this we have uploaded the image data set in to google COLAB.
- we have used glob in-order to retrieve the image data from google drive. (in order to get all images of the same pattern)
TRAINING DATA

TEST DATA

NOTE
We have used cv2.imread to read the image data and we have also converted into 1 channel in-order to reduce complexity. We have resized the image to 150,150,1 shape.
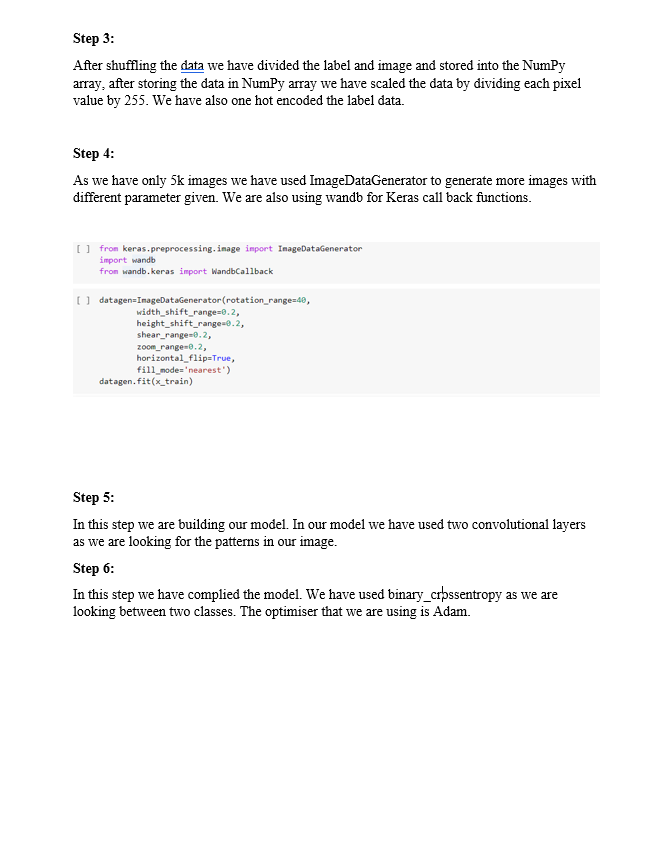
STEP 2:
Converted the list into NumPy to convert the matrix form of 1 image to 1 dimension array.

STEP 3:
Scaled the training data and test data by dividing each pixel value by 255.0 in order to reduce the complexity and to get better accuracy.

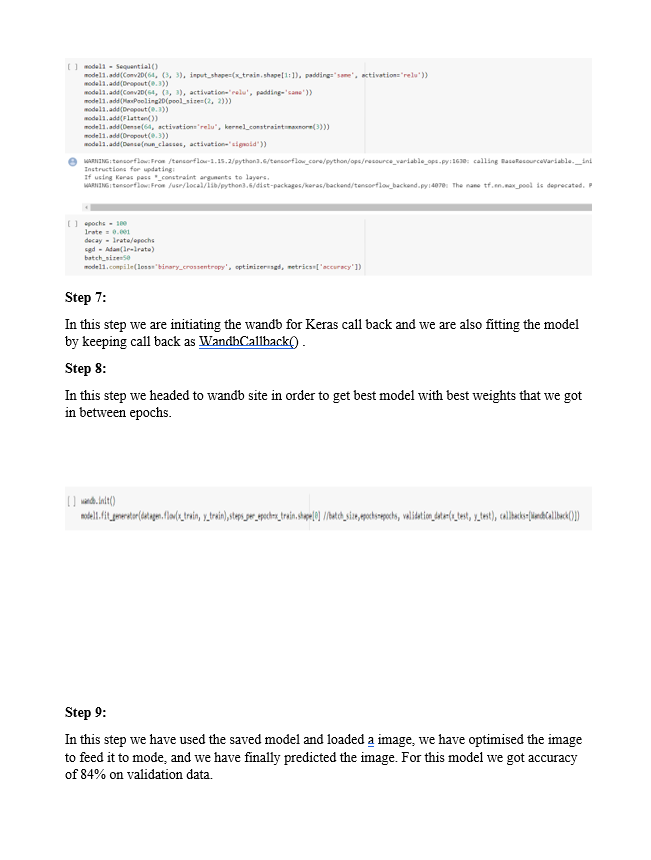
STEP 5:
Built the model

NOTE:
We have got an accuracy of 94% and a validation of 69%. The loss is too high on both ends.
STEP 6:
We have saved the model using pickle library.

STEP 7:
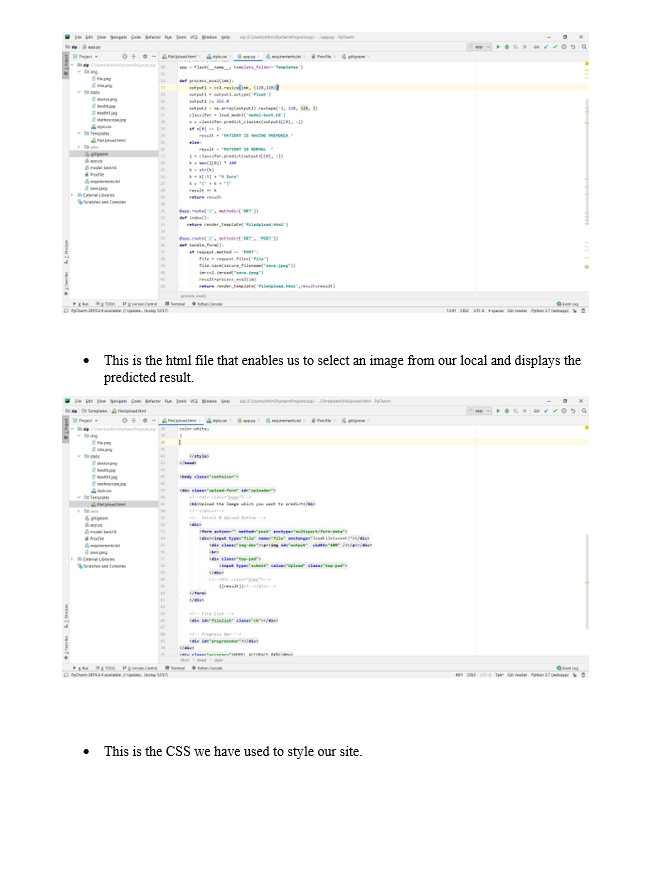
We have used flask framework in-order to create an API.

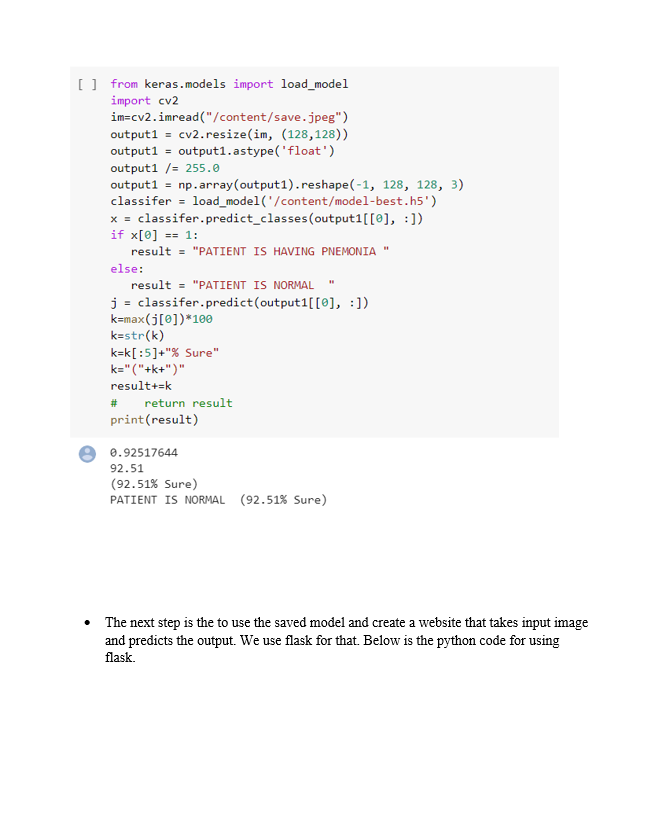
In-order to predict we need to convert the image format to feed into our model. So, for that, we have used the same pre-processing technique in-order to convert the received images.

STEP 8:
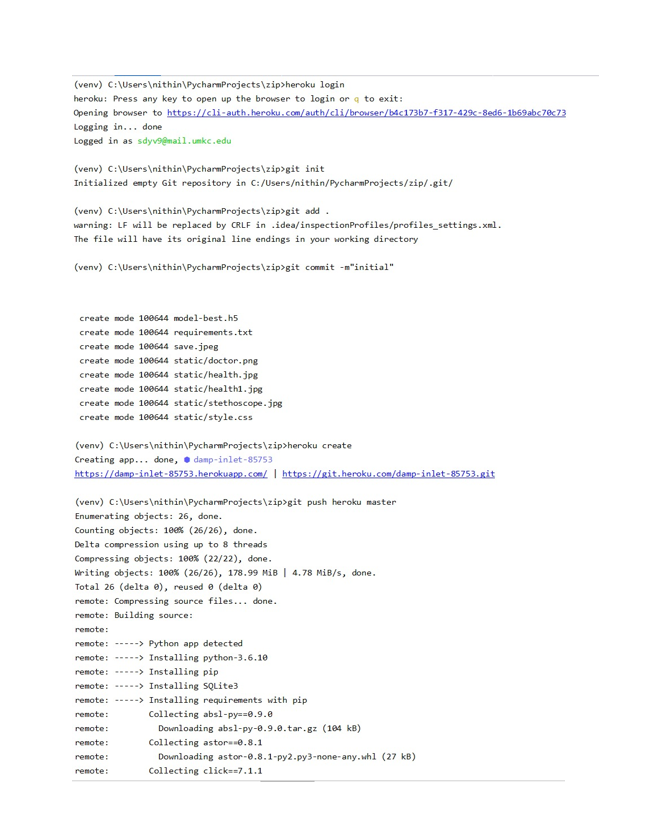
We have deployed this into HEROKU CLOUD in-order to make it a rest service so that it can be useful for us to use in our angular application.
LINK:
GET REQUEST:
https://calm-peak-20297.herokuapp.com/
POST REQUEST:
https://calm-peak-20297.herokuapp.com/handle_form

CHALLENGES FACED:
- While deploying into Heroku we have a slug size issue because of the TensorFlow library. We have only free space of 500MB and only TensorFlow was taking 540MB and my model size was around 90MB. In order to solve this, we have used .slugignore file which will ignore the unwanted libraries and stop installing them but in our case, it didn’t work because the TensorFlow Complier size was itself 540MB. Finally, we have tried with the TensorFlow version 1.13 version which has less compiler size and it did solve our problem.
MISTAKES THAT WE HAVE LEARNED:
- Shuffle the data before feeding into the model. In the first version, we haven’t shuffle the data which has made our model biased.
- We were not fully aware of the convolutional neural network.
STEP 1:
Importing the libraries and importing the images from the google drive


STEP 2:
Shuffling the data in order to conflict bias in our model. And we have pushed the list data into nd.array to feed into our model

We have reshaped the image size to 50,50,3. We reduced the size in order to avoid a crash while running epochs.
STEP 3:
Covert the labels to categorical values and scale the images by dividing each pixel by 255.

STEP 4:
BUILD THE MODEL

STEP 5:
Used the call back function to reduce overfitting in the model. Here we are observing the for 5 epochs whether my validation loss in decreasing (1e-1=0.001).

STEP 6:
We have got an accuracy of 74% and val_acc of 62% and loss is too high which is leading in the wrong prediction.

We have saved our model using pickle library.
STEP 7:
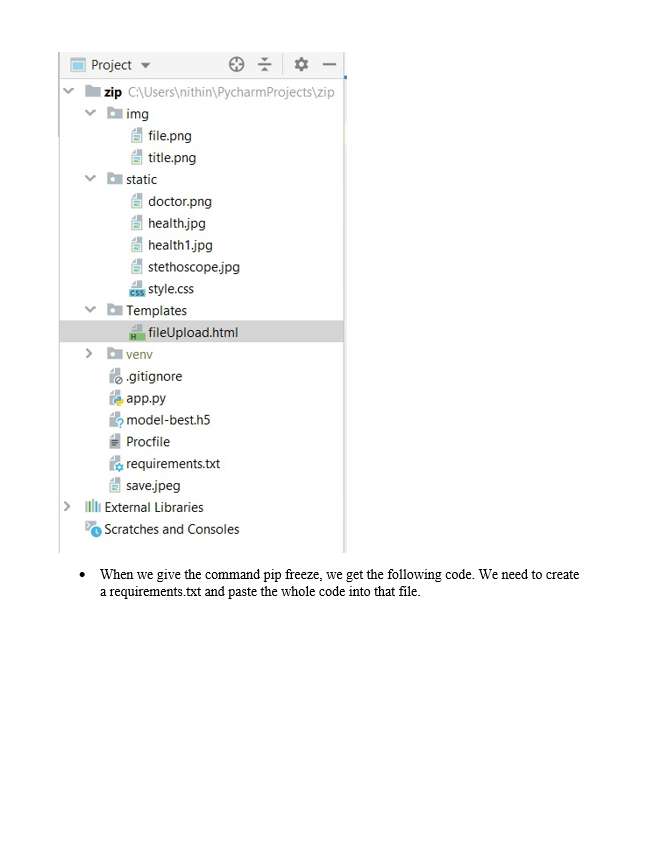
We have used flask frame in order to create web UI

For feeding received image we need to convert that image into feedable format.