Upgrading EGSnrc - nrc-cnrc/EGSnrc GitHub Wiki
Strictly speaking, EGSnrc is not a software, but a software toolkit: a collection of source code files that must be compiled in order to create a working software that models the passage of ionizing radiation in materials. EGSnrc is free software, the whole point of which is to provide users with the freedom to inspect the code and, perhaps more importantly, modify it to suit their specific needs. Distributing the software as source code meets these free software objectives, but it makes upgrading a little more complicated, because the newer files must in turn be compiled to build the upgraded software.
It is useful to know a little bit about the EGSnrc file structure in order to
better understand the upgrade process. When you
clone EGSnrc
with git or
download it
(and uncompress the .zip or .tar archive), you obtain the following
top-level directory:
EGSnrc/
    HEN_HOUSE/
    LICENCE
    LICENCE.md
    README.md
Once the EGSnrc configuration is complete, a personal
user area egs_home is added:
EGSnrc/
    HEN_HOUSE/
    LICENCE
    LICENCE.md
    README.md
    egs_home/
Note that you can rename the EGSnrc directory as you please, and pick another
name for egs_home during the configuration step. However, in this document,
we use these default names.
The HEN_HOUSE/ directory contains all the EGSnrc files required to build the
software, whereas the egs_home area is your own work area, where you can
modify applications or create new ones. EGSnrc comes with a few ready-made
applications (for example DOSXYZnrc, egs_chamber, etc.) which are initially
copied from HEN_HOUSE/user_codes/ to egs_home during the configuration step
(hence after configuration, changes underHEN_HOUSE/user_codes have no effect
unless the configuration is run again). Under normal circumstances, an EGSnrc
application reads inputs and writes simulation outputs under its own directory
under egs_home/. For example, the input and output files for the
egs_chamber application would be located in the egs_home/egs_chamber/
directory. , since these applications are compiled and run from egs_home.
If EGSnrc was installed from a standalone archive (downloaded .zip or .tar
file), then the only general recommendation we can provide to upgrade the
software reliably is to:
- Move your existing
EGSnrcdirectory to a backup location (or simply rename it); - Download and configure the new version as per the installation instructions;
- Carefully migrate your
egs_home/user files (for example simulation inputs) from the backup location.
The command diff -r might prove useful to list all changes between your old
and new directories, to ensure you migrate all local modifications
to your upgraded installation.
If EGSnrc is installed via the git clone command (recommended), it is also
possible to upgrade by moving the existing EGSnrc directory, etc., as
mentioned above. However, it is much more convenient to leverage the git
version control software to manage this process: that's what it's
for!
These instructions are geared towards a
linux installation of EGSnrc,
configured via the
shell script method.
If you are very familiar with EGSnrc and git, the procedure can be
summarized as follows:
- Clone the repository
- Checkout a new branch (e.g.,
myegsnrc) to record the local configuration - Configure EGSnrc as usual, but do not compile any user application
- Commit the configuration on the
myegsnrcbranch - Compile the user applications in
egs_home/ - Checkout a new branch (e.g.,
mychanges) to record your local modifications - Modify the code to suit your purposes
- Commit changes on the
mychangesbranch - Recompile modified applications (and reconfigure EGSnrc if needed)
- Repeat steps 7 to 9 as needed for additional code modifications
Otherwise, below we provide detailed instructions on how to install EGSnrc and
record local code modifications with git, to make it easier to upgrade to a
new release. It is a bit more work up front, but it pays off with a smooth
upgrade path later on!
First, clone the EGSnrc repository and go inside the newly created directory
(don't type the > symbol, it is only meant to indicate commands that should
be entered in the terminal):
> git clone [email protected]:nrc-cnrc/EGSnrc.git
> cd EGSnrc/
By default, you are on the master branch of the repository, which is the
stable version of the software, updated for every new official release.
> git branch
* master
Visually, a git branch is often represented as the label of a node in a
tree of commits, where a commit corresponds to a change in the software
repository. For example, let's visualize the master branch tip as a node (the
git log --graph command shows the node graph in text format in the terminal):

Now create a new branch, let's call it myegsnrc, to preserve your local
configuration, and move to that branch:
> git branch myegsnrc           # create new branch (pick any name)
> git checkout myegsnrc         # move to the newly created branch
Switched to branch 'myegsnrc'
At this point, the two branches master and myegsnrc point to the exact same
commit (the same node in the graph). Branches are simply labels: effectively
you just added the label myegsnrc to the current commit, as shown in the
output of the git log command:
> git log -1
commit a6fc389c6465c949645380976f38a013a639759c (HEAD -> myegsnrc, master)
Merge: b735e20 7b7b9a5
Author: Frederic Tessier <[email protected]>
Date:   Sat Apr 17 14:52:26 2021 -0400

    Merge #685: develop into master for 2021 release
Here the commit hash a6fc389c6465c949645380976f38a013a639759c (commonly
abbreviated to its first 7 characters) is the unique signature of this node in
the evolution of the software.
Configure the software as usual, except:
- As the configuration name, pick the first 7 characters of the current
commit (here
a6fc389); -
Do not compile any user application at this time: when asked
You may now compile user codes. Please select:, choose the option3 none (default)to avoid the source code copied intoegs_home.
Do update your .bashrc shell resource file as prescribed at the end of the
configuration, however, and start a new shell to ensure the environment
variables are updated. Once the configuration is completed, git status shows
what files have been added in the top-level EGSnrc directory during this
configuration step:
> git status --ignored
On branch myegsnrc
Untracked files:
  (use "git add <file>..." to include in what will be committed)
	HEN_HOUSE/specs/a6fc389.conf
	HEN_HOUSE/specs/dosxyznrc_a6fc389.spec
	HEN_HOUSE/specs/egspp_a6fc389.conf

Ignored files:
  (use "git add -f <file>..." to include in what will be committed)
	HEN_HOUSE/bin/
	HEN_HOUSE/egs++/dso/
	HEN_HOUSE/lib/
	HEN_HOUSE/log/
	HEN_HOUSE/mortran3/mornew77.lst
	HEN_HOUSE/omega/beamnrc/tools/beam_build.lst
	HEN_HOUSE/omega/beamnrc/tools/beam_build_a6fc389.f
	HEN_HOUSE/omega/beamnrc/tools/mortjob.mortran
	HEN_HOUSE/omega/progs/addphsp/addphsp_a6fc389.f
	HEN_HOUSE/omega/progs/addphsp/addphsp_a6fc389.mortlst
	HEN_HOUSE/omega/progs/addphsp/mortjob.mortran
	HEN_HOUSE/omega/progs/beamdp/beamdp_a6fc389.f
	HEN_HOUSE/omega/progs/beamdp/beamdp_a6fc389.mortlst
	HEN_HOUSE/omega/progs/beamdp/mortjob.mortran
	HEN_HOUSE/omega/progs/ctcreate/ReadCT_DICOM.o
	HEN_HOUSE/omega/progs/ctcreate/ctcreate_a6fc389.F
	HEN_HOUSE/omega/progs/ctcreate/ctcreate_a6fc389.mortlst
	HEN_HOUSE/omega/progs/ctcreate/mortjob.mortran
	HEN_HOUSE/omega/progs/readphsp/mortjob.mortran
	HEN_HOUSE/omega/progs/readphsp/readphsp_a6fc389.f
	HEN_HOUSE/omega/progs/readphsp/readphsp_a6fc389.mortlst
	HEN_HOUSE/omega/progs/statdose/mortjob.mortran
	HEN_HOUSE/omega/progs/statdose/statdose_a6fc389.f
	HEN_HOUSE/omega/progs/statdose/statdose_a6fc389.mortlst
	HEN_HOUSE/pegs4/mortjob.mortran
	HEN_HOUSE/pegs4/pegs4_a6fc389.f
	HEN_HOUSE/pegs4/pegs4_a6fc389.mortlst
	egs_home/

nothing added to commit but untracked files present (use "git add" to track)
The --ignored option lists even the files it has been told to ignore in terms
of version control (in the EGSnrc/.gitignore file). As you can see, there are
3 untracked files (configuration settings) and, beyond a bunch of intermediate
compilation file, the entire egs_home directory is also ignored by git.
Your goal here is to keep track of these newly created configuration files and
source code files under egs_home/. So you ask git to add those to the
repository (on the myegsnrc branch):
> git add HEN_HOUSE/specs/
> git add --force egs_home/
The --force option here instructs git to add the egs_home/ directory even
if it is normally ignored. Next, you commit these changes along with a log
message to record the purpose of this commit:
> git commit -m "Add local configuration and egs_home"At this point you have a clean working directory for your newly installed and configured version of EGSnrc:
> git status
On branch myegsnrc
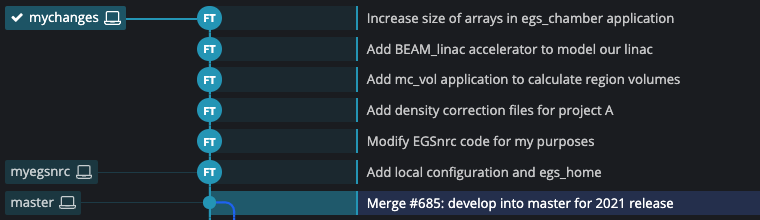
nothing to commit, working tree cleanThe branches now look like the figure below. The myegsnrc branch is ahead of
master by the one commit you just added (the FT letters on the node here
are just the initials of the person who created the commit).

Since you have skipped compiling EGSnrc applications in egs_home/ during the
configuration step, you must compile them now, by running the following script:
HEN_HOUSE/scripts/finalize_egs_foruserDouble-check that the target egs_home/ location is the one you created during
the configuration step, and then select the option to compile all or only some
of the user applications. You can also always compile any user application, as
needed, or later on, by simply issuing the make command in the application
directory, inside egs_home/.
In order to upgrade EGSnrc smoothly while preserving your local
modifications, you ought to commit your personnal changes to EGSnrc files.
To this end, create and checkout (move to) a new branch, say mychanges:
> git branch mychanges
> git checkout mychanges
Switched to branch 'mychanges'Now you may edit the EGSnrc files to suit your purposes. For the sake of
illustration, suppose you change the core source code file
HEN_HOUSE/src/egsnrc.mortran, and the sources of the dosxyznrc and
egs_chamber applications under egs_home/. Then, git status reports the
modified files:
> git status
On branch mychanges
Changes not staged for commit:
  (use "git add <file>..." to update what will be committed)
  (use "git restore <file>..." to discard changes in working directory)
	modified:   HEN_HOUSE/src/egsnrc.mortran
	modified:   egs_home/dosxyznrc/dosxyznrc_user_macros.mortran
	modified:   egs_home/egs_chamber/egs_chamber.cpp

no changes added to commit (use "git add" and/or "git commit -a")To ensure your local changes are not overwritten in an upgrade, commit your
local edits on the current branch mychanges with the following commands:
> git add --update                                      # add all updated files to the next commit
> git commit -m "Modify EGSnrc code for my purposes"    # record the changes in the repository (with given message)
The tree of commits now looks like the figure below. The mychanges branch is
ahead of myegsnrc by the one commit you just added to record local edits:

If at any time the command git status lists modified files, this means that
you have edited these files locally but have not yet recorded them on your
mychanges branch. You risk losing them when you upgrade, so commit them. The
more detailed output of the git diff command is helpful, to see exactly what
has changed in each file.
Recall that for source code changes to take effect in any EGSnrc application,
you must recompile it, by entering the target application directory inside
egs_home/ and issuing the make command. Note also that changes into a
few files within the repository may require to run the EGSnrc configuration
step again.
Now you may continue to commit additional modifications as you go (repeat steps
7 to 9). In fact it is preferable to create many small commits, by using git add --update and git commit often, so that each commit relates to a single change,
conceptually (though possibly involving many files). For example, after a few
more local modifications your tree of commits might look something like this:
After configuring EGSnrc and adding local files and modifications to a new
branch, as described above, git can provide a detailed account of all
modifications compared to your pristine configuration preserved on the
myegsnrc branch. For the sake of illustration again, suppose you change
the core source code file HEN_HOUSE/src/egsnrc.mortran, and the sources
of the dosxyznrc and egs_chamber applications under egs_home/. Then:
> git log --stat myegsnrc..mychanges        # note the double dot

commit ed6a77dd2d7692cc2e4ba720633d1a0c7bd6fe1c (HEAD -> mychanges)
Author: Frederic Tessier
Date:   Mon Apr 19 18:07:07 2021 -0400

    Modify EGSnrc code for my purposes

 HEN_HOUSE/src/egsnrc.mortran                     | 2 ++
 egs_home/dosxyznrc/dosxyznrc_user_macros.mortran | 8 ++++----
 egs_home/egs_chamber/egs_chamber.cpp             | 2 +-
 3 files changed, 7 insertions(+), 5 deletions(-)
To further see what changed in each file, in detail, use the git diff
command:
> git diff myegsnrc mychanges

diff --git a/HEN_HOUSE/src/egsnrc.mortran b/HEN_HOUSE/src/egsnrc.mortran
index fd81573..ef8cc09 100644
--- a/HEN_HOUSE/src/egsnrc.mortran
+++ b/HEN_HOUSE/src/egsnrc.mortran
@@ -993,6 +993,8 @@ SUBROUTINE ELECTR(IRCODE);
 "                                     for low energy transport     "
 "******************************************************************"

+"This is my favourite subroutine"
+
 $IMPLICIT-NONE;

 $INTEGER IRCODE;
diff --git a/egs_home/dosxyznrc/dosxyznrc_user_macros.mortran b/egs_home/dosxyznrc/dosxyznrc_user_macros.mortran
index 395d966..974ae31 100644
--- a/egs_home/dosxyznrc/dosxyznrc_user_macros.mortran
+++ b/egs_home/dosxyznrc/dosxyznrc_user_macros.mortran
@@ -87,11 +87,11 @@
 "
 REPLACE {$STAT}    WITH {10}  "Number of batches to use in calcn of statistics"
                               "It works with $STAT = 1 but gives no stats"
-REPLACE {$MXMED}   WITH {20}   "Maximum number of media
+REPLACE {$MXMED}   WITH {50}   "Maximum number of media
 REPLACE {$MXSTACK} WITH {900000}  "Maximum particle stack size
-REPLACE {$IMAX}    WITH {128} "Maximum number of x cells
-REPLACE {$JMAX}    WITH {128} "Maximum number of y cells
-REPLACE {$KMAX}    WITH {128} "Maximum number of z cells
+REPLACE {$IMAX}    WITH {256} "Maximum number of x cells
+REPLACE {$JMAX}    WITH {256} "Maximum number of y cells
+REPLACE {$KMAX}    WITH {512} "Maximum number of z cells
 REPLACE {$MAXDOSE} WITH {{COMPUTE $IMAX*$JMAX*$KMAX+1}}
          "Number of dose regions, can be set to < $IMAX*$JMAX*$KMAX if "
          "necessary to reduce memory requirement, +1 for outside region"
diff --git a/egs_home/egs_chamber/egs_chamber.cpp b/egs_home/egs_chamber/egs_chamber.cpp
index 25cd55f..929242f 100644
--- a/egs_home/egs_chamber/egs_chamber.cpp
+++ b/egs_home/egs_chamber/egs_chamber.cpp
@@ -2628,7 +2628,7 @@ void EGS_ChamberApplication::outputResults() {
     for(int j=0; j<ngeom; j++) {
         double r,dr; dose->currentResult(j,r,dr);
         if( r > 0 ) dr = 100*dr/r; else dr = 100;
-        EGS_Float norm = 1.602e-10*current_case/source->getFluence();
+        EGS_Float norm = 1.60217662e-10*current_case/source->getFluence();
         norm /= mass[j];
        //*HB_start************************
         if(pu_flag&&j) {
When citing EGSnrc for published simulation work, such local modifications should be reported to allow anyone to rebuild the state of the software used for the publication.
Say that you have installed the software using the foregoing method, and that a new version of EGSnrc is released. You want to upgrade to the new version. This is where the extra work during the installation and configuration pays off: you can easily upgrade your copy of the EGSnrc software while preserving your local changes. Here is how to do that.
But first, save a backup copy of your current EGSnrc/ directory for peace
of mind, in case something goes wrong during the upgrade!
If you are very familiar with EGSnrc and git, the procedure can be summarized as follows:
- Pull the new version into
master - Merge
masterintomyegsnrc - Reconfigure EGSnrc
- Commit the new configuration on
myegsnrc - Merge
myegsnrcintomychanges - Compile user applications
- Commit further local modifications (until the next upgrade)
Below we provide detailed instructions for each step, in order to upgrade EGSnrc with git when a new version is released.
Checkout the master branch (or whichever branch on which you based your
initial installation), and pull the new version from the EGSnrc repository:
> git checkout master
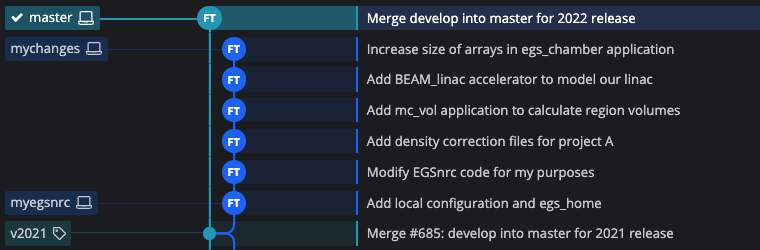
> git pullThe master branch has now moved ahead of your local branches (normally, the
new master branch would include many more commits, corresponding to all the
changes committed in the repository for the new release):
Checkout the myegsnrc branch, your pristine configuration branch, and merge
in the changes from the new version:
> git checkout myegsnrc
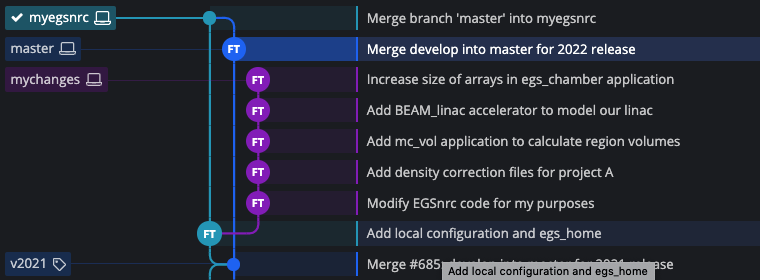
> git merge masterYour myegsnrc reference has now moved ahead and integrates the old
configuration files with the updated files from the master branch, through a
merge commit (two or more parent commits):
Now configure EGSnrc as in the initial installation, using the new commit hash of the updated master branch as the configuration name, and again skipping the compilation of user applications at this stage.
Commit the new configuration to your myegsnrc branch, to bring your pristine
configuration up to date:
> git add HEN_HOUSE/specs/
> rsync -av HEN_HOUSE/user_codes/* egs_home/
> git add -u egs_home/
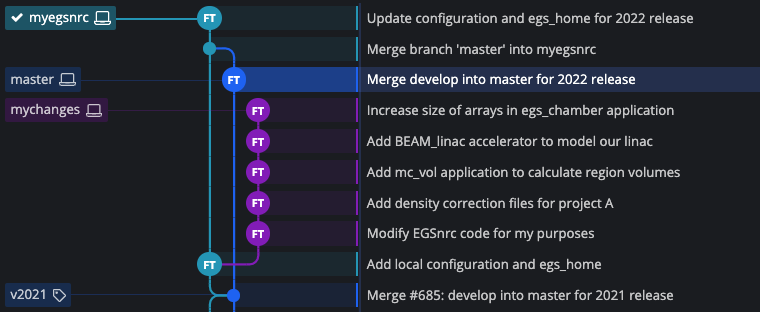
> git commit -m "Update configuration and egs_home for 2022 release"Your myegsnrc branch moved ahead by one commit. It now comprises the new
configuration files from inside HEN_HOUSE/specs/ and the updated application
source code under egs_home/:
Finally, merge the updated EGSnrc files into your mychanges branch which
tracks all your local edits. The whole point of this entire process is that
git merge is able, most of the time, to automatically insert the updates from
the new release while preserving your local changes.
> git checkout mychanges
> git merge myegsnrc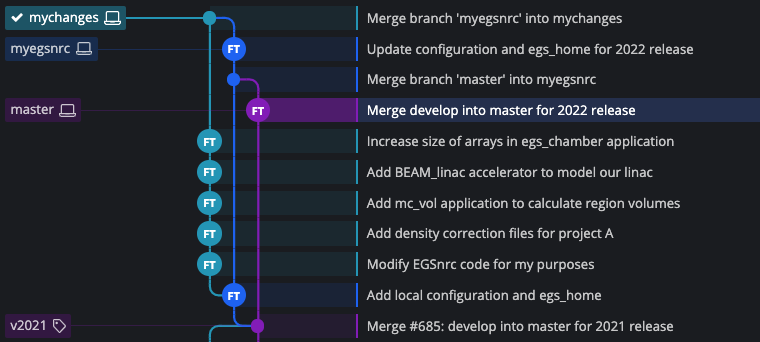
Occasionally, git might pause to report a merge conflict. This usually means that at least one of your local edits affects the same line in the same file as an update from the new release. Pay attention to such conflicts, as they may signal that your local changes are no longer consistent with the new version of EGSnrc.
You can resolve conflicts in a number of ways. You could use git status to
list conflicts, then git merge --abort to cancel the merge, and fix the issue
before attempting the merge again. If you are more familiar with git conflicts,
you could instead edit the files in question and continue the merge operation.
See "Basic Merge Conflicts" in the
Basic Branching and Merging
section of the git book.
When the merge is complete, your personal copy of EGSnrc has been updated to
the new version. You should verify that your local changes remained as
expected, and remind yourself what those are, with the git diff command:
> git diff myegsnrc mychanges
(...)Since you have skipped compiling EGSnrc applications in egs_home/ during the
configuration step, you should compile them now, with the following command:
$HEN_HOUSE/scripts/finalize_egs_foruserDouble-check that the target egs_home/ location is the one you created during
the configuration step, and then select the option to compile all or only some
of the user applications. You can also always compile any user application, as
needed, or later on, by simply issuing the make command in the application
directory, inside egs_home/.
At this point, your EGSnrc installation is upgraded to the new version. You should continue to commit local changes until the next upgrade, as described in the installation section, steps 7 to 10. When a new version is released, simply repeat the upgrade process.