UpdateProperties - novars-jp/MaBeeeiOSSDK GitHub Wiki
概要
- MaBeeeのプロパティを更新するサンプルプロジェクトです。
- samples配下のUpdateProperties(Objective-C), UpdatePropertiesSwift(Swift)がそれになります。言語は違いますが内容は全く同じです。
ライブラリのインポート
-
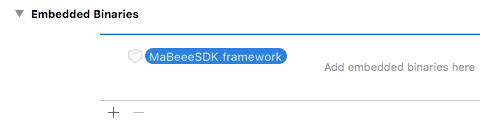
Embedded BinariesにMaBeee.frameworkをドラッグドロップして追加します。
-
ViewControllerにインポート宣言を追加します。
-
Objective-C
@import MaBeeeSDK;
- Swift
import MaBeeeSDK
UIの作成
1. Storyboard
ScanボタンとUpdateボタン、TextViewがあるUIを作成します。
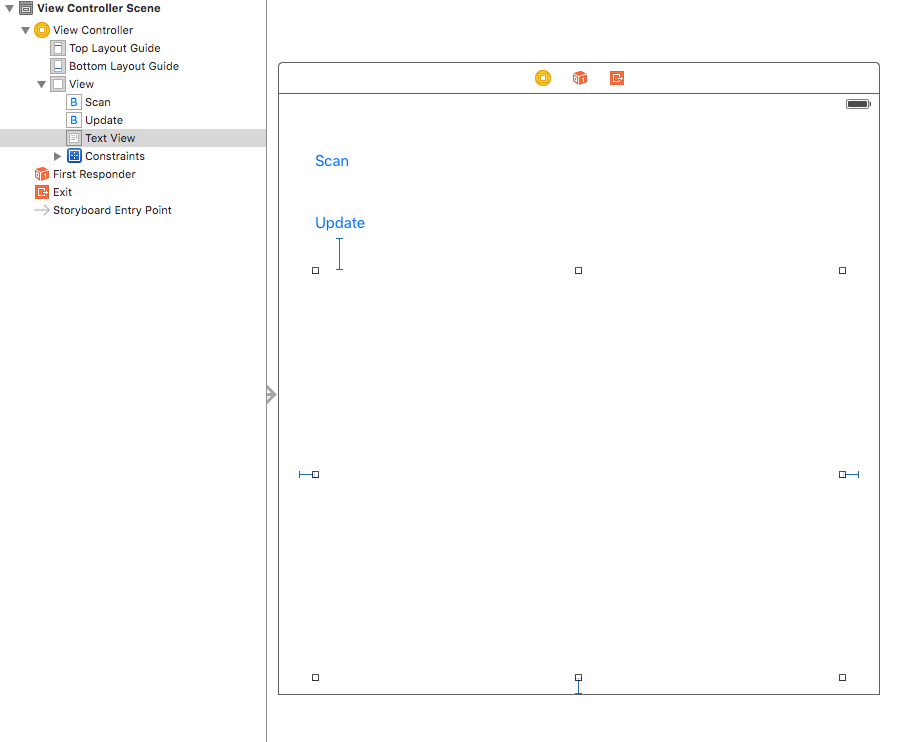
2. Scanボタン、Updateボタン
Scanボタン、UpdateボタンのTouch up insideとViewControllerを接続します。
Objective-C
- (IBAction)scanButtonPressed:(UIButton *)sender {
}

- (IBAction)updateButtonPressed:(UIButton *)sender {
}
Swift
@IBAction func scanButtonPressed(sender: UIButton) {
}

@IBAction func updateButtonPressed(sender: UIButton) {
}
3. TextView
TextViewのReferencing OutletsとViewControllerを接続します。
Objective-C
@interface ViewController ()
@property (weak, nonatomic) IBOutlet UITextView *textView;
@end
Swift
@IBOutlet weak var textView: UITextView!
MaBeeeScanViewController
- MaBeeeScanViewControllerはMaBeeeDeviceのスキャンと接続を簡単に実装できるUIを提供します。
- Scanボタンが押されたときに、MaBeeeScanViewControllerを生成して表示するコードを追加します。
- 単純にインスタンスを生成して、show関数を呼ぶだけです。
Objective-C
- (IBAction)scanButtonPressed:(UIButton *)sender {
  MaBeeeScanViewController *vc = MaBeeeScanViewController.new;
  [vc show:self];
}
Swift
@IBAction func scanButtonPressed(sender: UIButton) {
  let vc = MaBeeeScanViewController()
  vc.show(self)
}
スキャン実行
- ビルドして実行します。
- iOSのBluetoothがONになっているかを確認してください。
- MaBeeeをおもちゃなどにセットして、おもちゃなどの電源をONにしてください。
- スキャンボタンを押すと、MaBeeeScanViewControllerが表示されます。
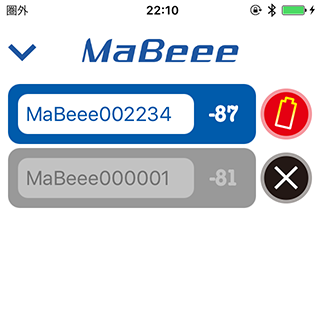
- 2台のMaBeeeがある状態です。
- セルには、MaBeeeの名前、RSSI、接続しているかどうかのアイコンが表示されます。
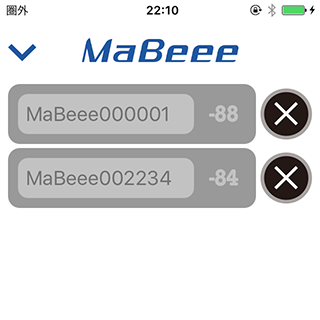
接続
- セルをタップすると接続します。
- 接続すると赤いアイコンになります。
MaBeeeAppからの通知の受信設定
- MaBeeeAppはシングルトンのインスタンスで、BluetoothやMaBeeeDeviceなどを管理します。
- MaBeeeAppから、Bluetoothの状態の変化、デバイスの切断、プロパティの更新などの通知を受信することができます。
- ここでは、ViewControllerのviewDidAppearで通知の受けるように設定、viewWillDisappearで通知を受けないように設定しています。
- 通知を受信するreceiveNotification関数についてはここでは定義のみとします。
- 通知についてくわしくはこちら
Objective-C
- (void)viewDidAppear:(BOOL)animated {
  [super viewDidAppear:animated];
  [MaBeeeApp.instance addObserver:self selector:@selector(receiveNotification:)];
}

- (void)viewWillDisappear:(BOOL)animated {
  [super viewWillDisappear:animated];
  [MaBeeeApp.instance removeObserver:self];
}

- (void)receiveNotification:(NSNotification *)notification {
}
Swift
override func viewDidAppear(animated: Bool) {
  super.viewDidAppear(animated)
  MaBeeeApp.instance().addObserver(self, selector: #selector(ViewController.receiveNotification(_:)))
}

override func viewWillDisappear(animated: Bool) {
  super.viewWillDisappear(animated)
  MaBeeeApp.instance().removeObserver(self)
}

func receiveNotification(notification: NSNotification) {
}
MaBeeeDeviceの取得・プロパティの更新
- MaBeeeDeviceは、MaBeeeAppクラスのシングルトンインスタンスが保持・管理しています。
- MaBeeeAppクラスのdevices関数で、MaBeeeDeviceの配列が取得できます。
- updateRssi, updateBatteryVoltage関数でそれぞれのプロパティの更新を指示します。
- ここではUpdateボタンが押されたときに、MaBeeeDeviceを取得して、updateRssi, updateBatteryVoltage関数を呼んでいます。
Objective-C
- (IBAction)updateButtonPressed:(UIButton *)sender {
  for (MaBeeeDevice *device in MaBeeeApp.instance.devices) {
    [device updateRssi];
    [device updateBatteryVoltage];
  }
}
Swift
@IBAction func updateButtonPressed(sender: UIButton) {
  for device in MaBeeeApp.instance().devices() {
    device.updateRssi()
    device.updateBatteryVoltage()
  }
}
通知の受信、プロパティの取得、画面表示
appendLine
- TextViewに行を追加する簡単なappendLine関数を用意します。
Objective-C
- (void)appendLine:(NSString *)line {
  self.textView.text = [self.textView.text stringByAppendingFormat:@"%@\n", line];
}
Swift
func appendLine(line: String) {
  textView.text = textView.text + line + "\n"
}
receiveNotification
- MaBeeeAppからの通知を受けるように設定した、receiveNotification関数で値の取得・表示を行ないます。
- ややソース見づらいかもしれませんが、以下の処理を行ないます。
- notification.nameが以下の2つのいずれかのみ処理する
- MaBeeeDeviceRssiDidUpdateNotificationRSSI
- MaBeeeDeviceBatteryVoltageDidUpdateNotification
- notification.userInfoにMaBeeeDeviceIdentifierというキーでデバイスのidentifierが入ってくるので取得
- MaBeeeAppからデバイスのidentifierに紐づくMaBeeeDeviceのインスタンスを取得
- MaBeeeDeviceのインスタンスから更新されたRSSIもしくはBatteryVoltageを取得して行追加
Objective-C
- (void)receiveNotification:(NSNotification *)notification {

  if ([MaBeeeDeviceRssiDidUpdateNotification isEqualToString:notification.name]) {
    NSUInteger identifier = [notification.userInfo[@"MaBeeeDeviceIdentifier"] unsignedIntegerValue];
    MaBeeeDevice *device = [MaBeeeApp.instance deviceWithIdentifier:identifier];
    NSString *line = [NSString stringWithFormat:@"%@ RSSI: %d", device.name, device.rssi];
    [self appendLine:line];
    return;
  }

  if ([MaBeeeDeviceBatteryVoltageDidUpdateNotification isEqualToString:notification.name]) {
    NSUInteger identifier = [notification.userInfo[@"MaBeeeDeviceIdentifier"] unsignedIntegerValue];
    MaBeeeDevice *device = [MaBeeeApp.instance deviceWithIdentifier:identifier];
    NSString *line = [NSString stringWithFormat:@"%@ Volgate: %f", device.name, device.batteryVoltage];
    [self appendLine:line];
    return;
  }
}
Swift
func receiveNotification(notification: NSNotification) {
  switch notification.name {
  case MaBeeeDeviceRssiDidUpdateNotification:
    if let identifier = notification.userInfo?["MaBeeeDeviceIdentifier"] as? UInt,
      device = MaBeeeApp.instance().deviceWithIdentifier(identifier) {
        appendLine(device.name + " RSSI : " + String(device.rssi))
      }
  case MaBeeeDeviceBatteryVoltageDidUpdateNotification:
    if let identifier = notification.userInfo?["MaBeeeDeviceIdentifier"] as? UInt,
      device = MaBeeeApp.instance().deviceWithIdentifier(identifier) {
      appendLine(device.name + " Volgate : " + String(device.batteryVoltage))
    }
  default:
    print(notification.name)
    print(notification.userInfo)
  }
}
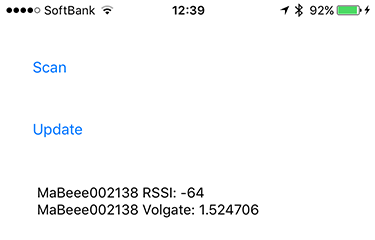
実行
- ビルドして実行します。
- iOSのBluetoothがONになっているかを確認してください。
- MaBeeeをおもちゃなどにセットして、おもちゃなどの電源をONにしてください。
- スキャンボタンを押すと、MaBeeeScanViewControllerが表示されます。
- セルをタップしてMaBeeeに接続します。
- 閉じるボタンでMaBeeeScanViewControllerを閉じます。
- Updateボタンを押すと、以下のように画面が更新されるはずです。