Iptables Tutorial - nimbo3/Keenbo GitHub Wiki
Iptables Tutorial - Beginners Guide to Linux Firewall
Iptables Linux firewall is used to monitor incoming and outgoing traffic to a server and filter it based on user-defined rules to prevent anyone from accessing the system. Using Iptables you can define rules which will allow only selective traffic on your server. In this Iptables tutorial, you will learn how to secure your web application using Iptables.
Note: For RHEL/ CentOS users there is a service named firewallD which is already installed on these operating systems. If you want to use Iptables, you have to disable it first.
What you'll need
Before you begin with Iptables tutorial, you will need the following:
If you want to learn more about SSH and SSH commands follow this tutorial.
Iptables Basics
All data is sent in the form packets over the internet. Linux kernel provides an interface to filter both incoming and outgoing traffic packets using tables of packet filters. Iptables is a command line application and a Linux firewall that you can use to set-up, maintain and inspect these tables. Multiple tables can be defined. Each table can contain multiple chains. A chain is nothing but a set of rules. Each rule defines what to do with the packet if it matches with that packet. When the packet is matched, it is given a TARGET. A target can be another chain to match with or one of the following special values:
- ACCEPT: It means the packet will be allowed to pass through.
- DROP: It means that packet will not be allowed to pass through.
- RETURN: It means to skip the current chain and go back to the next rule from the chain it was called in.
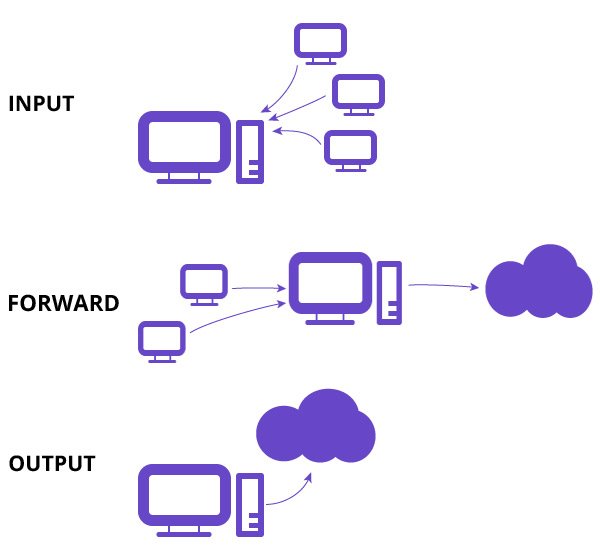
For the scope of this iptables tutorial, we are going to work with one of the default tables called filter. Filters table has three chains ( sets of rules).
- INPUT – This chain is used to control incoming packets to the server. You can block/allow connections based on port, protocol or source IP address.
- FORWARD – This chain is used to filter packets that are incoming to the server but are to be forwarded somewhere else.
- OUTPUT – This chain is used to filter packets that are going out from your server.
Step 1 – Installing Iptables Linux Firewall
1. Installing Iptables
Iptables comes pre-installed in almost all of the Linux distributions. But if you don't have it installed on Ubuntu/Debian system use:
sudo apt-get update
sudo apt-get install iptables
2. Checking current Iptables status
With this command, you can check the status of your current Iptables configuration. Here -L option is used to list all the rules and -v option is for a more tedious list. Please note that these options are case sensitive.
sudo iptables -L -v
Example output:
Chain INPUT (policy ACCEPT 0 packets, 0 bytes)
pkts bytes target     prot opt in     out     source             destination

Chain FORWARD (policy ACCEPT 0 packets, 0 bytes)
pkts bytes target     prot opt in     out     source             destination

Chain OUTPUT (policy ACCEPT 0 packets, 0 bytes)
pkts bytes target     prot opt in     out     source             destination
This is the output of the above command. Here, all three chains are set to default ACCEPT policy. There are currently no rules for any of the chains.
To make this Iptables tutorial more practical, we will modify the INPUT chain to filter the incoming traffic.
Step 2 – Defining chain rules
Defining a rule means appending it to the list (chain). Here's the Iptables command formatted with regular options. We don't have to specify all of them.
sudo iptables -A -i -p -s --dport -j
Here -A stands for append. The chain refers to the chain we want to append our rules. The interface is the network interface on which you want to filter the traffic. The protocol refers to the networking protocol of packets you want to filter. You can also specify the port, no of the port on which you want to filter the traffic.
For more detailed info about Iptables command and its options, you can check Iptables main page.
1. Enabling traffic on localhost
We want all communications between applications and databases on the server to continue as usual.
sudo iptables -A INPUT -i lo -j ACCEPT
Example output:
Chain INPUT (policy ACCEPT 7 packets, 488 bytes)
pkts bytes target     prot opt in     out     source               destination
0     0 ACCEPT     all  --  lo     any     anywhere             anywhere
Here -A option is used to append the rule to the INPUT chain, accept all connections on lo interface. lo means loopback interface. It is used for all the communications on the localhost, like communications between a database and a web application on the same machine.
2. Enabling connections on HTTP, SSH, and SSL port
We want our regular HTTP (port 80), https (port 443), ssh (port 22) connections to continue as usual. Enter the following commands to enable them. In the following commands, we have specified protocol with -p option and the corresponding port for each protocol with –dport(destination port) option.
sudo iptables -A INPUT -p tcp --dport 22 -j ACCEPT
sudo iptables -A INPUT -p tcp --dport 80 -j ACCEPT
sudo iptables -A INPUT -p tcp --dport 443 -j ACCEPT
Now all TCP protocol connections with specified ports will be accepted.
3. Filtering packets based on source
If you want to accept or reject packets based on the source IP address or the range of IP addresses you can specify it with -s option. For example to accept packets from address 192.168.1.3 –
sudo iptables -A INPUT -s 192.168.1.3 -j ACCEPT
You can drop packets from an IP address with a similar command with option DROP .
sudo iptables -A INPUT -s 192.168.1.3 -j DROP
If you want to drop packets from a range of IP addresses you have to use the Iprange module with -m option and specify the IP address range with –src-range.
sudo iptables -A INPUT -m iprange --src-range 192.168.1.100-192.168.1.200 -j DROP
4. Dropping all other traffic
Note: It is important to DROP all other traffic after defining the rules as it prevents unauthorized access to a server from other open ports.
sudo iptables -A INPUT -j DROP
This command drops all incoming traffic other than the ports mentioned in the above commands. You can check your set of rules now with:
sudo iptables -L -v
5. Deleting rules
If you want to remove all rules and start with a clean slate you can use the flush command.
sudo iptables -F
This command deletes all current rules. If you want to delete a specific rule you can do it with -D option. First, list all the rules with numbers by entering following command:
sudo iptables -L --line-numbers
Then you will get a list of rules with numbers.
Chain INPUT (policy ACCEPT)
num  target     prot opt source               destination
1    ACCEPT     all  --  192.168.0.4          anywhere
2    ACCEPT     tcp  --  anywhere             anywhere             tcp dpt:https
3    ACCEPT     tcp  --  anywhere             anywhere             tcp dpt:http
4    ACCEPT     tcp  --  anywhere             anywhere             tcp dpt:ssh
To delete a rule specify the number in the list and the chain of the rule. In our case INPUT chain and number 3.
sudo iptables -D INPUT 3
Step 3 – Persisting changes
Iptables rules we have created are saved in memory. That means we have to redefine them on reboot. To make these changes persistent after reboot, use the following command on Ubuntu/Debian systems:
sudo /sbin/iptables-save
This command saves current rules to system configuration file which is used to reconfigure the tables at the time of reboot. You should run this command everytime you make changes to the rules. To disable this firewall simply flush all the rules and make the changes persistent.
sudo iptables -F
sudo /sbin/iptables-save
Conclusion
In this Iptables tutorial, we have used Iptables Linux firewall to only allow traffic on specific ports. We have also made sure that our rules will be saved after reboot. This Linux firewall will drop unwanted packets, but there is a caveat here that Iptables can govern only ipv4 traffic. If your VPS box has enabled ipv6 networking you have to set different rules for that traffic with ip6tables.