MDRT Delim Import Guide - nickcounts/MDRT GitHub Wiki
Overview
Importing FCS Data into MDRT has never been easier. Check out this quick demo video:
Click the image for a video demonstration
Background
Data retrievals from FCS produce two files text files as output. Both files contain a timestamp, FD names, data types, recorded values and a few other bits of information. One of the output files has no file extension. That file is "whitespace delimited." The other file has a .delim extension and is comma delimited. This is essentially a .csv file. Structurally, each line of the file contains a single piece of data. In order to analyze and plot these data, these files must be sorted and parsed into a form that MDRT can manipulate.
Importing a .delim file into MDRT results in a collection of data files that can be analyzed and plotted. While importing data, it is important to associate the new data with any relevant operations or procedures. The MDRT Data Import Tool simplifies this process.
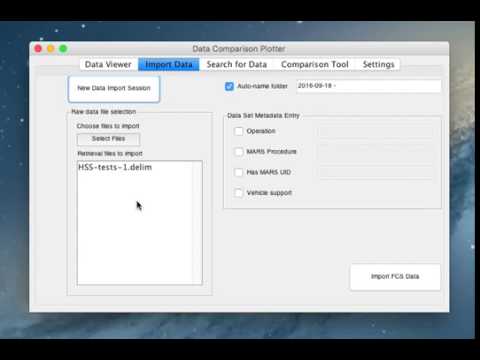
The Interface
images/MDRT-data-import-GUI-v0.4.4.png
The Data Import Tool has two main areas
Raw Data File Selection
Add FCS .delim files to be imported by dragging the file into the list. Alternatively, click the "Select Files" button. A file selection dialog will open that allows selecting multiple files.
It is important to understand that any files imported will be associated with each other. If you are importing files from two separate tests, they will share the same metadata tags, including operation name, procedure number, etc.
Importing separate test data files in separate import data sessions is the recommended practice at this time.
Data Set Metadata Entry
Check any box that is applicable and add the appropriate information in the corresponding text box.
Example: Importing data from an HSS test under ITR-1448
-
Check the "Operation" box and type "HSS Slam Test"
-
Check the "MARS Procedure" box and type "ITR-1448"
-
As you add information, the folder name will update automatically. If you wish to override the folder name, uncheck the "Auto-name folder" box and edit the folder name. If you re-enable auto-naming, your changes will be reverted.
Import Controls
To start over, click the "New Data Import Session" button. The list of files to import and metadata values will be cleared.
If you are ready to import your data, click the "Import FCS Data" button. This will begin the automated import process.
Automated Data Importing
The MDRT Data Import Engine runs several tasks as part of data importing.
- Data File Preliminary Read
- Data Extraction to individual files
- Data parsing and saving
- Data indexing
Each of these steps will display a progress bar to show you how much time is remaining.
The parsing and saving step is the most complex, due to the many variations of FCS data that can be retrieved. Occasionally the MDRT parser will fail on a particular FD. In this case, a new window will appear with a sample of the problematic data. A prompt will appear asking you if you wish to halt or continue.
If you select halt, any data files successfully parsed will be retained but will remain unindexed.
Selecting "skip" moves on to the next file. The troublesome data will be copied to the default Matlab workspace for quick viewing/debugging when the import process is completed.
You may skip any problematic files. Once the parsing and saving operation is complete, the data will be indexed.
You're Done!
That's it - nothing else to do. Your data set is now available to be loaded and plotted.