Using Authy or Google Authenticator for 2FA with XRDP - neutrinolabs/xrdp GitHub Wiki
This page details how to use the Authy mobile phone app to provide a second factor when logging in to a Linux-based XRDP system.
Although this guide uses Authy, it should be equally applicable to any other app which supports TOTP password generation (e.g. Google Authenticator).
This guide is applicable to all v0.9.x XRDP versions. These versions of XRDP are not natively 2FA-aware. However it is possible to use feature of the Linux 'PAM stack' to work around this. This is explained further below.
The reader should be aware of what two-factor authentication (2FA) is, and why it is becoming increasingly important.
An effort has been made to explain other concepts along the way. This may make the document somewhat wordy for more technically advanced readers, but the aim here is to reach as wide an audience as possible.
CentOS 8.2.2004 is used as an example, but the method should be readily adaptable to other distros.
This guide aims to be relatively simple so as to introduce the main concepts. Consequently, the scope has been restricted in these areas.
- The guide applies to the XRDP service only. Supporting other login methods such as SSH using the same technique and the same secret key is relatively simple once you understand the concepts in this guide.
- The guide applies to small installations with a handful of local users. However, there is no reason why it should not work in enterprise environments, with domain users provided via SSSD or otherwise. Some of the considerations which could apply to these environments are listed in an appendix to this document.
- The guide assumes that all XRDP users will be using 2FA logins. Having some users subject to 2FA and some not is more complicated than it seems at first.
- The guide assumes that the system time is synchronised using NTP or equivalent, and that so TOTP can be used as an algorithm.
An OTP or 'one-time password' is a password which is only valid for a single use.
This is an algorithm which allows a time-based one-time password to be used for authentication.
'Time-based' means the OTP is only valid for a few tens of seconds.
In order for this code to be generated and accepted, the authenticator and the authenticatee must share two data items:-
- A secret key
- The current time
TOTP is described further in RFC6238 or on Wikipedia.
PAM is the software stack which sits under most Linux applications, and is responsible for providing authentication services. PAM is extensively described elsewhere, including Wikipedia.
If you are not familiar with it, a good place to start is A.P Lawrence's understanding PAM page.
This software consists of the following items:-
- A program
google-authenticatorwhich allows a user to set up a shared secret which is stored both in Authy, and within the user's home directory in~/.google-authenticator. - A PAM module
pam_google_authenticator.sowhich processes the OTP generated by Authy using the secret in~/.google-authenticator.
More details on this software can be found in the module README.md, the latest version of which is here.
For CentOS 8 users, version 1.07 of this software is packaged in the EPEL google-authenticator RPM.
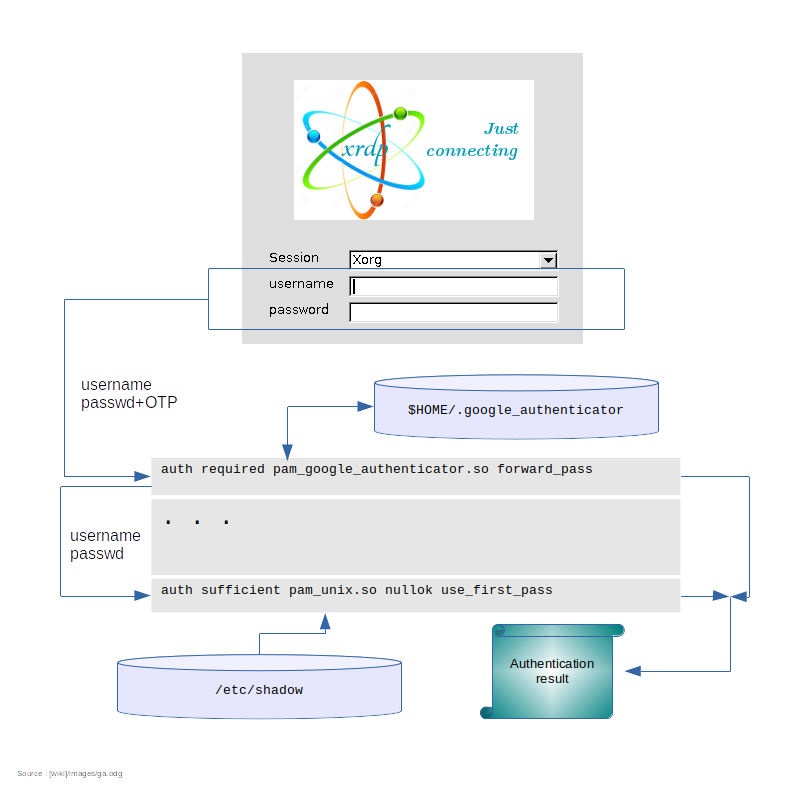
pam_google_authenticator.so has an important feature which we make use of here; when the module is configured with the forward_pass option, it will consider the password string entered by the user to be the user's normal password with the OTP appended to it.
The OTP is removed from the password string and processed by pam_google_authenticator.so. The remainder of the string (i.e. the normal password) is 'stacked' for other PAM modules to perform password checking.
Importantly, other PAM modules which support the use_first_pass option will need to be configured with this so that they pick up the stacked password and do not attempt to prompt the user for the password. The following modules will need this option, if you are using them:-
- pam_sss
- pam_unix
- pam_userdb
This diagram shows the main dataflows involved in the authentication process.
The user logging in is a local user with a password stored in /etc/shadow.
- Check the target systems are configured normally.
- Make initial preparations to the PAM stack.
- Install software.
- Have each user log in and set up their TOTP secret key.
- Edit
/etc/pam.d/xrdp-sesmanto implement support for the Google authenticator PAM module. - Test user logins using their standard password with Authy-generated codes appended.
The reader is assumed to have a fresh copy of CentOS 8 available with the following features:-
- The GNOME desktop is installed
- The
epel-releaseRPM has been installed - The
xrdpandxrdp-selinuxRPMs are installed from EPEL. - The system is provisioned with time via chrony or NTP so that time-based authentication can be used.
- Home directories are unencrypted and writeable.
-
authselecthas been used already, if appropriate. - Users are using the GNOME keyring, and
/etc/pam.d/xrdp-sesmanis configured appropriately.
The file /etc/pam.d/xrdp-sesman will look like this for a system which supports GNOME keyring:-
#%PAM-1.0
# Generic Fedora config
#auth       include      password-auth
#account    include      password-auth
#password   include      password-auth
#session    include      password-auth

# Gnome specific Fedora config
auth       include      gdm-password
account    include      gdm-password
password   include      gdm-password
session    include      gdm-password
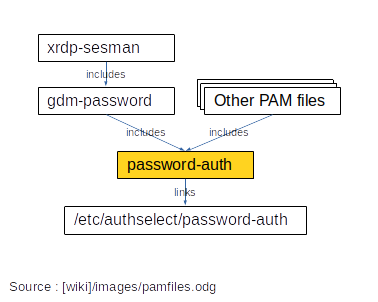
As shipped the password-auth stanzas are enabled. To get GNOME keyring working, these need to be commented out and the gdm-password stanzas enabled.
gdm-password is a file which ships with the gdm RPM. Its function is to ensure the pam_gnome_keyring.so modules gets called as required, and that the password-auth file is also included appropriately.
password-auth is called by many other PAM files. It performs generic password-based authentication. CentOS 8 provides this file as a soft-link to another file generated by the authselect utility:-
As previously described, we need make the following changes to the auth module type:-
- Include
pam_google_authenticator.so - Add
use_first_passto modules which normally might input a password.
The first of these is straightforward. The second is however not so straightforward, as the affected modules are stored within the password-auth file which is shared with other files.
The approach we take here is:-
- Copy the
password-authfile (or rather the file it links to) to a new PAM file calledpassword-auth-ga. Within this file we adduse_first_passas appropriate. - Copy
gdm-passwordtogdm-password-ga. Within this file changeauthreferences topassword-authtopassword-auth-ga. Also add the necessary call topam_google_authenticator.so
This only needs to be done for the auth module type. The account, password and session module types are not affected.
This gives us the following arrangement for the auth module type:-
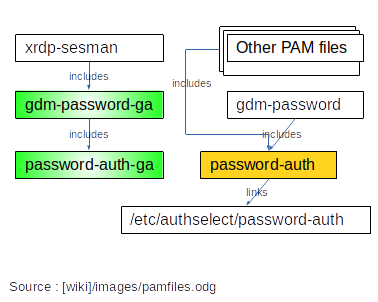
Note that future changes made to the system with authselect or authconfig may change password-auth but will NOT change password-auth-ga. You will have to make any necessary changes to this file manually.
We make the low-level PAM changes first. Until /etc/pam.d/xrdp-sesman itself is modified, this will have no effect on system operation.
sudo cp /etc/pam.d/gdm-password /etc/pam.d/gdm-password-ga
sudo cp /etc/pam.d/password-auth /etc/pam.d/password-auth-gaEdit /etc/pam.d/gdm-password-ga and make the following changes:-
- Add some kind of comment at the top describing what the file is.
- Delete all the module types other than
auth - Add a call to
pam_google_authenticator.soas the first item . - Replace the reference to
password-authwithpassword-auth-ga. This will give us something like the following:-
# See https://github.com/neutrinolabs/xrdp/wiki/Using-Authy-or-Google-Authenticator-for-2FA-with-XRDP
auth        required      pam_google_authenticator.so forward_pass
auth     [success=done ignore=ignore default=bad] pam_selinux_permit.so
auth        substack      password-auth-ga
auth        optional      pam_gnome_keyring.so
auth        include       postlogin
Edit /etc/pam.d/password-auth-ga and make the following changes:-
- Replace the 'do not edit' comment with something else which makes sense to you
- Delete all the module types other than
auth - Add
use_first_passto the modules which might otherwise prompt for a password (likely justpam_unix.soandpam_sss.so). Occurrences oftry_first_passorforward_passcan be deleted. This will give us something like the following:-
# See https://github.com/neutrinolabs/xrdp/wiki/Using-Authy-or-Google-Authenticator-for-2FA-with-XRDP auth required pam_env.so auth required pam_faildelay.so delay=2000000 auth [default=1 ignore=ignore success=ok] pam_succeed_if.so uid >= 1000 quiet auth [default=1 ignore=ignore success=ok] pam_localuser.so auth sufficient pam_unix.so nulloktry_first_passuse_first_pass auth requisite pam_succeed_if.so uid >= 1000 quiet_success auth sufficient pam_sss.soforward_passuse_first_pass auth required pam_deny.so
Install the necessary software:-
sudo dnf install google-authenticator qrencode-libsThe qrencode-libs package allows QR codes to be displayed during the user configuration process which normally makes things easier. If you don't want to configure Authy using QR codes, this can be omitted.
Google authenticator allows the user to specify options to vary the exact way the PAM module works. See this appendix for details. This document assumes a particular set of options which should be fine to start with.
Each user now needs to log-in to the command line (e.g. using ssh) with their mobile phone handy to set up the shared secret.
Arrange for each user to enter the following command.
google-authenticator -t -D -W -r 3 -R 30
A QR code will be displayed which the user can scan with Authy. Authy will then display a 2FA code.
The user enters a 2FA code from Authy to verify all is working properly. The user can then enter 'y' to the following prompt:-
Do you want me to update your "$HOME/.google_authenticator" file? (y/n) y
Use the ntpstat or chronyc tracking command to make sure the system time is synchronised to a suitable time source.
Finally, edit /etc/pam.d/xrdp-sesman. Replace the single auth reference to gdm-password with gdm-password-ga. This will give us something like the following:-
%PAM-1.0
# Generic Fedora config
#auth       include      password-auth
#account    include      password-auth
#password   include      password-auth
#session    include      password-auth

# Gnome specific Fedora config (auth stanza with GA)
auth       include      gdm-password-ga
account    include      gdm-password
password   include      gdm-password
session    include      gdm-password
Changes to the PAM stack are effective immediately. You do not need to restart the system or xrdp-sesman.
Users should now be able to log in over XRDP by entering their passwords immediately followed by Authy OTP codes in the XRDP login-screen password field.
To revert to the old PAM stack, we simply need to revert the one-line change to /etc/pam.d/xrdp-sesman
NFS home directories introduce significant technical challenges. These are not further considered here.
The documentation for Google Authenticator suggests that it is possible to set up the PAM module to ignore users who haven't configured their secret key yet with the nullok option. This would make it trivial for the system administrator to set up PAM to allow both 2FA and password-only users on the same system.
Sadly, the nullok option doesn't play well with the forward_pass option at the time of writing. If the user has no secret key configured, nullok allows the PAM authentication sequence to continue, but in this case it will not honour the forward_pass option.
In other words, it is not simple to configure only a subset of users to log in with 2FA over XRDP. It is possible using group memberships and other PAM modules, but this is outside the scope of this article.
The user is able to set some options related to the way the authenticator works in their secrets file. This can be problemmatic for a couple of reasons in an enterprise environment:-
- Some of these options may not be compatible with in-house security policies. You should check this before using a version of the authenticator software.
- By fiddling with the options, users may lock themselves out of their accounts or produce hard-to-debug failures of the authenticator.
Google authenticator allows the user to specify options to vary the exact way the PAM module works.
By default the bare google-authenticator command will prompt the user to supply their own defaults for these options. This may not be what you want.
Running google-authenticator --help will display available options. You can use this to decide which options are best for your environment. A script or alias could be then used to set up each user with your preferred options. This can cut down the setup time for large numbers of users.
Here is a recommended set of options to start with:-
google-authenticator -t -D -W -r 3 -R 30
| Option | Meaning |
|---|---|
| -t | Set up TOTP-based verification (see also -c) |
| -D | Allow reuse of previously used TOTP tokens (see also -d) |
| -W | Disable window of concurrently valid codes (see also -w) |
| -r 3 -R 30 | Limit login attempts to 3 per every 30 seconds |