UVMF Questions - muneeb-mbytes/UVMF GitHub Wiki
- This block is used for parallel execution.
- Uses when the same operation or module instance is repeated multiple times.
Syntax
generate
genvar gv;
endgenerate
- Inside block, can have module instance, user-defined primitives, continuous assignment, initial and always blocks.
genvar Genvar is the loop variable that can be declared inside or outside the generate block.
- A genvar is a variable used in generate-for loop. It stores positive integer values. It differs from other Verilog variables in that it can be assigned values and changed during compilation and elaboration time.
In this type, we just generate the required module for the required number of times.
The below example will show how to do an instantiation of the module for the required number in another module.
Code Snap
module mod_1;
bit [3:0]a;
bit [3:0]b;
initial begin
$display("mod_1 generate");
a=2;
b=3;
end
endmodule

module mod_2;
bit [6:0]sum;

generate
  genvar gv;  //default keyword
  for (gv=0;gv<=1;gv++)
  begin
  mod_1 mod_inst(); // instance of mod_1
  end
endgenerate

initial
begin
$display("module_2");
sum = mod_2.genblk1[0].mod_inst.a+mod_2.genblk1[0].mod_inst.b;
$display("Sum generation from mod_1[0] = %0d",sum);
// both mod_1[0] and mod_1[1] executes parallelly
sum =2*(mod_2.genblk1[1].mod_inst.a+mod_2.genblk1[1].mod_inst.b);
$display("Double of sum generation from mod_1[1]= %0d",sum);
end
endmodule
Output Snap
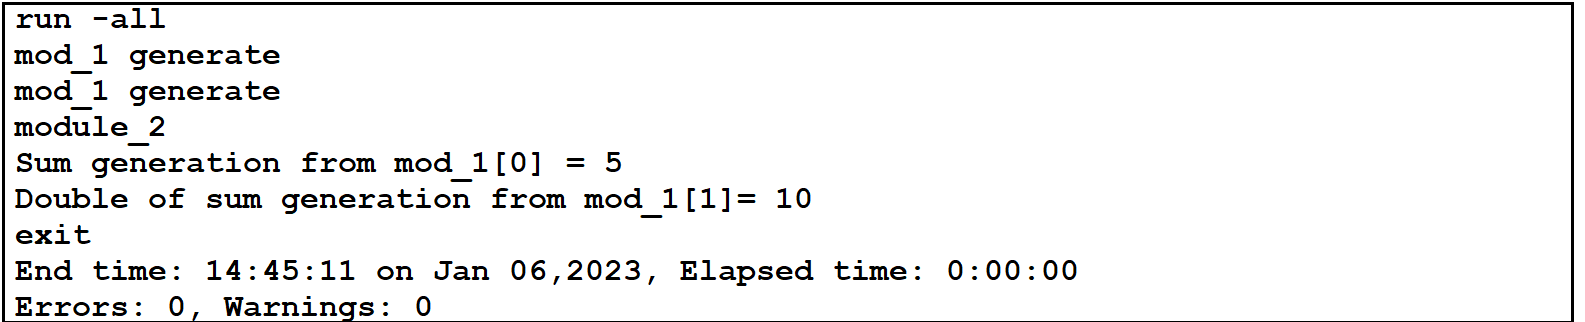
fig 1- Output for generate block
An inter-assignment delay statement has a delay value on the LHS of the assignment operator. this indicates that the statement itself is executed after the delay expires, and is the most commonly used form of delay control.
an intra-assignment dealy is one where there is a delay on the RHS of the assignment operator. this indicates that the statement is evaluated and values of all signals on the RHS are captured first. Then it is assigned to the resultant signal only after the delay.
Syntax pf the inter assignment delay
#<delay> <LHS> = <RHS>
Syntax of the intra-assignment dealy
<delay> #<LHS> = <RHS>
Example:
  module tb;
reg [3:0]a;
reg [3:0]b;
initial
begin
a=1;
b=1;
$monitor("time =%0d ; a= %0d ; b = %0d",$time,a,b);
#5 a=2;
#5 b=4;
fork
 a = #5 a+b;
 #3 a = b;
 join_none

end
endmodule
Here in the above example Inter and intra-assignment delays code
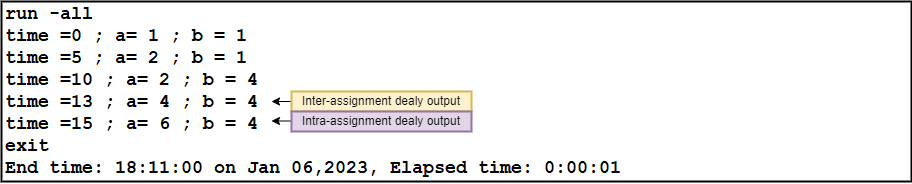
Fig. 2 - output for Inter and intra-assignment delays code
The above example is the inter and intra-assignment dealy the 5-time units a and b are assigned using blocking statement. same as the 10-time units.
at 13-time b value is assigned to the a value. in the intra-assignment dealy
at 15-time a and b are evaluated but not yet assigned when the blocking statement which is a value a is executed. So when RHS of a is evaluated a additional of b still has an old value of 2 and 4 will be assigned to a. $monitor does not detect a change to display the statement.
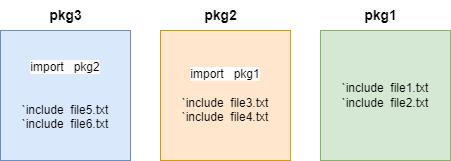
Figure 3: General example for importing packages.
Let us assume the above example, in which the pkg1 are included with 2 files. In similar way pkg2 is imported with pkg1 along with including 2 files and pkg3 is imported with pkg2and includes two more files.
Since pkg1 is imported inside pkg2, all the files which are included in pkg1 are visible and can be reused by the pkg2.
In similar way pkg2 is imported in pkg3, hence all the files included in pkg2can be used by pkg3 files. Since the pkg1 is not imported within the pkg3, the files included within that pkg1 are not available and cannot be reused by pkg3.
Eventhough we have imported pkg1inside pkg2, and if we still try to import only pkg2 and assume that pkg1 can be internally imported by pkg2, that is a wrong assumption. Every time if we need to import any file we need to specify it explicitly. Importing one file just imports the files within it, but not the another import file within the program. By the above example it is very clear that pkg3 can use only file3.txt and file4.txt as they are included files in pkg2and import pkg1 was also existed within the pkg2but it didn't even executed as it as not been triggered.
IN UVMF:
In UVMF, for system level testbench generation there will be generation of 3 main hierarchical packages they are agent_pkg ,sub_env_pkg and env_pkg. All the files included in agent_pkg are available for sub_env_pkg as it internally imports the agent_pkg and in similar way env_pkg imports sub_env_Pkg.
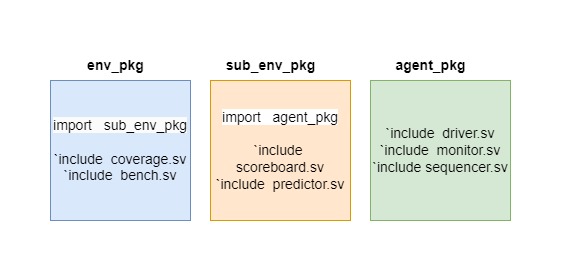
Figure 4: Only sub_env_pkg is imported, agent_pkg files cannot be used in env_pkg as it has not been imported.
Now if we try to compile and simulate the whole code we will get compile error as the files which are included in agent_pkg are not available to use at environment level because env_pkg as not imported the agent_pkg. Eventhough agent is hierarchically below the environmrnt still it was not able to access the agent_pkg. By this it is very clear that imports are not hierarchically usable, If we want to use any internal blocks files still we have to import that file and has to reuse.
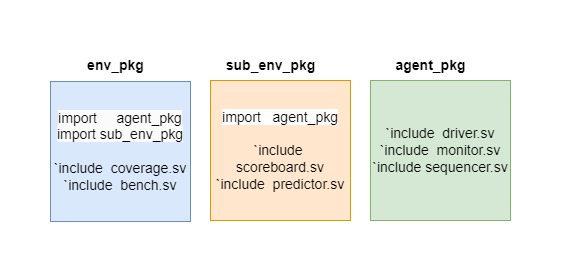
Figure 5: agent_pkg and sub_env_pkg are imported in env_pkg for sucessfull compilation.
-
NOTE:
For Successful compilation of generated system level code using UVMF, we have to import the agent packages in the system level environment yaml file. So that all the files from sub_env blocks and agent blocks are available and can be used by the top_env block.
- Serial communication is a commonly used method with which to exchange data between computers and peripheral devices. Serial transmission between the sender and receiver are subject to strict protocols which provide security and reliability and have led to its longevity and it's examples are SPI,I2C,RS232 etc.
- Used in shorter distances and Serial communication is the preferred method when dealing with circuits or processors with a limited number of I/O pins.

Fig.6 Working of Serial Protocols
-
Binary pulses are used to transmit data in serial data transmission. The binary digit one is represented by five volts or a HIGH logic. Conversely, binary zero is denoted with a logic LOW or zero volts. In order to implement serial communication, a source and destination are required. They are also referred to as the sender and receiver. Various types of serial communication can be employed and are designated as Simplex, Half Duplex, and Full Duplex
-
The Simplex method implements one-way data transmission. In this scheme, only the source or destination is active at any given time. If the source is sending data, the receiver has no choice but to accept the transmission. Simplex mode is used when broadcasting television or radio signals.
-
Half Duplex mode permits the source and destination to both be active, but not simultaneously. Transmission only occurs in one direction at a time. A case in point can be seen when using the Internet. When you make a request from your computer for a webpage, the server processes the request. It then becomes the sender when returning the information to your computer, which is now the receiver.
-
Full Duplex mode is the world’s most widely used form of serial communication. Source and destination are both active and can send and receive data simultaneously. Your smartphone is a prime example of full duplex mode in action.
- More I/O lines are needed to implement parallel communication. When data is sent in a block of 8,16 or 32 bits, each bit needs its own physical I/O line. The speed of parallel transfer is faster than serial transmission but needs a larger number of I/O lines. Parallel data transfer is used in personal computers to exchange data with internal components such as the random access memory (RAM) or the CPU.

Fig.7 Working of Parallel Protocols
| Serial Bus | Parallel Bus |
|---|---|
| Sends one data bit at each clock pulse | Transfers a block of data at a simultaneously |
| Better method for long distance communication | Mostly used for short distance communication |
| Slow transmission speed | Faster speed of communication |
| Requires a single wire for data transmission | Requires ‘n’ number of lines for transmitting ‘n’ bits |
| Low installation cost | Higher installation cost |
| Example: Computer to Computer | Example: Computer to multifunction printer |
Serial protocol divided into two types:
- Serial synchronous protocol
- Serial asynchronous protocol
Serial synchronous protocol - SPI protocol
- Used for longer distance
- Communication done with outside chip.
- Master and slave have different clocks because both are working in different chip.
Limitation
- serial synchronous protocol cannot be used for more distance.
Serial asynchronous protocol - UART
- UART communication happens between single line.
- Full duplex communication
- UART has start bit and stop bit to indicate when the data transfer done.
- High speed communication protocol
- If distance is more, data loss may happen.
- UART uses 128B/130B encoding for data transmission
Parallel Protocol
- Parallel Synchronous protocol
- Parallel Asynchronous protocol
Parallel Synchronous protocol - APB Protocol
- Half duplex communication
- Working on system clock
Parallel Asynchronous protocol - AXI protocol
- Burst based transaction
- Full duplex Communication
Protected variables can be assessed by using set() and get() method. In parent class protected (variable) should set.(variable) and we can access that variable in child class using get.(variable).
Example:
   class fruit;
   rand apple;
   rand orange;
   protected a = tomato;
   set.(a);
   endclass

   class dryfruits extend fruit;
   get.(a);
   endclass

Figure 8: call print() function in random sequence class

Figure 9: add printing preference in do_print() function in transaction class

Figure 10: output in table format
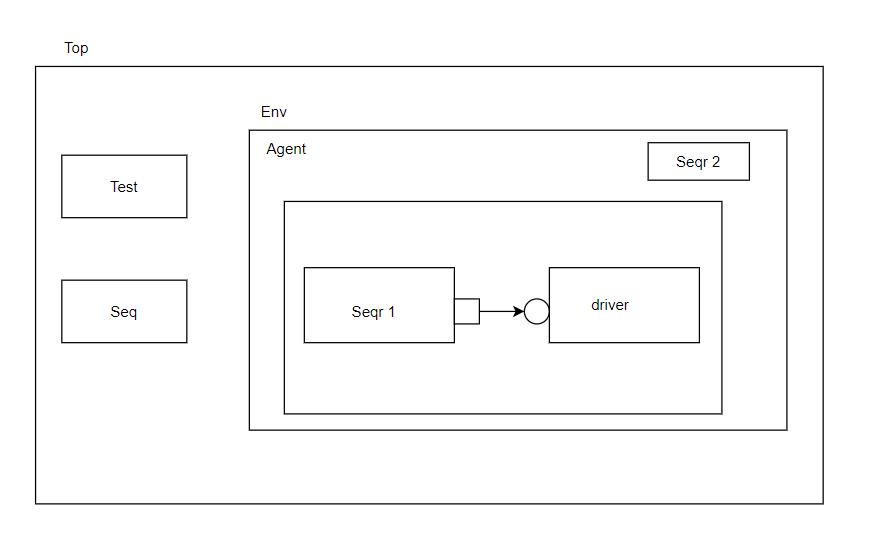
Figure 11: UVM Deadlock Method diagram
Generally, a sequence that is in the test, transmits the transactions to the sequencer and then the sequencer sends the transactions to the driver. If an object is created for a sequence then the sequencer initiates the transaction to the driver. But if the object is created again using a new method that creates a memory for another sequencer and driver then that sequencer is pointing to another driver but the driver which created in the previous case is still waiting for that sequence this waiting is called UVM DEADLOCK.
In the above diagram, seqr1 is created when the object is created, but when the object is again created then new seqr2 is created which is pointing to another driver, so the previous driver is still waiting for sequencer 1 which causes UVM DEADLOCK.
To prevent this we have to make sure that object is created only once for the same sequence so that another sequencer and driver are not created thereby waiting does not takes place thereby avoiding UVM DEADLOCK
8. UVM raise objections and drop objections using the set drain method and phase_ready_to_end methods
-
Objections are used to stop the simulation process.
-
Using this simulator know where to start and stop the simulation. When the number of raised objections is equal to a number of dropped objections then the simulation stops.
-
To make the simulator when to go for the extract phase we use objections.
-
Components and Objects can raise and drop objections.
-
It remains in the same phase till all the objections are dropped.
-
These are used in Run_Phase.
- phase.raise_objection(this);
- phase.drop_objection(this);
- starting_phase.raise_objection(this);
- starting_phase.drop_objection(this);
UVM provides an objection mechanism to allow hierarchical status communication among components which is helpful in deciding the end of test.
There is a built-in objection for each phase, which provides a way for components and objects to synchronize their testing activity and indicate when it is safe to end the phase and, ultimately, the test end.
The component or sequence will raise a phase objection at the beginning of an activity that must be completed before the phase stops, so the objection will be dropped at the end of that activity. Once all of the raised objections are dropped, the phase terminates.
Example:-
  class agent extends uvm_agent;
  task run_phase(uvm_phase phase);
  phase.raise_objection(this);
  #100;
  phase.drop_objection(this);
  endtask
Moves from run_phase to extract_phase after 100ns after all objects are finished.
Lets consider an example:- A master agent may need to complete all its write and read operations before the run phase should be allowed to stop. In this example, typically objections can either be added in sequence or test.
Objection in sequence:- objection is raised when it started as a root sequence (a sequence which has no parent sequence), and to drop the objection when it is finished as a root sequence.
        class ex_seq extends uvm_sequence#(s_seq_item);
        task pre_body();
        // raise objection if started as a root sequence
        if(starting_phase != null)
        starting_phase.raise_objection(this);
        endtask

        task body();
        `uvm_do(req)
        endtask

        task post_body();
        // drop objection if started as a root sequence
        if(starting_phase != null)
        starting_phase.drop_objection(this);
        endtask
        endclass
The starting_phase member is only set automatically if the sequence is started as the default sequence for a particular phase. so objections were used in the sequence if it is default sequence for a particular phase.
Objection in test:- If the sequence need to be started explicitly i.e in the test, then the objections were added in the test instead of sequence. Below code shows how to.
     class ex_test extends uvm_test;
     task main_phase(uvm_phase phase);
     phase.raise_objection(); //rasing objection
     ex_seq.start(ex_agent.sequencer);
     phase.drop_objection();  //droping objection
     endtask
     endclass
Note: When the sequence is started explicitly, the starting_phase member is null, so the sequence will not raise or drop the phase objection.
Set drain time
Drain time is the time for which the simulation halts after the last objection is dropped in a phase,It is the actual time at which the phase is ended.
-
We can set drain time in any phase before run phase. usually done in test.
syntax:phase.phase_done.set_drain_time(this,2);
Here phase is the uvm_phase object which has handle called phase_done in which the function set_drain_time exists.
code snippet:
     class ex_test extends uvm_test;
      ......
     task run_phase(uvm_phase phase);
      phase.raise_objection(this);
      phase.phase_done.set_drain_time(this,2);
      `uvm_info("Run_phase",$sformatf("%0t all ok",$time),UVM_LOW)
      #5
      phase.drop_objection(this);
      #2 `uvm_info("Run_phase",$sformatf("%0t dropped obj",$time),UVM_LOW)
     endtask
     endclass
Here when the test ex_test is being called each and every phase in it is called implicitly.and in run phase we set drain time as 2 which means the whole phase takes 2 nanoseconds to finish.
output:
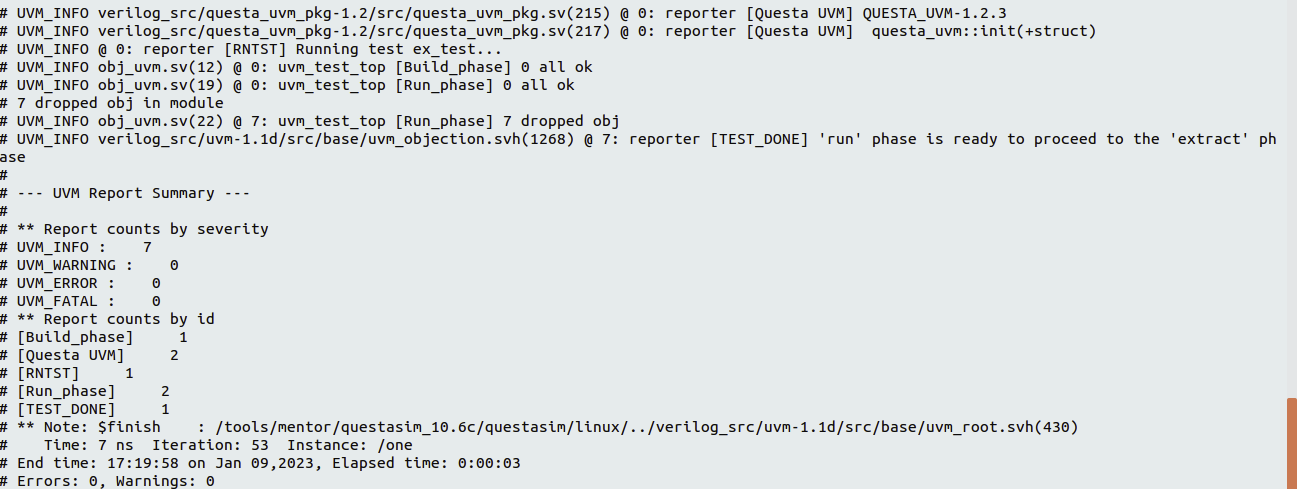
figure 12 : raise objections and drop objections
- phase_ready_to_end() is called whenever the total objection count for the current phase decrements to 0.
- For every type of phase, phase_ready_to_end will be iterated for 19 times. After this iteration, all forks will be killed.
- If the objection is raised and dropped in phase_ready_to_end(), it will be called again. To avoid endless loops, there is a maximum count of phase_ready_to_end() that defaults to 20.
Step 1 : create a leaf sequence in the interface (here it is add_fixed_sequence)
- After we write the yaml file , we need to generate the testcase of given DUT. When all required files are generated under UVM_Framework/UVMF_2022.3/my_adder/output/verification_ip/interface_packages/add_in_pkg/src we can observe some sequences is autogenerated which is show in under fig

Fig-13 add a sequence to UVMF testbench
- Under the src file we can create our own sequences. Here we created add_in_fixed_sequence.sv.In this sequence we gave the fixed value of input.
Code snippet of fixed_sequence
class add_in_fixed_sequence #(
      int add_width = 4
      )
  extends add_in_sequence_base #(
      .add_width(add_width)
      );

  `uvm_object_param_utils( add_in_fixed_sequence #(
                           add_width
                           ))

  // pragma uvmf custom class_item_additional begin
  // pragma uvmf custom class_item_additional end

  //*****************************************************************
  function new(string name = "add_in_fixed_sequence");
    super.new(name);
  endfunction: new

  // ****************************************************************************
  // TASK : body()
  // This task is automatically executed when this sequence is started using the
  // start(sequencerHandle) task.
  //
  task body();

      // Construct the transaction
      req=add_in_transaction#(
                .add_width(add_width)
                )::type_id::create("req");
      start_item(req);
      req.a=4;
      req.b=7;
      finish_item(req);
      `uvm_info("SEQ", {"Response:",req.convert2string()},UVM_MEDIUM)

  endtask

endclass: add_in_fixed_sequence

// pragma uvmf custom external begin
// pragma uvmf custom external end
Step 2: include the sequence created in the interface package(in our case add_in_pkg.sv)
- After adding the sequence file in src we need to include all created file in add_in_pkg.sv ,which is located in UVM_Framework/UVMF_2022.3/adder_yaml/newtest/verification_ip/interface_packages/add_in_pkg/add_in_pkg.sv.
We add all the created sequence.sv file under the pragma_begin end in add_in_pkg.sv
code snippet of include sequence
 // pragma uvmf custom package_item_additional begin
   `include "src/add_in_fixed_sequence.sv"
   // UVMF_CHANGE_ME : When adding new interface sequences to the src directory
Step 3: create a handle for the leaf sequence in sequence base (in our case it is add_ben_bench_sequence_base.sv)
we need to add our created sequence handle in that file (add_ben_bench_sequence_base.svh)

fig-14 create a handle for the leaf sequence in sequence base
Step 4: create a virtual sequence to start leaf sequence(here add_fixed_sequence)
So in order to access the above class of sequence, we need to create an object for it and start the sequence. So we move to project_bench (UVM_Framework/UVMF_2022.3/adder_yaml/newtest/project_benches/add_ben/tb/sequences/src/). Here we create another file add_fixed_sequence.sv in which we create handle for sequence which we created in interface package(i.e handle for add_in_fixed_sequence.sv) and we start the sequence.
code snippet
`ifndef __ADD_FIXED_SEQUENCE
`define __ADD_FIXED_SEQUENCE

`include "uvm_macros.svh"

class add_fixed_sequence #(int add_width = 4) extends add_ben_bench_sequence_base;

  `uvm_object_utils(add_fixed_sequence)

  function new(string name = "add_fixed_sequence");
    super.new(name);
  endfunction : new

  virtual task body();
  add_in_agent_fixed_seq = add_in_fixed_sequence#()::type_id::create("add_in_agent_fixed_seq");

  add_in_agent_config.wait_for_reset();
  add_in_agent_config.wait_for_num_clocks(1);
  repeat (5)
begin
  add_in_agent_fixed_seq.start(add_in_agent_sequencer);
end
 // add_in_agent_config.wait_for_num_clocks(50);

endtask

endclass : add_fixed_sequence

`endif
Step 5: include the virtual sequence in sequence_pkg(here it is add_ben_sequences_pkg.sv)
Now we include the above file in the package file of add_ben_sequences_pkg.sv (UVM_Framework/UVMF_2022.3/adder_yaml/newtest/project_benches/add_ben/tb/sequences)
  // pragma uvmf custom package_item_additional begin
  `include "src/add_fixed_sequence.sv"

  // UVMF_CHANGE_ME : When adding new sequences to the src directory
Step 6: create a test to start that sequence (here it is add_fixed_test.sv)
Now we direct to path - UVM_Framework/UVMF_2022.3/adder_yaml/newtest/project_benches/add_ben/tb/tests/src and we create files for every sequence for both which are auto-generated (add_in_random_sequence.sv) and our own created sequence (add_in_fixed_sequence.sv) which is shown in the below fig.

fig-15 which are auto-generated and own created sequence file list
code snippet:
`ifndef __ADD_FIXED_TEST
`define __ADD_FIXED_TEST

`include "uvm_macros.svh"

class add_fixed_test extends test_top;

  `uvm_component_utils(add_fixed_test)

  function new(string name = "add_fixed_test", uvm_component parent = null );
    super.new(name, parent);
  endfunction : new


  virtual function void build_phase(uvm_phase phase );
    add_ben_bench_sequence_base::type_id::set_type_override(add_fixed_sequence #(4)::get_type());
    super.build_phase(phase);
  endfunction : build_phase

endclass : add_fixed_test

`endif
Here we are overriding it with our created sequence handle so that it will not run the auto-generated sequences which are present in add_ben_bench_sequence_base.svh (located at UVM_Framework/UVMF_2022.3/adder_yaml/newtest/project_benches/add_ben/tb/sequences/src/add_ben_bench_sequence_base.svh)
Step 7: include that test in the tests_package(here it is add_ben_tests_pkg.sv)
Now include your sequence file in the test_package (add_ben_tests_pkg.sv which is located at UVM_Framework/UVMF_2022.3/adder_yaml/newtest/project_benches/add_ben/tb/tests/add_ben_tests_pkg.sv)
code snippet:
 // pragma uvmf custom package_item_additional begin
   `include "src/add_fixed_test.sv"
  // UVMF_CHANGE_ME : When adding new tests to the src directory
ifndefis a macro which compiles during the pre-compilation phase, this is similar to (if!)if NOT condition if a particular macro is not defined then if NOT condition becomes true and executes the statements below it. The meaning of ifndef is that if a particular macro is defined earlier consider that for compiling and it also tells the simulator not to compile the same macro again, in case if it is not defined then the codes below this macro are defined and compiled.
-
Example1: An example which uses
ifndefmacro to compile the set of statements (Different macros name given to different files).`include "class1.sv" `include "class2.sv" module display; extended_class_1 ex1_h; extended_class_2 ex2_h; initial begin ex1_h=new(); ex2_h=new(); ex1_h.display(); ex2_h.display(); end endmodule
First file having macro name as MY_CLASS.
  `ifndef MY_CLASS
  `define MY_CLASS

     class my_class;

      function void display();
         $display("Display from class");
      endfunction

    endclass

    class extended_class_1 extends my_class;

    function void display();
     $display("------------------------------");
     $display("Display from extended_class_1");
    endfunction
    endclass
 `endif
Another file having macros with different name and here in our file it is MY_CLASS2.
    `ifndef MY_CLASS_2
    `define MY_CLASS_2

    `include "class1.sv"

    class extended_class_2 extends my_class;

        function void display();
           $display("-------------------------------");
            $display("Display from extended_class_2");
           $display("-------------------------------");
       endfunction
    endclass
      `endif
OUTPUT:

Figure 16: Simulates without any error, as the macros name were diffrent.
Example2: Macros with same name does'nt compile both the files.
include "class1.sv" include "class2.sv"
module display; extended_class_1 ex1_h; extended_class_2 ex2_h; initial begin ex1_h=new(); ex2_h=new(); ex1_h.display(); ex2_h.display(); end endmodule
First file having macro name as MY_CLASS.
  `ifndef MY_CLASS
  `define MY_CLASS

     class my_class;

      function void display();
         $display("Display from class");
      endfunction

    endclass

    class extended_class_1 extends my_class;

    function void display();
     $display("------------------------------");
     $display("Display from extended_class_1");
    endfunction
    endclass
 `endif
Another file having macros with the same name and since this has already been compiled
    `ifndef MY_CLASS
    `define MY_CLASS

    `include "class1.sv"

    class extended_class_2 extends my_class;

        function void display();
           $display("-------------------------------");
            $display("Display from extended_class_2");
           $display("-------------------------------");
       endfunction
     endclass
     `endif
OUTPUT: Error during compilation as two files have the same macro names.

figure 17 of the Error during compilation as two files have the same macro names.
- It is the main VIP sequence provided by the vendors.
- we use sequence layering in order to start the leaf sequence from our test case.
- Sequence layering means using virtual sequences pointing to null in order to start the leaf sequence without disturbing the vendors VIP.
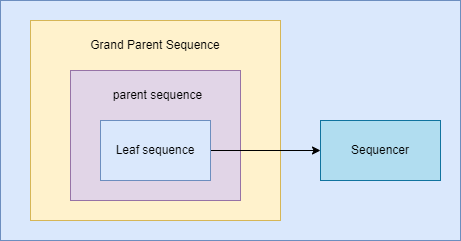
Fig 18: Leaf sequence
- Here leaf sequence is the vendor sequence and parent, grandparent sequence is our own sequences which are virtual sequences.
- The leaf sequence is instantiating inside the our sequences.
- Inorder to start the leaf sequence first we start the grandparent sequence using start method by passing null as the sequencer. Then body task of grandparent contains parent sequence start method with the sequencer has null and will execute the body task of grandparent which will point to the parent sequence body task.
- Then parent body task contains the leaf sequence start method which has real sequencer and starts the sequence of leaf sequence.
| Macros | Parameters |
|---|---|
| macros are replaceable | parameters are like variables |
| macros works in pre-compilation state | parameters works in Elaboration state |
| syntax : `define macro_name value | syntax : parameter parameter_name=value |
| We can use `define in any file | we can use parameter within the file |
| we can't give datatypes in macros | we can use and change datatype in parameters |
| Macros can have multiple lines | multiple lines cannot be possible here because parameter is just like declaring variables |
| We can give value for a macro in command line | parameters value can't be changed in command line |
Execution stage of macros and parameters

figure 19: Execution stage of macros and parameters
parameter data = 5; // data will be replaced by value 5 in Elaboration
`define  DATA data // in pre-compilation `DATA will be replaced with data
module tb();
  int a,b;
  initial begin

    $display("DATA=%0d",`DATA);


     b= `DATA + 2;

    $display(" b=%0d",b);
  end
endmodule
In the above code the parameter value of data =5 is used in the macro `DATA
`define  DATA 25
parameter data = `DATA;

module tb();
  int a,b;
  initial begin
    $display("data=%0d",data); // in pre-compilation `DATA will be replaced with 25.
    $display("DATA=%0d",`DATA); // data will be replaced by value 25 in Elaboration

     a = data +5;
     b= `DATA + 2;

    $display("a=%0d b=%0d",a,b);
  end
endmodule
In the above code the macro value of `DATA 25 is used in the parameter data.
Macros(`define) can be used in command line
-timescale 1ns/1ns +define+name=20
`define name 10

module hi;
int a;
initial begin
  $display("[%0t] a = %0d",$time,a);
  #1 a = `name;
  $display("[%0t] a = %0d",$time,a);
end
endmodule
We can give inputs to macros in command line interface using -timescale 1ns/1ns +define+name=20 in compile options .