Git wiki - mtafseerhaider/guides GitHub Wiki
A Version Control System, short VCS, is a system that records its changes to a file or a set of files over time, so that you can recall specific versions later.
- It is also called a Source Control System because in the context of software development, it is used to track and provide control over changes made to source code. Of course, it can also be used for maintaining documentation and configuration files of any kind. For example, for CI systems and CD pipelines.
- A Version Control System allows us to revert selected files back to your previous date, revert the entire project back to your previous date, compare changes over time, see who last modified something that might be causing a problem and who introduced an issue. When you lose files, you can easily recover to an earlier date.
- Collaboration - when we want to work on automating tests as a whole team, which means testers and developers, much of the collaboration, communication and documentation happens in the Version Control System of that specific project. Commit messages, pull requests, code reviews, comments, improvements and so on, the Version Control System contains the automation frameworks and the team’s whole working history and thus is a precious artifact.
- Pipeline for CI/CD - pipeline for continuous integration, deployment, and delivery. Without version control in place, it would be quite challenging or nearly impossible to integrate your test automation code into a pipeline. Tools like Concourse CI, Jenkins, Bamboo, Travis CI, Circle CI, just to name a few, have built-in support for source control sold at one can check out and run the automation code any time, where and when it is needed.
- Early Testing - running and testing an application locally from a freshly implemented feature branch in a document container, creates a fast feedback within a team and makes testing a matter of course for everyone and not just the tester.
- Learning - learning source control concepts and strategies is a gateway to other technical skills that are valuable for test automation. An example would be bash scripting for creating a Jenkins file for pipeline integration.
Git is one out of many version control systems, but it is probably the most well-known and used one these days. This because it version controls the Linux kernel and the huge popularity of GitHub, GitLab, and Bitbucket.
- Git arose out of the Linux development community, and in particular Linus Torvalds who invented it in 2005. It has matured and evolved a lot since then.
- The major difference between Git and other version control systems is the way Git thinks about data.
- Other version control systems like Subversion and PerForce think of the information they store as a set of files, and the changes made to each single file separately over time.
- Git is very different to this. Whenever you create a new commit, Git takes a picture, a so-called snapshot, of all your files.
- By taking a Snapshot, Git creates and compresses and stores three objects.
- The snapshot itself, also called the Tree Object
- The file or files which have to be versioned, called the Blob Object
- The Commit Object
- The snapshot object holds a reference to the compressed file objects (blob objects) and the commit object holds a reference to the snapshot.
- To be efficient, if the already existing files didn't change when committing something, Git simply adds the hash of the compressed files, blob objects to the new snapshot.
- If the already existing files have changed, Git compresses these changed files, stores them, and adds the hash of these compressed files to the new snapshot.
Simply said, Git is a file based key value store. You can insert any kind of content and get back a unique key. Every object in Git can thus be uniquely identified and referenced by its key. This key is called a hash or SHA-1 hash. So in nutshell, whenever Git creates one of these 3 objects, it is checksummed with a so-called SHA-1 Hash. - The hash itself is composed of 40 hexadecimal characters, 0-9 and A-F, and calculated based on the content of the object. For example,
24b9da6552252987aa49b52f8696cd6d3b00373
- So, we have the well-known commit hash, the snapshot hash and the file hash. With that mechanism in place, Git has integrity, which means it is impossible to change anything without Git knowing about it.
Git is a distributed version control system, short DVCS, which means that every committer on a project has always a copy of the whole repository on their machine. So, one can commit to the Git file system also in offline mode.
- Other version control systems, like Subversion or CVS, have a centralized repository model, and they're called centralized version control systems. They have a single database in place on a server and you need to be online and connected to it in order to be able to commit.
Git has three main states, also called trees, that your files can reside in.
- Modified or newly created data is living in the Working Tree. This is the place where your actual files, which you can see, are on your desk.
- Staged data that you have marked a search, which then goes into your next potential commit, lives in the Staging, or also called Index Tree. You can also see this tree as a kind of packaging station for your files. In reality, this is nothing else but a simple binary file.
- Finally, there is the commit data, which goes into the object store, also called the Local Repository Tree.
There is lots of theoretical stuff to digest in so to make life easier for you, let's practice Git in Tasks.
Creating a Git repository.
Before we create a Git repo, let's learn about basic concepts in Git.
[1] git --help
[2] git config
[3] git status
[4] git log
[1] With git --help, Git will give you a list of its most common commands. git –help followed by a specific command will give you a full detail description of that particular command.
[2] With git config, you have to first set your user name and your user email address. Git will then associate every single commit with these two things. Then you have to tell Git how it should handle the line endings, carriage return and line feed on your machine, depending on the operating system you have. This is done with the configuration auto control line feed (autocrlf) and safe control line feed (safecrlf). Optionally, you can also set your preferred Git text editor you want to use, otherwise it will open up your system’s default text editor. On Mac or Linux, this is in most cases Vim. On Windows, you should have been prompted to choose one during the Git installation procedure.
By amending the option --system, --global or -- local, you tell Git for which scope on your machine you want to set a specific configuration.
- System contains configurations for every user on all their repositories on one machine | git config --system
- Global host the configuration for one particular user | git config --global
- Local contains the configurations for a specific repository | git config --local
git config --system/global/local user.name "Your Name" user.email "[email protected]" core.autocrlf input (true) core.safecrlf warn core.editor "code --wait"
If you don't explicitly set an option, Git uses the local scope by default.
When we set auto carriage return to “true” — It means that Git will process all the text files and make sure that carriage return line feed is replaced by line feed when writing that file to the object database and turn all line feed back into carriage return line feed when writing out into the working directory. This is the recommended setting on Windows because it ensures that your repository can be used on other platforms as well while retaining carriage return line feed in your working directory.
When we set auto carriage return to “input” — It means that Git will process all the files, all the text files and make sure that the carriage return line feed is replaced by line feed when writing that file to the object database. It will not however do the reverse, when you read files back out of the object database and write them into the working directory, they will still have line feed to denote the end of the line.
This setting is generally used on Unix, Linux, USX and of course macOS to prevent carriage return line feed from getting written in to the repository. The idea behind that, if you paste that code from a web browser and accidentally got carriage return line feed into one of your files, Git would make sure they were replaced by line feed when you wrote to the object data base.
[3] With git status, you are able to see all the current path differences between working directory, staging index area, local repository and remote repository if you have configured a remote one.
[4] With git log, you can see all the commits which were created on a branch. It shows you the whole commit history including the hash, the author, and the date of the current active, which means checked-out local branch.
We can add few more options with this command:
- git log --oneline --graph --decorate - this will compress multiple entries into one line, provide the ASCII graph depicting the branching graph and finally add labels or tags or anything that sort of annotates the commits.
- **git log --since="3 days ago" - bring up the commits that have happened in the last three days.
- git log -- - look at the specific history of an individual file.
- git log --follow -- - follow the renames or the commit history for that specific file
[5] git init
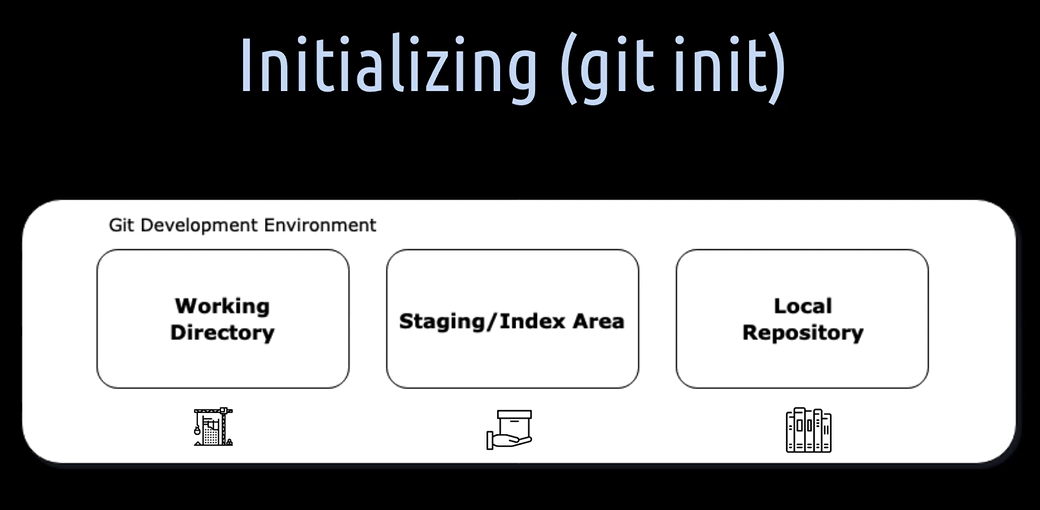
When we initialize a repository locally, we will get these three boxes. They represent the development environment.
Let's have a closer look at these three Git trees.
- The first box is the working directory. That's the construction site or the place where we actually work on our project files.
- The second box is the staging or also called index area. That's the place where we package the files for a commit.
- The third place is the local repository. That's the place where all the created commits and other objects are stored.
[5] By initializing a Git repository (using git init) a hidden directory named “.git” is created.
This directory contains the index file, the local repository and all the other information that is necessary for our project. Information about commits, remote repository if available, addresses, a lock which stores the commit history, et cetera. You can see the “.git” directory is a bit of a magic place where we put our magic show in.
We can actually see this hidden “.git” directory in any IDE, in IntelliJ to do that you have to go to Preferences > then to Editor > File Types, and then there is a section called ignore files and folders.
Then just delete this “.git” path in there and from then on you will see in the project tree here, that hidden .git directory.
We can shortly open that up and have a look at it and there we will find sub directories, as follows:
- hooks directory - stores server-side scripts
- info directory - exclude file for ignored patterns
- objects directory - the actual Git local repository in which all the objects are stored
- refs directory - the reference directory where all the branches are stored
- config file - this is where all our local configurations are stored
- description file - contains the description about the repo
- HEAD file - points to the current branch
- index file - points to the staging area
[6] git status
[7] git add <file> or .
[8] git ls-files --stage
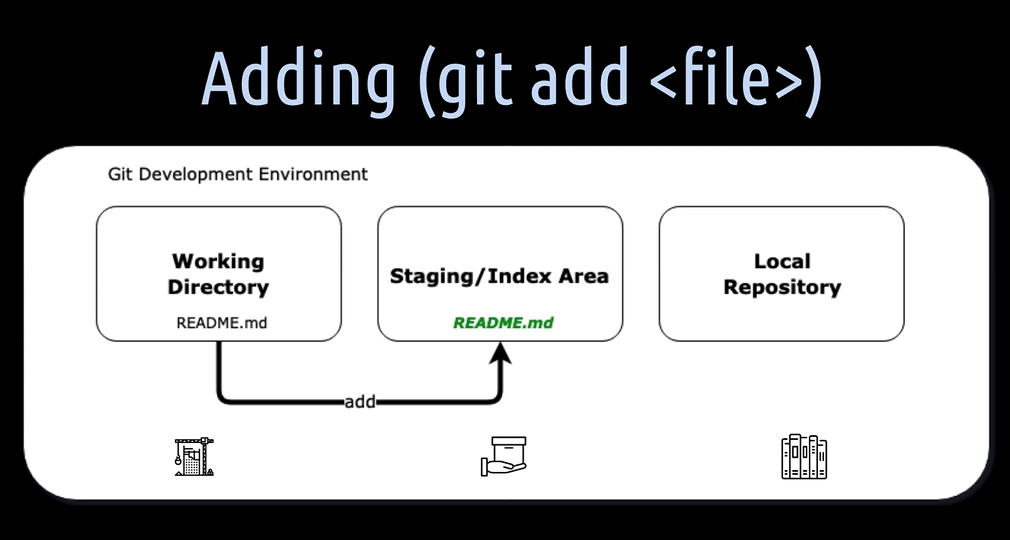
As soon as we have created the new file or modify the file in the working directory, we have to add this file to the staging, also called index area.
[6] With git status, we see what is up in the Git project - basically it tells us about any commits or any untracked files in the working directory.
[7] With git add , we can add the file from the working directory to the staging area. In git add . the dot tells Git to add everything, every changed or newly created file to the staging area.
[8] The staging area is just a simple binary file called the index file located in the .git directory. With git ls-files --stage, we can see what is actually in the index area.
Notice by adding all the files to the staging area, Git copies these files from the working directory, compresses them and stores them already kind of temporarily as a blob up check in the objects folder. So, all the file objects are now ready here in the local repository. But we can't do anything with these objects yet. In order to link them into a snapshot for a later reuse, we have to commit them into the local repository. This is important to notice because once you understand how Git handles its objects, it is much easier to see how they're all connected with each other.
[9] git commit -m "commit message"

[9] With git commit -m "commit message", you can commit the indexed files from staging to local repository. When you create a commit, you can add a so-called commit message. A commit message is, besides the content, the second most important thing you can add to a commit. A commit message lets you know what the committers intention was with a particular commit.
A good commit message consists of 3 parts:
- a short, precise title stating what the commit will do once it is applied. For that, use the imperative form and ask yourself what this commit will do once it is applied. Then start writing with an upper-case letter. For example, “Fix a typo in the README file.”
- a body that explains more deeply why exactly you did this commit. For example, "Fixes an important typo in the README file that might mislead people using the framework."
- a one liner at the bottom to add a reference to an issue tracker system. For example, "BUG-43 Fix typo in the README"
We can take a shortcut and add a commit and a message in one using git commit -am "commit message".
The local repository is located in the objects folder in the .git directory.
Whenever we create the commit it creates a snapshot of the files we have in the index and also a commit object which then references the snapshot. The files, the blob objects are added to the local repository by staging them.
[10] git remote add
[11] git push <reference> <target branch>

With git push, the commit(s) are sent from local repository to the remote repository. Assume we want to work as a team on a development project, we are going to need a Git repository manager like GitHub, Bitbucket, GitLab, Gitbucket, just to name a few, in place.
The push is always on some branch from the local repository to the project's remote repository manager. Let's say we have a remote repository URL:
[10] With git remote add origin , we setup remote reference for our local repository. Usually, we call it origin, but it actually doesn't matter how we call it, we could also name it Black Swan or whatever.
[11] With git push origin , we push the local repository to the remote repository (target branch). With git push – set-upstream origin main, we do all in one. We actually set the upstream origin main and push it directly to the remote repository. In essence, We have pushed the local main branch to the corresponding remote main branch on the remote repository manager.
Getting ready for collaboration with team members.
In this task, we'll learn about cloning an already existing remote repository, fetching changes made on the remote repository to the local repository, merging changes into the current active local branch, and finally, pulling, which is fetching and merging in one go.
[12] git clone <remote repository url>
[13] git branch -vv
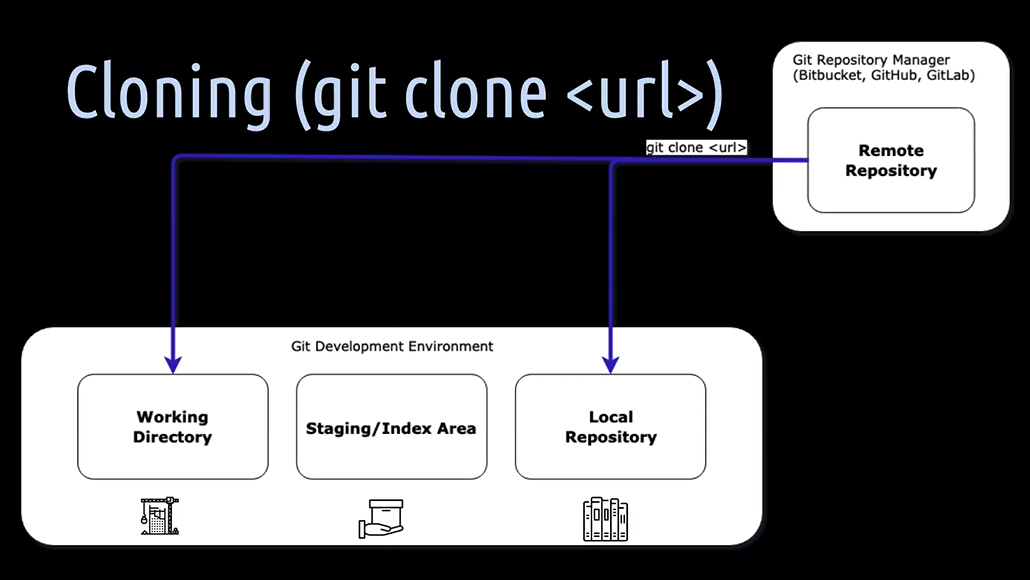
Cloning an already existing remote repository is similar to the concept of initializing, for example, from GitHub, Bitbucket or GitLab.
As soon as we have cloned the remote repository, we will also have a development environment as before, with the 3 boxes.
[12] With git clone - you can clone the remote repository into 2 places — into the working directory and into the local repository.
As you know Git is a distributed version control system, which means the local repository is a full-fledged copy of the remote repository and acts just like it. By cloning an already existing repository, you will get an additional box for the remote repository, which is then automatically connected to your local development environment. You don't have to additionally set the remote as upstream.
[13] With git branch -vv - you can know about the active main branch and its connection to the origin main branch, which means the local main branch is connected to the remote repository main branch.
[14] git fetch
[15] git branch -l -a
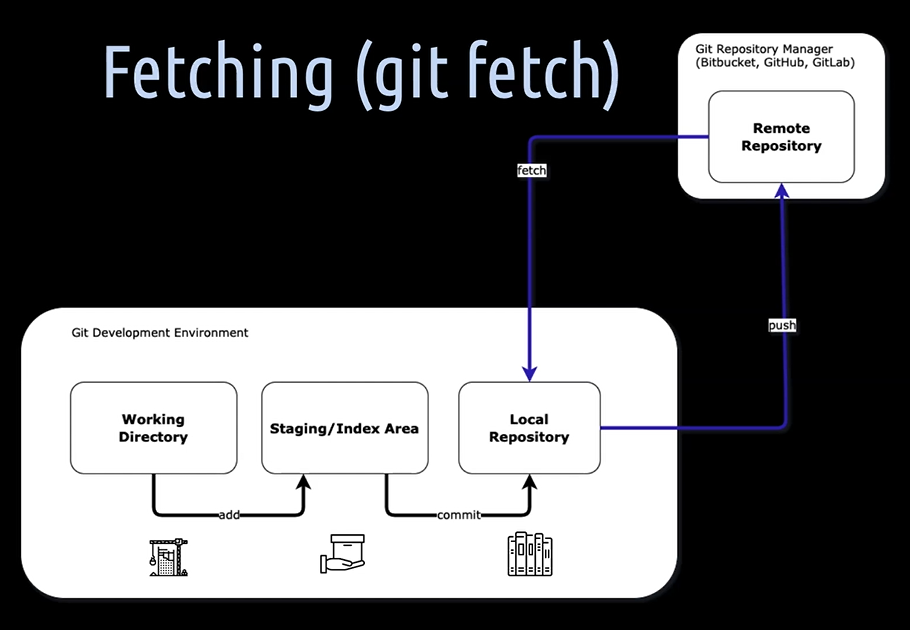
[14] By fetching, we get all the data — which means all the remote branches and all its objects, commits, snapshots, files — into the local repository.
Luckily, this does not touch, which means merge anything into the local checked out branch, in the working directory; nor the staging area.
[15] With git branch -l -a - you can see all the branches which are in the local repository.
[16] git merge
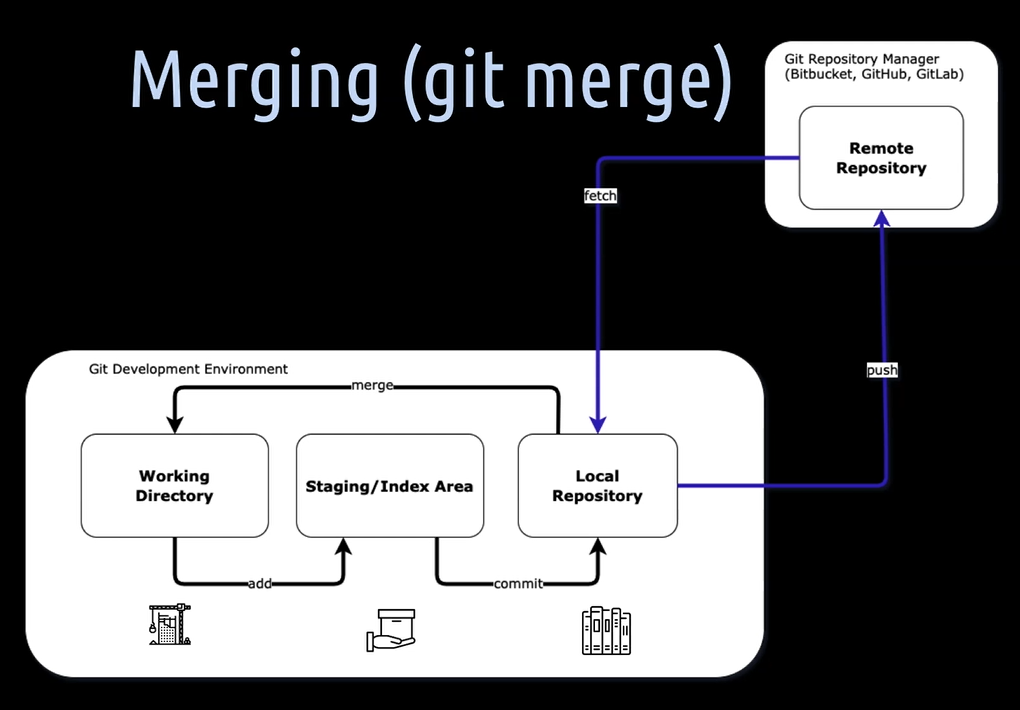
[16] With git merge - you can merge the changes which you have fetched into the local repository into the current active branch in the working directory, thereby also the staging area, which means the index file is updated accordingly.
A fast-forward merge is a merge from a branch into another, one where the target branch, usually the local master branch, has not diverged from the source branch.
[17] git pull
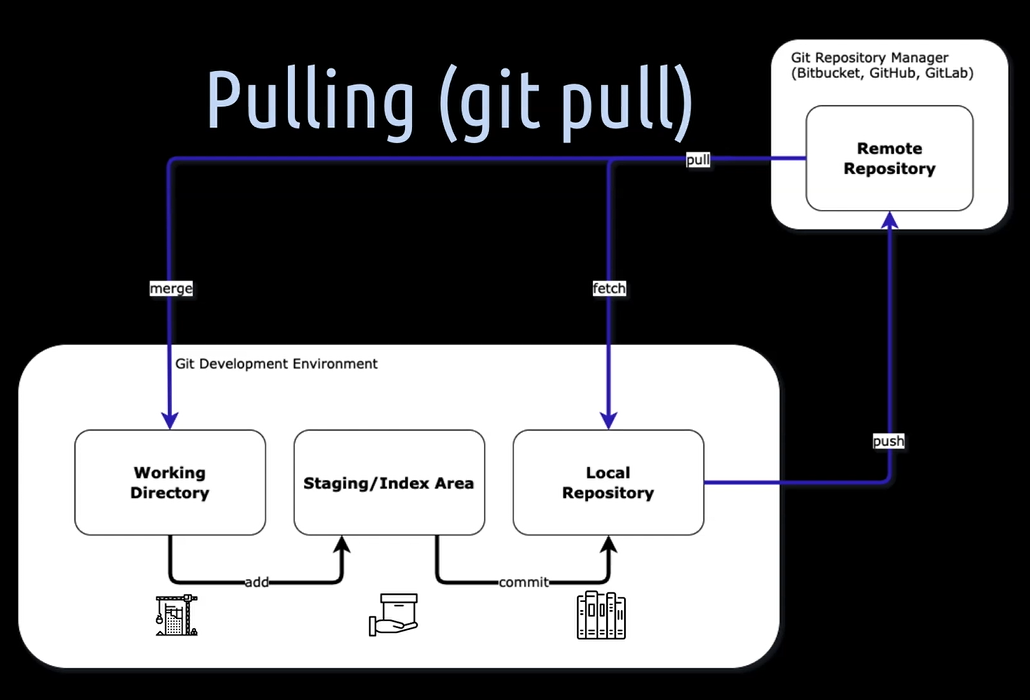
[17] By pulling, we fetch new data from the remote repository into the local repository, and also merge all the new things depending on the current active local branch into the working directory. The index gets also updated accordingly. Pulling is the shortcut for fetching and merging.
Notice that we cannot pull any changes as long as there are modified files in the working directory which would be changed by the commits we are pulling and trying to merge of course. To get the modified files away from the working directory, we can either commit them to the local repository of that branch. Or, if we don't want to commit them yet, we can put them with stashing in a stash in the working directory.
[18] git stash
[19] git stash list
[20] git stash pop
[21] git stash apply
[22] git reflog
[18] With git stash - you can save the current state of changes in the working directory and the index. This command saves our local modifications away and reverts the working directory back to a clean state to match the HEAD, which means latest commit of the active checked out branch. The first stash with the zero index is called WIP on the master branch.
[19] With git stash list - you can see a list of all stashes Git has created.
[20] With git stash pop - you can apply the stash and delete it from the list.
[21] With git stash apply - you can apply the stash but it does not delete it from the list.
Note that the stashes acts as a first in, last out process. This means that the latest stash is always on the top of the list.
[22] The git reflog is especially helpful after some occasions when returning to work and don't exactly remembering what we have done in the repository before we left. Or if we just want to find a certain commit in the local Git history. Git reference log, short reflog, records and shows all the tips, HEADs, and the references which were updated on all the commits in the local repository, on all the branches, in the order in which we have referenced them last.
Push a local branch with some new tests to the remote repo and create a PR.
In this task we will start looking at the first three of the most important advanced concepts in Git. Those are branching, merging one branch into another branch, and rebasing a branch onto the state of another branch.