Setup - morerokk/BottomGear GitHub Wiki
Setting up your PiShock with this app is pretty easy.
Avatar setup
You need to setup your avatar to receive shocks.
Add a VRC Contact Receiver component anywhere on your avatar. If setup correctly, it should look like this:
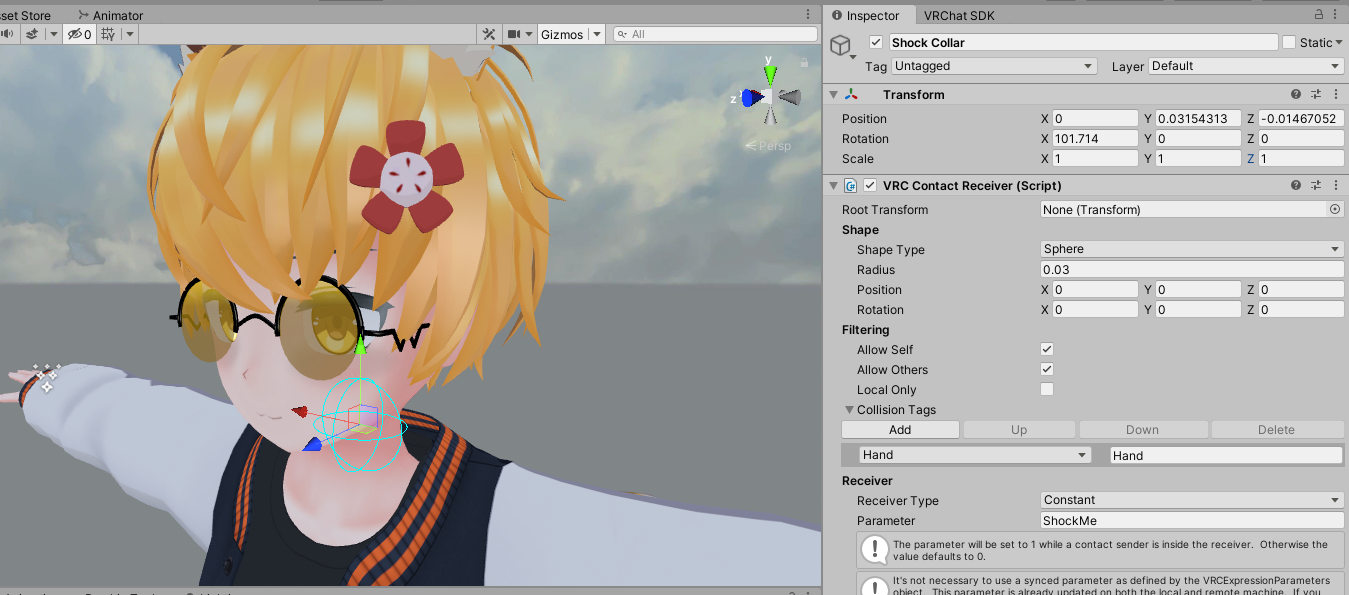
The default and recommended parameter name expected by this program is ShockMe, but you can name it anything you want. The Local Only option is generally recommended to be enabled, but if you enable it, other players will not be able to see the contact in the Physbones overlay. It will work either way.
The contact receiver needs tags to work. You can give it one of the default tags such as Hand, but you can also add other tags in case you want this to work with other systems (like weapons).
This next step is optional, but it will allow you to adjust the shock strength/duration ingame and test the shocks on desktop more easily.
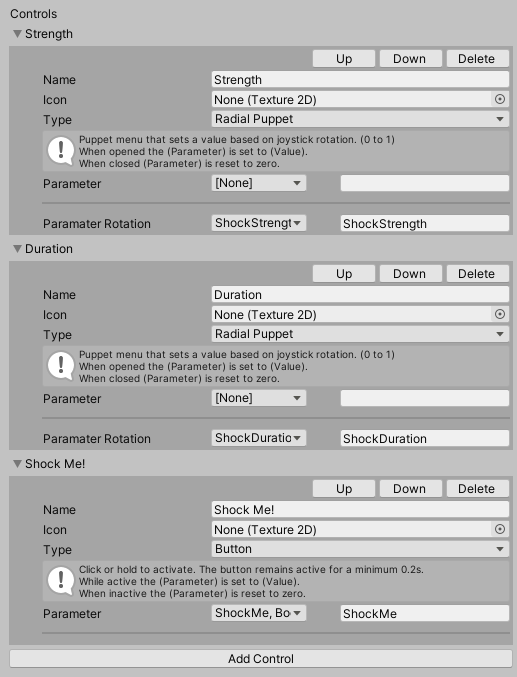
You should add the following parameters to your avatar's expression parameters and expression menu:
ShockMe: Bool. Allows you to shock yourself by pressing the button. Useful for testing.ShockStrength: Float. Controls the shock strength between 0-100%.ShockDuration: Float. Controls the shock duration between 0-10s. Each 10% increment adds another second.

The ShockMe parameter can also be a float or int. In this case, it will trigger a shock if the parameter value is exactly 1. You can use this to send shocks if a physbone is stretched!
Now all that's left for the avatar setup is to upload your avatar!
Config setup
Open config.json and adjust the values to your liking. Example config:
{
  "PiShockConfig": {
    "Username": "(provide PiShock username here)", // The username you use to login to the PiShock website.
    "ApiKey": "(provide PiShock API key here)", // An API key from the PiShock website.
    "ApiEndpoint": "https://do.pishock.com/api/apioperate", // Which API URL to use. Can be changed in case you use a local server or different API.
    "Debug": false, // If true, will NOT send HTTP requests to the API, but will instead log the request to the console.
    "Devices": [ // An array of devices. Useful if you have multiple shockers and want to control them individually.
      {
        "ShareCode": "(provide shocker's share code here)", // Generate a share code on the website and put it here. Please generate a new share code for your first-time setup, older ones are not always accepted by the API.
        "DeviceId": "(provider shocker's device ID here, currently unused until local requests get implemented)", // Device ID from the website. Unused for now.
        "Strength": 10, // The default shock strength percentage between 0-100%. Only used if the avatar has no parameter for strength.
        "Duration": 1, // The default shock duration between 0-15 seconds. Only used if the avatar has no parameter for duration.
        "ParameterName": "ShockMe", // The name of the parameter that will send a shock if it evaluates to true/1.
        "ShockType": 0, // Shock Type. 0 is shock, 1 is vibrate, 2 is beep.
        "LogName": "BottomGear", // The name that will appear in the "Log" history on the website.
        "StrengthParameterName": "ShockStrength", // Name of the parameter that controls shock strength.
        "DurationParameterName": "ShockDuration" // Name of the parameter that controls shock duration.
      }
    ]
  },
  "OscConfig": {
    "Address": "127.0.0.1", // The OSC address to connect to.
    "Port": 9001, // The port to receive OSC messages on.
    "Debug": false // If true, every incoming OSC message is logged to the console.
  }
}
Most of these values are fine at defaults, but you will want to fill in the Username, ApiKey and ShareCode fields.
Set up VRChat OSC
VRChat generates OSC configs whenever you first switch into an avatar. If you update an existing avatar with Shock support, you may have to edit or delete your OSC configs, otherwise VRChat will not be aware of these newly added parameters. If you upload a new avatar, this issue will not occur.
Go to %appdata%\..\LocalLow\VRChat\VRChat. If this is your first time using OSC, you can simply delete the entire OSC folder. Otherwise, find the .json file that corresponds to the avatar you want to use, and either delete it or edit it to include the ShockMe, ShockStrength and ShockDuration parameters.
Now all that's left to do is enable OSC ingame in the action menu, and switch into your avatar! Enjoy.
Running the program
Simply run BottomGear.exe and it will do the rest for you, assuming you setup your config.json correctly. It will automatically connect to VRChat OSC and start receiving messages and sending shocks.
Troubleshooting
Did you follow this guide but it doesn't seem to be working? Here's a small step by step guide to get you started in troubleshooting issues.
First, enable the Debug option under PiShockConfig in config.json. When you would normally get shocked, you should see the API request appear in the console.
The API requests are appearing in the console:
If the requests appear in the console, then your avatar is setup correctly and the application is running, but the API is not acknowledging it or your shock device is not receiving any messages. Test out your device manually via the website. If shocks work on the website, that means you probably entered an invalid API key or invalid share code. Try regenerating your API key and generate a new share code. Sharecodes will sometimes stop working for unknown reasons.
The application may also be blocked by a firewall. Verify that your firewall is not blocking the application.
The API requests are NOT appearing in the console:
This means there is an issue between the communication of your avatar and the OSC application. Verify that OSC is enabled in VRChat, verify that your parameters are set up properly, and verify that your avatar's OSC JSON configuration file is setup correctly. You may also have other applications (such as other OSC applications) running on the same ports. Try closing these.
You can enable the Debug options under OscConfig in config.json to display every incoming message in the console. Verify that you are receiving messages. If you are not receiving any, the ports you chose may already be in use or OSC is not enabled/misconfigured.