UsingAByteBlaster - mist-devel/mist-board GitHub Wiki
What is a Byte Blaster Cable?
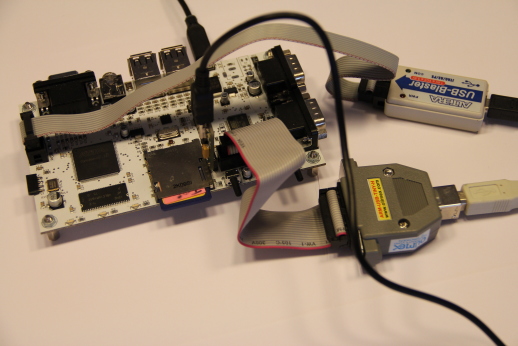
The USB Byte Blaster Cable is a cable that connects a host PC via USB directly to the MISTs FPGA using a so-called JTAG connection. It can be used to download FPGA configurations directly from the PC to the FPGA without using the SD card. Furthermore it allows direct monitoring and debugging of signals inside the FPGA. Cheap Byte Blaster Cables can be found on EBay.
Adding the connector
The USB Byte Blaster cable comes with a 10 pin flat ribbon cable. The matching plug is not present on the standard MIST boards but can easily be added. The required connector is a standard 10 pin 0.1" straight box header which needs to be soldered to SV1 at the left PCB side close to the VGA connector. Please be careful with the connectors orientation. Mounting it in the wrong direction my damage the MIST and/or the USB Blaster.
The special meaning of DIP switch 1
Usually the IO controller configures the FPGA. In that case the IO controller of course knows that the FPGA has been configured and will react accordingly.
When using a Byte Blaster cable the IO controller is not involved in the download process and thus cannot know that the FPGA has freshly been configured. It thus will not know that it needs to update its internal state with respect to the newly installed FPGA configuration. The IO controller needs to be restarted using the push button next to the SD card slot to re-establish its connection to the FPGA. Unfortunately upon reset the IO controller will automatically upload a new configuration to the FPGA overwriting anything that might have been downloaded via JTAG before.
The solution to this is DIP swtch 1 on the MIST board. In it default
state it is in the OFF position. This is the setting it should be in
normal operation.
When being switched ON the DIP switch 1 causes several things:
- The IO controller does not attempt to reconfigure the FPGA on its own reboot
- The IO controller tries to monitor the FPGA for JTAG uploads and tries to reset itself whenever it detects that the FPGA config has changed
- The IO controller increases some debug output and e.g. reports SD card accesses
With the DIP switch 1 in the ON position using a Byte Blaster cable
becomes very easy.
Steps to program MiST from Quartus
- If using the webedition of Quartus 13.1 make sure Talkback is enabled in options
- Connect USB Byte Blaster to the JTAG on the MiST, and connect to the PC. Drivers should automatically be installed.
- Set DIP switch 1 to 'ON' on the MiST.
- Compile the core in Quartus
- Quartus > Tools > Programmer, select USB Blaster in Hardware Setup, make sure the core sof is listed and press 'Start' to program the MiST.
- Use Quartus "SignalTap II Logic Analyzer" to debug the core using the USB Blaster.
Troubleshooting
On Linux if you get errors trying to do anything from Quartus or Programmer check the permissions on the USB Byte Blaster device drivers. A fix is here