MinimigMassStorage - mist-devel/mist-board GitHub Wiki
Mass storage?
The original Amiga primarily used 3.5 inch double density floppy disks. These were able to hold up to 880k. It was possible to connect up to four floppy drives via the floppy port and one or more harddisk using special harddisk controllers.
The MiST board does not support physical floppy disks nor real harddisks. Instead the only mass storage option available on the MiST board is the SD card slot. This is being used to emulate floppy disks and harddisks not only for the Amiga but also for the Atari ST.
It is likely possible to support USB thumb drives as well. This has not been implemented yet.
Floppy disks
The Minimig MiST core supports raw floppy disk images usually using the .ADF file extension. The MiST supports up to four such disk images.
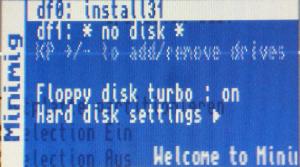
To use such floppy disk images simply copy them onto the SD card used in your MiST board. Once booted into Kickstart press F12 to open the main menu. Images for floppy drives DF0: and DF1: can directly be selected on the main menu page. Floppy drives DF2: and DF3: have to be activated using the + key on the keypad.
Hard disk
Emulating a harddisk with the Minimig MiST core is very simple. Since the Amiga 600 IDE controller is being emulated Workbench 3.1 is needed with a matching Kickstart ROM.
The additional disk images from the workbench 3.1 setup are required (install disk, fonts disk, extras disk, locale disk and storage disk). Copy all these disk images to the SD card.
There exists a patch for Kickstart 1.3 to include a scsi.device from Kickstart 3.x for booting from IDE disks which also works with MiST/Minimig.
Since firmware 210618 and minimig_mist_rtg 210618 core 4 IDE drives are supported. This requires IDEfix/AtapiMagic
Harddisk image file
Also required is a big file to be used as the harddisk. Under Linux these can easily be created using the dd command:
dd if=/dev/zero of=hd64m.hdf count=64k bs=1k
This creates a file named hd64m.hdf which is exactly 64MBytes big resulting in a harddisk similar to a 60 MBytes harddisk.
Copy this file to the same SD card as the floppy disk images.
Setting up the MiST
Insert the SD card and power up your MiST board. Open the OSD (hit F12) and select Install 3.1 disk image for DF0:.
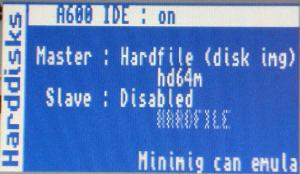
Go to the hard disk settings submenu and enable A600 IDE emulation and select the hd64m.hdf file as the Master Hardfile (disk img). Set the Slave to be Disabled.
You are now done doing the MiST specific stuff. In the next steps will format and partition the harddisk as if it was a real harddisk on a real Amiga.
Setting up the harddisk
On the workbench open the Install drawer and then the HDTools drawer. Run the HDToolBox. First click on "Change Drive Type" and in the following menu select "Define New...". Click "Read Configuration" to adjust the image size. The total size displayed should equal the size of your image (63MB in this case). You may also specify a new "Manufacturer name" and a "Drive Name". Hit "ok" twice. You can ignore the warning about the missing file.
Select "Save Changes to Drive" and then "Partition Drive".
In the Partitioning Dialog select the right partition and click the "Delete Partition" button. Then drag the "Size" cursor all the way to the right to increase the size of the remaining first partition. Important if you want to make the hard disk bootable afterwards: Set the partition name to DH0:.
Then select the "Change..." button. In the following dialog set the checkmark at "Directory Cache", change the MaxTransfer value to "0x1fe00" and click Ok.
In the main menu once more select "Save Changes to Drive".
Click "Exit". The Amiga OS will now reboot. Once this has finished the harddisk will show up on the desktop.
You can now format your harddisk by selecting it first and then right clicking for the menu and selecting "Format Disk..." in the Icon menu. Give your new drive a nice name and hit "Quick Format".
Your new harddisk is now usable.
Make the harddisk bootable
To boot without a workbench floppy image inserted you need to the make the harddisk image bootable. To do so run the Install program from the Install 3.1 disk and follow the instructions.
Importing and exporting files
Amiga emulators often have the ability to access the hosts file system directly and present it to the emulated Amiga as a hard disk. An example for such an emulator is FS-UAE. Its ability to access the hosts file system directly is explained in detail in the Using directory Hard Drives section of its manual.
This emulator can mount ADF floppy disk images as well as the HDF harddisk image created in the previous section. Once the Minimig/MiST has been used to initialize the HDF image on the SD card it can be transferred back to the PC to be used with an emulator.
In order to export or import single files to or from the hard disk image copy your hd64m.hdf back to your PC or simply access it directly on the SD card inserted into the PC. Start fs-uae-launcher and select the hdf file as a hard disk image. Also choose the host file system as a second hard drive and boot the emulator. You'll now get two icons on the workbench. One is the hard disk image created with Minimig/MiST, the second one is your PCs file system. You can now copy files forth and back between both disks and move data from your PC into your Minimig/MiST harddisk image or back.
When finished just copy the hd64m.hdf modified by the emulator back to the SD card and boot your MiST board with it in order to use the newly installed files. Or if you worked directly with the image in the SD card just plug it back into the MiST board.
Using Amiga floppy and hard disk images under Linux
Linux PCs can directly access the contents of Amiga floppy and hard disk images. A floppy disk can simply be mounted by specifying the affs file system type. The following command will make the contents of the floppy.adf floppy image available at /mnt
mount -t affs -o loop floppy.adf /mnt
Using harddisk images (disk img type as explained above) requires only one step more. First the parted tool needs to be used to figure out where inside the image the partition is stored:
$ parted hardfile.hdf
WARNING: You are not superuser.  Watch out for permissions.
GNU Parted 2.3
Using hardfile.hdf
Welcome to GNU Parted! Type 'help' to view a list of commands.
(parted) u b
(parted) p
Pralloc = 0, Reserved = 2, blocksize = 1, root block at 79254
Model:  (file)
Disk hardfile.hdf: 80936960B
Sector size (logical/physical): 512B/512B
Partition Table: amiga

Number  Start    End        Size       File system  Name  Flags
1      258048B  80898047B  80640000B  affs3        DH0   boot
This tells us that the first partition starts at byte 258048 and is 80640000 bytes long. This can just be mounted:
mount -t affs -o loop,offset=258048,sizelimit=80640000 hardfile.hdf /mnt
Importing games from HDF images (by Majd)
Games distributed as HDF images (usually bigger games) can be imported into a MiST generated harddisk using the following simple steps:
- create a hd1g.hdf ( i made it 1Gb )file using "dd" command
- format the hd1g on the MiST/Minimig with Workbench/Kickstart 3.1
- install WinUAE amiga emulator and mount the hd1g.hdf on the emulator as hard disk
- start workbench 3.1 on WINUAE and copy all the HDF games/software files on the mounted hd1g.hdf
- copy the ready hd1g.hdf back to the SD card and run it on the MiST/Minimig, you will have all programs installed and 100% running
Alternally it's possible to mount such images directly on the MiST using the "hardfile(filesys)" option.