AtariMassStorage - mist-devel/mist-board GitHub Wiki
Mass storage?
The original Atari ST primarily used 3.5 inch double density floppy disks. These were able to hold either 360k data (single sided) or 720k (double sided). It was possible to connect a second floppy drive via the floppy port and one or more SCSI harddisks via ACSI.
Later hardware modifications allowed the usage of HD (1.4M) and ED (2.8M) floppy drives as well IDE harddisks.
The MIST board does not support physical floppy disks nor real harddisks. Instead the only mass storage option available on the MIST board is the SD card slot. This is being used to emulate floppy disks and harddisks not only for the Atari ST but also for the Amiga.
It is likely possible to support USB thumb drives as well. This has not been implemented yet.
Floppy disks
The Atari MIST core supports raw floppy disk images usually using the .ST file extension. The MIST supports up to two such disk images for disk with 80-85 tracks, one or two sides and 9 to 12 sectors per track. These cover 99% of the disk formats typically used in the Atari ST. Also HD floppy disk images with 18 sectors per track and ED disk images with 36 sectors per track are supported giving a total of 1.44 or even 2.88 MBytes available floppy disk space per floppy disk images.
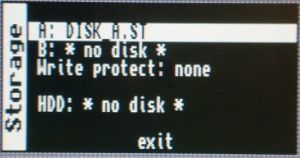
To use such flpppy disk images simply copy them onto the SD card used in your MIST board. Once booted into TOS press F12 to open the main menu. A image for floppy drive A: can conveniently be selected on the main menu page. Floppy drive B: as well as the write protection switch can be found in the "storage" submenu.
Default floppy images
At boot time the firmware of the MIST board checks for floppy disk images named disk_a.st and disk_b.st. If these are found they are inserted automatically at boot time.
A ready to run floppy disk image can be found at https://raw.githubusercontent.com/wiki/mist-devel/mist-board/disk_a.st
Copy protections
A floppy disk is organized in tracks (typically 80 on a ST floppy disk). Each track contains a number of 512 bytes sectors (typically 9 per track on a ST floppy disk). The Atari floppy disk controller can be used to read and write single sectors or whole tracks incl. control bytes atored in between the sectors.
The TOS operating system and the vast majority of software only works with sectors and doesn't care for any additional information stored on a track outside the sectors. The Atari MIST core also only supported the read/write sectors commands of the floppy disk controller (FDC) and ot the read/write track commands.
Fianlly the .ST images being used are simple dumps of all data sectors of a floppy disk and don't include any further information stored on a track outside the sectors.
The additional data hidden between sectors is typically used by copy protections. Since the MIST board currently doesn't support the read/write track commands and also doesn't support any disk image format that is able to hold the additional track information (e.g. .STX) copy protected disk images cannot be used on the MIST board. If you want to use a software that uses a floppy disk based copy protection you might have to look for a version that has the copy protection removed.
In the furture it may be possible to add support for disk images containing those parts of a floppy disk that contain parts of the copy protection. This requires changes in the core (to support the read/write track commands) as well as the io controller firmware (to handle the extended disk image formats).
Exchanging data
The Atari core for the MIST board treats the .ST disk images just like any emulator does. This means that disk images created or modified by emulators like Hatari can be copied onto SD card and used on the MIST and floppy disk images modified by the MIST can be copied back to the PC and used with an enulator there.
Creating floppy disk images
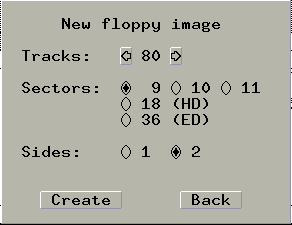
The most convenient way to create disk images is to use an emulator like Hatari. The following assumes that you have at least a very basic working Hatari setup.
In Hatari press F12 to open the menu. Then select the "Floppy disks" button to open the Floppy disks submenu. Click the "Create blank image" button and to create a disk image of any size you want. The default settings with give you a 720kBytes disk image which was the most common format used on the ST. Click "create" and choose a file name for your new image. You can now insert this into a virtual disk drive inside Hatari to e.g. fill your fresh image with data or you can simply copy the new empty disk image to the SD card and use it with the MIST board.
Importing single files into the MIST
The Atari core for the MIST cannot read single files directly from the SD card. Any data to be used must be stored inside floppy or harddisk images. If you have seperate files the easiest way is to use Hatari. Hatari can mount the PCs directories as if they were a harddisk. To do so go to the "Hard disks" submenu in the Hatari main menu. Click the "Browse" button for the "GEMDOS drive" section and select the directory on the PC containing the single files you'd like to import.
Then select a floppy disk image for drive A: (or create an empty one as previously explained). Finally boot Hatari into the ST desktop. Your fies should show up on drive C: and you can use TOS inside Hatari to copy them to the floppy disk image A:. Once you are done close Hatari and copy the updated floppy disk image onto your SD card. MIST will now be able to use that image and to access the files that once were on the harddisk of your PC.
Of course there are limitations regarding maximum file sizes and also file names might get truncated when being converted to the 8+3 Atari ST file naming scheme.
Exporting files from the MIST
Export works like import above, just copy the data from drive A: back to drive C: being mapped to a directory of your PCs harddisk.
Hard disk
Emulating a harddisk with the Atari MIST core is very simple. Only two things are needed: The Atari ST harddisk driver and a big file on SD card to be used as the hardisk.
Make sure you have a working Atari ST setup for your MIST. Any TOS version will do, but TOS 1.04 or TOS 2.06 are preferred.
Hard disk drivers
Atari Harddisk Driver (AHDI)
First of all you need to get a floppy disk image containing the Atari Harddisk driver (AHDI). This can e.g. be found here. Since this does not come as a disk image but as a set of files the aforementioned method of creating a floppy disk image will have to be used.
Copy the AHDI floppy disk image to the SD card to be used on the MIST.
AHDI does not support the so-called "ICD" extensions implemented in the MIST. It's thus limited to harddisk images of up to 1GB in total (just like it is on a real ST).
Furthermore AHDI does not support DOS/Windows partitions and this cannot be used for data exchange with a PC using the "Direct SD" approach explained futher below.
Uwe Seimets HDDriver
Uwe Seimets Hddriver has also been verified to work. Verisons 9.03 and 9.04 have been tested with the MiST board.
Hddriver supports the ICD extensions can be used on the MIST to access harddisk images bigger than 1GB. It is especially useful with the "Direct SD" approach explained below as this allows unlimited access to big SD cards. This has been tested with a 8GB SDHC card.
Hddriver also allows to create media to be shared between a PC and the Atari ST.
PPHdr harddisk driver
The PPHdr driver has not been tested intensively with the MIST. But at least some versions do work.
Harddisk image file
The second thing required is a big file to be used as the harddisk. Under Linux these can easily be created using the dd command:
dd if=/dev/zero of=hd64m.hd count=64k bs=1k
under Windows the command
fsutil file createnew hd64m.hd 67108864
does the same (thanks Chris, for the hint).
This creates a file named hd64m.hd which is exactly 64MBytes big resulting in a harddisk similar to the Megafile 60.
Copy this file to the same SD card as the AHDI floppy disk image. The harddisk file has to be located at the root of the SD card (don't put it in a subfolder otherwise the system won't be able to find it).
Setting up the MIST
The following descriptions assumes that AHDI is to be used as the harddisk driver.
Insert the SD card and power up your MIST board. Open the OSD (hit F12) and select the AHDI floppy disk image for floppy drive A:. Go to the storage submenu and select in the ACSI0 or ACSI1 field the hd64m.hd as the harddisk.
You are now done doing the MIST specific stuff. In the next steps will format and partition the harddisk as if it was a real harddisk on a real ST.
Setting up the harddisk
Inside the Atari desktop open the floppy A:, go to the HDX folder and start HDX: Select Disk/Format from the menu and just click yourself right through the dialogs until your harddisk is being formatted. This will take some time.
This will also automatically partition your harddisk with four partitions of 16MB each. You might select Disk/Partition from the menu to change this, and in this case, you have to do it after the harddisk formatting (you mustn't format it again after the partitioning).
Quit HDX, the Atari will now reset. If the AHDI floppy disk image has the AHDI driver in the auto folder it will automatically detect the harddisk and you'll get a C: icon in the desktop for the first partition. You can create icons for drives D: to F: also if you want to.
Note: you can also prepare your harddrive from within the Hatari emulator, the formatting will be faster.
Make the harddisk bootable
To boot without the AHDI floppy image inserted you need to the make the harddisk image bootable. To do so run HINSTALL from the AHDI floppy, select File/Install from the menu and select drive C:.
You are done, you can now "eject" the AHDI floppy image and reset the embedded ST by pressing CTRL/ALT/DEL or by selecting SYSTEM/RESET from the OSD. Do NOT reset the entire MIST board using the reset button on the front!
The Atari ST will now boot from the harddisk image as if it was a real harddisk.
Default harddisk image
If you want your Atari ST to boot from harddisk automatically whenever you switch on your MIST board (or press the reset button on the front) you can name the harddisk image harddisk.hd. It will then be selected automatically on system powerup and the embedded Atari ST will boot immediately from the harddisk image.
A ready to run hard disk image can be found at https://raw.githubusercontent.com/wiki/mist-devel/mist-board/harddisk.zip
Direct SD card access (not using a harddisk image)
Firmware_141121_r512.upg introduced a new feature called "direct SD" for ACSI0 in the Storage submenu. With this option enabled TOS is granted direct access to the first partition of the SD card avoiding the need to use hardisk images.
This features can be quite difficult to use since the first partition on the card has to be formatted in a way that the MIST board itself understands to be able to load the core and the tos image from it. Furthermore the embedded ST must be able to use it and finally a PC may also need to access it to be able to exchange data with the MIST/ST. The following instructions assume you are using Uwe Seimets HDDriver. AHDI is not suited for this, other harddisk drivers may be. More information regarding this can be found in the Atari HD File System Reference Guide.
The most useful setup i've found so far is this:
The current ACSI implementation of the MiST board is supports the ICD extensions. Together with a driver like HDDriver the 1GB limit of the original Atari ST harddisk interface can be surpassed. This has been tested with SD cards up to 8GB.
Step 1: Start with an SD card of any size and put a tos.img (tos 2.06 recommended) and a core.rbf and a floppy disk image containing hddriver (tested with 9.03 and 9.04) onto the card.
Step 2: Boot the MIST board from that card. While tos does the ram test enable "ACSI0 direct SD" in the Storage submenu of the OSD. Then select the hddriver floppy image and boot into TOS. Hddriver will load from disk and detect the card as ACSI device 0.
Step 3: Launch hddrutil from the floppy disk image. Select the ACSI0 drive in the window "Available Devices". Then pick "Medium"->"Partition" from the menu. Click on "split" and split the available space into partitions so that no partition is bigger than 512MB (e.g. split a 8GB card into 16 Partitions). Select "Compatibility" and Check "TOS". Click "ok" until the new partition is being done. Reboot.
Step 4: Launch hddrutil again. Select drive C: in the list of the "Available Devices" and select "File"->"Install HDDRIVER" from the menu. You now have a SD card with several DOS & TOS compatible partitions of nearly 512MB of which Windows can use the first one out of the box.
Step 5: Reinstall core.rbf, tos.img and a few floppy images on the first partition. Reinsert the SD card into the MIST.
Step 6: Boot the MIST. Again select "ACSI0 direct SD". You may save this setting permanently while the ST is doing its RAM test. Don't use the OSD to save settings later when the Atari runs and this will cause the Atari and the MISTs firmware to alter the same data on disk which will very likely corrupt the data on the card. But the moment when TOS tests its RAM is a safe moment to save the MIST settings on the card.
Step 7: Swap the card between the MIST and your Windows PC to exchange files.
Very useful information regarding this can be found in the Atari HD File System Reference Guide.