NextCloud Build and Install - mirpag/DFS-Project-Group-3 GitHub Wiki
Description
NextCloud is a client-server software that can be used for creating and hosting file hosting services. It is free and open source meaning that anyone can install this on their machine and be able to access the files on the server.
Networking
ad01-group3 10.0.5.5/24
mgmt01-group3 10.0.5.10/24
ubuntu1-group3 10.0.5.121/24
ubuntu2-group3 10.0.5.122/24
ubuntu3-group3 10.0.5.123/24
cent7a 10.0.5.154/24
cent7b 10.0.5.155/24
wks01-group3 10.0.5.156/24
Set gateway to 10.0.5.2 (your gateway) and DNS to 8.8.8.8 (alternatively your internal DNS server (10.0.5.5))
Install LAMP Stack on Ubuntu machines (ubuntu1-group3, ubuntu2-group3, ubuntu2-group3)
sudo apt update
Install Apache
sudo apt install -y apache2 apache2-utils
systemctl start apache2
systemctl status apache2
apache2 -v -- to see version
sudo ufw allow http
systemctl restart apache2
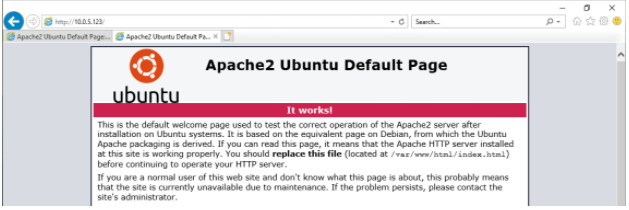
Go to http://10.0.5.123 to see if it is running and should look like the screenshot below:
Sudo chown www-data:www-data /var/www/html/ -R
Install MariaDB Database Server
sudo apt install mariadb-server mariadb-client
systemctl enable mariadb
systemctl status mariadb
sudo mysql_secure_installation
sudo mariadb -u root
exit;
mariadb --version
And should see this version:
mariadb Ver 15.1 Distrib 10.3.22-MariaDB, for debian-linux-gnu (x86_64) using readline 5.2
Install PHP7.4
sudo apt install php7.4 libapache2-mod-php7.4 php7.4-mysql php-common php7.4-cli php7.4-common php7.4-json php7.4-opcache php7.4-readline
sudo a2enmod php7.4
sudo systemctl restart apache2
php --version
You should see this version:
PHP 7.4.3 (cli) (built: Mar 26 2020 20:24:23) ( NTS )

Copyright (c) The PHP Group`

Zend Engine v3.4.0, Copyright (c) Zend Technologies`

with Zend OPcache v7.4.3, Copyright (c), by Zend Technologies
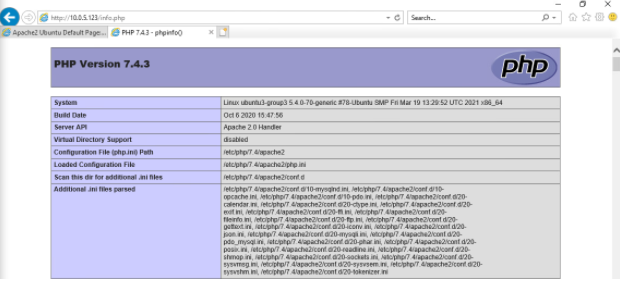
Create an info.php file in the document root directory:
sudo nano /var/www/html/info.php
Type the following code into that file:

In the browser, type the following and you should see something similar to the screenshot below:
How to Run PHP-FPM with Apache
sudo a2dismod php7.4 -- disable the PHP7.4 module in Apache
sudo apt install php7.4-fpm
sudo a2enmod proxy_fcgi setenvif
sudo a2enconf php7.4-fpm
sudo systemctl restart apache2
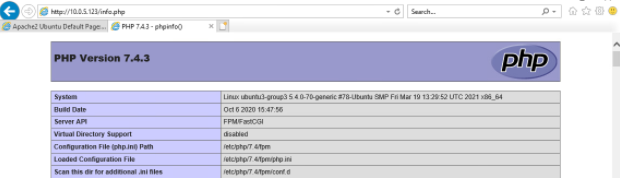
Refresh the page and it should look like this:
Congrats LAMP stack is installed!
Download NextCoud on Ubuntu 20.04
wget https://download.nextcloud.com/server/releases/nextcloud-21.0.0.zip
sudo apt install unzip
sudo unzip nextcloud-21.0.0.zip -d /var/www/
sudo chown www-data:www-data /var/www/nextcloud/ -R
Create a Database and User for Nextcloud in MariaDB Database Server
sudo mysql
create database nextcloud;
create user nextcloud@localhost identified by 'your-password';
grant all privileges on nextcloud.* to nextcloud@localhost identified by 'your-password';
flush privileges;

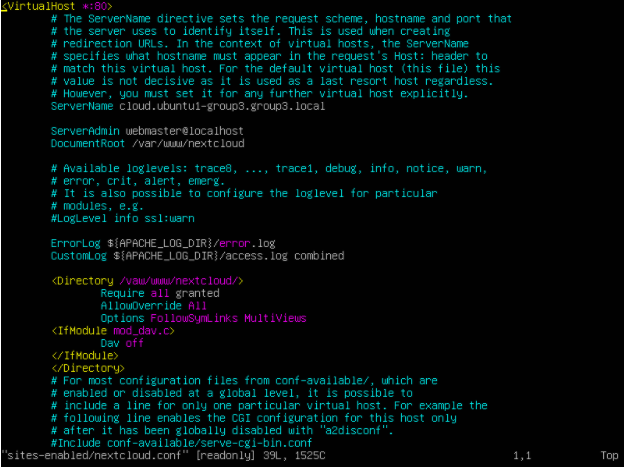
Create an Apache Virtual Host for Nextcloud
sudo nano /etc/apache2/sites-available/nextcloud.conf
Add the following to the file:
Configure Nextcloud
###Install and Enable PHP Modules
sudo apt install imagemagick php-imagick libapache2-mod-php7.4 php7.4-common php7.4-mysql php7.4-fpm php7.4-gd php7.4-json php7.4-curl php7.4-zip php7.4-xml php7.4-mbstring php7.4-bz2 php7.4-intl php7.4-bcmath php7.4-gmp
sudo systemctl reload apache2
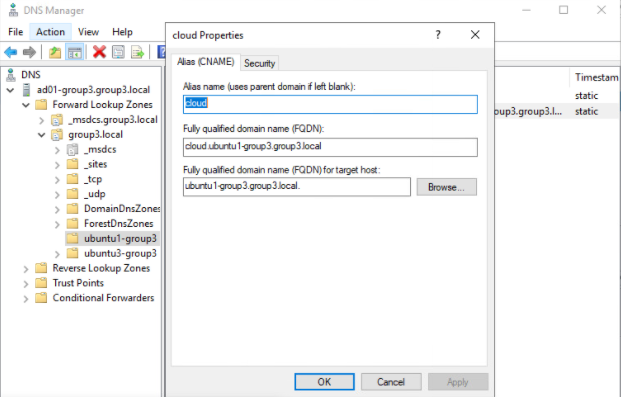
**add to DNS Manager
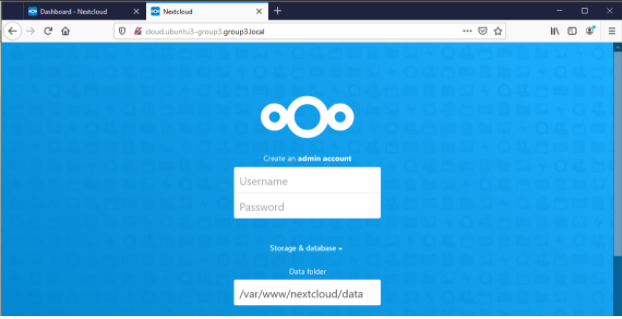
Completing the NextCloud Installation in the Web Browser (wks01-group3)
Configure an admin account, specify the path
nextcloud.ubuntu3-group3.group3.local -- to access the NextCloud install wizard
Login at localhost:3306
If webpage isn’t loading, you might need to open port 80 and port 443 on the firewall:
sudo iptables -I INPUT -p tcp --dport 80 -j ACCEPT
sudo iptables -I INPUT -p tcp --dport 443 -j ACCEPT
_ 💡 A good security practice is to put the data directory outside of the NextCloud webroot directory_
sudo mkdir /var/www/nextcloud-data
sudo chown www-data:www-data /var/www/nextcloud-data -R
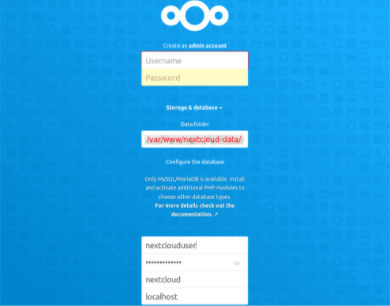
Select Finish Setup and you should see a web interface of NextCloud similar the screenshot below: