Making it more stealthy (recognized as keyboard & mouse only) - michalmonday/supremeDuck GitHub Wiki
List of content:
-Pros and cons
-Parts required
-Overview
-Step by step guide
-Reverting it to original state
Pros
- PC won't know that it's an Arduino
- PC won't recognize it as multiple devices
- Possibly lower set up time after first plug-in on the new machine (need a proof though, didn't test it enough)
Before:

After:

I used USBDeview program to see how it's recognized by PC
Cons
- Board can't be programmed through USB anymore (can be programmed through USB if it gets reverted with the same equipment that was used to make it stealthy)
- Possibly board could be bricked but idk... It's just my assumption (correct wiring and firm connection are important)
- Requires additional parts, time and effort to be done
- It is necessary to modify core Arduino files (However in this guide there's a cool, convienient way of choosing the core-files based on the board choice without the need to manually edit+revert core files every time)
- I did not test this method with Arduino IDE versions other than 1.8.5
- Re-installation of Arduino IDE will erase any settings created using this tutorial, which means that it would be necessary to go through the tutorial again
- Inability to read debug information through Serial Monitor anymore
Parts required
- Arduino UNO (or clone, I used Sintron UNO) + standard USB cable for it
Arduino Pro Micro also can be used (using its' SPI pins)
- 6 Clips/hooks like these (to grab the pins without soldering)
- 6 Male to male jumper wires
Overview
From my observations when you plug supremeDuck or any other Arduino based BadUSB (e.g. Malduino) into PC it gets recognized by it as:
- Human Interface Device
- Arduino Leonardo x 2
The point of this guide is to make it recognized as Human Interface Device only. Arduino UNO will be used as ISP (In-system programmer). It will be flashed with the code found in standard examples of Arduino IDE, then connected to the Arduino-Pro-Micro/supremeDuck/Malduino/Atmega32U4/etc and used to flash the code without bootloader and without CDC (Communication Device Class) interface being initialized.
Additional aim of this guide is to make it easy to repeat/revert this process in further attempts without the need to copy/modify/backup/revert any files (unless Arduino IDE is reinstalled). To achieve that there will be:
- copy of arduino core folder "arduino_hid_only" which will be assigned to the newly created board's setting
- additional board setting added to board.txt file called "Arduino Leonardo (HID only)"
- additional programmer setting added in programmers.txt file (+ name of the current "Arduino as ISP" modified to display its purpose)
Step by step guide
- Make copy of arduino folder located at: Arduino/hardware/arduino/avr/cores
- Rename the copy to arduino_hid_only.

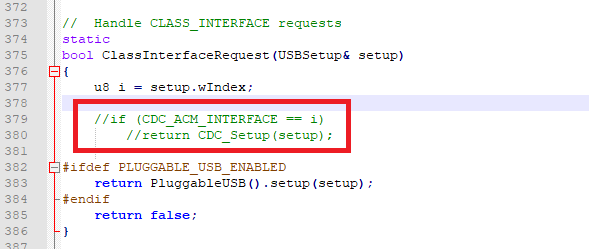
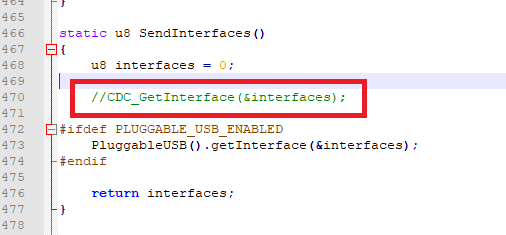
- Open the newly renamed folder and open USBCore.cpp file.
- Comment out the lines marked on the 2 images below.
-
Save the file.
-
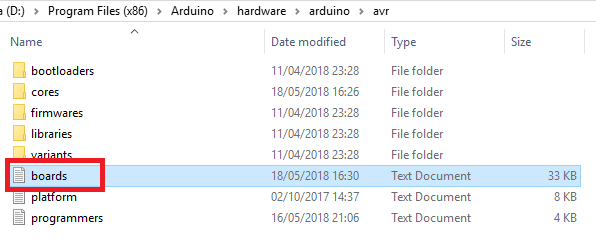
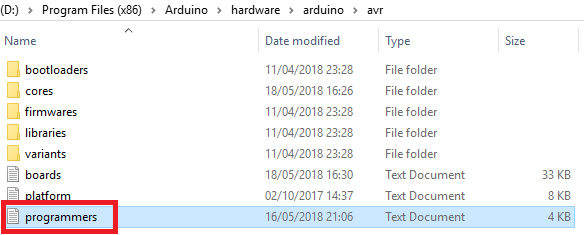
Open board.txt file located at Arduino-installation-folder/hardware/arduino/avr
I used Notepad++ for editing which shows index of each line so desired text is easier to find. You could make a backup of the file in case if something goes wrong.
- Copy the following text:
##############################################################
leonardo_stealthy.name=Arduino Leonardo (HID only)
leonardo_stealthy.vid.0=0x1A2C
leonardo_stealthy.pid.0=0x2124leonardo_stealthy.upload.tool=avrdude
leonardo_stealthy.upload.protocol=avr109
leonardo_stealthy.upload.maximum_size=28672
leonardo_stealthy.upload.maximum_data_size=2560
leonardo_stealthy.upload.speed=57600
leonardo_stealthy.upload.disable_flushing=true
leonardo_stealthy.upload.use_1200bps_touch=true
leonardo_stealthy.upload.wait_for_upload_port=trueleonardo_stealthy.bootloader.tool=avrdude
leonardo_stealthy.bootloader.low_fuses=0xff
leonardo_stealthy.bootloader.high_fuses=0xd8
leonardo_stealthy.bootloader.extended_fuses=0xcb
leonardo_stealthy.bootloader.file=caterina/Caterina-Leonardo.hex
leonardo_stealthy.bootloader.unlock_bits=0x3F
leonardo_stealthy.bootloader.lock_bits=0x2Fleonardo_stealthy.build.mcu=atmega32u4
leonardo_stealthy.build.f_cpu=16000000L
leonardo_stealthy.build.vid=0x1A2C
leonardo_stealthy.build.pid=0x2124
leonardo_stealthy.build.usb_product="USB Keyboard"
leonardo_stealthy.build.board=AVR_LEONARDO
leonardo_stealthy.build.core=arduino_hid_only
leonardo_stealthy.build.variant=leonardo
leonardo_stealthy.build.extra_flags={build.usb_flags}
- Locate the text selected on the image below.

- Paste the previously copied text under it so it looks like:
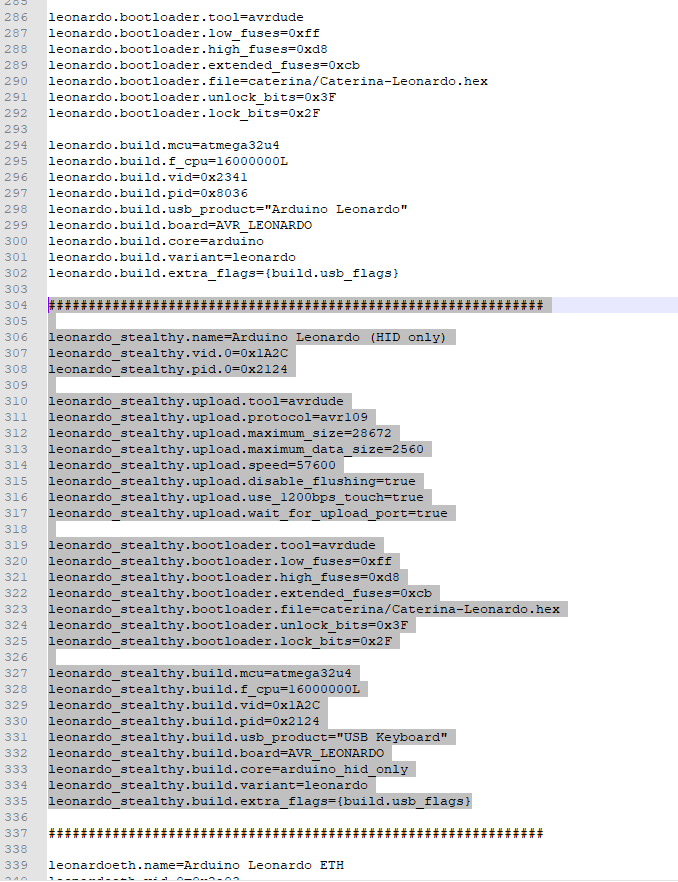
-
Save the file.
-
After re-launching Arduino IDE you should see the following options available:
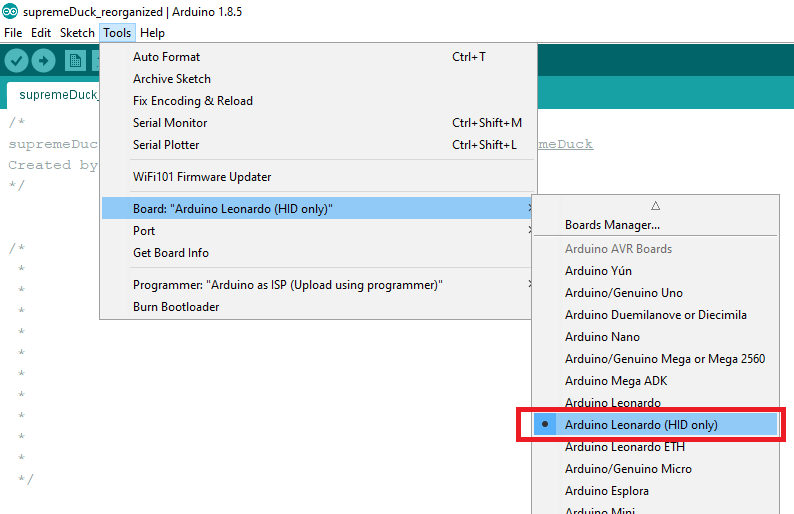
Don't just close 1 of the opened Arduino sketches, make sure that all sketches are closed and then run Arduino again to see the change.
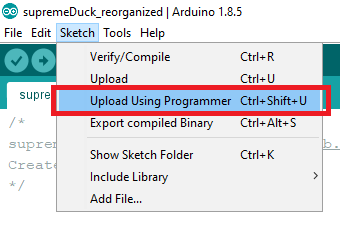
**WARNING: ** don't upload the code through USB with "Arduino Leonardo (HID only)" board setting. Always use "Sketch -> Upload Using Programmer" option.
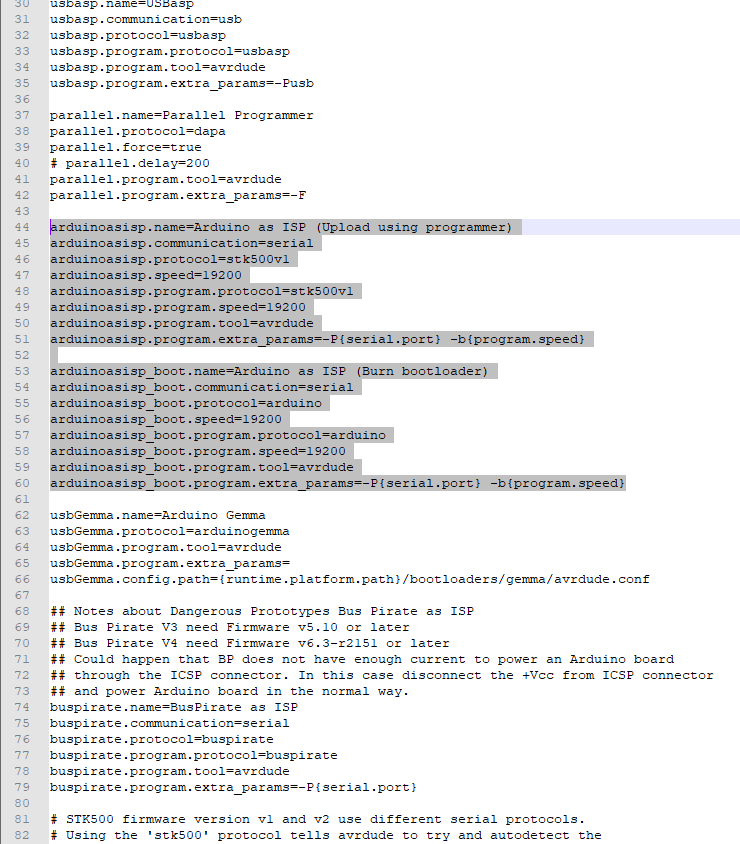
- Open programmers.txt file located in the same folder.
- Copy the following text.
arduinoasisp.name=Arduino as ISP (Upload using programmer)
arduinoasisp.communication=serial
arduinoasisp.protocol=stk500v1
arduinoasisp.speed=19200
arduinoasisp.program.protocol=stk500v1
arduinoasisp.program.speed=19200
arduinoasisp.program.tool=avrdude
arduinoasisp.program.extra_params=-P{serial.port} -b{program.speed}arduinoasisp_boot.name=Arduino as ISP (Burn bootloader)
arduinoasisp_boot.communication=serial
arduinoasisp_boot.protocol=arduino
arduinoasisp_boot.speed=19200
arduinoasisp_boot.program.protocol=arduino
arduinoasisp_boot.program.speed=19200
arduinoasisp_boot.program.tool=avrdude
arduinoasisp_boot.program.extra_params=-P{serial.port} -b{program.speed}
- Locate the selected text on the image below.

- Replace the located text with the previously copied one, so it should looks like this:
- After re-launching Arduino IDE you should see the following options available:
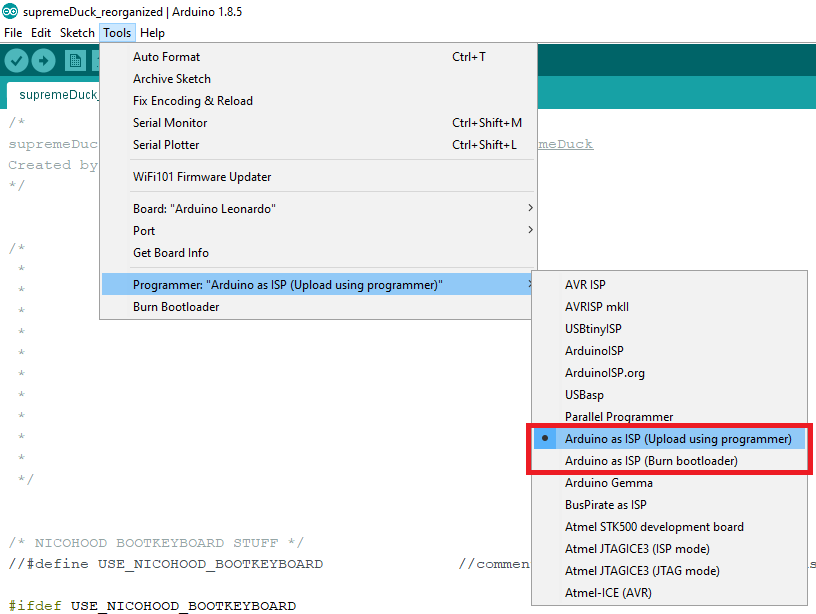
- Prepare the programmer
- Connect Arduino Uno to PC (it will become the programmer)
- Open arduino IDE -> File -> Examples -> ArduinoISP -> ArduinoISP
- Tools -> Board -> Arduino/Genuino Uno
- Tools -> Port -> Com X (Arduino Uno)
- Upload the sketch
- Disconnect the Arduino Uno from PC
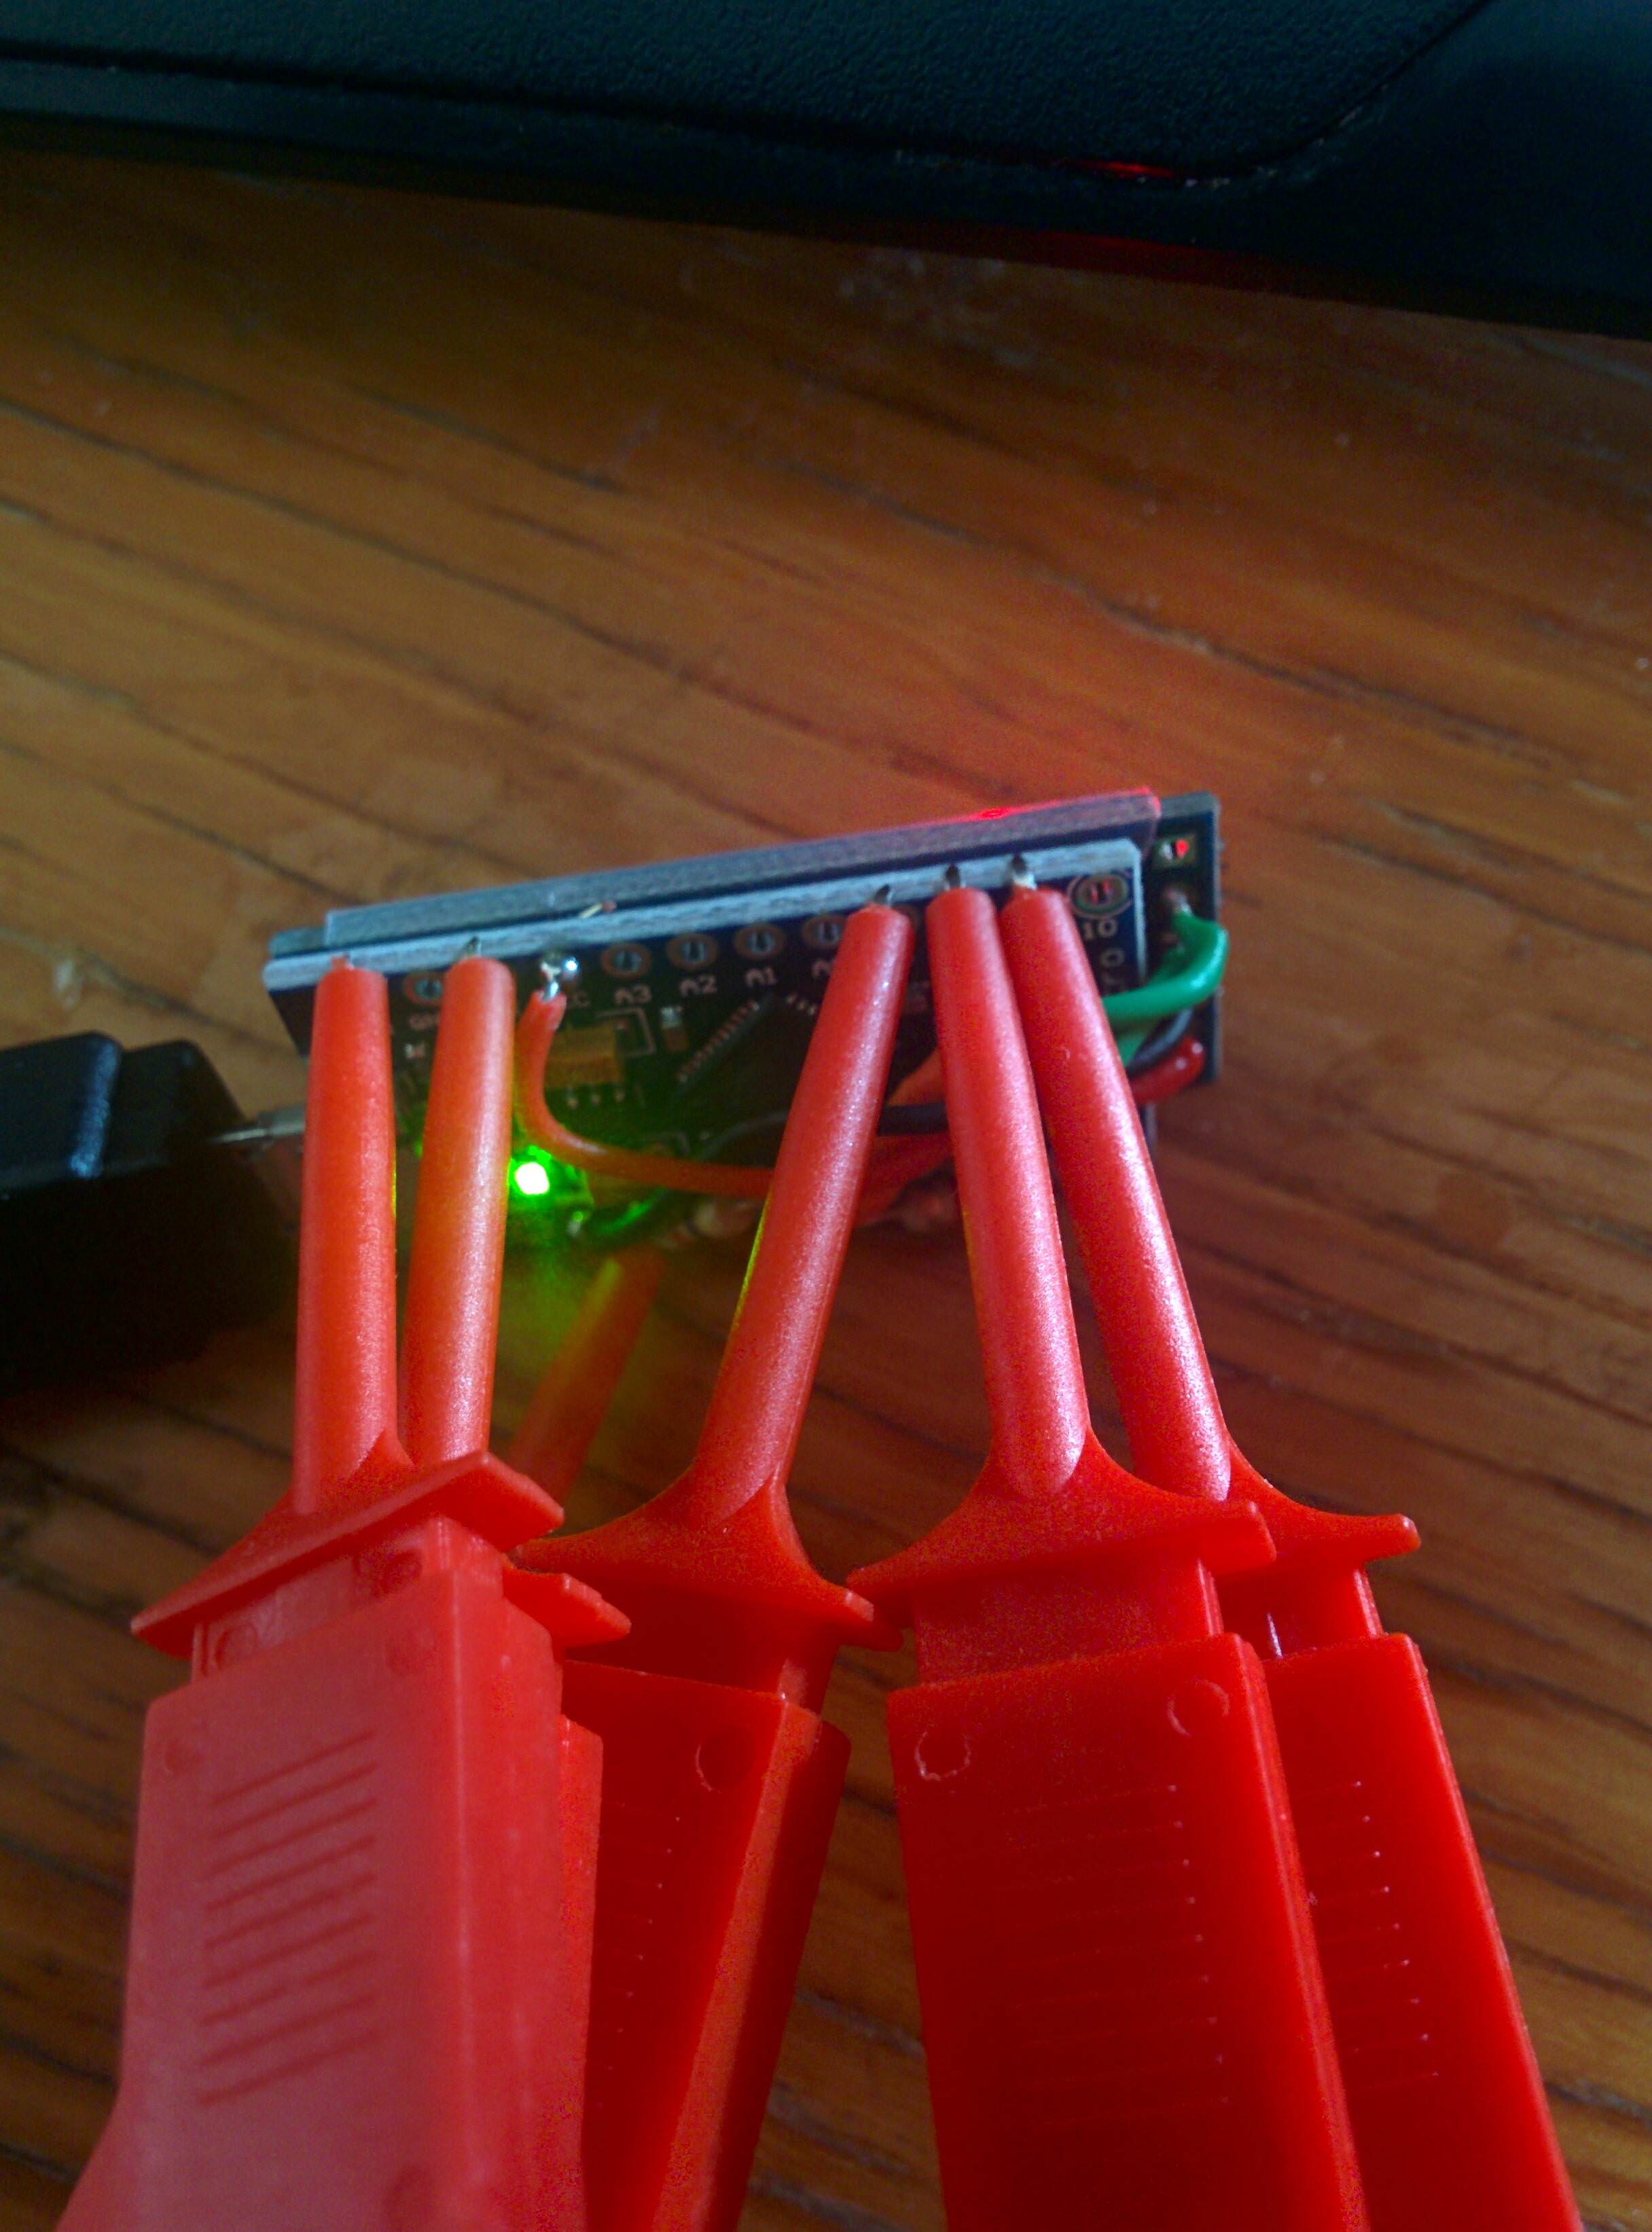
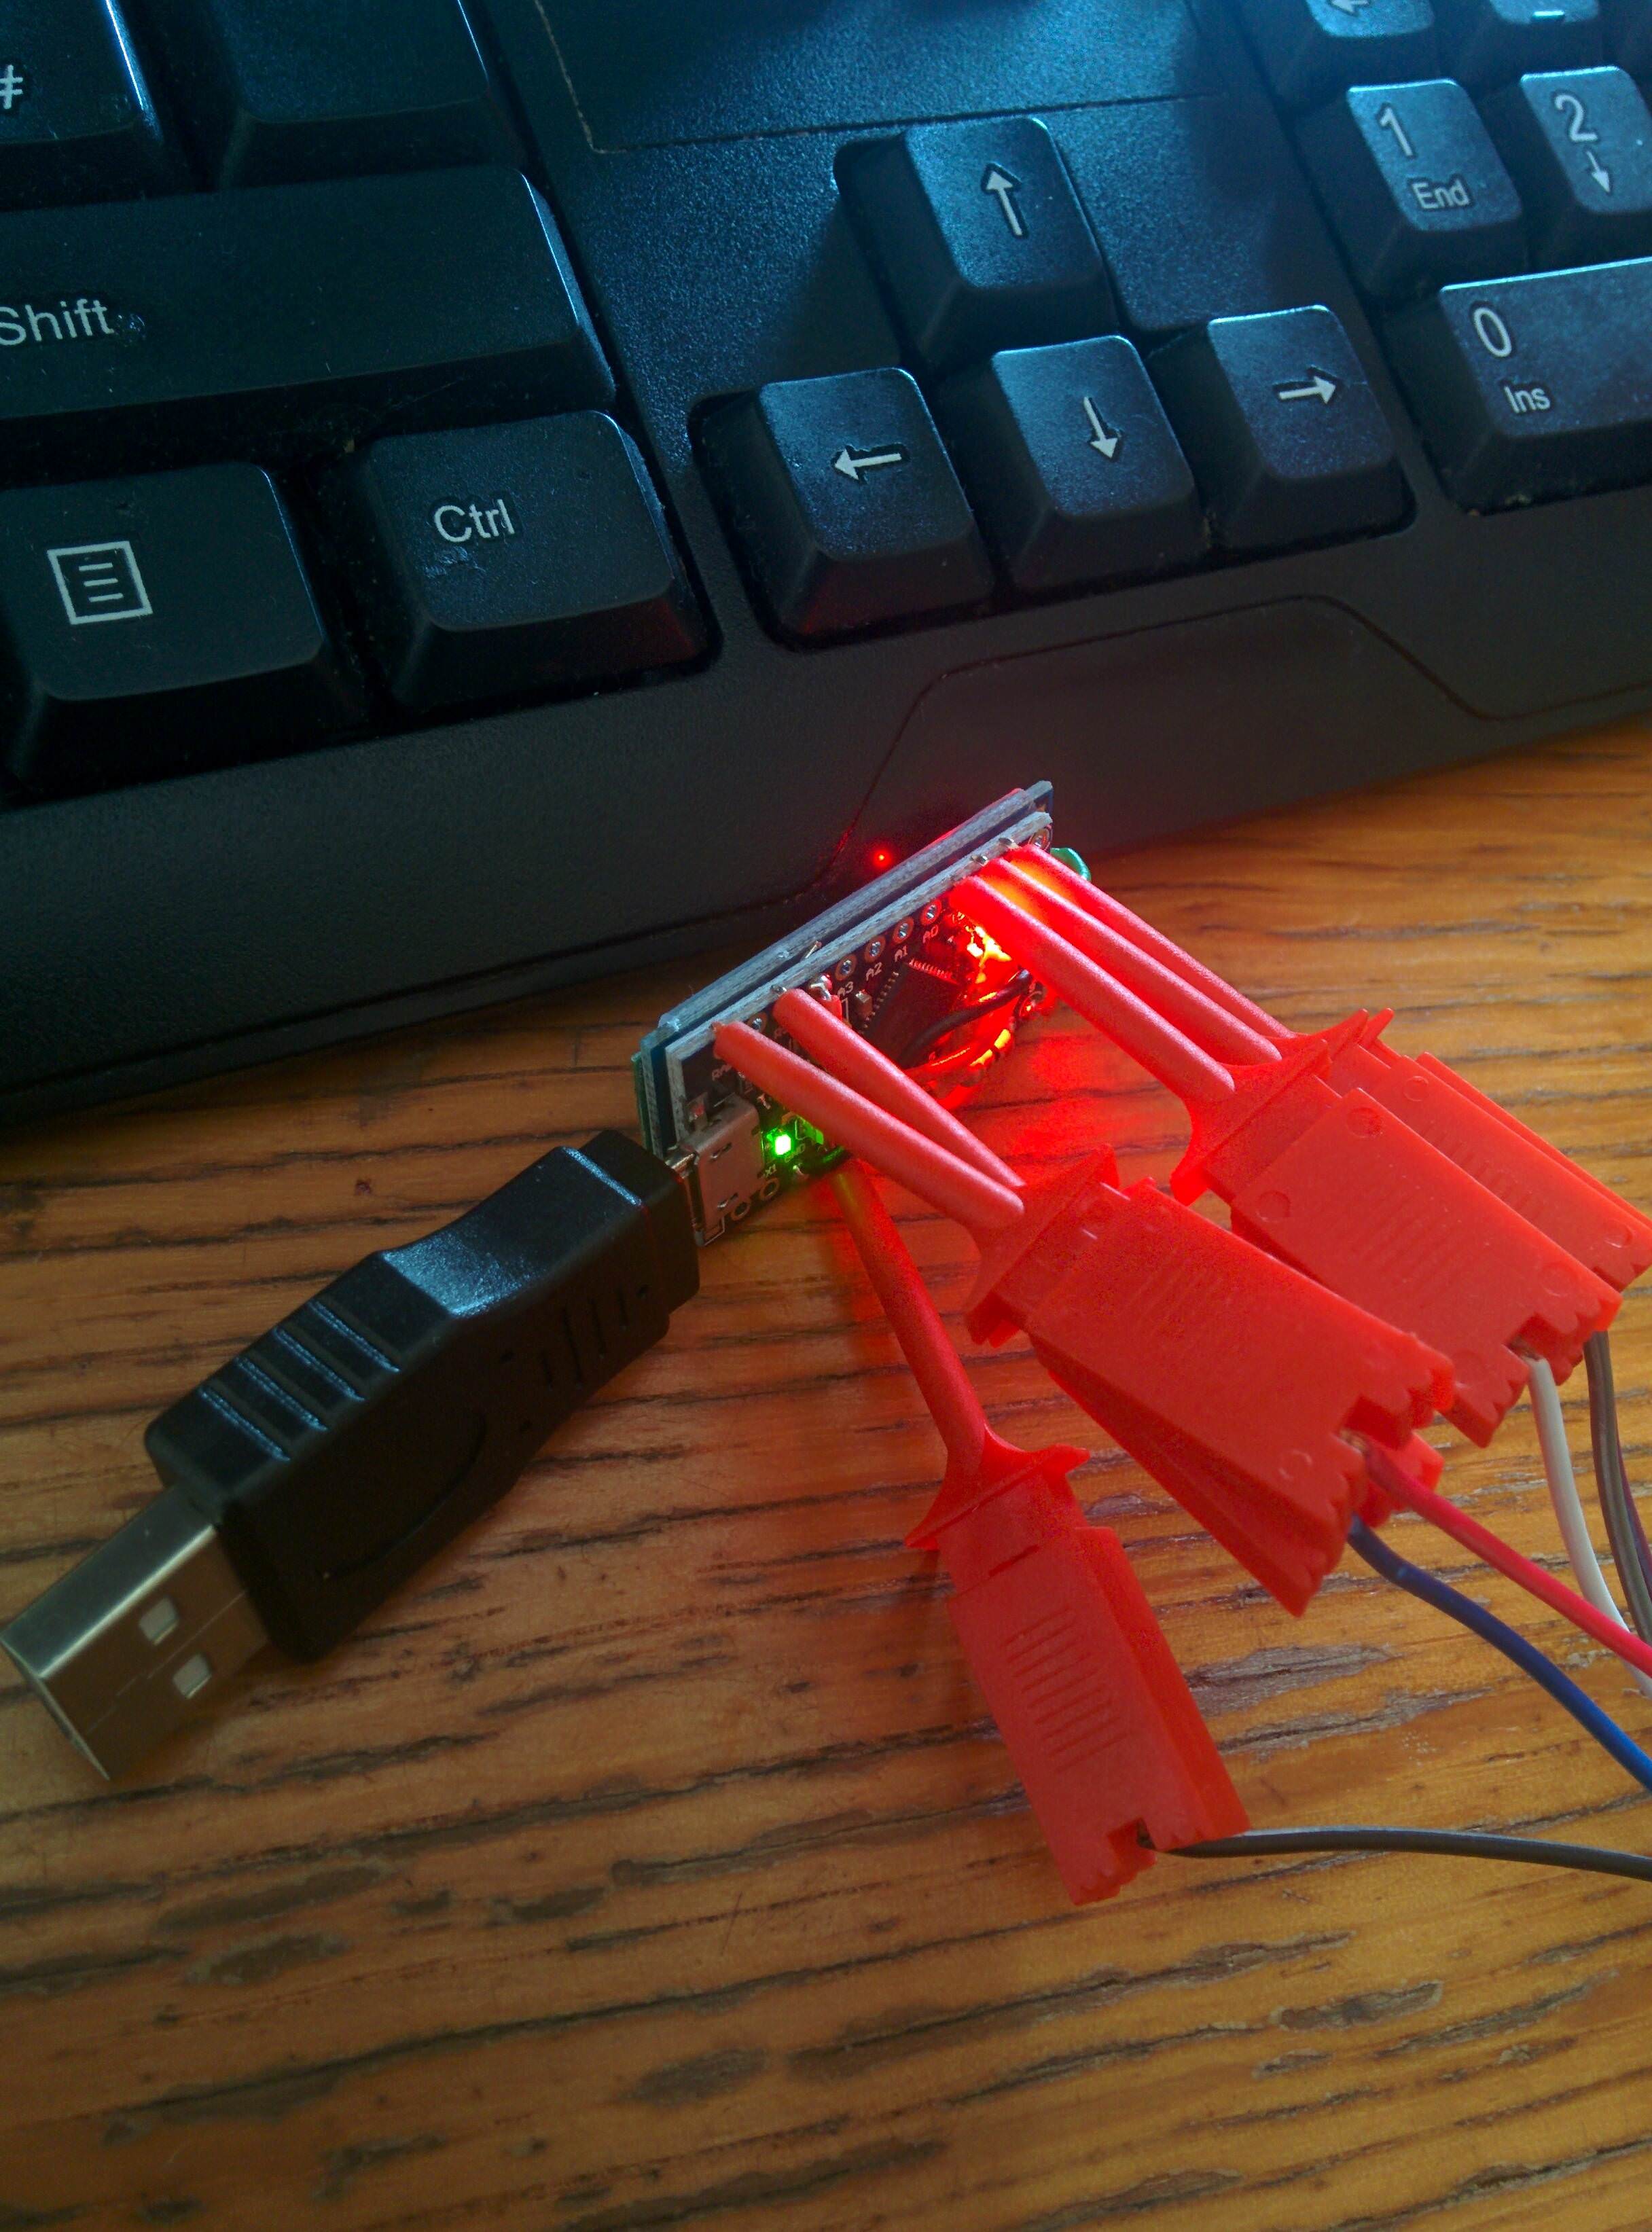
- Connect the target board (e.g. supremeDuck) to the newly created programmer (Arduino UNO) using the wiring below.

Use 3.3V pin if your board is running on 3.3V (e.g. Pro Micro 8Mhz or Malduino Elite). More detailed wiring info and alternative picture: https://schou.dk/linux/arduino/isp/
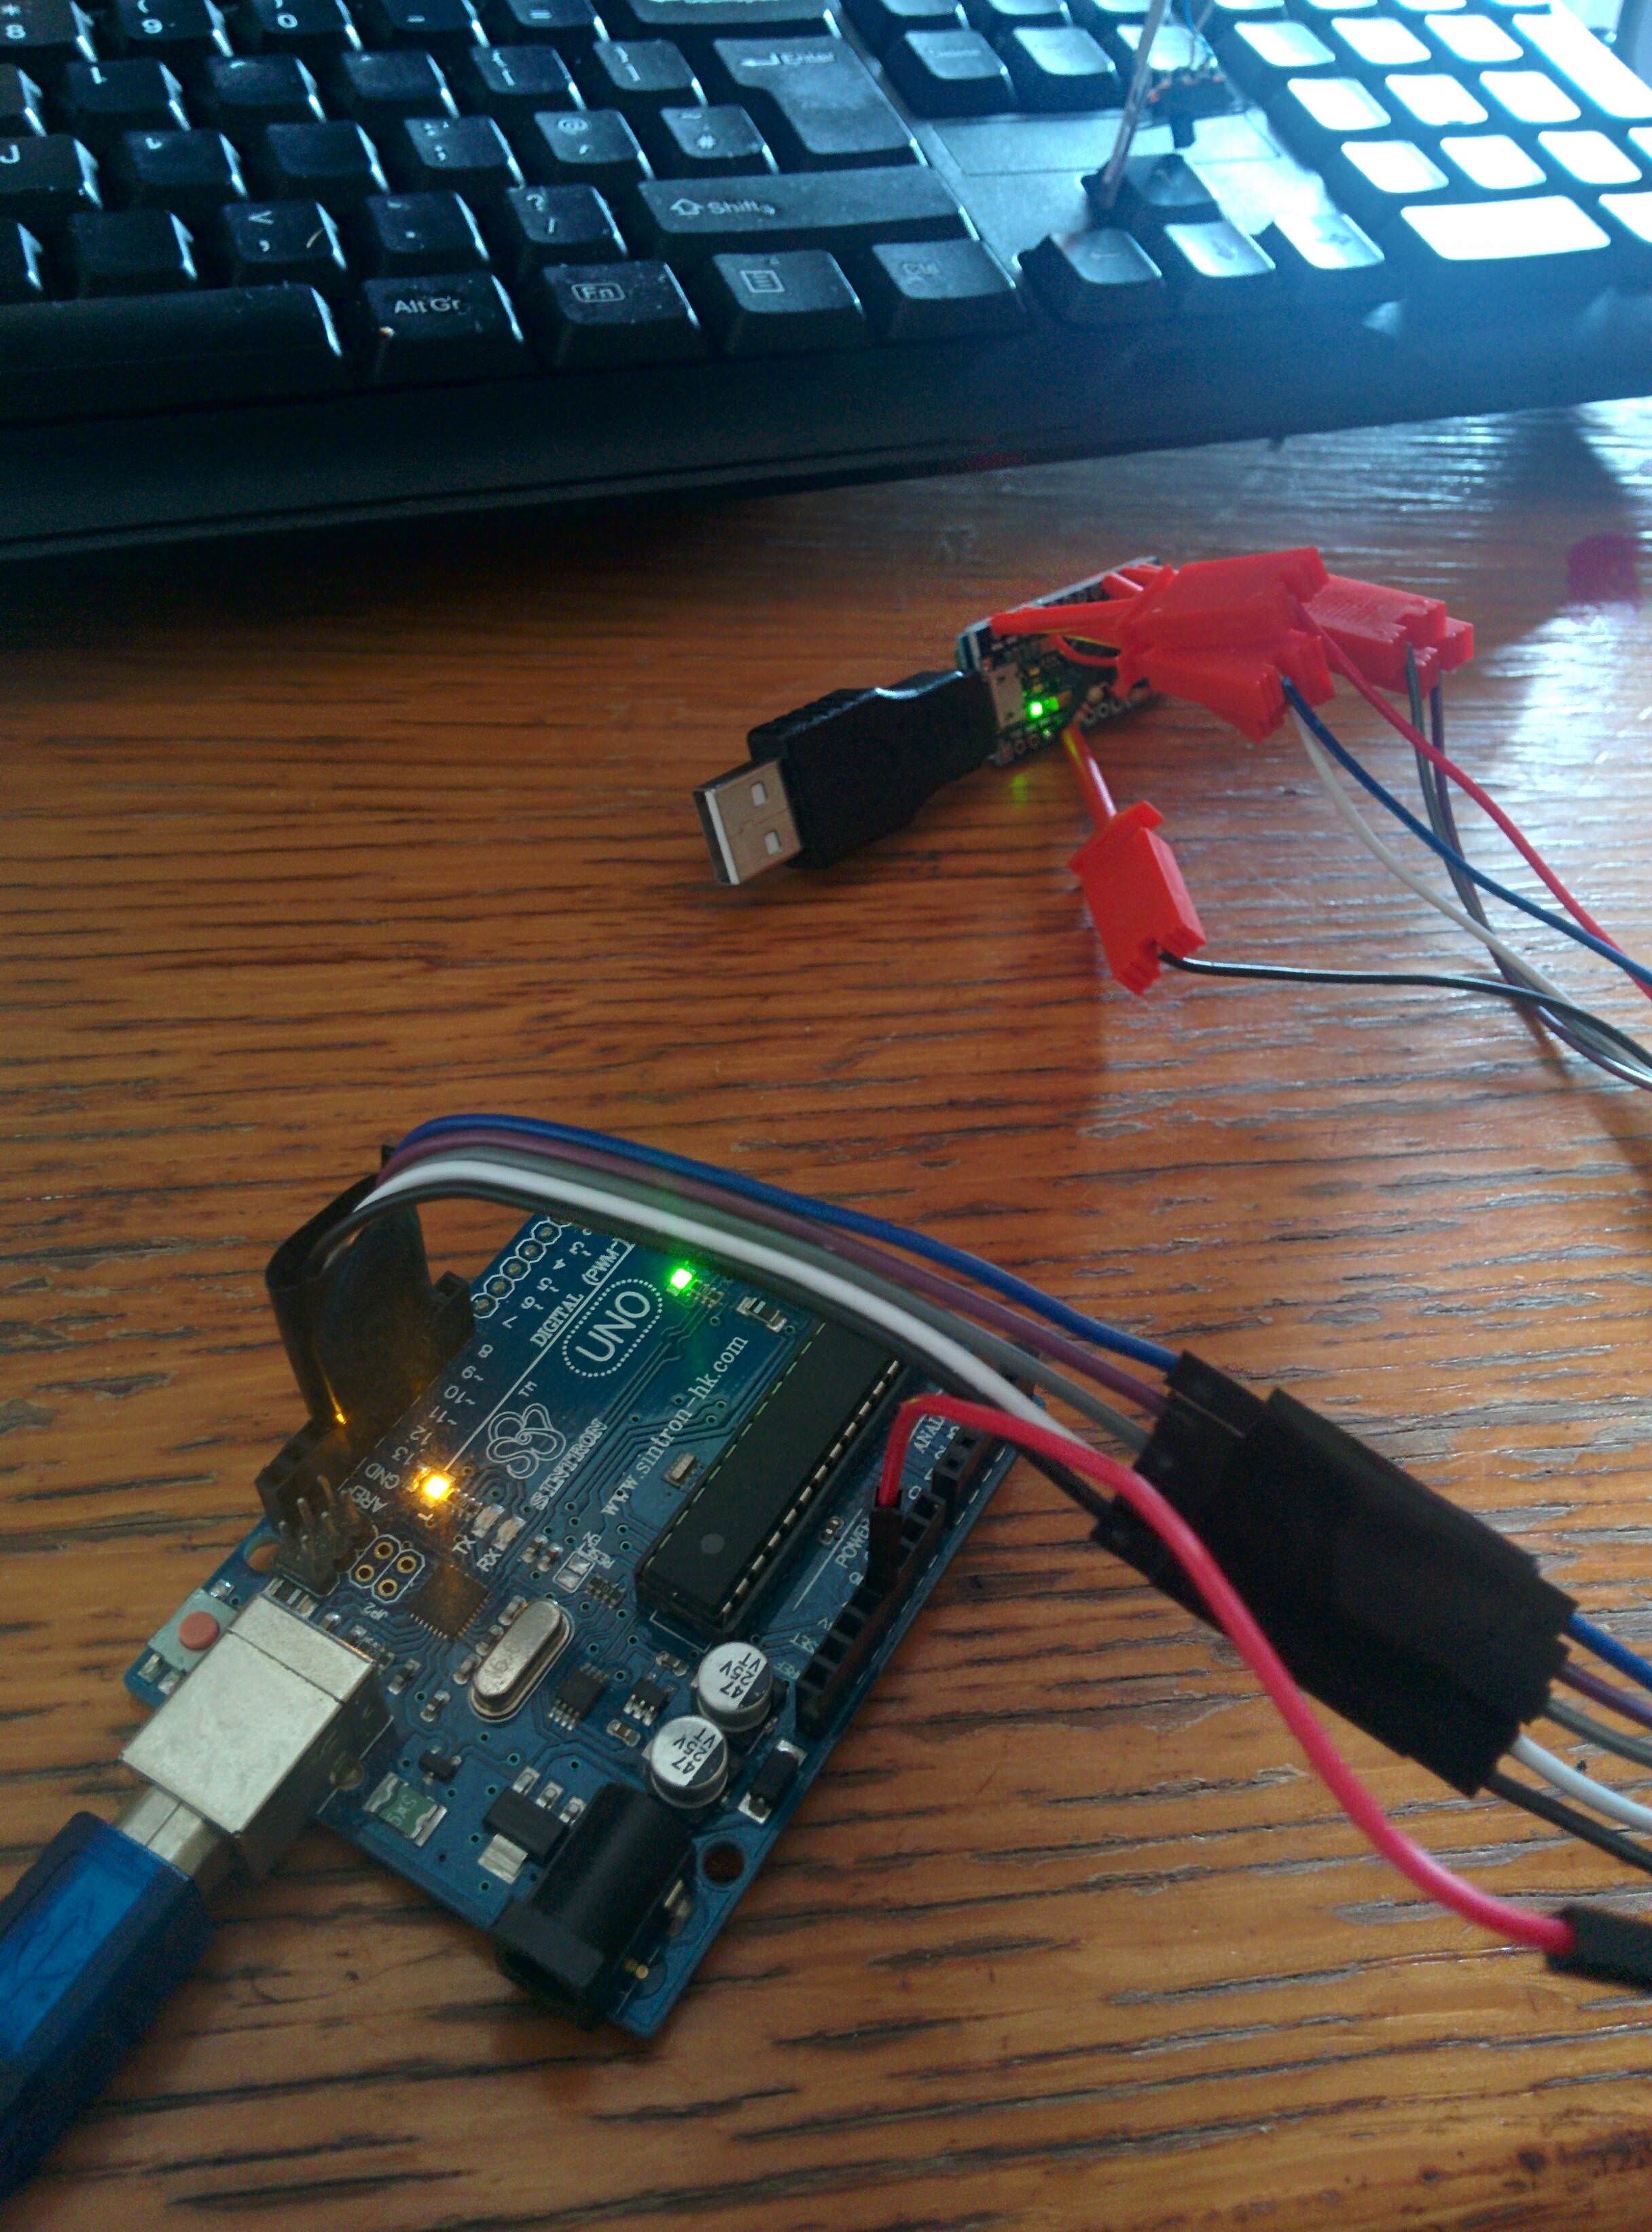
I used tape to keep the connectors in the same arrangement for future uploads.
- Connect Arduino Uno to PC and choose the options shown below.
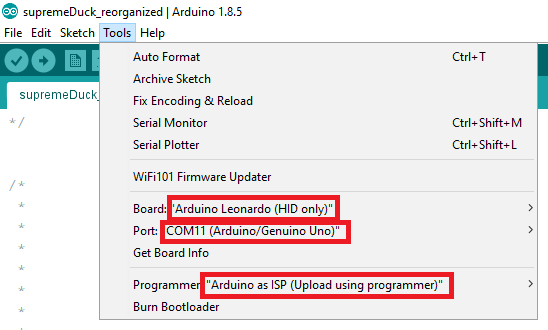
- Make sure that the wiring is correct and click Sketch->Upload Using Programmer.
If there is a problem with uploading process and there is no firm connection between 2 boards (e.g. using of tied cables instead of clips or solder) then most likely it's a connection problem.
- After uploading process is completed all the leds should be emmiting steady light.
-
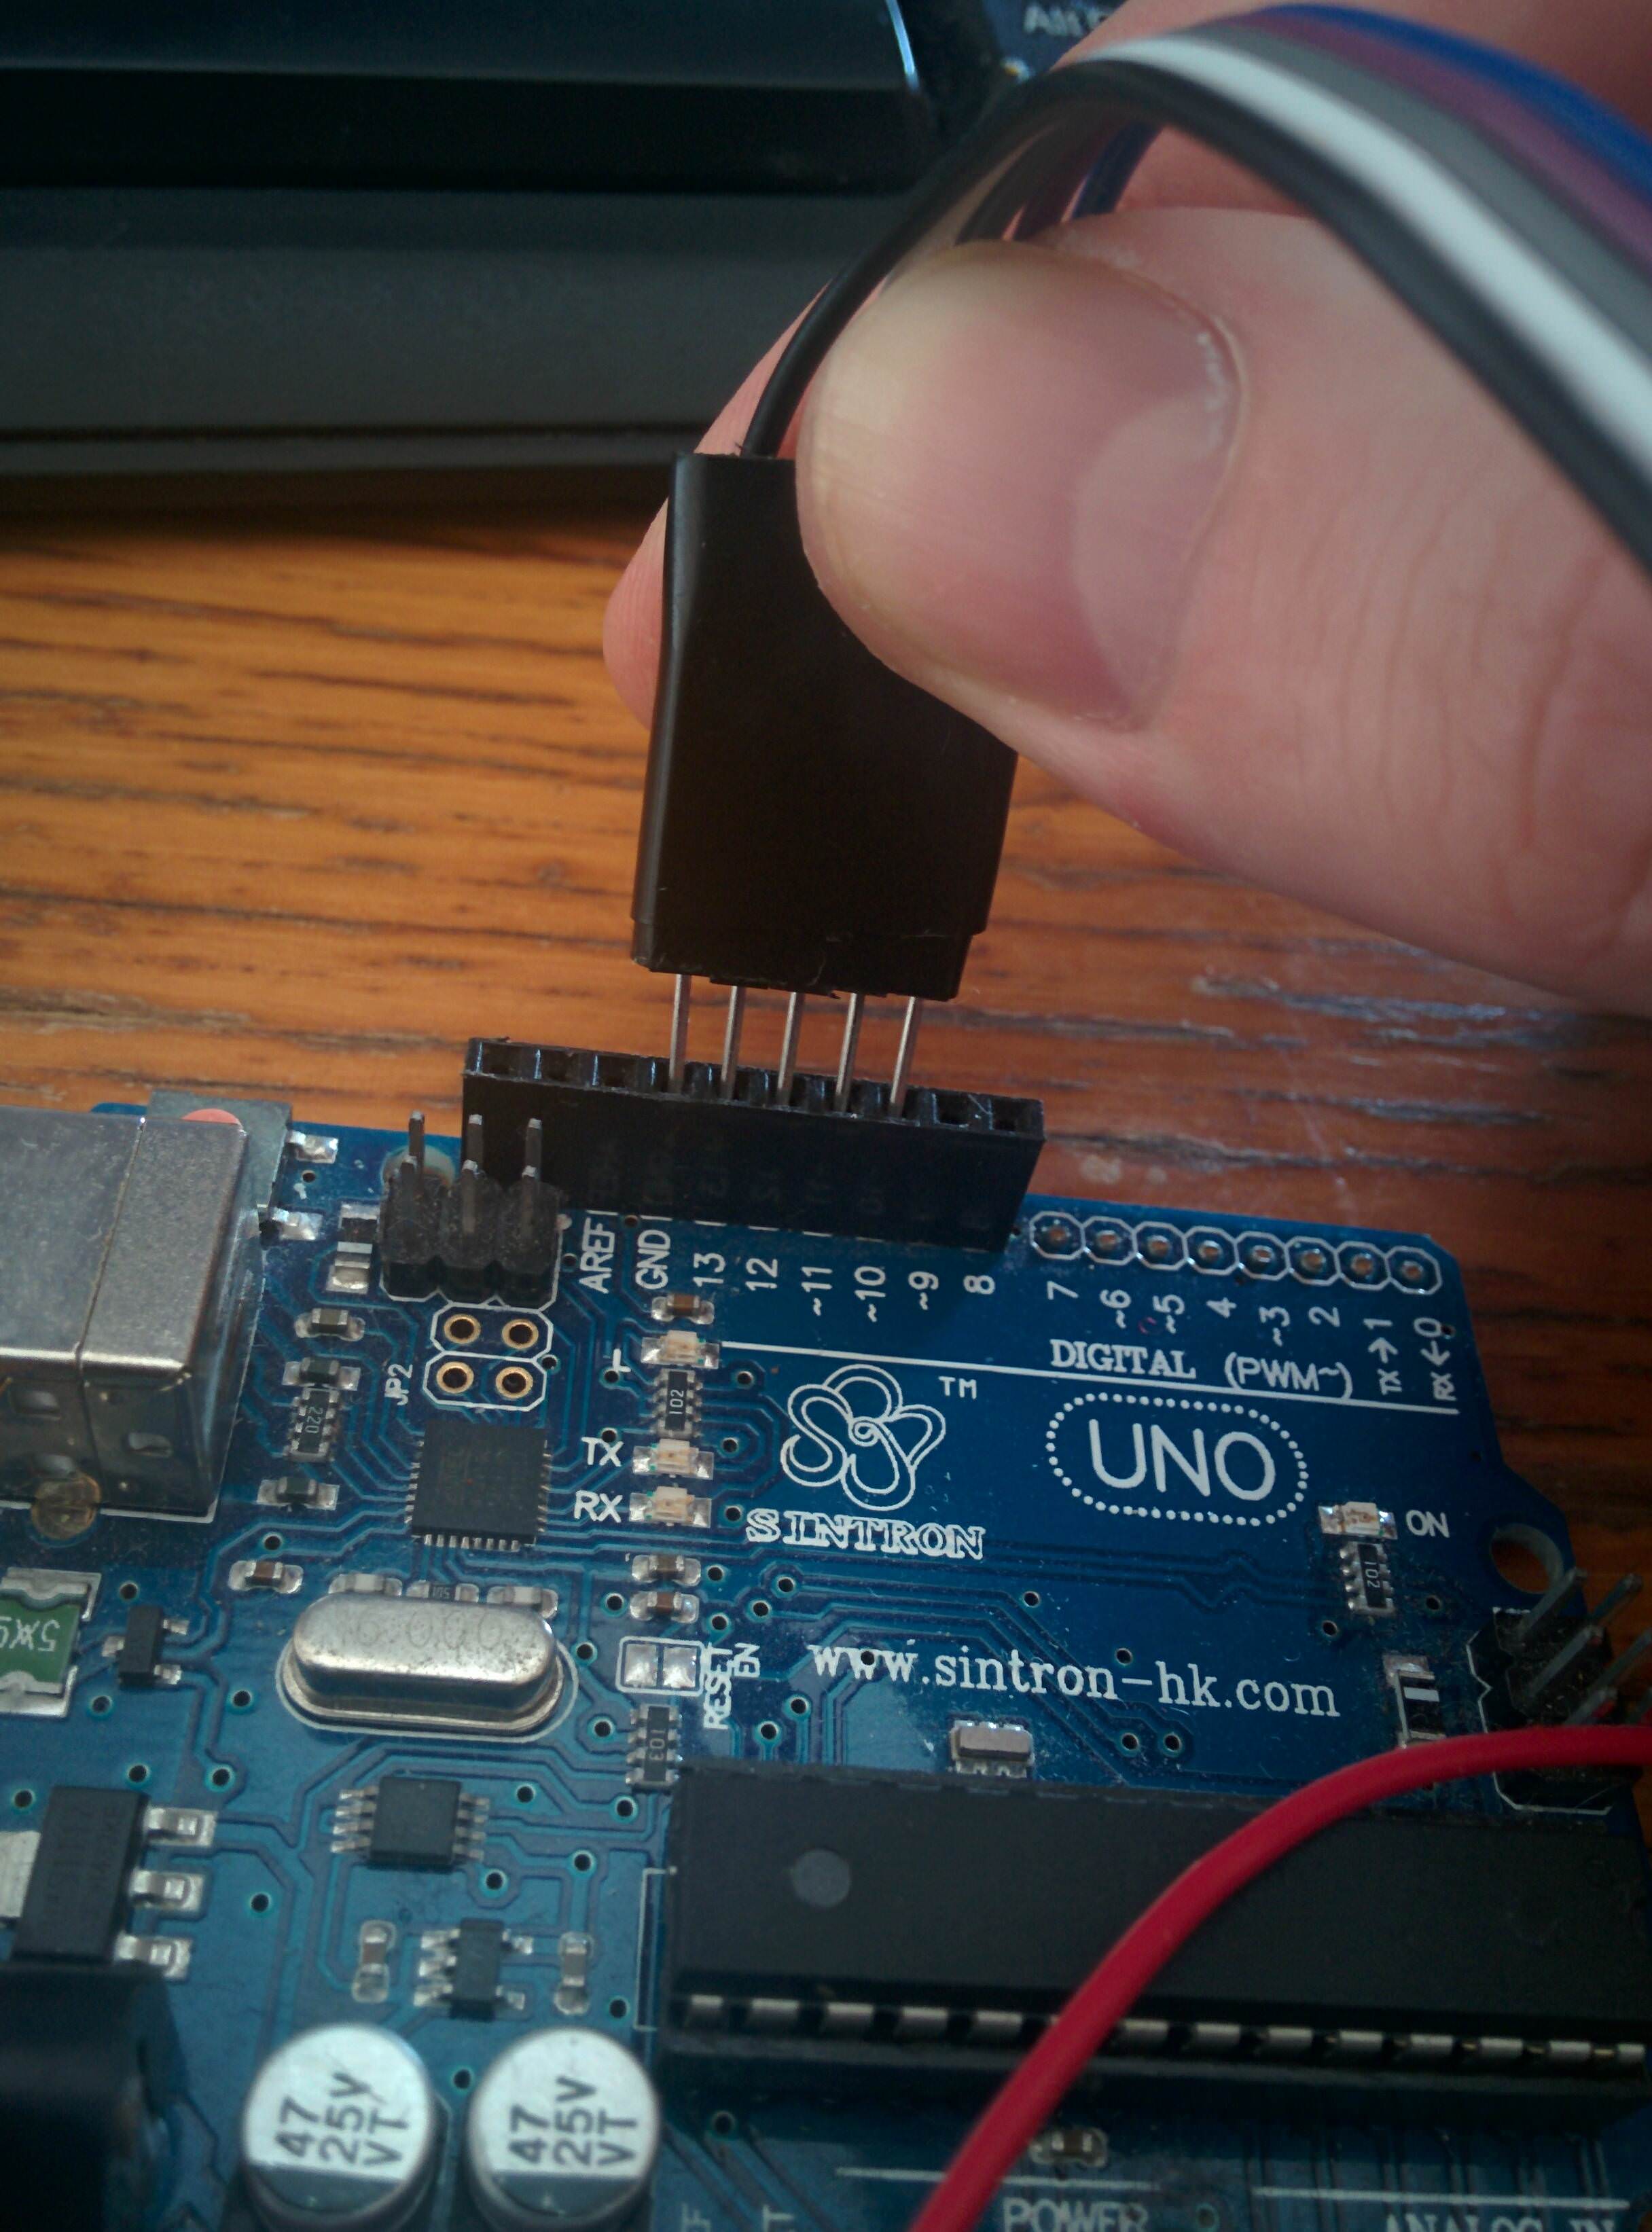
Disconnect Arduino Uno, disconnect clips from the supremeDuck.
-
At this point it the process should be completed and it should be recognized as HID only.
If for some reason it does not work you could try the reverting steps below.
Reverting to original state
-
Make sure that the Arduino Uno is flashed with the ArduinoISP code and connected appropriately to the target device (Arduino Pro Micro, supremeDuck etc.)
-
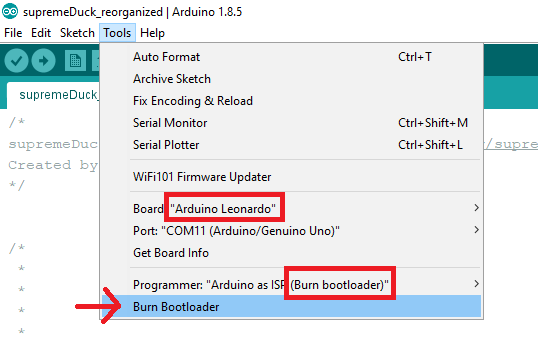
Pick the options shown on the image below and press "Burn bootloader".
- After the process is completed the device should be able to be programmed by USB like it was before.