Flashing bootloader to Atmega32U4 using Arduino IDE - michalmonday/supremeDuck GitHub Wiki
Additional Arduino Uno or Arduino Pro Micro board is required which will be used as a programmer board.
-
Upload the ArduinoISP code to the programmer board. It can be found in:
File -> Examples -> ArduinoISP -
Select:
Tools -> Programmer -> Arduino as ISP
Not to be confused with "ArduinoISP" which is also an option there.
- Connect the boards in the following way:
Upper board is the programmer board of your choice.
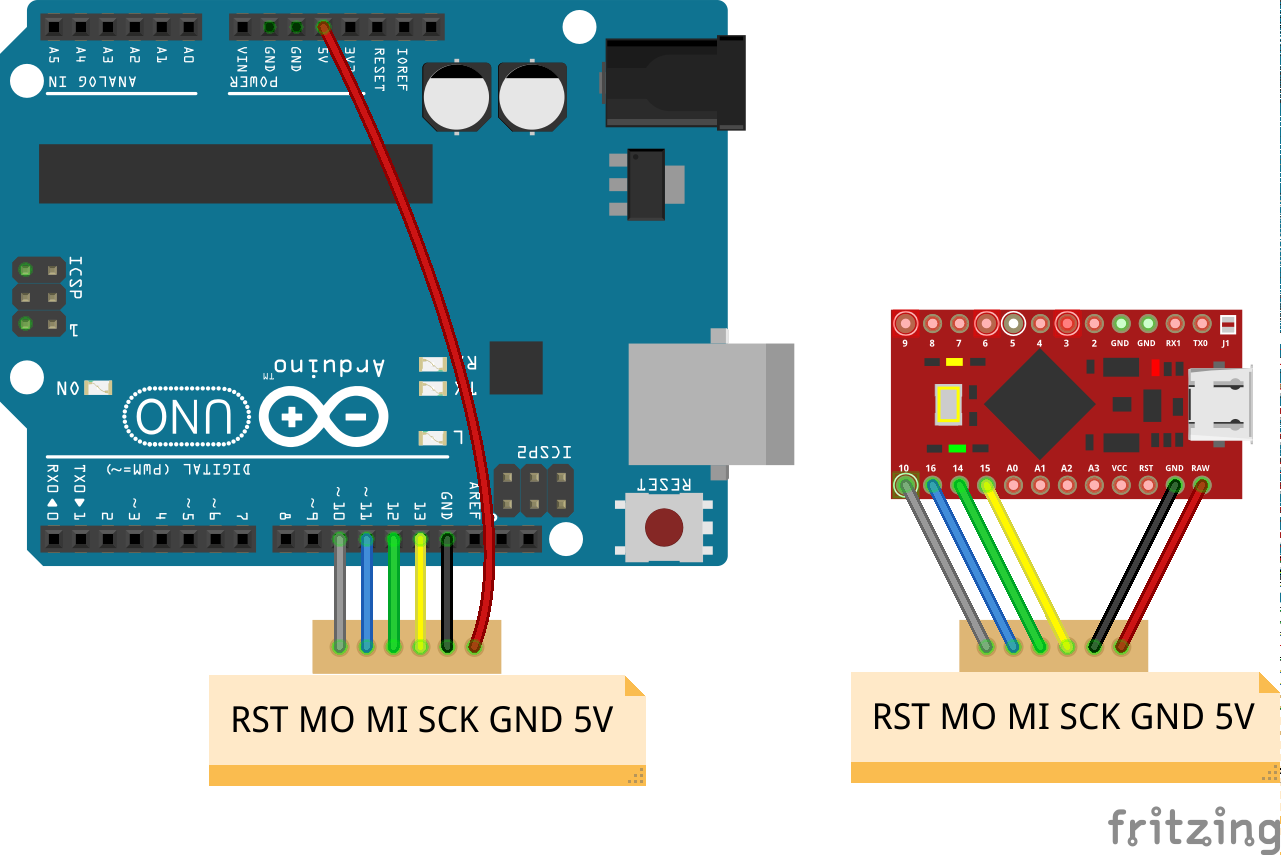
You can solder it but I would recommend using breadboard, jumper wires, header pins and applying pressure which can be seen in this video at 02:32.

Using this kind of wiring you could also program another Arduino Pro Micro
SCK is pin 15 of Arduino Pro Micro, 9 of Atmega32u4
MI (MISO) is pin 14 of Arduino Pro Micro, 11 of Atmega32u4
MO (MOSI) is pin 16 of Arduino Pro Micro, 10 of Atmega32u4
RST is pin RST of Arduino Pro Micro, 13 of Atmega32u4 (notice that it is the only pin that isn't connected to its' counterpart)
- Plug-in the programmer board to your PC and select:
Tools -> Board -> "Arduino Leonardo"
Assuming that the Atmega32U4 board which is being programmed runs on 5V, otherwise you'll need Sparkfun plugin and select 3.3V version of Arduino Pro Micro). Anyway, the selected board should be the one that is being programmed (so even if you're using Arduino Uno as "programmer board" you should still select "Arduino Leonardo" instead because that is the actual board being programmed).
- Make sure the 2 boards are connected and click:
Tools -> Burn Bootloader
By default you won't see the progress. The bootloader flashing routine involves writing and reading/verifying bootlaoder. To enable output and see the progress you can enable "Show verbose output during - upload" in "File -> Preferences".