README_EN - michail-nikolaev/task-force-arma-3-radio GitHub Wiki

TeamSpeak integration for Arma 3. TFAR won the 1st place (Addon) in Make Arma Not War contest.
###Installation
- Download and unzip the 0.9.7.3 radio archive.
- Copy the contents of
TeamSpeak 3 Clientfolder into the root folder of TeamSpeak. - Copy the contents of
Arma 3folder into game folder –...\SteamApps\common\Arma 3.
Every release of TFAR includes the most recent version of СBA – Community Base Addons. If you already have CBA installed, but uncertain about its version, then it's better to let Windows replace the existing folder.
###Configuration
- Make sure that Caps Lock is not used as the push-to-talk key in TeamSpeak.
- In the game settings, to avoid voice doubling, turn off Voice Over Network (VON), or change its assgined key to something other than Caps Lock.
- Open the plugin list in TeamSpeak –
Settings> Plugins. - Enable
Task Force Arma 3 Radio. - Disable
ACREand other similar radio plugins, if you have them, to avoid possible conflicts. - Press the
Reload All(bottom left) to restart all of the current plugins. - Make sure the volume of alerts is not turned off in TeamSpeak –
Options> Payback> Sound Pack Volume– set a positive value. - Start the game with both
@CBA_A3&@task_force_radioaddons enabled. You can do this by adding their names to the game shortcut, or right after theexefile –…\arma3.exe -mod=@CBA_A3;@task_force_radio. However, the game's own menu (Settings> Expansions) is a more preferable method of setup. - Join the same TeamSpeak channel as other players using the radio. While playing in serious mode, the server will have a channel named
TaskForceRadio, where all participating players will be navigated automatically at the start of a shared mission.
During the game, TFAR will change your TeamSpeak nickname to match the one from your current game profile. Make sure your in-game nick is at least 3 characters long.
We do not recommend using the plugin with simultaneous connections to multiple TeamSpeak servers.
We recommend disabling the preconfigured alert sounds used by TeamSpeak –
Options> Notifications> Sound Pack: "Sounds Deactivated". To apply this change, make sure to restart TeamSpeak afterwards.
###Controls
| Keys | Action |
|---|---|
| Push-to-talk hotkey in TS | Direct Speech. |
| Caps Lock | To talk on a radio. |
| Ctrl+Caps Lock | To talk on a long range radio. |
| Ctrl+P | To open the handheld radio interface (the radio must be in the inventory slot). In that case, if you have a number of radios – you can select the one needed. It is also possible to set the radio as active (the one that will be used for transmission). Also it is possible to load radio settings from another radio with same encryption code. |
| Num [1-8] | Rapid switching of shortwave radio channels. |
| Alt+P | Opens the long range radio interface – for this action to work, you either have to have long range radio on you, or you have to be in a vehicle as a driver, gunner, or co-pilot. If a number of radios are available – you’ll be asked to choose one. Also, one of them can be set as active. Furthermore, it is possible to load radio settings from another radio with same encryption code. |
| Ctrl+Num [1-9] | Rapid switching of long range radio channels. |
| Ctrl+Tab | To change the direct speech volume. You can talk: Whispering, Normal or Yelling. Does not affect the signal volume in the radio transmission. |
| Shift+P | To open an underwater transceiver interface (you should be wearing a rebreather). |
| Ctrl+~ | To talk on underwater transceiver. |
| Ctrl+] | Select next handheld radio. |
| Ctrl+[ | Select previous handheld radio. |
| Ctrl+Alt+] | Select next long range radio. |
| Ctrl+Alt+[ | Select previous long range radio. |
| Ctrl+[←,↑,→] | Change the stereo mode of handheld radio. |
| Alt+[←,↑,→] | Change the stereo mode of long range radio. |
| T | Transmit on additional channel of commander radio. |
| Y | Transmit on additional channel of long range radio. |
| Esc | To exit from the radio interface. |
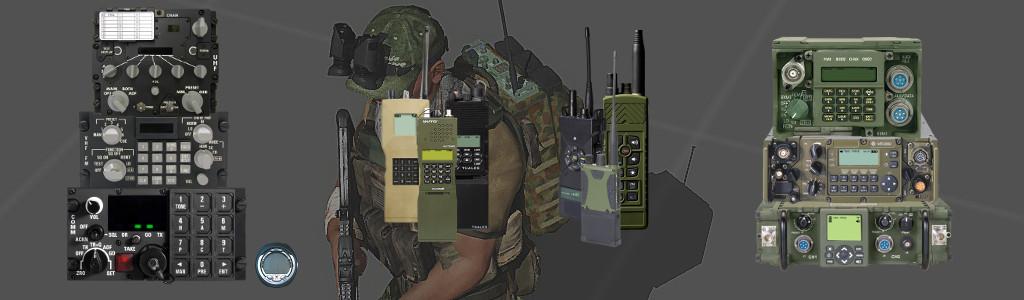
###Radios
| Radio | Side | Range /Distance |
|---|---|---|
|
AN/PRC-152 (commander) |
BLUFOR | 30–512 MHz /5 km |
|
RF-7800S-TR (squadmate) |
BLUFOR | 30–512 MHz /2 km |
|
RT-1523G (ASIP) (manpack) |
BLUFOR | 30–87 MHz /20 km (30 km for vehicle-mounted) |
|
AN/ARC-210 (airborne) |
BLUFOR | 30–87 MHz /40 km |
|
AN/PRC148-JEM (commander) |
Independent | 30–512 MHz /5 km |
|
AN/PRC-154 (squadmate) |
Independent | 30–512 MHz /2 km |
|
AN/PRC-155 (manpack) |
Independent | 30–87 MHz /20 km (30 km for vehicle-mounted) |
|
AN/ARC-164 (airborne) |
Independent | 30–87 MHz /40 km |
|
FADAK (commander) |
OPFOR | 30–512 MHz /5 km |
|
PNR-1000A (squadmate) |
OPFOR | 30–512 MHz /2 km |
|
MR3000 (manpack) |
OPFOR | 30–87 MHz /20 km (30 km for vehicle-mounted) |
|
MR6000L (airborne) |
OPFOR | 30–87 MHz /40 km |
|
Transceiver (underwater) |
All | 32–41 kHz /70–300 m (depending on waves) |
Short range (handheld, of commander or squadmate class) and long range radios (manpack, airborne, vehicle-mounted) of same faction are configured using a common protocol, allowing them to communicate with each other. If the transmission is carried out using a short range radio – the sound will be of high-frequency. In the case of a long range transmission – it will be of low-frequency.
The quality of radio signal is affected by the nature of surrounding terrain. Worst case scenario – you are located at the edge of a steep hill. If you start moving away from the hill's edge, in direction opposite the transmitting player, you will start getting better signal reception. Best case scenario – a direct line of sight to the source of transmission.
Commander and long range class of radios support transmitting and receiving on two channels simultaneously. Pressing the "Setup additional channel" switch will mark the currently selected radio channel as additional. After switching to another channel you will hear both – active and additional channels.
####Distribution
-
By default, a long range radio is given out to squad leaders. If a given player is initialy wearing a backpack, it will be automatically discarded on the ground in exchange for a distributed radio.
-
Short range radios are given out to players who have
ItemRadioin their inventory. At mission start, the process of radio distribution may take up to a few seconds to fully complete – note the game messages appearing at the center of your screen.
####In vehicles
-
A long range radio is available to driver, commander, gunner, and co-pilot. Not all vehicles support mounted radios.
-
Every vehicle slot has its own radio, which has to be configured separately. If you plan to switch seats in a vehicle, then configure the radio for each seat beforehand – for example, at the driver and gunner positions.
-
Vehicles are classified into open and closed (isolated) types. If you are in an isolated vehicle, you will barely hear any voices from the outside (and vice versa). However, when turned out, you will be able to hear voices from both, inside and outside of your vehicle.
####Interception
- Radios can be picked up from dead players, and exchanged between players. In doing so, they retain all their settings (channels, frequency, volume).
To bypass the well-known game bug with disappearing world items and pick up a radio safely, we recommend you do so through the inventory screen while standing directly over its position on the ground.
- Settings configured for vehicle-mounted radios are also persistently stored.
- By default, all radios use an embedded faction-specific encryption code for transmission. In practice, this means that even if you somehow found out the radio frequency of your opponent you would still not be able to intercept their communication by simply switching to it on your own radio. To be able to listen and talk on enemy frequency, you will also need to have a captured enemy radio.
While intercepting your opponent's communication using a captured manpack radio, it is preferable to get in and remain inside a friendly vehicle. This way, you'll be able to listen to the enemy chatter using manpack, while at the same time being able to broadcast to your allies using the vehicle-mounted radio as the active one.
####Divers
- You can not talk underwater (even while wearing a diving suit). However, at close distance your communication partner can hear some indistinct speech (exception: if you are underwater in an isolated vehicle).
- Being underwater, you can faintly hear muffled voices on land.
- Use an underwater transceiver for communication among divers.
- You can not use radio communication underwater (neither to talk nor to hear). If you want to pass some message – surface first. Exception: submersible at the periscope depth (divers can use a long range radio there).
###Operation modes The plugin supports two operation modes – serious and a lightweight mode.
-
Lightweight is the default mode. It is designed mainly for cooperative games (PvE). Its special feature is that using the plugin players can hear the dead, users not playing, users playing on a different server and users playing without the plugin avoiding the radio (just like with TeamSpeak). This makes games against people less convenient, but allows your friends to easily find out where you play, what's your frequency, etc. Naturally, those who play on the same server with activated addons and plugins will hear each other according to "radio laws": taking into account the radio frequency and distance.
-
Serious is designed for organized games played in player versus player (PvP) modes. To enable it, TeamSpeak administrator has to create a channel called
TaskForceRadiowith the password of123. Before the game, players upon launching TS, enable the radio plugin, split into teams with each occupying its own side channel and then, after joining the game server commence a briefing on their forthcoming mission. As the mission loads, in a few seconds time, players will be forwarded toTaskForceRadiochannel. Therein, players can hear only other live players that have TFAR enabled, are on the same server and the same team. Dead players can communicate only among themselves, but once respawned will again adhere to the aforementioned restrictions. After the played mission concludes, all participants are transferred back to the TS channel they used for briefing.
###Problem solving
-
Pipe error 230– most likely, it means you forgot to enable the plugin in TeamSpeak. - If the plugin is red-marked in TS and does not load – you will probably have to update TeamSpeak.
- If something doesn't work – try to reload the plugin first.
-
Caps Lock actions aren't working – common issue with use of special gaming keyboards, where Caps Lock code is different. Try changing your key mapping (by editing the
userconfig). - If due to an error, you are no longer able to hear other players, even outside the game, open
Setup 3D Soundin TeamSpeak and clickCenter All. - To eliminate possible errors with the plugin, developers may require your TeamSpeak logs. To copy it, select
Tools> Client Log, tick all checkboxes at the top and, by selecting all of the text with Ctrl+A, copy it to the clipboard. - If TeamSpeak stopped working (Heaven forbid!) while using the plugin – it will show a dialog with instructions on where you can find the dump file (information about an error). I'd appreciate if you attached this file in your bug reports.
####For TS admins
To be on the safe side, reduce the level of flood protection – right-click on server> Edit Virtual Server> More> Anti Flood – set the values at 30, 300 and 3000 (from the top).
####For developers If this plugin ever becomes popular, it would be great if we could avoid having piles of incompatible community forks. For this reason, if you’d like to contribute to the project, contact me – it is very likely that your improvements will be merged into the main branch. Looking forward to your pull requests.
###Special Thanks
- Task Force Arrowhead squad for testing, support, patience and all the help.
- MTF (varzin) for help with graphics and documentation.
- Hardckor for help with graphics.
- Shogun for help with graphics.
- Blender for the fonts.
- vinniefalco for DSP Filter.
- WOG and TRUE personally, for helping with the QA.
- Music DSP Collection for the compressor.
- Avi for the code review.
- Vaulter (GutHub) for the development help.
- Dina for translations.
- Zealot (GitHub) for the development help and useful scripts.
- NouberNou for advice and friendly competition.
- Megagoth1702 for his old work on emulation of radio sounds.
- Naught for the code review.
- Andy230 for translations.
- L-H (GitHub) for changes to the code.
- NorX_Aengell for translation into French.
- lukrop (GitHub) for changes to the code.
- nikolauska (GitHub) for improvements to SQF code.
- Kavinsky for AN/PRC-154, RF-7800S-TR and other radios.
- JonBons (GitHub) for changes to the code.
- ramius86 for translation into Italian.
- Killzone Kid for tutorials.
- Krypto202 (GitHub) for sounds.
- pastor399 (GitHub) for backpack models and textures.
- J0nes for help with the models.
- Raspu86 (GitHub) for backpack models.
- Gandi for textures.
- Pixinger for help with Zeus.
- whoozle for sound engine and help.
- MastersDisaster for the Rotator switch sound.
- CptDavo for help with textures.
- KoffeinFlummi for help with the code.
- R.m.K Gandi for backpack textures.
- Pomigit for texture patterns.
- Priestylive for BWMOD textures.
- Audiocustoms (SoundCloud) for radio sounds.
- EvroMalarkey (GitHub) for translation into Czech.
- Tourorist for help with documentation.
- ViperMaul for help with CBA.
- Armatech for help with CBA.
- marc_book for BWMOD textures.
- The development team of RHS, for their help with integration.
- Everyone who made videos or wrote review articles.
- All the players who use TFAR, especially those taking out their time to report bugs.
- Sorry if I missed anyone out (let me know)!