Installing Android SDK Tools - meswapnilwagh/android_guides GitHub Wiki
The Android SDK can be installed automatically using Jake Wharton's SDK Plugin or downloading the Android SDK manually in several different ways. Below is an overview of all different approaches.
Installing the Android SDK (Automated Way)
You can use Jake Wharton's SDK Manager to manage all missing SDK dependencies. It is particularly useful for simplifying the steps of retrieving the Build Tools, SDK version, or support libraries used in your project.
Edit your root build.gradle file to include this plugin. Because the latest plugin version has not been released to a Maven repository in awhile, we can use Jitpack to grab the latest version as described here. The old version attempts to download an Android SDK Manager that does not include ProGuard as noted in this issue.
buildscript {
  repositories {
    jcenter()
    maven { url 'https://jitpack.io' }
  }
  dependencies {
    classpath 'com.android.tools.build:gradle:1.3.1'
    // download commit hash 220bf7
    classpath 'com.github.JakeWharton:sdk-manager-plugin:220bf7a88a7072df3ed16dc8466fb144f2817070'
  }
}
The android-sdk-manager plugin needs to be declared before the regular com.android.application plugin is applied. If you have multiple subprojects used in your app, make sure every build.gradle has this dependency included.
apply plugin: 'android-sdk-manager' // run before com.android.application
apply plugin: 'com.android.application'
If you wish to also download a specific emulator, add this section too:
// optionally including an emulator
sdkManager {
  emulatorVersion 'android-19'
  emulatorArchitecture 'armeabi-v7a' // optional, defaults to arm
}
When the SDK Manager plug-in runs, it will look at the local.properties file to see where the Android SDK files are located. If this file does not exist, it will attempt to check the environment variable ANDROID_HOME for the location. If it does not find one defined, it will create a directory in ~/.android-sdk. In any case, you will want to make sure that that the build has permissions to write to whichever directory if any new packages need to be downloaded.
If you are having any issues with this -plugin, you can run gradlew build -d to help see the verbose logging messages.
Installing for Ubuntu Linux
If you are using Ubuntu 15.04 or 15.10, make sure to install the following packages. Otherwise, you may notice No such file or directory when running trying to execute the aapt program that is part of the Android SDK toolset:
sudo apt-get install libc6-dev-i386 lib32z1 default-jdk
Installing the Android SDK (via Homebrew)
Assuming you have OS X running, you can use Homebrew to install the Android SDK.
- Install Homebrew - package manager for OSX
- run
brew install android-sdk
This will install the Android SDK tools in /usr/local/Cellar/android-sdk/<version number>
Installing the Android SDK (Manual Way)
You wlil need to download the Android SDK without Android Studio bundled. Go to Android SDK and navigate to the SDK Tools Only section. Copy the URL for the download that's appropriate for your build machine OS.

Use wget with the correct SDK URL:
$ wget http://dl.google.com/android/android-sdk_r22.6.2-macosx.zip
Unzip and place the contents within your home directory. The directory names can be anything you like, but save the files in somewhere easy to find (i.e. ~/android-sdk).

Now it's time to set your build environment's PATH variable and other variables that will be use to locate Android.
Edit your .bash_profile file. If you're not using bash, edit the right config file for your environment.
# Android
export ANDROID_HOME=/Users/ciandroid/android-sdk-macosx
export PATH=$PATH:$ANDROID_HOME/tools
Save and quit. Reload .bash_profile:
$ source ~/.bash_profile
Installing via the GUI
At the prompt, type android and hit Enter to launch the Android SDK Manager in a window. If this doesn't work, your PATH variable has not been set up with the Android SDK location.
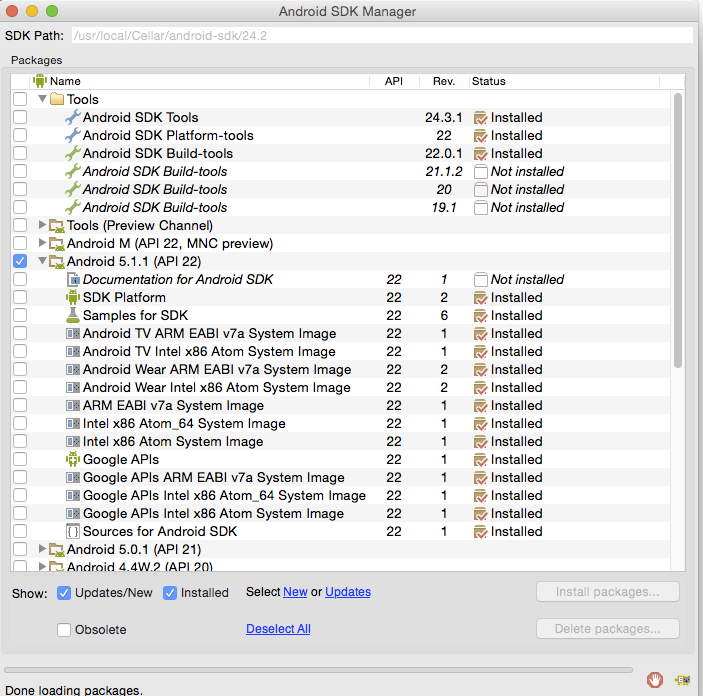
You will want to install the same Android SDK packages on your build machine as you did to get Gradle running locally. Before you begin, take a look at the build.gradle file in your project.
Packages to install
Here are the SDK package names you'll definitely wish to select:
Tools > Android SDK ToolsTools > Android SDK Platform-toolsTools > Android SDK Build-tools- One version of the Android Platform. E.g.,
Android 5.1.1 (API 22). It should be the one you named named in theandroid: compileSdkVersionsection of yourbuild.gradlefile.
You will also want to download the extras:
- Android Support Repository
- Android Support Library
Note: Choose the Android SDK Build-tools for the version of Android that you listed in the build.gradle file as the android: buildToolsVersion target. If your build.gradle says
    android {
        buildToolsVersion '21'
        ...
    }
then make sure to download that API version in the Android SDK Manager.
Installing via the Command Line
You can also download the SDK packages using the command line with the --no-ui parameter.
android update sdk --no-ui --all
If you want to be selective about installing, you can use android list to view all the packages and apply the --filter option for selective installs:
sudo android update sdk --no-ui --filter platform-tools,tools
If you decide to be selective about which packages to be installed, make sure to include the extra Android Maven repository. Otherwise, you may not be able to use the latest support design library.
android update sdk --no-ui --all --filter extra-android-m2repository
There is currently no filter to install the build tools directly. See this ticket for more information.