Scaling and Load Balancing - mekya/antmedia-doc GitHub Wiki
Ant Media Server can run in cluster mode which means number of Ant Media Server instances(nodes) can work together to scale number of viewers and publishers. In other words, you can publish a live stream to one node of Ant Media Server in the cluster and you can watch the stream in another node in the cluster.
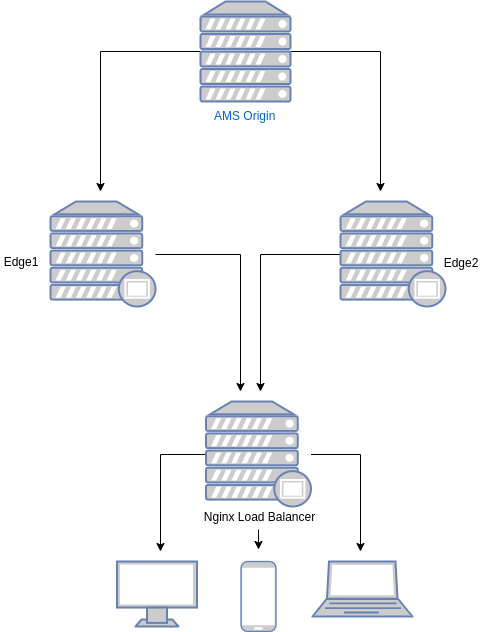
Ant Media Server Cluster has mainly four components.
-
Database(MongoDB): Stream information is recorded to database(MongoDB) to let all nodes access the data. Stream information contains the bitrates, settings, origin node of the stream, etc.
-
Origin Group: This group consists of Ant Media Server nodes which ingest streams and do the necessary actions such as transcoding, transmuxing, etc. Nodes in origin group distribute the streams to the nodes in the edge group. Viewers should not get connected to the nodes in the origin group to play the streams. Nodes in the origin group generally can have GPU if adaptive bitrates are enabled in the cluster.
-
Edge Group: This group consists of Ant Media Server nodes which get streams from nodes in the origin group and send to the viewers. Nodes in this group should not ingest stream and these nodes does not perform any actions like transcoding or transmuxing. They only get the stream from origin and send it to the viewers.
-
Load Balancer: This component is the frontend for the viewers and publishers. It receives the request from the users and forwards the request to a node in the origin or edge group. It balances the incoming load into the nodes running in the backend.
To run Ant Media Server in Clustering please follow these steps.
1. Installing Database(MongoDB)
You can install MongoDB to an instance or even you can make cluster installation for MongoDB. In this documentation, we explain how to install MongoDB to a Ubuntu 16.04 box.
- Connect your instance and Run the following commands in the shell
wget -qO - https://www.mongodb.org/static/pgp/server-4.2.asc | sudo apt-key add -
echo "deb [ arch=amd64 ] https://repo.mongodb.org/apt/ubuntu `lsb_release -cs`/mongodb-org/4.2 multiverse" | sudo tee /etc/apt/sources.list.d/mongodb-org-4.2.list
sudo apt-get update
sudo apt-get install -y mongodb-org
-
Set
bind_ipvalue as0.0.0.0in/etc/mongod.conffile to let MongoDB accept connections from other nodes.0.0.0.0 means
listen on every available network interface. If you don't have a firewall, you will accept all connection from everywhere to your MongoDB server. We recommend adding security credentials to your MongoDB instance with following commands.- Connect to the MongoDB shell
mongo- Create admin user and password (please change the values for
userandpwdfields)
db.createUser( { user: "superadmin", pwd: "admin", roles: [ { role: "userAdminAnyDatabase", db: "admin" } ] } )- Enable security in MongoDB confiruation
sed -i 's/#security:/security:\n authorization: "enabled"/g' /etc/mongod.conf- Finally restart mongod service
systemctl restart mongod -
Enable MongoDB start at boot
sudo systemctl enable mongod.service
- Restart MongoDB
sudo systemctl restart mongod
2. Installing Origin Group and Edge Group
You can easily switch Ant Media Server mode from standalone mode to cluster mode or vice versa. Let's switch running standalone Ant Media Server to cluster mode. In order to make Ant Media Server to run in Cluster mode, you just need to run the following command.
cd /usr/local/antmedia
sudo change_server_mode.sh cluster <MONGODB_SERVER_IP>
You can monitor all nodes in the cluster by visiting the web page below in any node.
http://<ANT_MEDIA_SERVER_NODE_IP>:5080/#/cluster
Basics of Clustering
- Each instance register itself to the MongoDB.
- When an instance starts receiving a live stream, it register itself as the origin of the stream.
- When the load balancer forwards a play request to any of the nodes in the edge group
- Node gets the stream origin from MongoDB
- Node fetches live stream from the origin node
- Distribute stream to the viewers
For any case, if you want to return back to standalone mode, just run the following command
cd /usr/local/antmedia
sudo change_server_mode.sh standalone
3. Installing Load Balancer(HAProxy)
Load Balancer is the sister of cluster so If you make Ant Media Server instances run in Cluster Mode. Then a load balancer will be required to balance the load. In this documentation, you will learn how to install HAProxy Load Balancer with SSL termination.
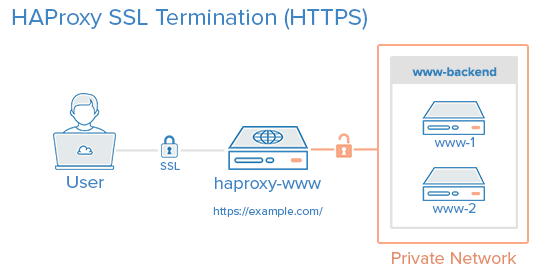
The configuration below balances RTMP, HLS, HTTP/HTTPS and WebSocket(WS/WSS) connections so that it will be used for RTMP, HLS and WebRTC streaming.
HAProxy Installation
Run the commands below to install HAProxy
sudo apt-get install software-properties-common -y
sudo add-apt-repository ppa:vbernat/haproxy-2.0
sudo apt-get update
sudo apt-get install haproxy=2.0.\*
SSL Certificate Installation
- Install the
certbot
sudo apt-get update
sudo apt-get install software-properties-common
sudo add-apt-repository ppa:certbot/certbot
sudo apt-get update
sudo apt-get install certbot
- Get the Certificate
Please change example.com with your domain name
sudo certbot certonly --standalone -d example.com -d www.example.com
- Combine
fullchain.pemandprivkey.pemand save it to/etc/haproxy/certsfolder
sudo mkdir -p /etc/haproxy/certs
DOMAIN='example.com'
sudo -E bash -c 'cat /etc/letsencrypt/live/$DOMAIN/fullchain.pem /etc/letsencrypt/live/$DOMAIN/privkey.pem > /etc/haproxy/certs/$DOMAIN.pem'
sudo chmod -R go-rwx /etc/haproxy/certs
Right now required pem file is ready under /etc/haproxy/certs folder to let HAProxy use.
Configuring HAProxy
- Backup the default configuration file
mv /etc/haproxy/haproxy.cfg{,_backup}
- Create and edit new configuration file
nano /etc/haproxy/haproxy.cfg
- Add global and default parameters to configuration
/etc/haproxy/haproxy.cfg
global
    log 127.0.0.1 local0 notice
    maxconn 2000
    user haproxy
    group haproxy
defaults
    log global
    mode http
    option forwardfor
    option http-server-close
    option httplog
    option dontlognull
    timeout connect 5000
    timeout client  5000
    timeout server  5000
    timeout tunnel  2h  #this is for websocket connections, 2 hours inactivity timeout
    timeout client-fin 5000
    errorfile 400 /etc/haproxy/errors/400.http
    errorfile 403 /etc/haproxy/errors/403.http
    errorfile 408 /etc/haproxy/errors/408.http
    errorfile 500 /etc/haproxy/errors/500.http
    errorfile 502 /etc/haproxy/errors/502.http
    errorfile 503 /etc/haproxy/errors/503.http
    errorfile 504 /etc/haproxy/errors/504.http
The configuration above makes maximum number of connections to 2000. Please change it according to your hardware and cluster size.
- Add Monitoring Parameters
Please change
UsernameandPassword. You can use these parameters while entering the monitor panel
listen stats # Define a listen section called "stats"
  bind :6080
  mode http
  stats enable  # Enable stats page
  stats hide-version  # Hide HAProxy version
  stats realm Haproxy\ Statistics  # Title text for popup window
  stats uri /haproxy_stats  # Stats URI
  stats auth Username:Password  # Authentication credentials
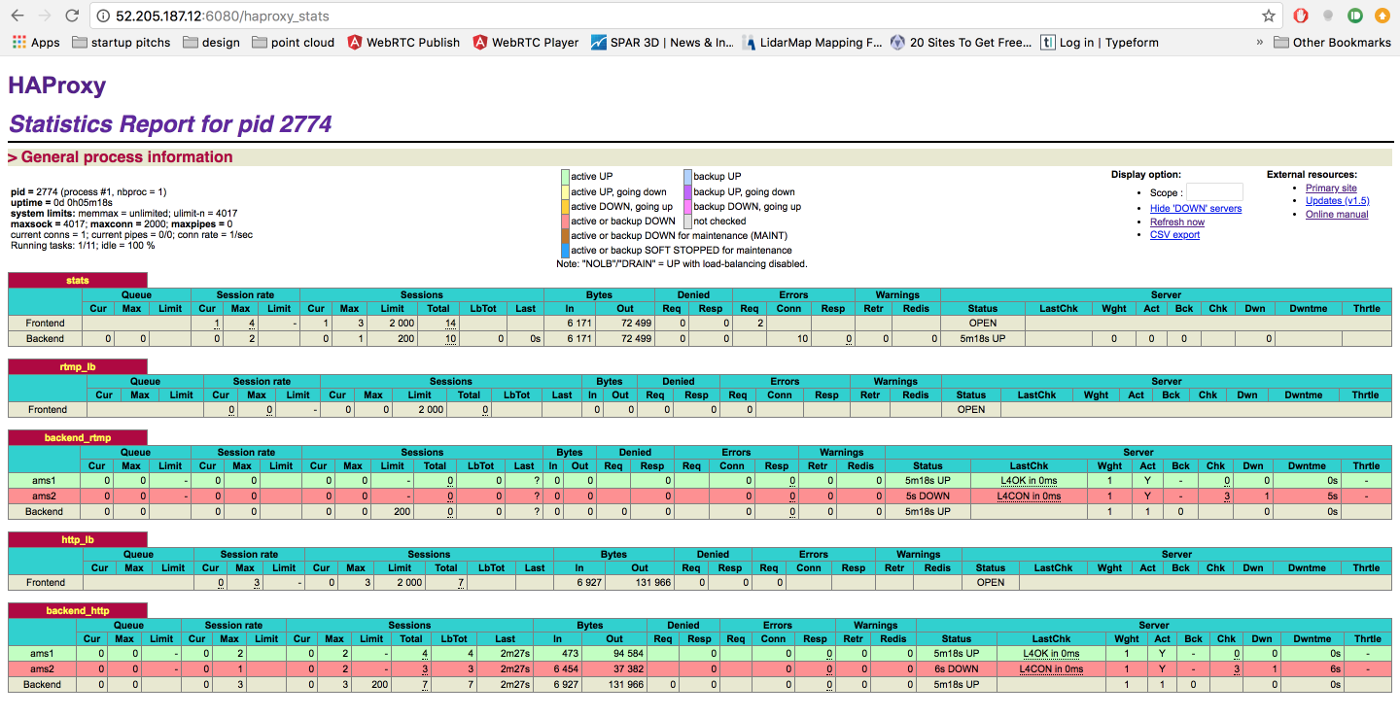
With the configuration above you can visit http://HAPROXY_LB:6080/haproxy_stats URL to monitor the HAProxy
- RTMP Load Balancing
frontend rtmp_lb
    bind *:1935
    mode tcp
    default_backend backend_rtmp

backend backend_rtmp
    mode tcp
    server ams1 172.30.0.42:1935 check  # Ant Media Server instance 1
    server ams2 172.30.0.48:1935 check  # Ant Media Server instance 2
    # you can add more instances
- HTTP Load Balancing
frontend http_lb
  bind *:80
  bind *:5080
  mode http
  reqadd X-Forwarded-Proto:\ http
  default_backend backend_http
- HTTPS Load Balancing
frontend frontend_https
  bind *:443 ssl crt  /etc/haproxy/certs/$DOMAIN.pem
  bind *:5443 ssl crt /etc/haproxy/certs/$DOMAIN.pem
  reqadd X-Forwarded-Proto:\ https
  default_backend backend_http
- Backend Servers
backend backend_http
  # below line forwards http requests to https, if you do not have SSL termination, remove it
  redirect scheme https if ! { ssl_fc }
  # below line provides session stickiness
  cookie JSESSIONID prefix nocache
  server ams1 172.30.0.42:5080 check cookie ams1  #if you do not use session stickiness, remove cookie ams1
  server ams2 172.30.0.42:5080 check cookie ams2  #if you do not use session stickiness, remove cookie ams2
  # you can add more instances
Starting HAProxy
When everything is complete, restart the HAProxy
systemctl restart haproxy
and you can view status of the instance through http://HAPROXY_LB:6080/haproxy_stats URL