Sample 4 - mcneel/Rhino.Inside-Workshop GitHub Wiki
This example builds upon Sample-3 and adds a connection to Grasshopper.
Please follow step 1 of Sample-3. For the purpose of this sample, our Unreal project is called Sample4.
Please follow step 2 of the first sample: https://github.com/mcneel/Rhino.Inside-Workshop/wiki/Sample-1#2-add-the-assembly-references-to-the-project
We should already have a ASample4Actor class that derives from AActor.
3.1 Add a static constructor to the class and add assembly resolving code from the Rhino.Inside NuGet package.
static ASample4Actor()
{
  RhinoInside.Resolver.Initialize();
}
3.2 Add a static variable to the class for storing the RhinoCore object. Also create a static mesh to store Rhino mesh data.
[UClass, BlueprintType, Blueprintable]
class ASample4Actor : AActor
{
  static RhinoCore rhinoCore;
  static Rhino.Geometry.Rhino mesh;
// ...
3.3 Create a method called LaunchRhino() and decorate it with [UFunction, BlueprintCallable]. Create a new RhinoCore object in this method and add logic to check if Rhino is already loaded.
[UFunction, BlueprintCallable]
public void LaunchRhino()
{
  if (rhinoCore == null)
    rhinoCore = new RhinoCore(new string[] { "/NOSPLASH" }, WindowStyle.Hidden);
}
3.4 Create a variable to store the Grasshopper plugin GUID. We will use this to launch Grasshopper. Also create a static variable to store our GH Definition.
[UClass, BlueprintType, Blueprintable]
class ASample4Actor : AActor
{
  static RhinoCore rhinoCore;
  static Rhino.Geometry.Rhino mesh;
  static readonly Guid GrasshopperGuid = new Guid(0xB45A29B1, 0x4343, 0x4035, 0x98, 0x9E, 0x04, 0x4E, 0x85, 0x80, 0xD9, 0xCF);
  static GH_Document definition;
// ...
3.5 Create a method to launch Grasshopper. We will decorate this method so we can call it from the Blueprint Editor.
We first check if we can load the Grasshopper plugin, then we subscribe to the CanvasCreated event, and finally, we launch the Grasshopper interface with RunScript.
[UFunction, BlueprintCallable]
public static void LoadGH()
{
  if (!PlugIn.LoadPlugIn(GrasshopperGuid))
    return;

  var script = new Grasshopper.Plugin.GH_RhinoScriptInterface();

  if (!script.IsEditorLoaded())
    script.LoadEditor();

  script.ShowEditor();
}4.1 Find the Sample4Actor class in the Unreal Engine Editor Modes > Place tab and drag it into the scene.
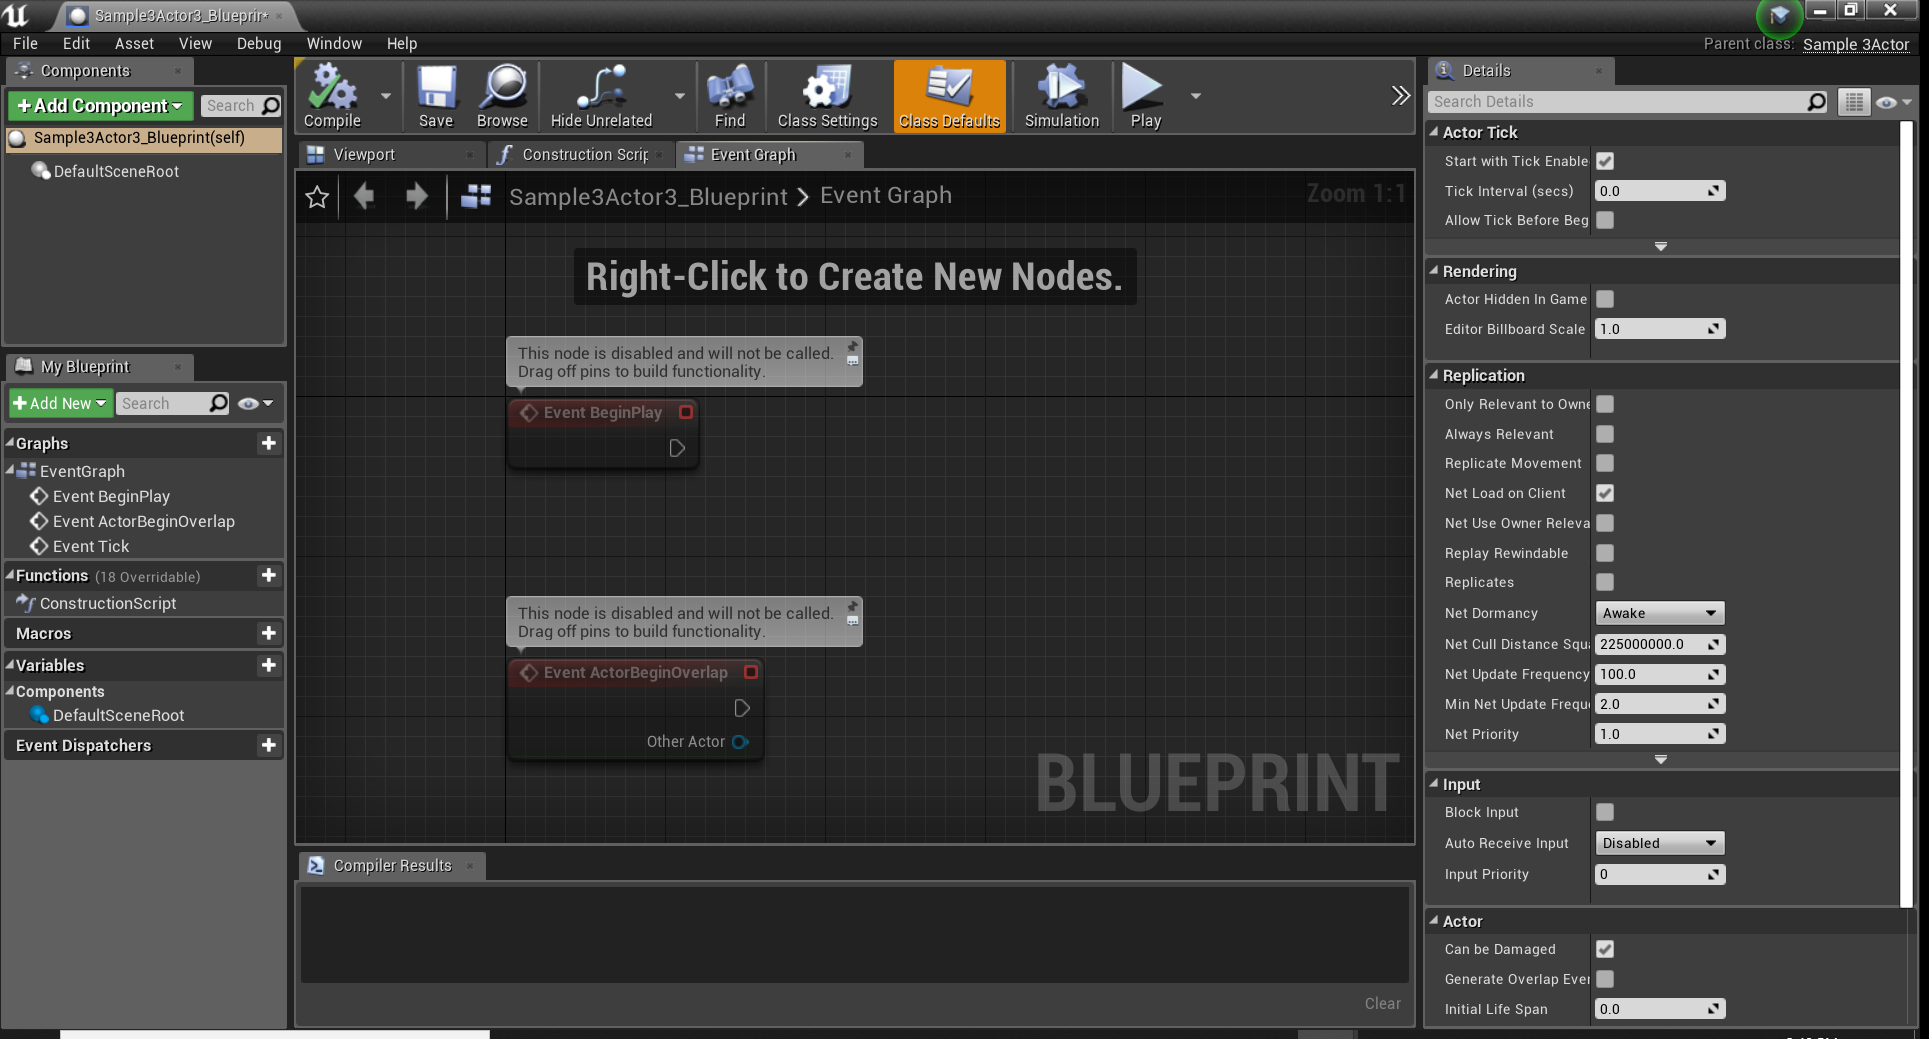
4.3 In the Details panel, click on Blueprint/Add Script. Accept the default conditions. You should now have a Sample4Actor_Blueprint object in the World Outliner and in the Content Browser. Unreal Engine automatically opens the Blueprint Editor for this object.
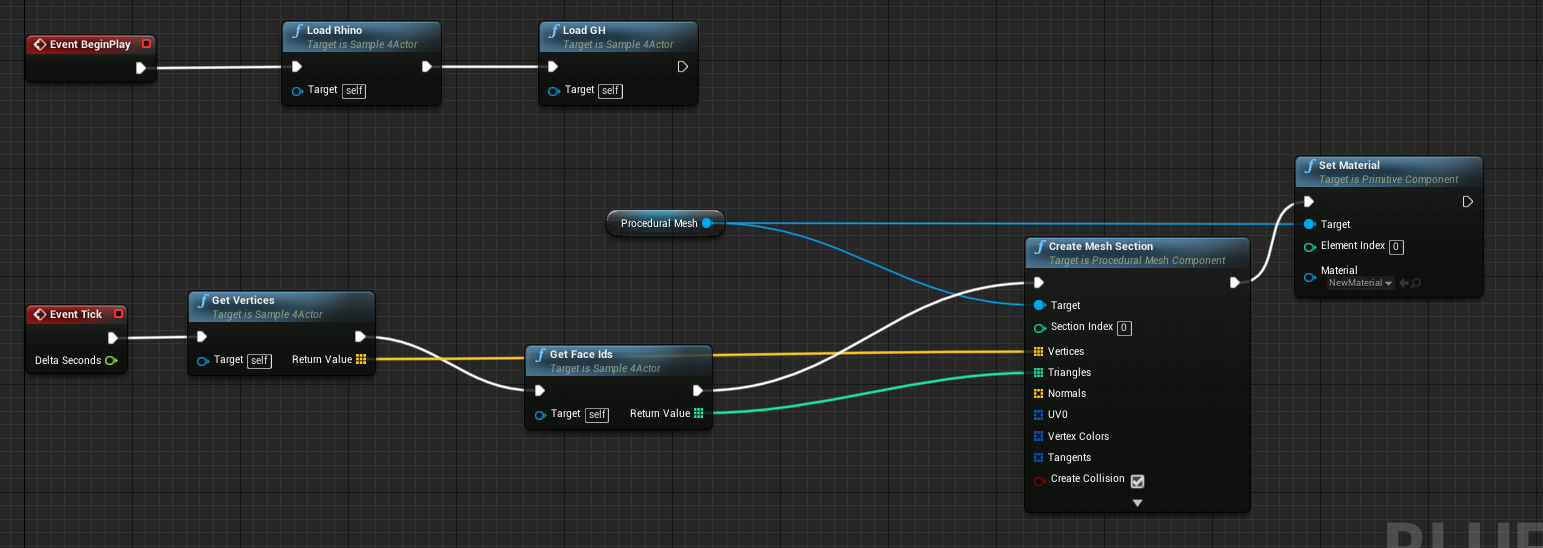
4.5 Navigate to the Event BeginPlay node. This is the same method that is called when we press play.
4.6 Click and drag from the arrow icon on the lower right hand side of the node, dragging the cable away from the icon, and release click to open the Executable Actions panel.
4.8 From the end of the LaunchRhino() method, cluck and drag, search for the LoadGH() method, click on the result to add the node to the blueprint.
4.9 Save and compile the blueprint. Close the Blueprint Editor. Press Play. Rhino and Grasshopper should open.
[UFunction, BlueprintCallable]
public static void LaunchGrasshopper()
{
  // ...

  if (definition == null)
    Grasshopper.Instances.DocumentServer.DocumentAdded += DocumentServer_DocumentAdded;

}
5.2 Create a method to handle the DocumentAdded event. In this method, we'll subscribe to the DocumentServer_DocumentAdded event. Here we will subscribe to the SolutionEnd event, and set the definition variable.
private void DocumentServer_DocumentAdded(GH_DocumentServer sender, GH_Document doc)
{
  doc.SolutionEnd += Definition_SolutionEnd;
  definition = doc;
}NOTE: The
FMessage.Log()method allows us to output information to the Unreal Editor Output Log.
private void Definition_SolutionEnd(object sender, GH_SolutionEventArgs e)
{
  FMessage.Log(ELogVerbosity.Warning, "Solution Ended");
  // TODO: Add code to harvest display meshes when the Grasshopper Definition solution completes solving.
}Once Unreal Editor is open, drag the actor blueprint to the 3d scene and press Play. After Grasshopper opens, try to put some components on the canvas. The Unreal Editor Output Log should show Solution Ended after you add components to the Grasshopper canvas.
6.1 In the Definition_SolutionEnd handler, deal with getting the meshes from the GH definition. We'll also set up a GetDocumentPreview() method.
private void Definition_SolutionEnd(object sender, GH_SolutionEventArgs e)
{
  FMessage.Log(ELogVerbosity.Warning, "Solution End");
  if (definition != e.Document)
    return;

  mesh = GetDocumentPreview(e.Document);

  if (mesh == null)
    return;

  mesh.Faces.ConvertQuadsToTriangles();
  mesh.Flip(true, true, true);

}Rhino.Geometry.Mesh GetDocumentPreview(GH_Document document)
{
var meshPreview = new Rhino.Geometry.Mesh();
var meshes = new List<Rhino.Geometry.Mesh>();
foreach (var obj in document.Objects.OfType<IGH_ActiveObject>())
{
if (obj.Locked)
continue;
if (obj is IGH_PreviewObject previewObject)
{
if (previewObject.IsPreviewCapable)
{
if (obj is IGH_Component component)
{
if (!component.Hidden)
foreach (var param in component.Params.Output)
meshes.AddRange(GetParamMeshes(param));
}
else if (obj is IGH_Param param)
{
meshes.AddRange(GetParamMeshes(param));
}
}
}
}
if (meshes.Count > 0)
{
meshPreview.Append(meshes);
return meshPreview;
}
else return null;
}
public List<Rhino.Geometry.Mesh> GetParamMeshes(IGH_Param param)
{
var meshes = new List<Rhino.Geometry.Mesh>();
foreach (var value in param.VolatileData.AllData(true))
{
if (value is IGH_PreviewData)
{
switch (value.ScriptVariable())
{
case Rhino.Geometry.Mesh mesh:
meshes.Add(mesh);
break;
case Rhino.Geometry.Brep brep:
var previewMesh = new Rhino.Geometry.Mesh();
previewMesh.Append(Rhino.Geometry.Mesh.CreateFromBrep(brep, Rhino.Geometry.MeshingParameters.Default));
meshes.Add(previewMesh);
break;
}
}
}
return meshes;
}6.3 Add methods to retrieve mesh vertices and faces. Decorate these to expose them to the Blueprint Editor.
[UFunction, BlueprintCallable]
public List<FVector> GetVertices()
{
  var list = new List<FVector>();
  foreach (var vert in mesh.Vertices)
    list.Add(new FVector(vert.X, vert.Y, vert.Z));
  return list;
}

[UFunction, BlueprintCallable]
public List<int> GetFaceIds()
{
  var list = new List<int>();
  foreach (var face in mesh.Faces)
  {
    list.Add(face.A);
    list.Add(face.B);
    list.Add(face.C);
  }
  return list;
}