Sample 3 - mcneel/Rhino.Inside-Workshop GitHub Wiki
In this example, we will look at how to run Rhino inside of a host application. We will use Epic Games' Unreal Engine 4.23 as a test case. Unreal Engine is a popular game engine for authoring video games and archviz. Unreal Engine is Open Source and free to use and extend. There are also several ways to extend the functionality of Unreal Engine, including an extensive C++ API and even a visual programming interface called Blueprints.
This being said, Unreal Engine does not meet the technical criteria for being Rhino.Inside compatible as it does not ship with a .NET API. While it does have an extensive C++ API, Epic Games has not written any wrapper code to make it directly compatible with the RhinoCommon API. Luckily, some 3rd party developers have developed a project called USharp. From the USharp README:
USharp is a plugin for Unreal Engine (4.23) which allows for programming in C#. This project adapts various parts of mono-ue https://mono-ue.github.io/ and is roughly similar but has support for Mono, .NET Framework and .NET Core. The C++ code used is mostly PInvoke methods and the equivalent mono-ue backend code is mostly written in C#. This project currently isn't usable for most use cases. There are a lot of bugs and lacking features. Check back soon for updates!
We evaluated the library and found it to have sufficient functionality to begin testing running Rhino and Grasshopper inside Unreal Engine.
✋ Please ensure you've setup the USharp library according to these instructions: https://github.com/mcneel/Rhino.Inside-Workshop/wiki/Setup#unreal-engine-423-and-usharp-setup
USharp handles the creation of an Unreal Engine C# project, including .sln and .csproj files and an Unreal Engine .uproject file. The C# project can be found in the Managed directory.
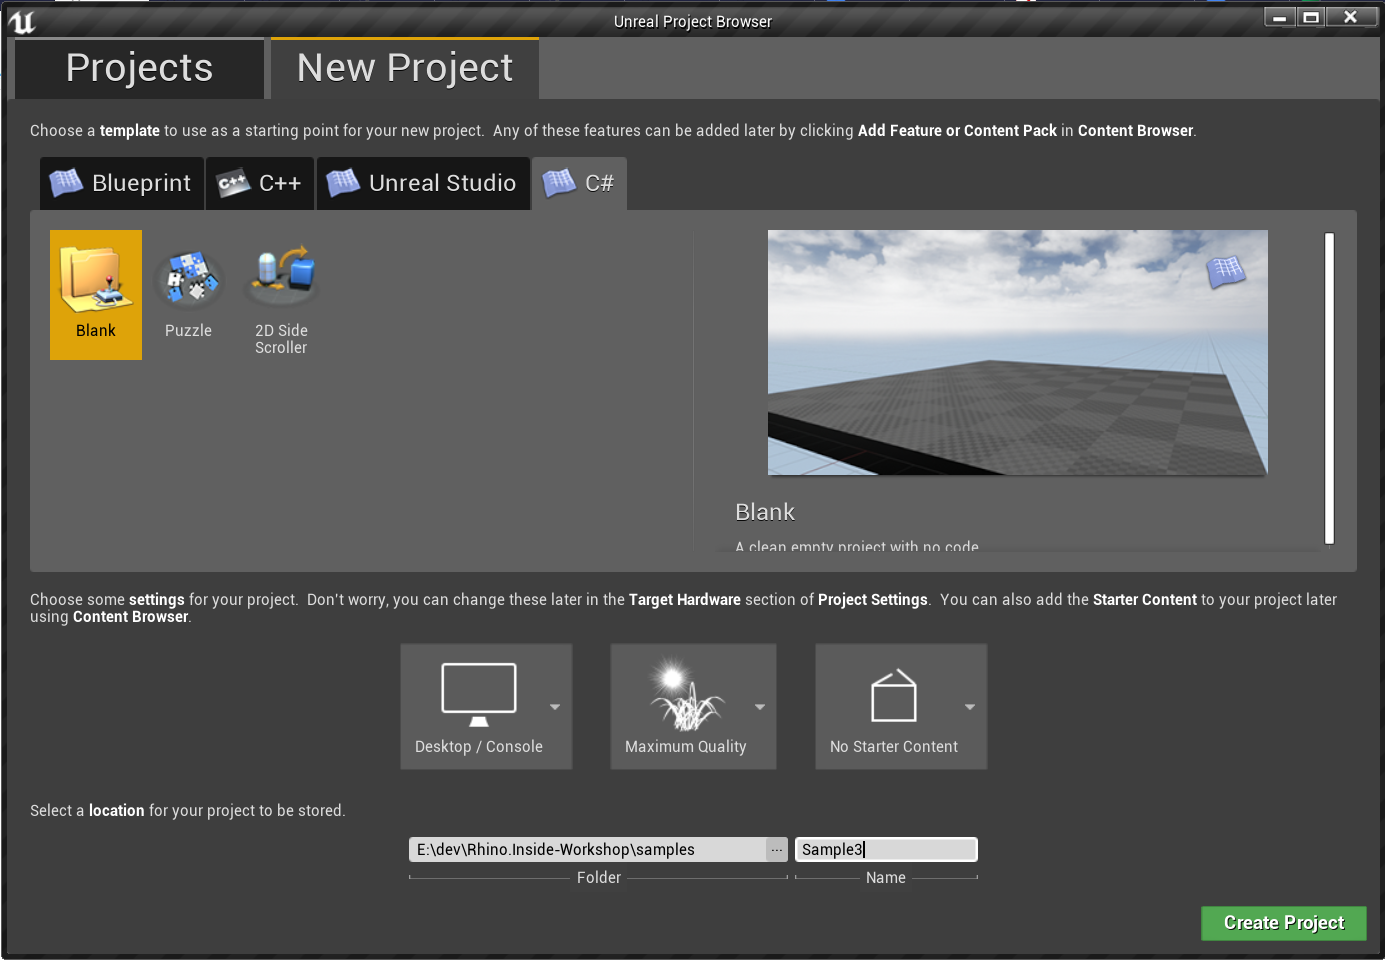
- Open the Unreal Engine Editor,
- navigate to the
New Projecttab, - navigate to the
C#tab, - click on the
Blanktemplate, - enter a folder and project name, press
Create Project
NOTE: In the rest of this tutorial, we use
Sample3as the project name.
- When prompted to compile the C# project, click
Yes.
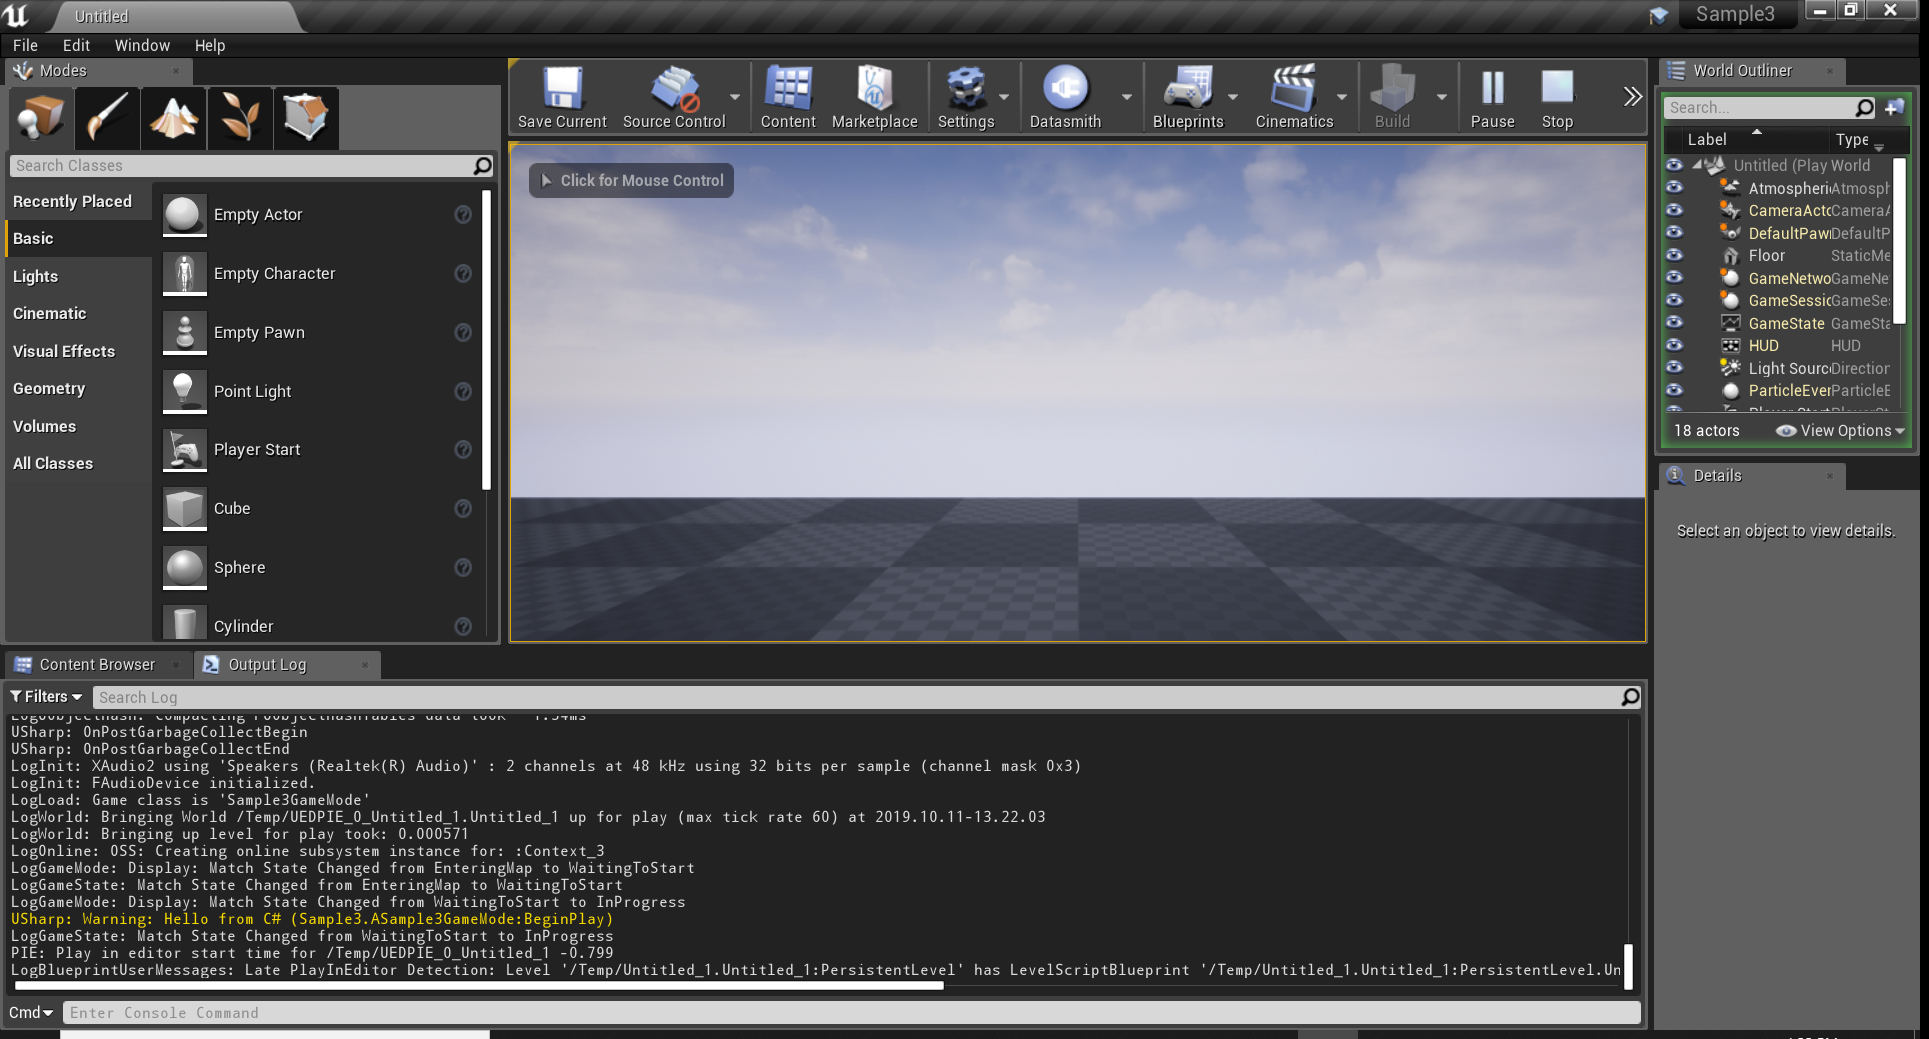
- Once the project has been created, open the Output Log. This can be found in the Unreal Engine Editor menu in
Window > Developer Tools > Output Log. - Press the
Playbutton in the Unreal Engine Editor. Check the Output Log to see a message coming from USharp.
Please follow step 2 of the first sample: https://github.com/mcneel/Rhino.Inside-Workshop/wiki/Sample-1#2-add-the-assembly-references-to-the-project
The Blank C# Project Template adds a Sample3GameMode.cs file with one class which derives from AGameMode. This class derives (eventually) from AActor, which has a BeginPlay() method. Instead of using this class, we will make a new class that derives directly from AActor. We will add our code to call Rhino in this method.
NOTE: For more information on the API for
AGameMode, please check the Visual Studio Object Browser or the Unreal Engine C++ API Reference: https://docs.unrealengine.com/en-US/API/Runtime/Engine/GameFramework/AGameMode/index.html
NOTE: All class names must be prefixed with the same first letter as the class they are derived from. For example, if you are deriving from
AGameMode, your class name should start with anAresulting inAMyGameMode. This is imposed by USharp to maintain consistency with the Unreal Engine C++ API.
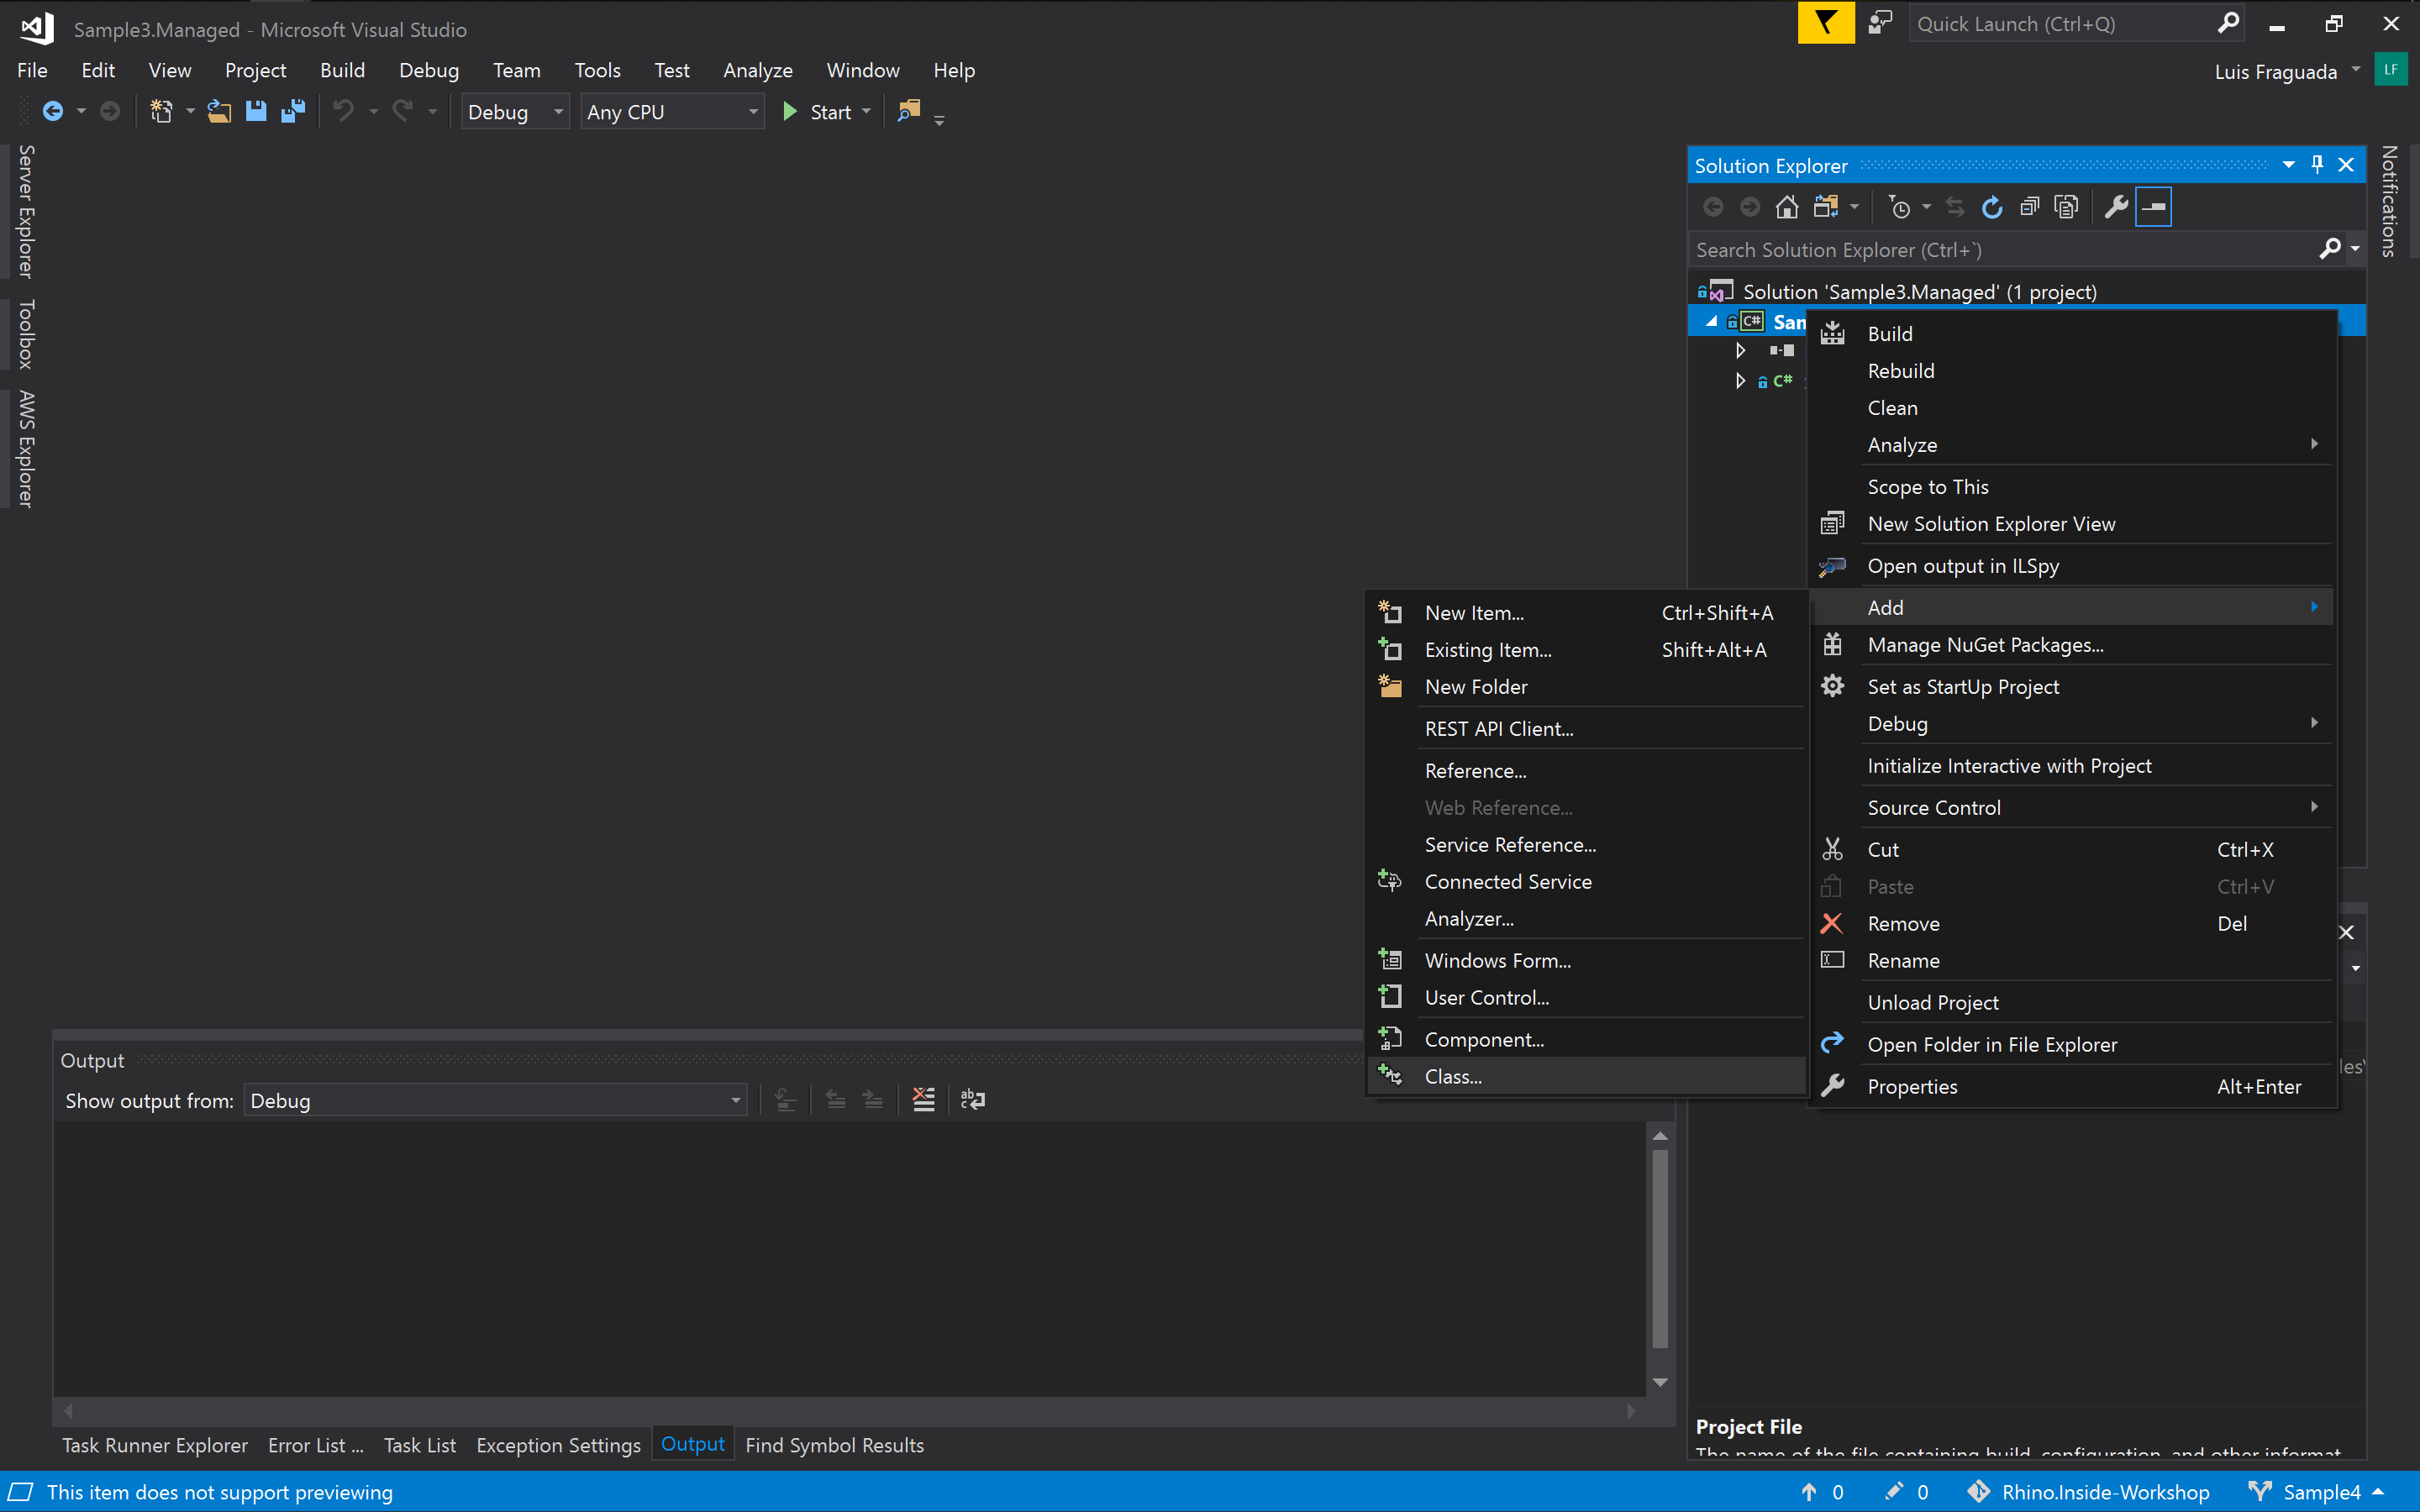
3.1 In the Visual Studio Solution Explorer, right click on the project and add a new class. Name this file Sample3Actor.cs and click Add.
3.3 Decorate the class with [UClass, BlueprintType, Blueprintable]. You class code should look like this:
[UClass, BlueprintType, Blueprintable]
class ASample3Actor : AActor
{
}
3.4 In the ASample3Actor class, create a static constructor and add assembly resolving code from the Rhino.Inside library.
static ASample3Actor()
{
  RhinoInside.Resolver.Initialize();
}// ...
class ASample3Actor : AActor
{
static RhinoCore rhinoCore;
// ... protected override void BeginPlay()
{
base.BeginPlay();
}3.7 Create a new RhinoCore object in the BeginPlay method and add logic to check if Rhino is already loaded.
public override void BeginPlay()
{
base.BeginPlay();
if(rhinoCore==null)
rhinoCore = new Rhino.Runtime.InProcess.RhinoCore();
}// ...
class ASample3Actor : AActor
{
static RhinoCore rhinoCore;
static Rhino.Geometry.Mesh mesh;
// ...public void DoSomething()
{
var sphere = new Rhino.Geometry.Sphere(Rhino.Geometry.Point3d.Origin, 10);
mesh = Rhino.Geometry.Mesh.CreateFromSphere(sphere, 10, 10);
FMessage.Log(ELogVerbosity.Warning, "Created a mesh with " + mesh.Vertices.Count.ToString() + " vertices and " + mesh.Vertices.Count.ToString() + " Faces.");
}protected override void BeginPlay()
{
base.BeginPlay();
if(rhinoCore==null)
rhinoCore = new Rhino.Runtime.InProcess.RhinoCore();
DoSomething();
}Here is how all of this code looks together:
using UnrealEngine.Runtime;
using UnrealEngine.Engine;
using Rhino.Runtime.InProcess;
namespace Sample3
{
[UClass, BlueprintType, Blueprintable]
class ASample3Actor : AActor
{
static RhinoCore rhinoCore;
static Rhino.Geometry.Mesh mesh;
static ASample3Actor()
{
RhinoInside.Resolver.Initialize();
}
protected override void BeginPlay()
{
base.BeginPlay();
if(rhinoCore==null)
rhinoCore = new Rhino.Runtime.InProcess.RhinoCore();
FMessage.Log(ELogVerbosity.Warning, "Hello from C# (" + this.GetType().ToString() + ":BeginPlay)");
DoSomething();
}
public void DoSomething()
{
var sphere = new Rhino.Geometry.Sphere(Rhino.Geometry.Point3d.Origin, 10);
mesh = Rhino.Geometry.Mesh.CreateFromSphere(sphere, 10, 10);
FMessage.Log(ELogVerbosity.Warning, "Created a mesh with " + mesh.Vertices.Count.ToString() + " vertices and " + mesh.Vertices.Count.ToString() + " Faces.");
}
}
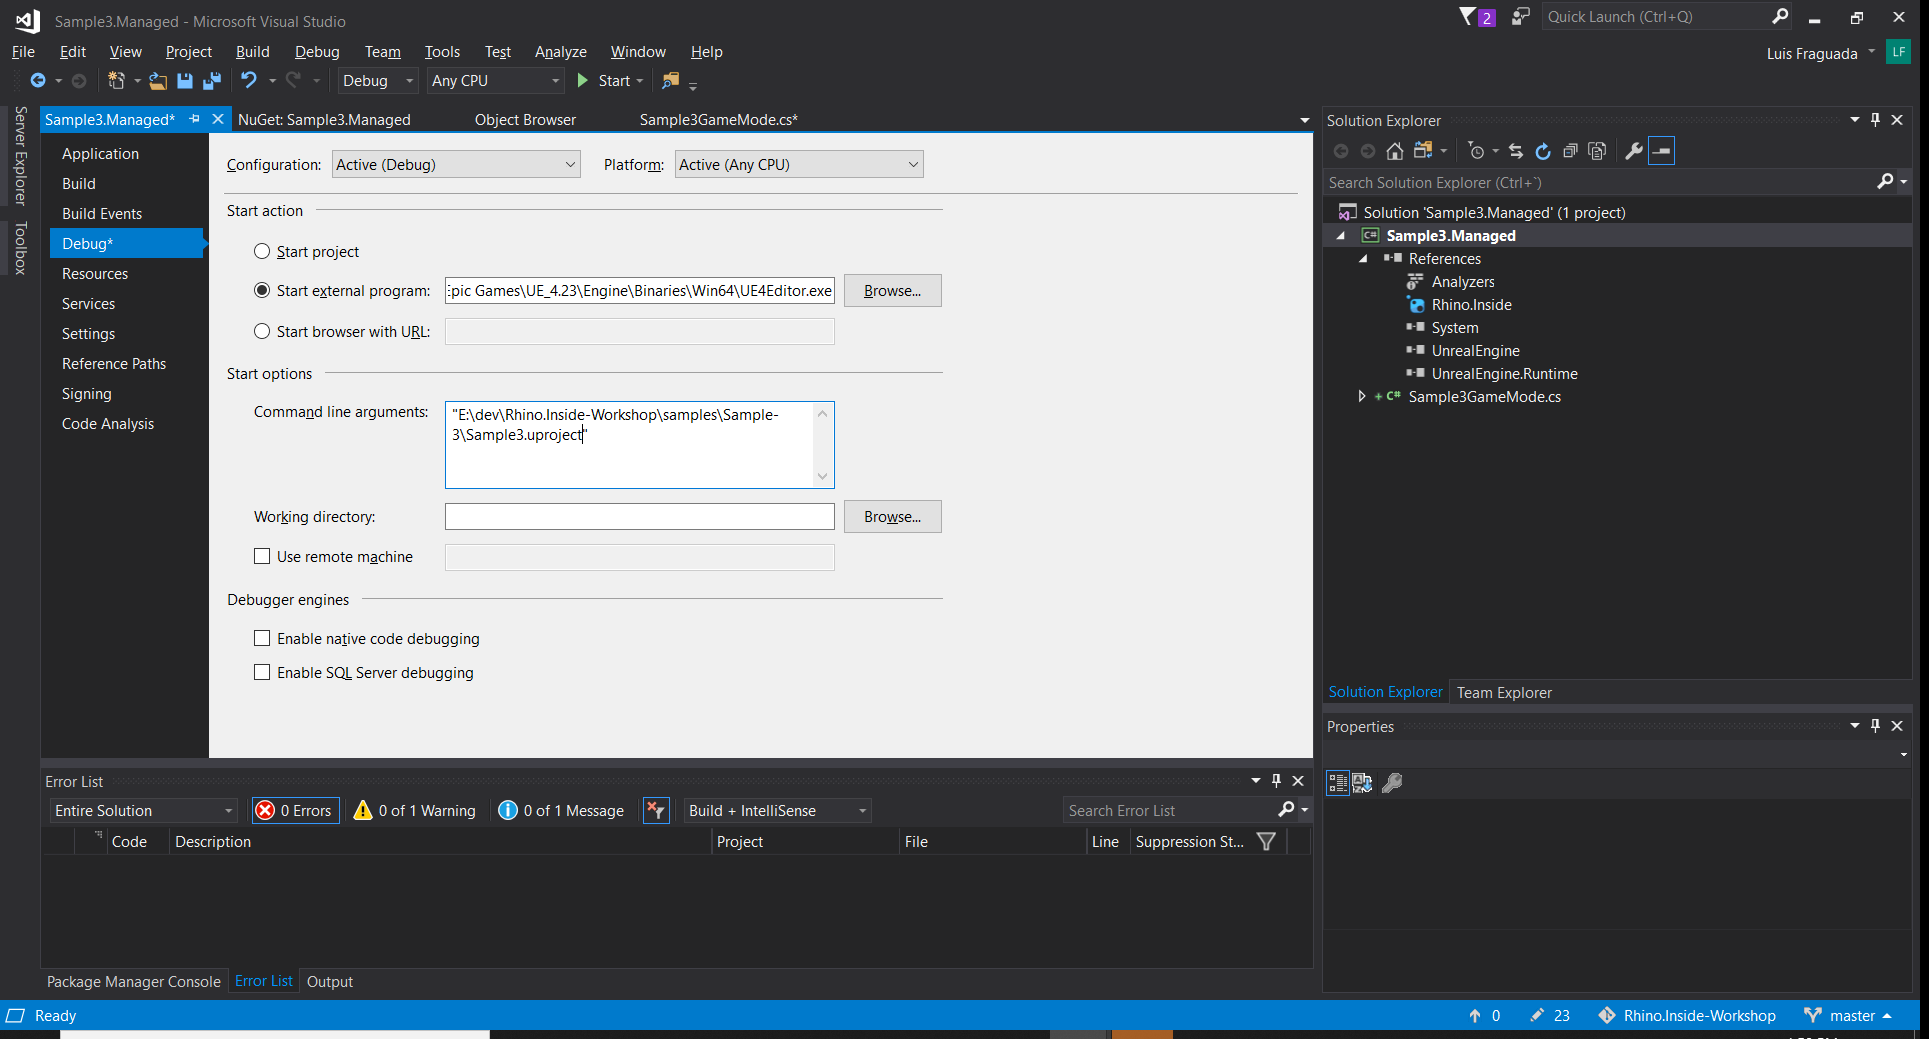
}By default, there is no external program associated with the project. When debugging, we should start the Unreal Engine Editor and open the appropriate .uproject file.
4.2 In the project properties window, go to the Debug page and set the 'Start ActiontoStart External Program`.
4.3 Click on the Browse... button and find the Unreal Engine Editor executable. In a default installation, this can be found in C:\Program Files\Epic Games\UE_4.23\Engine\Binaries\Win64\UE4Editor.exe
4.4 Under Start options, add the full path to the .uproject file associated with the Unreal Engine project. This is usually in the root of the project directory. Save the solution by pressing CTRL+S.
NOTE: If you do not set the
.uprojectfile, the Unreal Engine Editor will start and prompt you for a project file. If you click on your project file, Visual Studio will stop debugging, since the Unreal Engine Editor essentially needs to restart.
If all goes well, we should see the Unreal Engine Editor open, as well as our project.
4.5 Search for the Sample3Actor object in the Modes > Place tab of the Unreal Editor. Once found, drag it onto the scene.
4.6 Press the Play button on the Unreal Engine Editor. Check the Output Log for our message related to the geometry created in Rhino.

To make this class more functional for the Blueprint System, we should break up the code into more granular blocks. We will create a few methods and plce some of our existing code in these methods. We will then decorate these methods with [UFunction, BlueprintCallable] to make these available to Unreal and the Blueprint System.
5.1 Create a LaunchRhino() method, decorate it with [UFunction, BlueprintCallable], and add the code to launch Rhino which was in the BeginPlay() method.
    protected override void BeginPlay()
    {
      base.BeginPlay();
    }
[UFunction, BlueprintCallable]
public void LaunchRhino()
{
if (rhinoCore == null)
rhinoCore = new RhinoCore(new string[] { "/NOSPLASH" }, WindowStyle.Hidden);
}5.4 Find the Sample3Actor class in the Unreal Engine Editor Modes > Place tab and drag it into the scene.
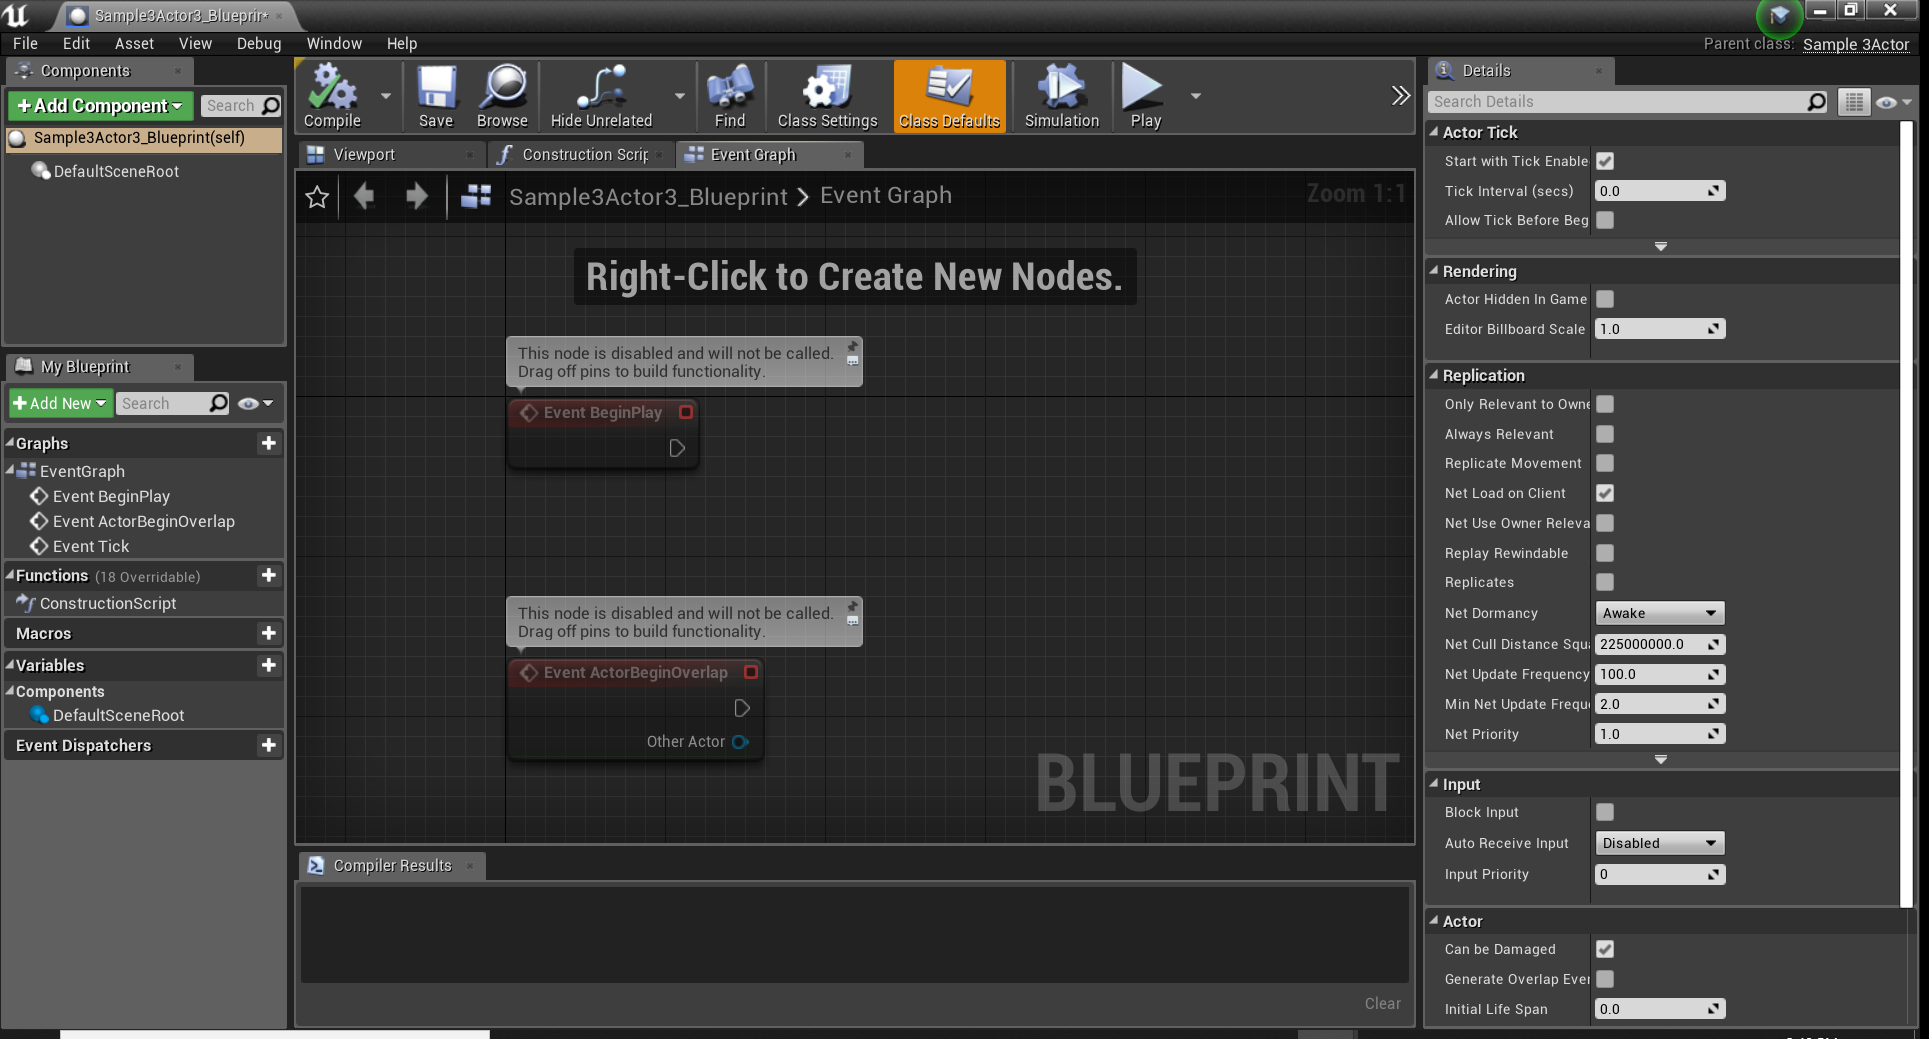
5.6 In the Details panel, click on Blueprint/Add Script. Accept the default conditions. You should now have a Sample3Actor_Blueprint object in the World Outliner and in the Content Browser. Unreal Engine automatically opens the Blueprint Editor for this object.
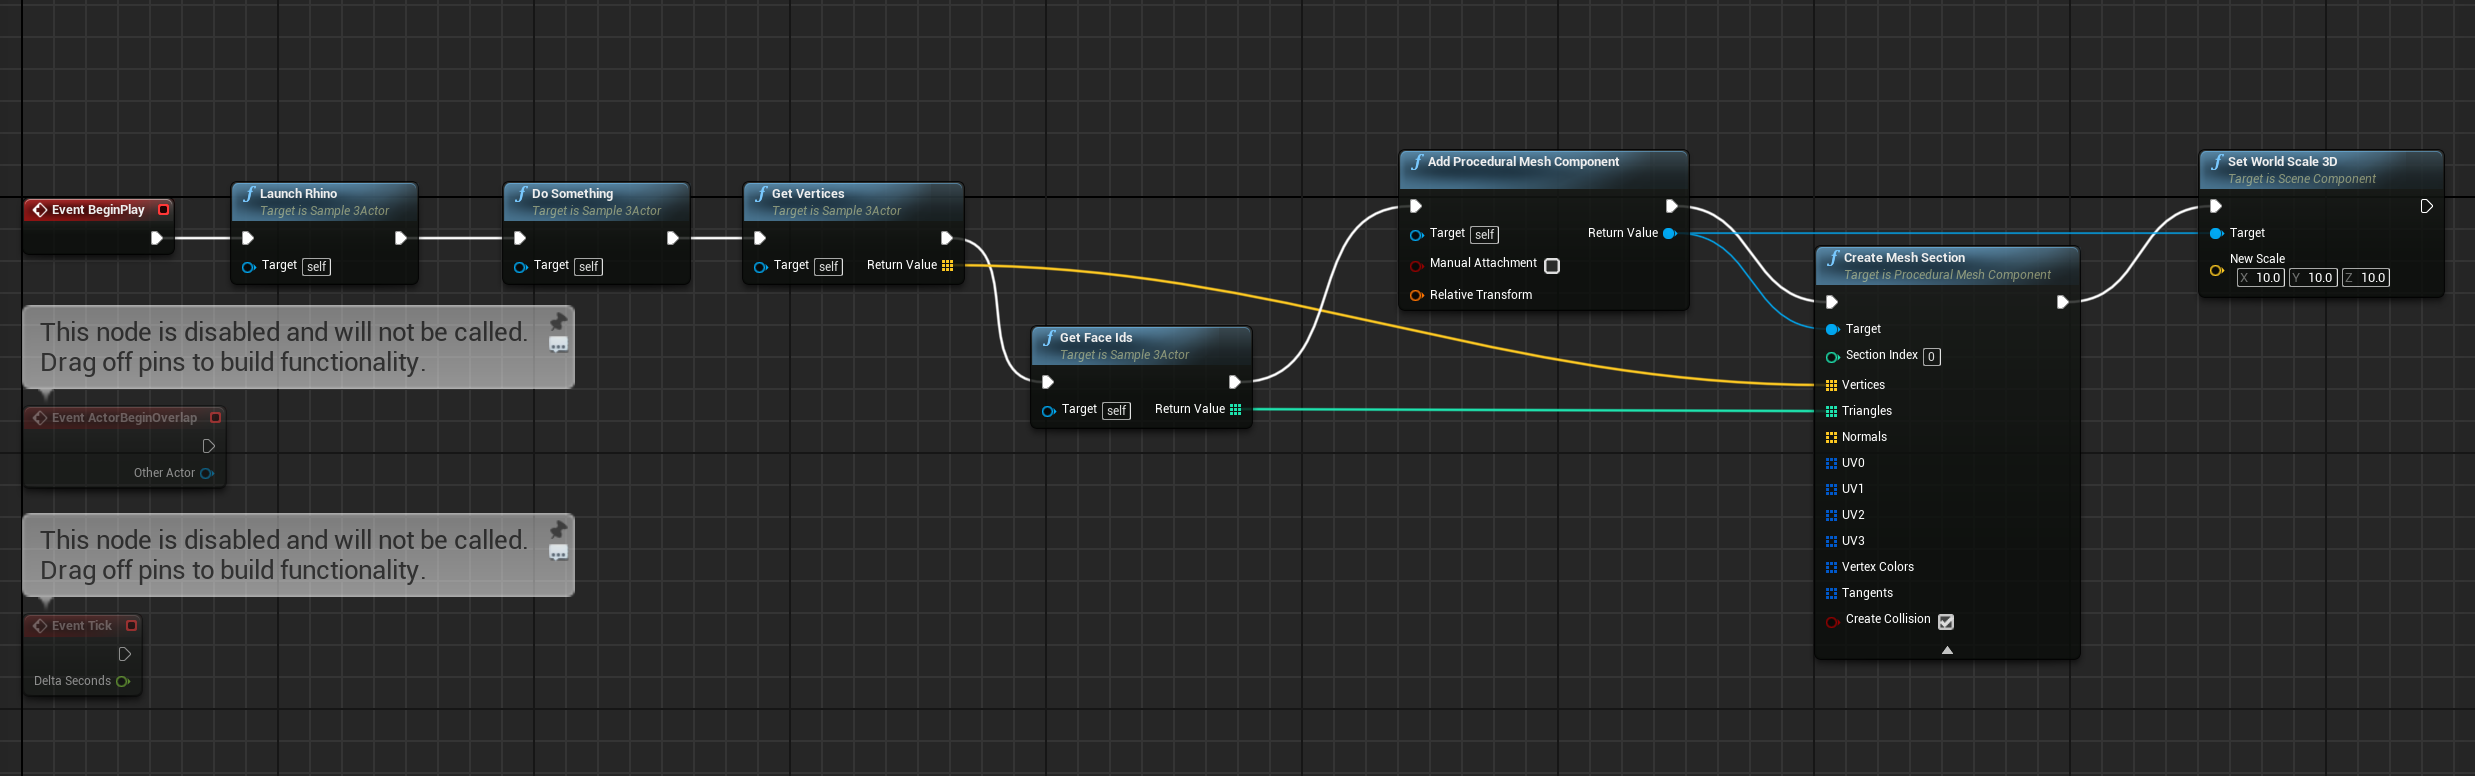
5.8 Navigate to the Event_BeginPlay node. This is the same method that is called when we press play.
5.9 Click and drag from the arrow icon on the lower right hand side of the node, dragging the cable away from the icon, and release click to open the Executable Actions panel.
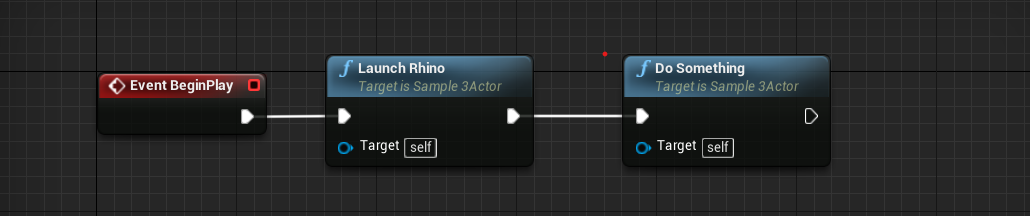
5.11 Click on the Save and Compile in the Blueprint Editor to save our changes. close the Blueprint Editor.
USharp: Warning: Created a mesh with 92 vertices and 92 Faces.
Until now, we've only been doing simple operations in Rhino. Now that you know how to expose methods to the Unreal Engine Blueprint System, you can add any method you like to the Sample3Actor class and it will show up in the Blueprint Editor. Let's make some methods that pass some geometry data.
6.1 In the DoSomething() method, add code to convert mesh quad faces to triangles and flip the mesh.
[UFunction, BlueprintCallable]
public void DoSomething()
{
  var sphere = new Rhino.Geometry.Sphere(Rhino.Geometry.Point3d.Origin, 10);
  mesh = Rhino.Geometry.Mesh.CreateFromSphere(sphere, 10, 10);
  mesh.Faces.ConvertQuadsToTriangles();
  mesh.Flip(true, true, true);

  FMessage.Log(ELogVerbosity.Warning, "Created a mesh with " + mesh.Vertices.Count.ToString() + " vertices and " + mesh.Vertices.Count.ToString() + " Faces.");
}
NOTE: In order for the mesh to be displayed and oriented correctly, we must convert quad faces to triangles and flip the mesh.
6.2 Create methods to retrieve the mesh vertex and face data. These methods should be decorated with [UFunction, BlueprintCallable].
[UFunction, BlueprintCallable]
public List<FVector> GetVertices()
{
  var list = new List<FVector>();
  foreach (var vert in mesh.Vertices)
    VertList.Add(new FVector(vert.X, vert.Y, vert.Z));

    return list;
}

[UFunction, BlueprintCallable]
public IList<int> GetFaceIds()
{
  var list = new List<int>();
  foreach (var face in mesh.Faces)
  {
    list.Add(face.A);
    list.Add(face.B);
    list.Add(face.C);
  }
  return list;
}