Pro Micro - mcaple/tmk_keyboard GitHub Wiki
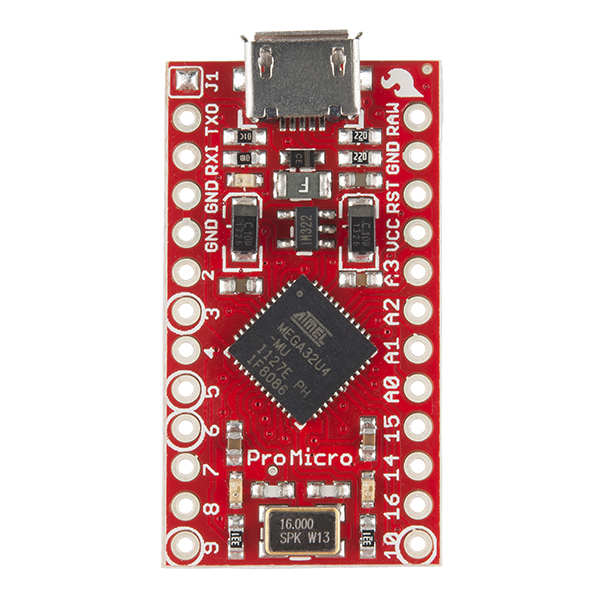
Sparkfun Pro Micro
I believe that Pro Micro was designed originally by Sparkfun to be used with Arduino sketches and its IDE, and then it have been copied the design and manufactured cheapy clones by small unknown verdors.
Sparkfun is really reliable company and have made great contribution to hobby electroincs community. Kudos to them!
They have good documentation for troubleshooting.
https://learn.sparkfun.com/tutorials/pro-micro--fio-v3-hookup-guide/all#troubleshooting-and-faq
You can support by getting Pro Micro from them, instead of clone manufacturers.
https://www.sparkfun.com/products/12640
CAVEAT
I'm never willing to recommend you to use Pro Micro unless you are already familiar to it and have skill to solve problems yourself.
You will have various troubles on power line, reset to bootloader and flashing when you are careless or sloppy.
That being said, I know that people go with cheaper one and dare to walk into trouble. Go on!
Alternatives to Pro Micro
TMK Converters
You can support TMK keyboard firmware project with getting prebuilt converter from here.
https://geekhack.org/index.php?topic=72052.0
PJRC Teensy2.0
This makes your life a lot easier than getting Pro Miro.
https://www.pjrc.com/store/teensy.html
Arduino Leonardo
If you have a plan to play with any Arduino project this is a better choice. Pro Micro is generally compatible with this genuine Arduino board.
https://www.arduino.cc/en/Main/Arduino_BoardLeonardo
5V vs 3.3V
Get Pro Micro 5V.
There is no reason for you to select 3.3V one in most cases, for keyboard converter in particular.
Note that 5V Pro Micro has 5V-regulator and 16MHz-cyrstal while 3.3V Pro Mircor has 3.3V-regulator and 8MHz-crystal.
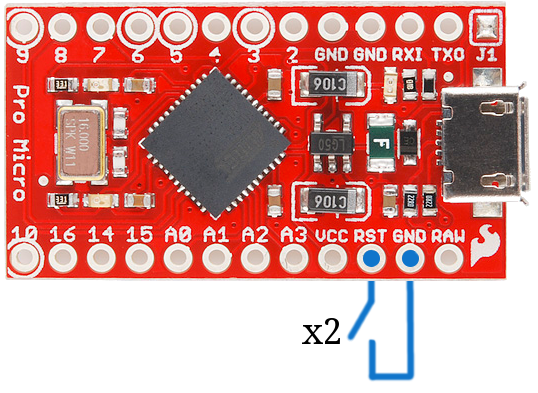
J1 Solder bridge
It should be bridged for 5V Pro Micro.
Without the solder bridge cheap Pro Micro spit out only 4.6V instead of 5V at both VCC and RAW pin. This is due to forward voltage drop of protection diode D2 in schematic below. The low voltage may cause something wrong with old power hog keyboard.
Cheap Pro Micro clones come without the bridge unfortunately, I believe it is just laziness or ignorance of its manufacturers or vendors. Make solder bridge on J1 immediately withoug asking questions if you don't want to check schematics or voltage with mulitimeter yourself.
Use VCC pin to power 5V onto keyboard, instead of RAW pin. (You may see 5V at RAW pin which is given backward through regulator, but the voltage will drop when supplying power to keyboard and is not good for powre source even with the solder bridge.)
Legitimate SparkFun Pro Micro doesn't have this problem. This is good and SparkFun is reliable but PJRC Teensy 2.0 is still preferable and easy to program for beginners.
Voltage measurement in my setup
Without J1 solder bridge
| Keyboard | VCC | RAW |
|---|---|---|
| No | 4.64 | 4.67 |
| Cherry G80-3600 | 4.58 | 4.62 |
| IBM 122-key Model F | 4.15 | 4.29 |
With J1 solder bridge
| Keyboard | VCC | RAW |
|---|---|---|
| No | 5.01 | 5.01 |
| Cherry G80-3600 | 4.97 | 4.96 |
| IBM 122-key Model F | 4.73 | 4.60 |
Pinout

Note that ATmega32u4 pinout PD0, PD1 and PB6 are maked on Pro Micro PCB as 3, 2 and 10 respectively. Use VCC pin to power 5V onto keyboard, instead of RAW pin.
Schematic

Voltage regulator
Pro Micro has unknown LDO voltage regulator on its PCB.
As for 5V version the regulator is used for external power input(6V-12V) from RAW pin, not for USB power line(bus power application) by design. As shown in its schematic the regulator is given power from USB line through protection diode D2(and resttable fuse F1) and gets only around 4.6V due to it forward voltage drop. The 4.6V is obviously not enough to get 5V from the regulator.
The 4.6V is still enough for ATmega32u4 itself but some of keyboards that require proper voltage may not work with random problems. You have to make solder bridge on J1 and get power from VCC(instead of RAW) pin unless you have external power supply. You have to leave J1 open when you use external power, perhaps? (not confirmed)
As for 3.3V version keep J1 open on the other hand.
How to program
Start bootloader
Press reset button twice in quick successsion to enter bootloader mode.
I'd recommend soldering push button between RST and GND pin. Bridging between the pins with tweezers will work but this doesn't give reliable result, in particular when you are in trouble.
 https://cdn.sparkfun.com/datasheets/Dev/Arduino/Boards/32U4Note.pdf
Some Pro Micros require pressing only once, though, press twice anyway if you don't know you Pro Micro has which one.
Avrdude
Reset to start bootloader and then run command like below within 8 seconds.
avrdude -patmega32u4 -cavr109 -b57600 -Uflash:w:blahblah.hex -P/dev/ttyACM1
Change hex file and device file part depeding on your environment.
https://www.nongnu.org/avrdude/
USB VID/PID
| Device | VID | PID |
|---|---|---|
| SparkFun Pro Micro/5V Bootloader | 1b4f | 9205 |
| SparkFun Pro Micro/5V Sketch | 1b4f | 9206 |
| SparkFun Pro Micro/3.3V Bootloader | 1b4f | 9203 |
| SparkFun Pro Micro/3.3V Sketch | 1b4f | 9204 |
| Arduino Leonardo Bootloader | 2341 | 0036 |
| Arduino Leonardo Sketch | 2341 | 8036 |
udev Rules on Linux
On Linux like ubuntu you will have to place this setting under /etc/udev/rules.d to prevent ModemManager from doing weirdness with Pro Micro.
78-arduino.rules:
# SparkFun Pro Micro USB
# http://wiki.bauwe.nl/Arduino/ProMicro
# https://forum.sparkfun.com/viewtopic.php?t=38582
# ID_MM_DEVICE_IGNORE doesn't work, ID_MM_PORT_IGNORE does a job instead for some reason 2020-03-23
# 3.3V Pro Micro bootloader
ATTRS{idVendor}=="1b4f", ATTRS{idProduct}=="9203", ENV{ID_MM_DEVICE_IGNORE}="1", ENV{ID_MM_PORT_IGNORE}="1"
# 3.3V Pro Micro sketch
ATTRS{idVendor}=="1b4f", ATTRS{idProduct}=="9204", ENV{ID_MM_DEVICE_IGNORE}="1", ENV{ID_MM_PORT_IGNORE}="1"
# 5V Pro Micro bootloader
ATTRS{idVendor}=="1b4f", ATTRS{idProduct}=="9205", ENV{ID_MM_DEVICE_IGNORE}="1", ENV{ID_MM_PORT_IGNORE}="1"
# 5V Pro Micro sketch
ATTRS{idVendor}=="1b4f", ATTRS{idProduct}=="9206", ENV{ID_MM_DEVICE_IGNORE}="1", ENV{ID_MM_PORT_IGNORE}="1"


# Arduino Leonardo bootloader(ACM)
ATTRS{idVendor}=="2341", ATTRS{idProduct}=="0036", ENV{ID_MM_DEVICE_IGNORE}="1", ENV{ID_MM_PORT_IGNORE}="1"
# Arduino Leonardo sketch serial port(ACM)
ATTRS{idVendor}=="2341", ATTRS{idProduct}=="8036", ENV{ID_MM_DEVICE_IGNORE}="1", ENV{ID_MM_PORT_IGNORE}="1"
Troubles
Check this document first.
https://learn.sparkfun.com/tutorials/pro-micro--fio-v3-hookup-guide/all#troubleshooting-and-faq
Northgate Omnikey 102 and RT101+ with PS/2 Converter
With the keyboards the conveter doesn't work on Pro Micro sometimes when plugin. To recover from this requires trying reset and replug several/many times. Solder bridge on J1 solved the issue magically.
This issue doesn't happen on Teensy, which gives USB 5V directly through VCC pin.
Bootloader vanish shortly On Linux
ModemManger may cause if bootloader goes away very shortly and difficult to communicate with. Check udev rules.
Technical resources
Bootloader
It seems that some have SparkFun bootloader and others have Arduino one.
SparkFun Pro Micro Caterina
Press reset button twice in quick successsion to enter bootloader mode which remains for only 8 seconds. Then you have to start flash tool within 8 seconds to program firmware into Pro Micro.
Source Code
https://github.com/sparkfun/Arduino_Boards/tree/master/sparkfun/avr/bootloaders/caterina
Arduino Leonardo Caterina
Press reset button to enter bootloader mode which remains for only 8 seconds. Then you have to start flash tool within 8 seconds to program firmware into Pro Micro.
Source Code
https://github.com/arduino/ArduinoCore-avr/tree/master/bootloaders/caterina
Fuse/Lock Bits setting
| Bit | Pro Micro 5V | Pro Micro 3.3V | Leonardo |
|---|---|---|---|
| Ext Fuse | CB | FE | CB |
| Low Fuse | FF | FF | FF |
| High Fuse | D8 | D8 | D8 |
| Lock | 2F | 2F | 2F |
| UnLock | 3F | 3F | 3F |
https://github.com/sparkfun/Arduino_Boards/blob/master/sparkfun/avr/boards.txt#L74
https://github.com/arduino/ArduinoCore-avr/blob/master/boards.txt#L282
A0-3(PF4-7)
OCD, JTAG debug is disabled(1) in Fuse High byte. A0-3(PF4-7) pins can be used without care of JTD bit in MCUCSR.
Bootloader always runs after reset
BOOTRST is enabled(0) in Fuse High byte. Note that bootloader always takes control after every reset and power cycle. This configuration is different from Teensy and many of other custom devices.
Bootloader section is locked
Bootloader section is protected with Lock bits setting and you cannot wipe or overwrite bootloader unintentionally with normal flash programming using bootloader.
In other words, you can't brick it and you should be able to access bootloader somehow.
To rewrite bootloader section you need extra hardware.
https://learn.sparkfun.com/tutorials/installing-an-arduino-bootloader