1. Pertinent Information - m-division-2018-2019/Team-17 GitHub Wiki
Introduction
There are mainly 4 methods of building robots based on Gesture Recognition:
1. Light-based Gesture Recognition: Light or illumination tracking and controlling robots with light sensors are being done in a lot of cases. Such robots are autonomous in nature. Generally, there are some light sensors associated with the robot. The sensors send some rays of light and track them as they gets absorbed in the surface or reflected back to it. According to this, the robot can be line-sensing robots where it is made to follow a black or a white path autonomously.
2. Vision-based Gesture Recognition: Several robots are designed to be controlled by vision-based gestures. In such robots, there are, generally, some cameras as the sensor, which also acts as an interface to control the robot with some manipulators. The input gesture can be some patterns, movements of hands, color tracking, face recognition, finger tracking, or some templates. They are also used in ball tracking and Robo-football games where the robots play the traditional game of football by tracking the movement of the ball. Though it has paved a way for advanced robot operations, but it is affected by factors such as illumination, foggy weather, background lights, etc.
3. Motion-based Gesture Recognition: The motions can be used to control a robot. This is generally done by incorporating an accelerometer to control the robot wirelessly. This can also be done using sensors. This method is beneficial over other methods in the sense that it can interact with machines naturally without being intruded by the factors that affects the mechanical devices [3]. One important development in this field is done by Sauvik Das et al in 2010, where he designed a spying device yielding location and activities of the user without his/her knowledge [4].
4. Sixth Sense Technology: The Sixth sense technology begins in 1990 by Steve Mann who implemented a wearable computing device via neck-projector or head-mounted projector coupled with a camera. Later, following his idea, Pranav Mistry, a young research scientist at MIT at that time came up with new applications of this technology. Pranav Mistry came up with the name "Sixth Sense Technology” and has since been named Wear Ur World (WUW). This technology applies all of the techniques mentioned above and designing applications that give an intuitive output with the connection of internet.
Solutions to our problem:
- Accelerometer based Gesture Control Robot
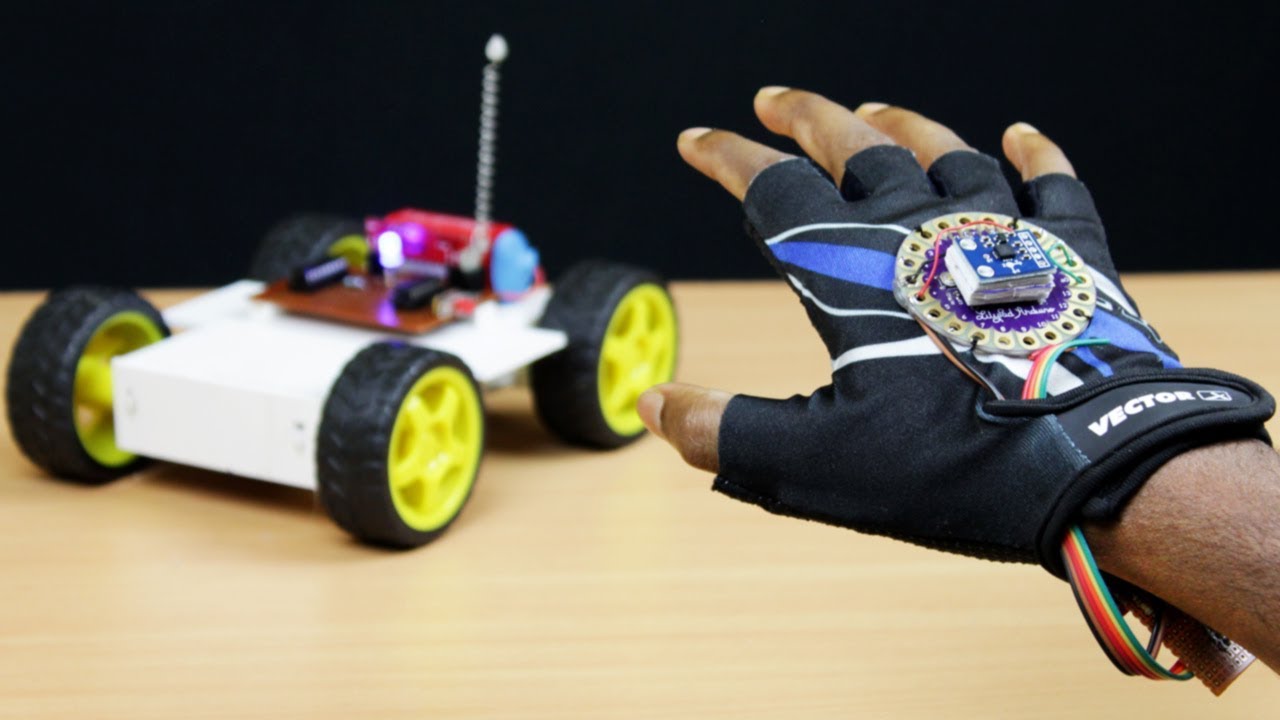 fig[1]
| Sl. No. | Electronic Parts Used | Mechanical Parts Used | Working Principle Identified | Links |
|---|---|---|---|---|
| 1. | Arduino Uno | Here the brain of the robot is Arduino Uno (Atmega32) it is fed with some set of code. The gestures/motion made by hand are recognized by a acceleration measuring device called accelerometer (ADXL335).Here the accelerometer reads the X Y Z coordinates when we make gestures by hand and send the X Y Z coordinates to the Arduino (here we don’t need the Z axis we need only two coordinated X and Y So neglect the Z coordinate). The Arduino checks the values of coordinates and sends a 4 bit code to the Encoder IC. The Encoder passes the data to RF transmitter and the transmitted data is received by the RF receiver. The receiver sends the 4 bit code to the Decoder IC and the decoder passes it to Motor Driver IC. Later the motor driver makes the decision to turn the two motors in the required direction. | https://learn.sparkfun.com/tutorials/what-is-an-arduino/all | |
| 2. | Triple Axis Accelerometer Breakout-ADXL335 | In short, an accelerometer is a three-axis acceleration measuring device. The accelerometer used here is ADXL335 and it has 3 axis (X Y Z).Almost all smart phones now have accelerometers (even though we are not going to take it from a smart phone). You definitely played motion games in your mobile (e.g Temple run) where the character in the game moves left and right when you tilt your phone left and right respectively it is done by the accelerometer. There is another sensor called Gyroscope found in smart phone which we don’t need now. | https://learn.sparkfun.com/tutorials/accelerometer-basics/all | |
| 3. | RF Module 434-MHz | We would be using a 433 MHz RF module to control our Linkit one from our arduino. I specifically prefer using this module because it is very cheap in price, has a good range, easily available in market, easy to use and connect. I searched for it on various online stores and found that the market was flooded with this RF module. There are many variety of the RF module of 433MHZ frequency. I have two types of module, first one has 8 pins in the receiver and the other one has 4 pins in the receiver(I am using the module which has four pin in it receiver) but both work exactly same. So don't get panic.The connections of this module are very simple and easy to understand. One module would be connected to your robot and other to your glove. We are using "RC switch" library to control our RF module. Adafruit also developed a library to control this module but I found that "RC switch" library was more easy to use and understand. The command of this library were not very much complicated. If there are two data pin in your module then sort them and connect anyone of them to the linkit one board. | https://en.wikipedia.org/wiki/RF_module | |
| 4. | HT12D | It is commonly used for radio frequency (RF) applications. By using the paired HT12E encoder and HT12D decoder we can easily transmit and receive 12 bits of parallel data serially. | https://www.engineersgarage.com/electronic-components/ht12d-datasheet | |
| 5. | HT12E | HT12E simply converts 12 bit parallel data in to serial output which can be transmitted through a RF transmitter. | https://www.engineersgarage.com/electronic-components/ht12e | |
| 6. | Dual H-Bridge Motor Drivers L298 | An H bridge is an electronic circuit that switches the polarity of a voltage applied to a load. These circuits are often used in robotics and other applications to allow DC motors to run forwards or backwards. | https://en.wikipedia.org/wiki/H_bridge | |
| 7. | Prototyping PCB | A printed circuit board (PCB) mechanically supports and electrically connects electronic components or electrical components using conductive tracks, pads and other features etched from one or more sheet layers of copper laminated onto and/or between sheet layers of a non-conductive substrate. Components are generally soldered onto the PCB to both electrically connect and mechanically fasten them to it. | https://en.wikipedia.org/wiki/Printed_circuit_board | |
| 8. | Linear Regulators | In electronics, a linear regulator is a system used to maintain a steady voltage. The resistance of the regulator varies in accordance with the load resulting in a constant output voltage. | https://en.wikipedia.org/wiki/Linear_regulator | |
| 9. | DC Motor(Generic) | First we will start with the power supply circuit. We need two power supply circuits: one for the transmitter and one for receiver. The receiver circuit needs to powered using 12V supply (since I am using a 12V motor) and the transmitter circuit can be powered using 9V battery. | https://www.magneticinnovations.com/dc-motor-how-it-works/ |
- Gesture Controlled Robotic Hand
 fig[2]
| Sl. No. | Electronic Parts Used | Mechanical Parts Used | Working Principle Identified | Links |
|---|---|---|---|---|
| 1. | Arduino Uno x2 | Arduino is an open-source electronics platform based on easy-to-use hardware and software. Arduino boards are able to read inputs - light on a sensor, a finger on a button, or a Twitter message - and turn it into an output - activating a motor, turning on an LED, publishing something online. | https://learn.sparkfun.com/tutorials/what-is-an-arduino/all | |
| 2. | Xbee S2 x2 | The XBee module consists of a hardware and a software part (protocol). The modules are designed to mount into a receptacle and therefore doesn't require soldering when mounted into a board. The sensors measure data and send this through a XBee module to a gateway. | https://www.sparkfun.com/pages/xbee_guide | |
| 3. | Xbee shield for Arduino Uno x2 | |||
| 4. | Xbee Explorer Dongle | |||
| 5. | Shrink cables x4 | This is a shrinkable plastic tube used to insulate wires, providing abrasion resistance and environmental protection for stranded and solid wire conductors, connections, joints and terminals in electrical work. | https://www.cableorganizer.com/learning-center/articles/heat-shrink-tubing-facts.html | |
| 6. | Dual H-bridge ,SN754410NE | An H bridge is an electronic circuit that switches the polarity of a voltage applied to a load. These circuits are often used in robotics and other applications to allow DC motors to run forwards or backwards. Most DC-to-AC converters (power inverters), most AC/AC converters, the DC-to-DC push–pull converter, most motor controllers, and many other kinds of power electronics use H bridges. In particular, a bipolar stepper motor is almost invariably driven by a motor controller containing two H bridges. | https://en.wikipedia.org/wiki/H_bridge | |
| 7. | Flex Sensors x4 | The flex sensor you linked to uses flexible conductive ink printed on flexible base forming a resistor. It works when bent with the ink on the outside of the curve. When bent, the conductive layer is stretched and thus extends, resulting in reduced cross section (imagine stretching a rubber band). | https://electronics.stackexchange.com/questions/207029/how-does-a-flex-sensor-work | |
| 8. | Trolley wheels (30mm) x2 | A wheel is a circular block of a hard and durable material at whose center has been bored a circular hole through which is placed an axle bearing about which the wheel rotates when a moment is applied by gravity or torque to the wheel about its axis. | ||
| 9. | 12v DC motor x2 | A motor is an electrical machine which converts electrical energy into mechanical energy. The principle of working of a DC motor is that "whenever a current carrying conductor is placed in a magnetic field, it experiences a mechanical force". | https://www.magneticinnovations.com/dc-motor-how-it-works/ | |
| 10. | 5V regulator | . A voltage regulator is used to regulate voltage level. When a steady, reliable voltage is needed, then voltage regulator is the preferred device. It generates a fixed output voltage that remains constant for any changes in an input voltage or load conditions. | https://www.elprocus.com/types-of-voltage-regulators-and-working-principle/ | |
| 11. | Robotic claw | The end effector, or robotic claw, can be designed to perform any desired task such as welding, gripping, spinning etc., depending on the application. For example, robot arms in automotive assembly lines perform a variety of tasks such as welding and parts rotation and placement during assembly. |
3.Gesture Controlled Lock
 fig[3]
| Sl. No. | Electronic Parts Used | Mechanical Parts Used | Working Principle Identified | Links |
|---|---|---|---|---|
| 1. | SparkFun APDS-9960 | An electronics breadboard (as opposed to the type on which sandwiches are made) is actually referring to a solderless breadboard. These are great units for making temporary circuits and prototyping, and they require absolutely no soldering. | https://www.sparkfun.com/products/12787 | |
| 2. | Arduino Uno | Arduino is an open-source electronics platform based on easy-to-use hardware and software. Arduino boards are able to read inputs - light on a sensor, a finger on a button, or a Twitter message - and turn it into an output - activating a motor, turning on an LED, publishing something online. | https://learn.sparkfun.com/tutorials/what-is-an-arduino/all | |
| 3. | Adafruit Standard LCD - 16x2 White on Blue | Liquid crystal display screen works on the principle of blocking light rather than emitting light. LCD's requires backlight as they do not emits light by them. We always use devices which are made up of LCD's displays which are replacing the use of cathode ray tube. | https://www.elprocus.com/ever-wondered-lcd-works/ | |
| 4. | Resistor 4.75k ohm | A resistor is a passive two-terminal electrical component that implements electrical resistance as a circuit element. In electronic circuits, resistors are used to reduce current flow, adjust signal levels, to divide voltages, bias active elements, and terminate transmission lines, among other uses. | https://www.explainthatstuff.com/resistors.html | |
| 5. | Jumper wires (generic) | Jumper wires are simply wires that have connector pins at each end, allowing them to be used to connect two points to each other without soldering. Jumper wires are typically used with breadboards and other prototyping tools in order to make it easy to change a circuit as needed. | http://blog.sparkfuneducation.com/what-is-jumper-wire | |
| 6. | Resistor 1k ohm | A resistor is a passive two-terminal electrical component that implements electrical resistance as a circuit element. In electronic circuits, resistors are used to reduce current flow, adjust signal levels, to divide voltages, bias active elements, and terminate transmission lines, among other uses. | https://www.explainthatstuff.com/resistors.html |
- Gesture Controlled Trainable Arduino Robot
_fqwF4zNVPu.gif?auto=compress&gifq=35&w=900&h=675&fit=min&fm=jpg) fig[4]
fig[4]

| Sl. No. | Electronic Parts Used | Mechanical Parts Used | Working Principle Identified | Links |
|---|---|---|---|---|
| 1. | 6 DOF Robotic Arm Set | A typical robotic arm is made up of seven metal segments, joined by six joints. The computer controls the robot by rotating individual step motors connected to each joint (some larger arms use hydraulics or pneumatics). | https://en.wikipedia.org/wiki/Six_degrees_of_freedom | |
| 2. | Arduino Uno | Arduino is an open-source electronics platform based on easy-to-use hardware and software. Arduino boards are able to read inputs - light on a sensor, a finger on a button, or a Twitter message - and turn it into an output - activating a motor, turning on an LED, publishing something online. | https://learn.sparkfun.com/tutorials/what-is-an-arduino/all | |
| 3. | 6x MG996r Metal Servo | Servos are controlled by sending an electrical pulse of variable width, or pulse width modulation (PWM), through the control wire. There is a minimum pulse, a maximum pulse, and a repetition rate. A servo motor can usually only turn 90° in either direction for a total of 180° movement. | https://www.elprocus.com/servo-motor/ | |
| 4. | 16 Channel Servo Shield | This servo shield allows the user to connect 20 servos to SPDuino and other arduino-compatible boards. | https://sproboticworks.com/shop/products/servo--shield.html | |
| 5. | HC-06 Bluetooth Module | HC‐06 module is an easy to use Bluetooth SPP (Serial Port Protocol) module,designed for transparent wireless serial connection setup.The HC-06 Bluetooth Module can be used in a Master or Slave configuration, making it a great solution for wireless communication. | https://www.gme.cz/data/attachments/dsh.772-148.1.pdf | |
| 6. | 2x 18650 Li-ion Batteries | When the battery is charging up, the lithium-cobalt oxide, positive electrode gives up some of its lithium ions, which move through the electrolyte to the negative, graphite electrode and remain there. The battery takes in and stores energy during this process. | https://batteryuniversity.com/learn/archive/is_lithium_ion_the_ideal_battery | |
| 7. | 2x 18650 Battery Holder |
- Control Computer using Hand Motion.

fig[5]
| Sl. No. | Electronic Parts Used | Mechanical Parts Used | Working Principle Identified | Links |
|---|---|---|---|---|
| 1. | Arduino Uno | Arduino is an open-source electronics platform based on easy-to-use hardware and software. Arduino boards are able to read inputs - light on a sensor, a finger on a button, or a Twitter message - and turn it into an output - activating a motor, turning on an LED, publishing something online. | https://learn.sparkfun.com/tutorials/what-is-an-arduino/all | |
| 2. | Ultrasonic Sensor - HC-SR04 (Generic) | Ultrasonic sensors emit short, high-frequency sound pulses at regular intervals. These propagate in the air at the velocity of sound. If they strike an object, then they are reflected back as echo signals to the sensor, which itself computes the distance to the target based on the time-span between emitting the signal and receiving the echo. | https://www.keyence.com/ss/products/sensor/sensorbasics/ultrasonic/info/ | |
| 3. | Jumper wires (generic) | Jumper wires are simply wires that have connector pins at each end, allowing them to be used to connect two points to each other without soldering. Jumper wires are typically used with breadboards and other prototyping tools in order to make it easy to change a circuit as needed | https://blog.sparkfuneducation.com/what-is-jumper-wire |
References
[2] http://engineerlabs.weebly.com/blog/gesture-controlled-trainable-arduino-robot-arm-via-bluetooth
[3] https://www.microsonic.de/en/support/ultrasonic-technology/principle.htm
[4] https://learn.sparkfun.com/tutorials/how-to-use-a-breadboard/all
[5] https://www.hackster.io/smart-tech/amazing-control-computer-using-hand-motion-and-arduino-d933f1#
[6] https://create.arduino.cc/projecthub/KureBasRobotics
[7] https://store.arduino.cc/usa/arduino-uno-rev3
[8] https://maker.pro/arduino/projects/hand-gesture-controlled-robotic-arm-arduino
[9] https://www.youtube.com/watch?v=0XXRPXGIoIs
[10] https://www.youtube.com/watch?v=tw0F6MVos5k Image Sources:
[1] :https://www.youtube.com/watch?v=rejZmqRrKMc
[2] :https://www.instructables.com/id/DIY-Robotic-Hand-Controlled-by-a-Glove-and-Arduino/
[3] :https://www.youtube.com/watch?v=i7oHcb7c9ro
[4] :https://www.youtube.com/watch?v=ebx1oecOEl4
[5] :https://circuitdigest.com/microcontroller-projects/control-your-computer-with-hand-gestures