Day 7 (Dec 20, 2020) ~~~ Putting the Graphics Pipeline Together by Defining (lots of) Fixed Function Stages and the Render Pass - kwilson33/learning-vulkan GitHub Wiki
Progress Today
I made it through these pages today of the official Vulkan tutorial.
-
Drawing a triangle --> Graphics pipeline basics --> Fixed functions
-
Drawing a triangle --> Graphics pipeline basics --> Render passes
-
Drawing a triangle --> Graphics pipeline basics --> Conclusion
Here are some major takeaways
1. Today I started by taking care of the fixed-function stages and some other parts of the Vulkan graphics pipeline.
- The stages/parts I took care of today were (in order)
- Vertex input
- Input assembly
- Viewport and scissors
- Rasterizer
- Multisampling (filled in, disabled for now)
- Depth and stencil testing (not really filled in, disabled for now)
- Color blending
- Dynamic states (not filled in, disabled for now)
- Pipeline layout
- Render pass (created before any of the stuff above, but done later in tutorial)
2. You can specify how you'd like your vertex input data to be assembled.
- This is done through the
topologymember of theVkPipelineInputAssemblyStateCreateInfostruct. Some of the options are:VK_PRIMITIVE_TOPOLOGY_POINT_LIST: points from verticesVK_PRIMITIVE_TOPOLOGY_LINE_LIST: line from every 2 vertices without reuseVK_PRIMITIVE_TOPOLOGY_LINE_STRIP: the end vertex of every line is used as start vertex for the next lineVK_PRIMITIVE_TOPOLOGY_TRIANGLE_LIST: triangle from every 3 vertices without reuse. USED IN THE TUTORIAL
3. The rasterizer performs depth testing, face culling, and the scissor test.
- The rasterizer takes the geometry that is shaped by the vertices from the
vertex shaderand turns it into fragments to be colored by thefragment shader. - The rasterizer can also be configured to do
wireframe renderingby just outputting the edges. - You can customize how the fragments are generated for geometry.
- FILL (fills in the area of the polygon with fragments) USED IN THIS TUTORIAL
- LINE
- POINT
- You also specify in the rasterizer what order of vertices means the polygon is front-facing (clockwise or counterclockwise).
4. How multisampling works (this chapter only briefly goes into it, there's a whole chapter about it on the tutorial much later)
- Multisampling needs to be specified for the pipeline through a struct (like everything else in Vulkan).
- Basically, multisampling uses multiple points for a pixel (4x is good) to best see what areas the polygon covers. This helps reduce aliasing on edges of polygons, where just using one sampling point may not give a good representation of how much the polygon covers.
- Multisampling is more efficient than rendering to a higher resolution and downscaling.
- This is because, even if 4 sampling points for a single pixel are covered, the
FSis still only run once for that pixel by interpolating the covered points at the pixel center. With rendering to a higher resolution you might be rendering more than you need to, just to get rid of some aliasing.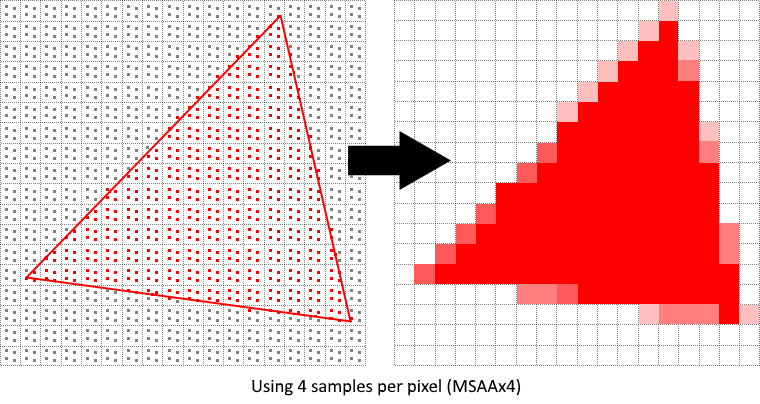
Image from the Vulkan tutorial
- This is because, even if 4 sampling points for a single pixel are covered, the
5. Color blending is very customizable.
- There are two ways to do color blending, either just mixing old and new, or by using a bitwise operation to combine the old and new colors.
- In this tutorial, I'm using the first method.
- The most common way to use color blending is to implement alpha blending, where the new color is blended with the old based on its opacity (alpha value). The final color is computed like below:
finalColor.rgb = newAlpha * newColor + (1 - newAlpha) * oldColor;
finalColor.a = newAlpha.a;
6. You actually don't have to recreate the entire pipeline to make some changes (through dynamic states).
- Some of the states can be changed without recreating the pipeline through specifying
dynamic states.- Examples of states that can be changed like this are
- The viewport
- Line width
- Blend constants
- Examples of states that can be changed like this are
- To get this working you have to fill in a struct. Ignored for now. This will make those states configuration values ignored, and you are required to specify the data at drawing time (instead of beforehand like I did for this tutorial).
7. The pipeline layout is used to hold uniform and push values.
- These values are referenced by the shader and can be updated at draw time.
- For this step of the tutorial, not using any of these values.
8. The render pass is very important and tells Vulkan about the framebuffer attachments referenced by the pipeline stages and how they're used.
- The
render passbasically tells Vulkan how many framebuffers there are, what they are, and how to handle the data they store. - A render pass can consist of one or more
subapasses. Eachsubpassdepends on the contents of framebuffers in previous passes. For example, there can be multiplesubpassesto apply post processing effects one after another. You can group multiplesubpassestogether and Vulkan will reorder the operations to conserve memory bandwidth for maybe better performance. - Each
subpassreferences one or more attachments. For this part of the tutorial I created oneone framebuffer attachment, which I called acolor attachmentthat describes:- What to do with the data in the attachment before and after rendering (ie. clearing or preserving the image on the screen)
- The format of the images stored in the framebuffer attachment.
- How many samples (for multisampling).
- What to do with stencil data before and after rendering.
- The initial layout of the image before a render pass begins. For example,
VK_IMAGE_LAYOUT_UNDEFINEDspecifies we don't care what previous layout the image was in. - The final layout we want the image to transition to after the render pass. Setting this to
VK_IMAGE_LAYOUT_PRESENT_SRC_KHRbasically means we want the image to be ready for presentation in the swap chain. (render image --> swap chain)
9. What pipeline derivatives are and why they might help performance. Also pipeline caches.
- The idea of them is that it's less expensive to set up pipelines when they have a lot of functionality in common with an existing pipeline. Not using for this part of the tutorial.
- When creating a graphics pipeline like below, you can specify a pipeline cache as the second parameter. A pipeline cache can be used to store and reuse relevant data across multiple calls to
vkCreateGraphicsPipelinesand even across program executions if the cache is store in a file. This speeds up creation a LOT. Not using for this part of the tutorial.
vkCreateGraphicsPipelines(device, VK_NULL_HANDLE, 1, &pipelineInfo, nullptr, &graphicsPipeline)
See ya!
I'm so happy with the progress I'm making! I've heard and learned a little about some of the concepts covered in this tutorial (like multisampling, color blending/alpha blending, rasterization), but actually taking care of each of these little concepts slowly is really helping me understand how the graphics pipeline works. Throughout this tutorial, I've been printing out each of the important steps to the console (some printouts were specified in the tutorial, but most I did myself) to keep track of everything done up to this point. I've pasted that console output below and WOW you can really see how much must be done to do a simple drawing to screen in Vulkan. Without keeping track of this it'd be really easy to forget how each step leads into the other. I haven't even gotten a triangle to show up to the window yet and there's even more to do before that. But I'm getting really close!
Available validation layers:
~~~~~~~~~~~~~~~~~~~~~~~~
        VK_LAYER_AMD_switchable_graphics
        GalaxyOverlayVkLayer
        GalaxyOverlayVkLayer_VERBOSE
        GalaxyOverlayVkLayer_DEBUG
        VK_LAYER_OBS_HOOK
        VK_LAYER_RENDERDOC_Capture
        VK_LAYER_VALVE_steam_overlay
        VK_LAYER_VALVE_steam_fossilize
        VK_LAYER_LUNARG_api_dump
        VK_LAYER_LUNARG_device_simulation
        VK_LAYER_LUNARG_gfxreconstruct
        VK_LAYER_KHRONOS_validation
        VK_LAYER_LUNARG_monitor
        VK_LAYER_LUNARG_screenshot
VK_LAYER_KHRONOS_validation found!
Validation layer requirements fulfilled!

Available Vulkan extensions:
~~~~~~~~~~~~~~~~~~~~~~~~
        VK_KHR_device_group_creation
        VK_KHR_external_fence_capabilities
        VK_KHR_external_memory_capabilities
        VK_KHR_external_semaphore_capabilities
        VK_KHR_get_physical_device_properties2
        VK_KHR_get_surface_capabilities2
        VK_KHR_surface
        VK_KHR_win32_surface
        VK_EXT_debug_report
        VK_EXT_debug_utils
        VK_EXT_swapchain_colorspace

Required GLFW extensions:
~~~~~~~~~~~~~~~~~~~~~~~~
        VK_KHR_surface
        VK_KHR_win32_surface
VK_KHR_surface extension found!
VK_KHR_win32_surface extension found!

Extension requirements fulfilled!

{########## Vulkan instance created. ##########}

{########## Debug messenger setup. ##########}

{########## VkSurfaceKHR object created. ##########}

Physical device set to: AMD Radeon R9 200 / HD 7900 Series
Physical device extension requirements met!

{########## Physical device picked. ##########}

{########## Logical device created. ##########}

Surface Format: 50, Color Space: 0
Presentation Mode: 2
Swap Extent Width: 800, Swap Extent Height: 600

Number of swap chain images: 2

{########## Swap chain created. ##########}

{########## Image views created. ##########}

{########## Render pass created. ##########}

shaders/vert.spv size is 1540 bytes.

shaders/frag.spv size is 608 bytes.

Vertex shader module created.
Fragment shader module created.
Vertex input format specified.
Input assembly specified.
Viewport and scissor rectangle specified.
Rasterizer specified.
Multisampling specified (disabled for now).
Depth & stencil tests specified (disabled for now).
Color blend attachment state specified.
Color blend global settings specified.
Dynamic states specified (disabled for now).
Pipeline layout created.

{########## Graphics pipeline created. ##########}