TextKit Study - kirseia/study GitHub Wiki
TextKit
UILabel에 뭔가 하기
-
Dynamic type - 설정 - 접근성 - 폰트 크기에서 세팅한거에 따라 조정되려면 Dynamic type으로 설정해야 함
- UIFont.preferredFont(forTextStyle:) 을 사용해야 됨.
- Storyboard나 Xib 에서는 system font 말고 font에 body, caption ... 등이 있는데 그걸로 해야 함
-
Dynamic type 앱 리로드 없이 바로 적용하기
- ViewController의 viewDidLoad() 에 아래 코드를 추가하면 됨
textView.adjustsFontForContentSizeCategory = true -
TextEffectStyle 효과 넣어주기 위해서 NSAttributedString 를 사용
- foregroundColor, font, textEffect (NSAttributedString.TextEffectStyle.letterpressStyle)
Exclusion Paths
/// Copyright (c) 2018 Razeware LLC
///
/// Permission is hereby granted, free of charge, to any person obtaining a copy
/// of this software and associated documentation files (the "Software"), to deal
/// in the Software without restriction, including without limitation the rights
/// to use, copy, modify, merge, publish, distribute, sublicense, and/or sell
/// copies of the Software, and to permit persons to whom the Software is
/// furnished to do so, subject to the following conditions:
///
/// The above copyright notice and this permission notice shall be included in
/// all copies or substantial portions of the Software.
///
/// Notwithstanding the foregoing, you may not use, copy, modify, merge, publish,
/// distribute, sublicense, create a derivative work, and/or sell copies of the
/// Software in any work that is designed, intended, or marketed for pedagogical or
/// instructional purposes related to programming, coding, application development,
/// or information technology.  Permission for such use, copying, modification,
/// merger, publication, distribution, sublicensing, creation of derivative works,
/// or sale is expressly withheld.
///
/// THE SOFTWARE IS PROVIDED "AS IS", WITHOUT WARRANTY OF ANY KIND, EXPRESS OR
/// IMPLIED, INCLUDING BUT NOT LIMITED TO THE WARRANTIES OF MERCHANTABILITY,
/// FITNESS FOR A PARTICULAR PURPOSE AND NONINFRINGEMENT. IN NO EVENT SHALL THE
/// AUTHORS OR COPYRIGHT HOLDERS BE LIABLE FOR ANY CLAIM, DAMAGES OR OTHER
/// LIABILITY, WHETHER IN AN ACTION OF CONTRACT, TORT OR OTHERWISE, ARISING FROM,
/// OUT OF OR IN CONNECTION WITH THE SOFTWARE OR THE USE OR OTHER DEALINGS IN
/// THE SOFTWARE.

import UIKit

class TimeIndicatorView: UIView {
  let fillColor = UIColor(red: 0.329, green: 0.584, blue: 0.898, alpha: 1)
  var label = UILabel()

  required init?(coder aDecoder: NSCoder) {
    super.init(coder: aDecoder)
  }

  init(date: Date) {
    super.init(frame: CGRect.zero)

    // Initialization code
    backgroundColor = .clear
    clipsToBounds = false

    // format and style the date
    let formatter = DateFormatter()
    formatter.dateFormat = "dd\rMMMM\ryyyy"
    let formattedDate = formatter.string(from: date)
    label.text = formattedDate.uppercased()
    label.textAlignment = .center
    label.textColor = .white
    label.numberOfLines = 0

    addSubview(label)
  }

  func updateSize() {
    // size the label based on the font
    label.font = UIFont.preferredFont(forTextStyle: .headline)
    label.frame = CGRect(x: 0, y: 0, width: .max, height: .max)
    label.sizeToFit()

    // set the frame to be large enough to accomodate the circle that surrounds the text
    let radius = radiusToSurroundFrame(label.frame)
    frame = CGRect(x: 0, y: 0, width: radius * 2, height: radius * 2)

    // center the label within this circle
    label.center = center

    // offset the center of this view to ... erm ... can I just draw you a picture?
    // You know the story - the designer provides a mock-up with some static data, leaving
    // you to work out the complex calculations required to accomodate the variability of real-world
    // data. C'est la vie!
    let padding: CGFloat = 5.0
    center = CGPoint(x: center.x + label.frame.origin.x - padding, y: center.y - label.frame.origin.y + padding)
  }

  // calculates the radius of the circle that surrounds the label
  func radiusToSurroundFrame(_ frame: CGRect) -> CGFloat {
    return max(frame.width, frame.height) * 0.5 + 20.0
  }

  func curvePathWithOrigin(_ origin: CGPoint) -> UIBezierPath {
    return UIBezierPath(arcCenter: origin, radius: radiusToSurroundFrame(label.frame), startAngle: -.pi, endAngle: .pi, clockwise: true)
  }

  override func draw(_ rect: CGRect) {
    let context = UIGraphicsGetCurrentContext()
    context?.setShouldAntialias(true)
    let path = curvePathWithOrigin(label.center)
    fillColor.setFill()
    path.fill()
  }
}
TextKit Stack
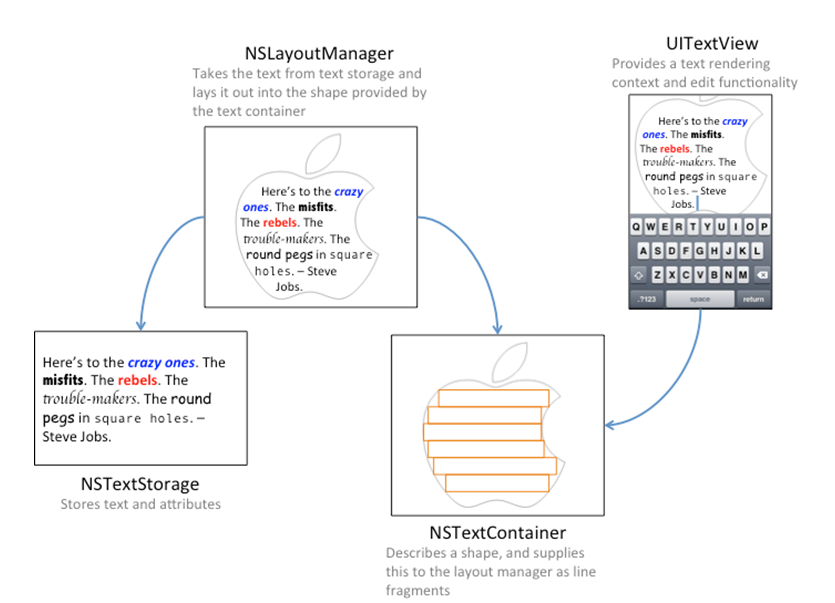
-
NSTextStorage
- 텍스트의 attribute 등을 변형함.
-
NSTextContainer
- 텍스트가 나올 영역을 지정
- NSTextContainer.exclusionPaths 를 설정해서 기본 사각형 외에 텍스트가 들어가지 않을 영역을 지정할 수 있음
-
NSLayoutManager
- 위 2개를 연결하는 것
-
를 각각 상속받아서 구현하면 텍스트를 변형(?)할 수 있음
func createTextView() {
  // 1
  let attrs = [NSAttributedString.Key.font: UIFont.preferredFont(forTextStyle: .body)]
  let attrString = NSAttributedString(string: note.contents, attributes: attrs)
  textStorage = SyntaxHighlightTextStorage()
  textStorage.append(attrString)

  let newTextViewRect = view.bounds

  // 2
  let layoutManager = NSLayoutManager()

  // 3
  let containerSize = CGSize(width: newTextViewRect.width,
                             height: .greatestFiniteMagnitude)
  let container = NSTextContainer(size: containerSize)
  container.widthTracksTextView = true
  layoutManager.addTextContainer(container)
  textStorage.addLayoutManager(layoutManager)

  // 4
  textView = UITextView(frame: newTextViewRect, textContainer: container)
  textView.delegate = self
  view.addSubview(textView)

  // 5
  textView.translatesAutoresizingMaskIntoConstraints = false
  NSLayoutConstraint.activate([
    textView.leadingAnchor.constraint(equalTo: view.leadingAnchor),
    textView.trailingAnchor.constraint(equalTo: view.trailingAnchor),
    textView.topAnchor.constraint(equalTo: view.topAnchor),
    textView.bottomAnchor.constraint(equalTo: view.bottomAnchor)
  ])
}
- 추가적으로 외곽선이나 배경색 모양 등을 그리고 싶다면 UIView에 TextKit또는 UILabel을 넣고, draw 에서 그려주면 됨
- 정확한 텍스트의 크기나 위치 등을 구하려면 UITextView를 이용해야 함
UITextView
- https://developer.apple.com/documentation/uikit/uitextview
- https://developer.apple.com/documentation/uikit/uitextviewdelegate
Properties
- UITextView.textContainerInset - 기본 값은 UIEdgeInstes (8, 0, 8, 0)임.
- 실제 크기를 구하려면 edge 를 .zero 로 세팅해서 sizeThatFits 해서 들어갈 크기를 계산 하면 됨
- UITextView.textContainer.lineFragmentPadding 의 기본값이 5, 줄 바꿈 할 때 앞뒤에 붙는 사이즈. 이것도 0으로 해줘야 함
Custom UITextView 정리
- 텍스트의 attribute 같은걸 바꾸고 싶다 -> NSTextStorage 를 상속받아 구현
- 텍스트의 좌표나 영역을 바꾸고 싶다 -> NSTextContainer를 상속받아 구현
- 위 2개 구현한 것은 NSLayoutManager 에 연결, 그리고 NSLayoutManager를 UITextView에 연결한다.
- NSLayoutManager를 통해서 텍스트의 좌표를 얻어온 뒤에 그 좌표를 이용해 텍스트 뒤에 draw 해주면 커스텀 뷰를 그릴 수 있게 됨.