How to setup Raspberry Pi PICO 2 with CircuitPython and screen - keycube/K3_embedded_game GitHub Wiki
Firstly, you need to download CircuitPython for Raspberry Pi PICO 2 W (any other version would not work) and flash it to your Pico. Circuit Python can be found here , at the moment of writing, we use the latest alpha available, which is https://adafruit-circuit-python.s3.amazonaws.com/bin/raspberry_pi_pico2_w/en_US/adafruit-circuitpython-raspberry_pi_pico2_w-en_US-10.0.0-alpha.6.uf2. This needs to be at least the 10.x.x version in order to be compatible with some libraries.
Then for connecting the screen to the PICO, several configurations are possible with the SPI protocole, but here's one below which is working if you just want to connect your Adafruit Sharp to a raspberry PICO W (1 or 2). Some pins may be different with the non W version, since the wifi is using some pin internally so it may shift some of the others. If you need to connect the pins differently, please use this guide to check which pins are working together using SPI.
Raspberry Pi PICO wiring with a Adafruit Sharp screen :
| PICO pin | SHARP pin |
|---|---|
| Any GND | GND |
| 3V3_O | VIN (3.3-5V) |
| GP9 | CS |
| GP10 | SCLK |
| GP11 | MOSI |
| Please refer to this image if you don't have pin label on your Pico. |
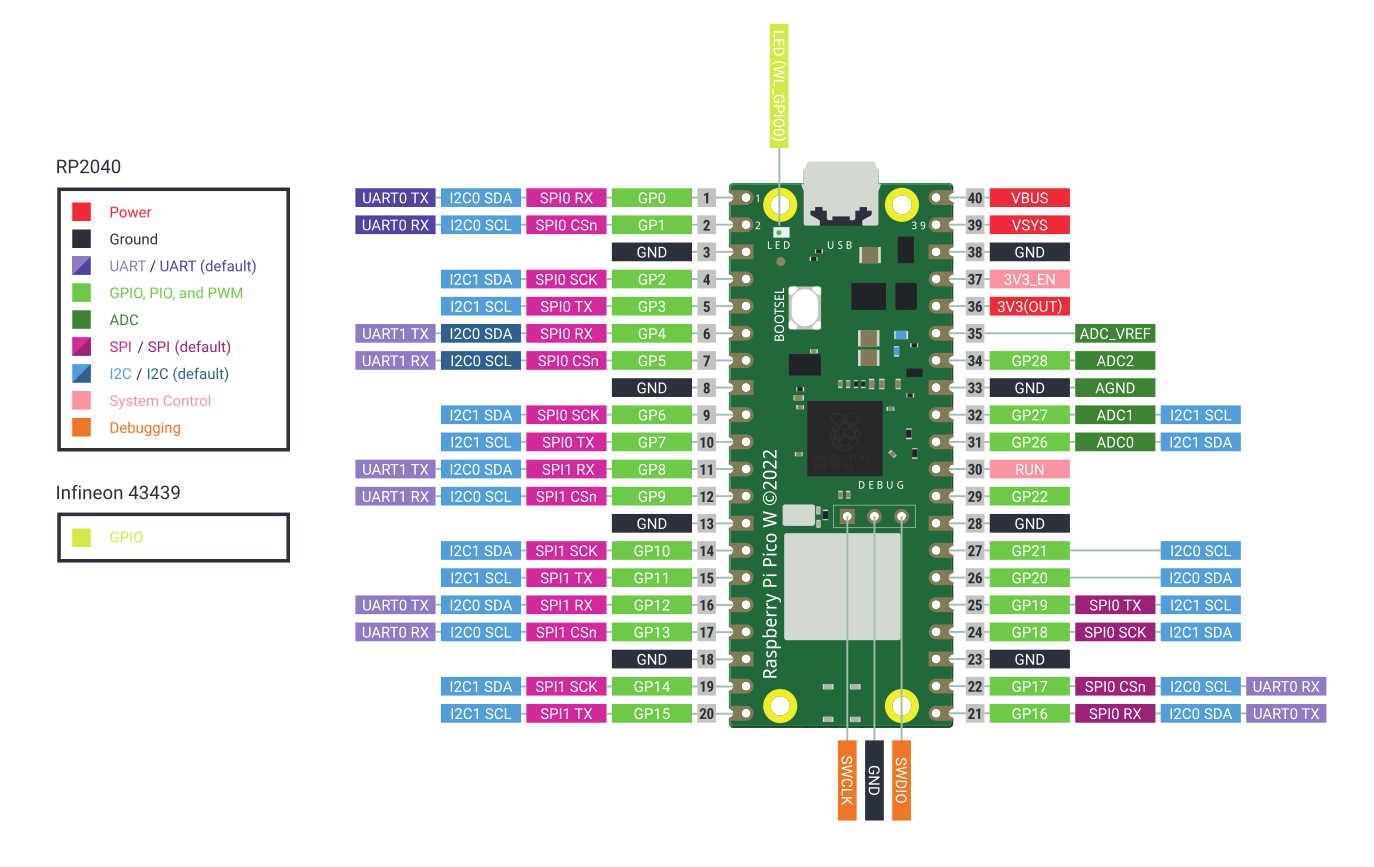
Receive Input from the K3 to the Pico Through a Computer
At the moment we began this project, the screen was not embedded in the K3 yet. We had on one side the Keycube with its onboard sending input via USB to the PC, and on the other side the Raspberry Pi Pico with screen, connected to the PC via a REPL. We had to link both systems in order to reproduce game-like conditions.
The Python Middleware
So far, we used MU editor to communicate between the Pico and the computer. This was an easy setup as MU comes with a setup REPL, to execute Python commands on the Pico, and receive the output. However, this solution is not really convenient in our case, as we want to redirect the K3 outputs to the Pico, and MU's REPL does not allow that (as far as we know). Also, MU cannot have two REPL instances that we need: one for Pico and the other for K3. If we try to connect both at the same time, one takes over the priority of the REPL.
PuTTY
First lead was to use Adafruit's guide on using advanced serial console. Which made use of an external program PuTTY, to create one REPL for each device. We just followed the guide, no special difficulties here.
The next step would be to redirect the K3's PuTTY instance to a Python program (running on the computer), then redirect again to the Pico's PuTTY instance, like this:
PUTTY_K3 | python_middleware | PUTTY_PICO
However, we found a simpler solution in the meantime.
Only a Python Program is Required
Python has a module named pyserial to connect directly to the serial port of the computer to our program, as PuTTY did before.
Here's the basic code we used to redirect K3's output to Pico input:
pip install pyserial
import serial

baudrate = 115200

keycube_port = 'COM7'
pico_port = 'COM5'

keycube_ser = serial.Serial(keycube_port, baudrate, timeout=1)
pico_ser = serial.Serial(pico_port, baudrate, timeout=1)

while True:

    line = keycube_ser.readline().decode('utf-8', errors='ignore').strip()

    if line:

        print(line)

        pico_ser.write((line + "\r\n").encode("utf-8"))
With this, we just needed to receive input correctly on the pico :
import usb_cdc

# Make sure the serial console is enabled and non-blocking
usb_cdc.console.timeout = 0

print("====== STDIN ======")

while True:
    data = usb_cdc.console.readline(-1)
    if data:
        stdin = data.decode("utf-8")
        print(stdin)
No special lib was required on the pico. The complete setup can be found in the stdin printer example.
The puTTY setup is not used in final one, but still useful to simulate k3 input through a console to the pico.
Save files on PICO's storage
Logging files directly on the Raspberry pi Pico is quite easy. This guide explains it all, but here's a summary made for the PICO :
Read-only mode:
In order to be able to write from the Pico to its own storage, you need to mount it in read-only mode. This mode blocks the computer to write Pico's files in order to prevent issues with both writing at the same time.
This can be done by adding boot.py at the root folder.
import board
import digitalio
import storage

button = digitalio.DigitalInOut(board.GP16)

button.direction = digitalio.Direction.INPUT
button.pull = digitalio.Pull.UP

# If the button pin (GP16) is connected to the ground during PICO's connection to the
# computer (after the led's 3 blinks), the PICO can now write to its storage and the
# computer will be in read-only mode.
storage.remount("/", readonly= not button.value)
Since this code only executes when the PICO is plugged in the computer, and not when code.py is reloaded, we need a way to manually toggle on or off the read-only mode. An inconvenience appears : the PICO enters read-only whenever you connect it to the computer, which means the only way to edit its contents is by remounting it in safe mode.
To prevent this, we must connect a pin (in this case GP16, but it can be any free GP pin) to a button wired to the ground. This way, if we press the button during PICO's initialisation (must be held until the 3 blinks are finished), the PICO enters read-only and can write on its own storage. If we want to write code from the PC for faster code iteration, don't press the button during initialisation.