Secure API(backend) application using Gluu Gateway and OAuth plugins - kdhttps/appauth-angular-gluu GitHub Wiki
Secure REST API application using Gluu Gateway and OAuth plugins
You can now secure your any API applications with Zero line of Code using Gluu Gateway. You focus on your products features and let handle your product security by Gluu Gateway. What you need to do it to install Gluu Gateway and Configure your application with Gluu Gateway.
The Gluu Gateway has many features and plugin to secure different types of applications, needs, and requirements. In this blog, I am mainly focusing on the API Application. For this, I am using gluu-oauth-auth plugin to authenticate the request using an access token.
Before starting this, check OpenID Connect OAuth 2.0 Overview and Security Flows for more details on OpenID Connect and terms and also check Single Page Application SSO With Gluu CE using AppAuth JS.
Flow
In this tutorial, I am going to secure our API application using gluu-oauth-auth plugin. It does two things.
-
Introspect the token, check token is active or not, and cache the token authentication.
-
Validate the OP Client which we used to get the
access_token.
Let's assume you have an angular app that requests to OP Server for user authentication using OP client's client_id/client_secret and get access token. After this angular app requesting this Gluu Gateway secured the application with access token in the authorization header. I covered this part in Single Page Application SSO With Gluu CE using AppAuth JS blog so take a look into this blog first.
Let's call OP client's client_id/client_secret as a Consumer OP Client, but why?, You will get it in the next following steps. This is the OP client which is validated by Gluu Gateway in the second step and this is the same client by which you requested for access_token. You need to register this OP Client into Gluu Gateway. We will see this configuration in the next following steps.
The next flow is in the below diagram.

https://sequencediagram.org

bottomparticipants

title OIDC Authorization Code PKCE Flow and Gluu Gateway API Security

actor "++**User**++" as User #yellow
fontawesome5solid f2d0 "++**Angular App**++" as RP #purple
fontawesome5solid f5fd "++**Gluu OIDC Server**++" as OIDC #green
fontawesome5solid f085 "++**Gluu Gateway**++" as GG #lightgreen
fontawesome5solid f022 "++**Backend API App**++" as UpstreamApp #tomato

User->RP: login request or directly request \nfor protected resources \nusing browser or mobile app
RP->OIDC: Redirect to **you_op_server.com/authorize** endpoint with \n**repsonse_type=code**, **redirect_uri**, **state**, \n**code_challenge** and **code_challenge_method**

note over OIDC#lightgreen: Auth Process Started \ne.g. Login page or 2FA
note over OIDC#lightgreen: User enter credentials
note over OIDC#lightgreen: OIDC Server Authenticate the user and \nif all is ok then redirect to RP with **code** and **state

OIDC->RP: Redirected to RP \n**your_rp.com/redirect_uri?code=[string]&state=[string]**
RP->OIDC: Request to \n**your_op_server.com/token** endpoint with \n**code** and **code_verifier**
OIDC->RP: Return **access_token**
RP->OIDC: Request to \n**your_op_server.com/userinfo** endpoint with **access_token**
OIDC->RP: Return user details
RP->RP: Verify user and allow
RP->User: Allow login


User->RP: Request for proteced resources/data/features
RP->GG: Request to protected endpoints for data\n**access_token** in **Authorization** header.
GG->OIDC: **Introspect** the **access_token**
note over GG#lightgreen: check **access_token**
note over GG#lightgreen: Verify the **Consumer OP Client**
note over GG#lightgreen: If all ok then **cache** the token data

GG<->UpstreamApp: Request and take a response
GG->RP: response data
RP->User: Show data
-
Request always comes first to Gluu Gateway, it send request to your backend API application.
-
Overall you need to request Gluu Gateway with the
access_tokenfor protected endpoints(resources). -
Gluu Gateway OAuth plugin introspect the token and validate the token
-
Next, it verifies the OP Consumer client
-
If all ok then GG request to your backend API, get a response, and return to RP Client
As I told you you don't need to do a single line of code for security integration what you need to do it to install Gluu Gateway and configure your application in it. So let's configure your application with Gluu Gateway.
Prerequisites
Gluu Server
This is our OpenID Connect Server (OP Server), from where the Requesting(Relying) party issue the OAuth token with scopes. Install Gluu.
Gluu Gateway(GG)
This is our Resource Server (RS), where we will configure our backend application and it will validate the access tokens. Install Gluu Gateway.
After installation of GG you will get the following components:
-
It is
Proxy Middleware GatewaySoftware whichhandle the requestat GG, apply the securitypluginsand perform thesecurity tasksas per plugin configuration.It provides two endpoints. One is
Admin EndpointandProxy Endpoint.Admin Endpointis used to configure upstream apps, services, routes, consumers, and plugins.Proxy Endpointis your final endpoint which accept request from clients. In our case, the angular application calling this endpoint for protected resources. -
It is Admin GG UI Panel. Where you can configure your backend API, routes, consumer, and plugins.
-
Gluu Gateway provides many plugins. Check here for list. We are only using the
gluu-oauth-authplugin for request authentication.
Backend API(Protected Resources)
We can also call it as a Protected resources or Upstream App or target or backend APIs. In this blog, I am using a demo Node.js App, available here. You should have to deploy this app on the Gluu-Gateway machine. This is your backend application that you want to secure and used by your frontend application e.g. mobile app, web frontend app.
Angular Client
I am using Angular Client to access protected resources. This is your Frontend application which requests to Gluu Gateway. Check blog Single Page Application SSO With Gluu CE using AppAuth JS for detail configuration and implementation. You can use your application, overall you need an application that will request to GG protected API.
Consumer OP Client
This is the same client that you are using in the Angular App. I am calling this as a Consumer OP Client. We need to register this clients client_id into Gluu Gateway so it will only allow this client to access protected resources.
Configuration
There are mainly 4 steps
- Configure your Backend API Application into Gluu Gateway Service
- Configure Kong Gateway Routes
- Add OAuth Security
- Configure
Consumer OP Client
1. Configure your Backend API Application into Gluu Gateway Service
We need to first register the Backend API Application which we want to secure using Gluu Gateway. Service is the Kong entity. After authentication GG uses this configuration to request and get a response from the Backend API Application.
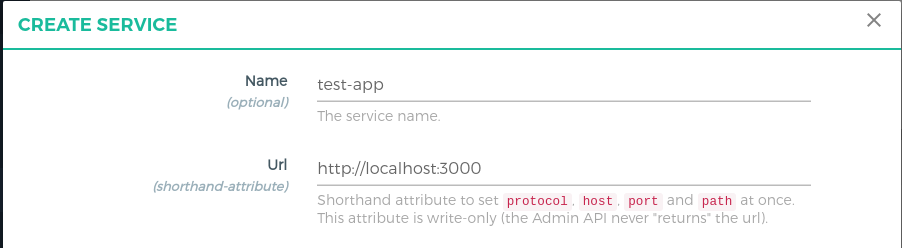
My API Backend is running on http://localhost:3000 so I am configuring service as per that. You need to set configuration as per your application.
Follow these step to add a Service using GG UI:
-
Click
SERVICESon the left panel -
Click on the
+ ADD NEW SERVICEbutton -
Fill in the following boxes:
Name:
test-app, you can give any name here.URL:
http://localhost:3000
2. Configure Kong Gateway Routes
The Routes is specially used by the GG Kong to recognize and accept the request. It is a child entity that we need to add it into the Service object.
Follow these step to add a Route using GG UI:
-
Click
SERVICESon the left panel -
Click on the
test-appservice, which we created on the above step -
Click
Routes -
Click the
+ ADD ROUTEbutton -
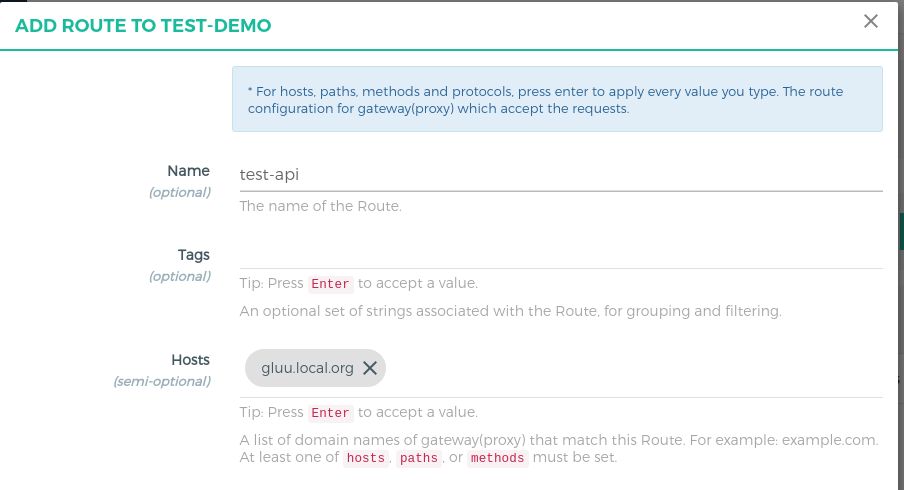
Fill in the following boxes:
Name:
test-api, you can give any name here.Hosts:
<your-server-host>, Tip: Press Enter to accept value. This is the host of your gluu gateway proxy. This is the host that will be requested by the angular app. I have install GG on my servergluu.local.org. The rest of the tutorial will usegluu.local.orgas an example, replace it with your host. Check the Gluu Gateway docs for more routing capabilities.
3. Add OAuth Security
There are plugins available in GG which provides the security. Overall we just need to configure plugins here. For currently purpose we just need one plugin i.e. gluu-oauth-auth. Let's add this plugin.
-
Click
ROUTESon the left panel -
Click on the
route id/namewithgluu.local.orgas the host -
Click on
Plugins -
Click on the
+ ADD PLUGINbutton -
You will see
Gluu OAuth Auth and PEPtitle and+icon -
Now you will see below the form
- Set
DisabletoOAUTH PEP Scope expression configuration, we don't need this for now - Set blank to
OXD Id,Client Id, andClient Secret. GG UI will create one separate client for plugin usage. - Leave
Headersas it is or configure as per your requirements. - Click on the
ADD Pluginbutton to add plugin
- Set

You may face cors problem when you call GG from your angular application for that you need to add cors plugin which is by default comes with Kong CE addition. Check here for cors plugin configuration.
4. Configure Consumer OP Client
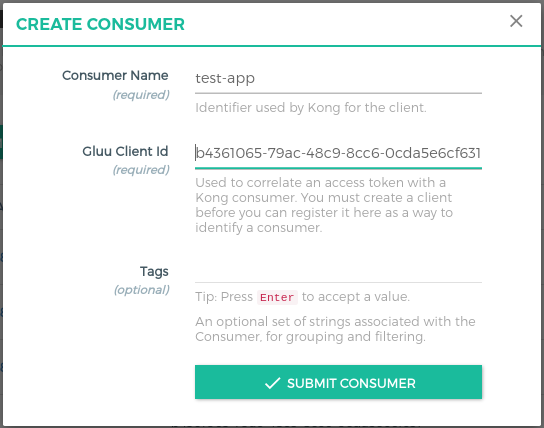
Follow these steps to configure the consumer using GG UI:
-
Click
CONSUMERSon the left panel in GG UI -
Click on the
+ CREATE CONSUMERbutton and addclient_idin theGluu Client Idfield. This is the same client that you are using in the Angular App. We need to register this clientsclient_idinto Gluu Gateway Consumer so it will only allow this client to access protected resources.
Configuration is finished here. Now you need to call the protected API using GG Kong Proxy Endpoint.
Request to Proxy
GG Kong expose the proxy endpoint on the port :443 so you just need to call api in your angular app and pass access_token in authorization header.
As per my configuration, I am calling proxy endpoint like https://gluu.local.org:443/posts with access_token in authorization header.
Below code is the angular code to call GG Proxy Endpoint:
this.http.get('https://gluu.local.org:443/posts',
    {headers: {authorization: 'Bearer ' + this.accessToken}}
)
      .subscribe((response) => {
        this.images = response;
      }, (error) => {
        console.log(error);
      });
If all is ok then you will get response from the GG.
Thank you !!!