Upgrading bladeRF firmware - junaid124/bladeRF GitHub Wiki
This page describes how to update the firmware on the bladeRF.
Pre-built firmware is hosted on the nuand website. The latest firmware is pointed to by: http://nuand.com/fx3/latest.img. Make note of any library or FPGA dependencies provided on the FX3 firmware download page.
Below are a few approaches for upgrading the bladeRF firmware. The first method listed here is the easiest method.
However, some firmware versions are incompatible with the current tools. If know or suspect your firmware to be earlier than version 1.5.3 or run into errors while trying to upgrade the firmware, it is recommended that you try the second approach of upgrading via the bootloader.
"Don't Panic!" - Unless you're loading custom firmware that incorrectly configures device pins, it's generally not possible to "brick" the device. If a failure occurs during he firmware update process, you should always be able to recover via the FX3 bootloader.
Before continuing, ensure you've...
- Installed all libraries and utilities, per the Getting Started Guides.
- Downloaded the latest FX3 image. In Linux:
$ wget http://nuand.com/fx3/latest.img
The bladeRF-cli program may be used in Linux, Mac OSX, and Windows (from cmd.exe) to upgrade firmware.
- Write the firmware to the bladeRF's SPI flash. Enabling verbose output here will result in the SPI flash block erases and page read/write operations being printed out. Remove the
-v verboseportion of this command to suppress that information.$ bladeRF-cli -f latest.img -v verbose
- When the write operation completes, power-cycle the device.
- The interactive mode command,
versionshould now reflect the new firmware version:
$ bladeRF-cli -i
bladeRF> version

  bladeRF-cli version:        0.10.8-git-c4bb11d
  libbladeRF version:         0.15.0-git-c4bb11d

  Firmware version:           1.6.1-git-b7e6642
  FPGA version:               Unknown (FPGA not loaded)
The bladeRF is configured to fall back to a USB bootloader if valid firmware is not in SPI flash. By placing a jumper across one of the SPI communication pins, it is possible to force the SPI boot to fail and place the device into bootloader mode. From there, one can load and execute bladeRF firmware, and then follow the above procedure to write the firmware to SPI flash.
- Unplug all bladeRF devices from your machine.
- If you are powering the device(s) from a DC barrel jack, ensure this is disconnected.
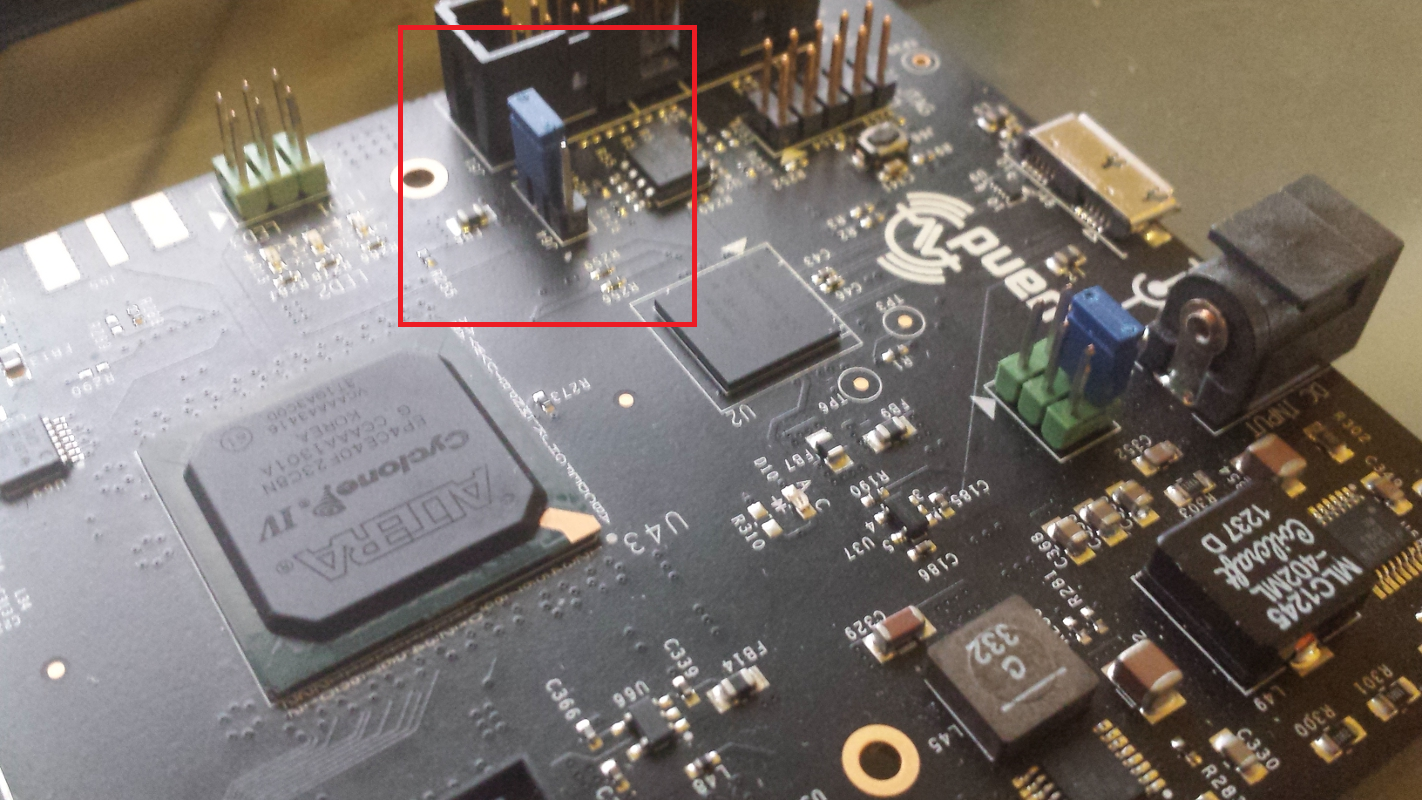
- Connect a jumper on J64, as shown in the below image.
- This forces the loading of firmware from SPI flash to fail, which results in the device falling back to the USB bootloader.
- Power the board on.
- You should see the bootloader enumerate as
04b4:00f3 Cypress Semiconductor Corp.in dmesg output, or a CypressWestBridgedevice in Device Manager.- Windows Users: Windows will automatically install the CYUSB3 driver for this bootloader. This will work with the Cypress Control Center utility shipped with the FX3 SDK , as shown in this video. To recover the device as shown below, you will need to use Zadig (as you did when following the Getting Started Guide) to associate the VID/PID of the Cypress bootloader with a libusb-driver (libusbK or WinUSB) before continuing on.
- You should see the bootloader enumerate as
-
Remove the jumper on J64.
- This is very important, as otherwise the SPI flash writes will not be able to succeed in the following steps.
- From a shell (or cmd.exe), run
bladeRF-cli -i.- You should now be at a bladeRF> prompt, with a message indicating that the bootloader detected via a string like: [INFO] Found FX3 bootloader device on bus=1 addr=10. This may be a bladeRF.
- All of the following commands should be entered in the bladeRF-cli's prompt -- not from your shell.
- Run
recover <bus> <addr> <path to firmware>- bus and addr are the values shown in your [INFO] message, and path to firmware is the path to the firmware you want to load.
- This command does not write the firmware to flash; it only loads it into RAM. We will write the firmware to the SPI flash in the next two steps.
- Run
open.- This will attach to the first available bladeRF. Specifically, this will attach to the device that you just booted bladeRF firmware on via the recover command.
- Run
load fx3 <firmware>.- This will will write the firmware to SPI flash.
- Unplug and replug the device.
- A power cycle is required to boot the new firmware.
This video also shows a procedure to that outlined above, but using the Cypress Control Center (provided with the FX3 SDK) to load firmware, instead of using the bladeRF-cli.
When running the Windows installer (see the Windows Getting Started guide), the option to upgrade the firmware is provided:

To upgrade firmware at a later time, the bladerf_winflasher.exe program, included with the installation, may be used. This program uses CyUSB API, so an unsigned driver is required for it to work. It is generally located in: C:\Program Files (x86)\bladeRF\bladerf_winflasher.exe.
Remember to power cycle the device after running this program.