Getting Started - jordanbtucker/ff7r-data-editor GitHub Wiki
To get started with Final Fantasy VII Remake Data Editor to make a mod, you'll need to understand a few topics and set up some tools. This is an overview of the workflow. Details on how to set up these tools will be provided further down the page.
The Data Editor works on the raw *.uasset and *.uexp game files. Those files
are contained inside the *.pak files in the game's installation folder. There
are two primary tools used to extract the *.uasset and *.uexp files from the
*.pak files, UE Viewer (also
known as UModel) and QuickBMS.
With the *.uasset and *.uexp files extracted, you'll be able to use Final
Fantasy VII Remake Data Editor to make changes to values in those files.
Finally, to test those changes in-game, you'll need to create a *.pak file for
your mod. The primary tool to do that is UnrealPak.
I highly recommend joining the OpenFF7R Discord server if you need additional help after reading this article. You can find me there as jordanbtucker#5561.
I recommend organizing your folders to make it easier to find the tools you need. In this article, I'll be using the following folder structure.
- C:\
- Modding\
- FF7R\
- Export\
- Tools\
- Mods\
- Workspace\
- FF7R\
- Modding\
You can use another drive besides C:\.
-
Exports: This is where the exported game files will be kept, and they will
be kept in the same structure as they are stored in the
*.pakfiles. (e.g.Export\End\Content\GameContents\DataObject\Resident\Equipment.uasset.) -
Tools: This is where modding tools and applications will be kept. (e.g.
Tools\ff7r-data-editor-win32-x64\.) - Mods: This is where finished, packaged mods will be kept.
-
Workspace: This is where work on each mod will be done. This folder should
contain a folder for each mod you are working on. (e.g.
Workspace\MyFirstMod\.)
There are two primary tools to used to extract the raw *.uasset and *.uexp
files from the game's *.pak files. For the purposes of using Data Editor,
UE Viewer is recommended since it allows you to browse and choose
which files you want to extract. If you want to extract all of the game's
files, then I recommend the QuickBMS method.
UE Viewer can be used to browse *.pak files and extract specific packages
(*.uasset and related files).
Download UE Viewer from its author's website. Download the latest version of UE Viewer for Win32.

The download is a zip file named umodel_win32.zip. Extract its contents to
Tools\UEViewer\. Your Tools folder should have this structure.
- Tools\
- UEViewer\
- LICENSE.txt
- readme.txt
- SDL2.dll
- SDL2_64.dll
- umodel.exe
- umodel_64.exe
- UEViewer\
Next, you'll need to download an
updated version of UE Viewer patched
for Final Fantasy VII Remake. This will download a zip file named
umodel_FFVII_intergrade_v2.zip. Extract its contents to Tools\UEViewer\.
Your Tools folder should have this structure.
- Tools\
- UEViewer\
- (Original UE Viewer files)
- umodel_FFVII_intergrade_v2.exe
- UEViewer\
Now, you're ready to extract the *.uasset and *.uexp files from the game's
*.pak files.
Run Tools\UEViewer\umodel_FFVII_intergrade_v2.exe. Press the browse folder
button, and select the folder where Final Fantasy VII Remake is installed. (The
default location is C:\Program Files\Epic Games\FFVIIRemakeIntergrade\.)
Finally, press OK.
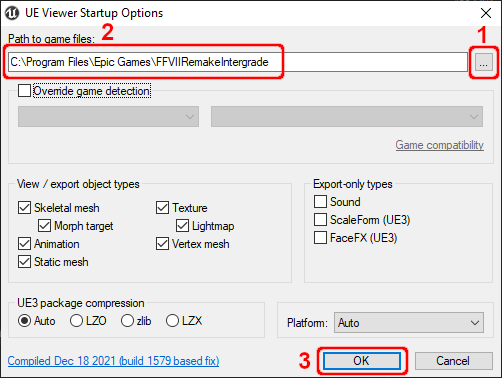
UE Viewer will ask for an encryption key. Copy and paste the following text into the textbox, then press Ok.
0x23989837645C9D28BA58072B2076E895B853A7C9E1C5591B814C4FD2A2D7B782

After UE Viewer locates and checks the game's *.pak files, another window will
open. On this window, you can choose which files you want to extract. For this
tutorial, use the folder tree on the left to select
End\Content\GameContents\DataObject\Resident\. Find Equipment.uasset in the
list on the right, right-click it, and select Save packages.

On the next window, use the browse folder button to select your Export folder.
Ensure that Keep directory structure is checked, then press OK.

This will save the *.uasset and *.uexp files for the selected packages. Your
Export folder should have the following strcuture.
- Export\
- End\
- Content\
- GameContents\
- DataObject\
- Resident\
- Equipment.uasset
- Equipment.uexp
- Resident\
- DataObject\
- GameContents\
- Content\
- End\
QuickBMS can be used to fully extract the contents of *.pak files. Follow
these steps to extract all of the game files for Final Fantasy VII Remake.
Note: You'll need around 200 GB of free space to extract the entire game.
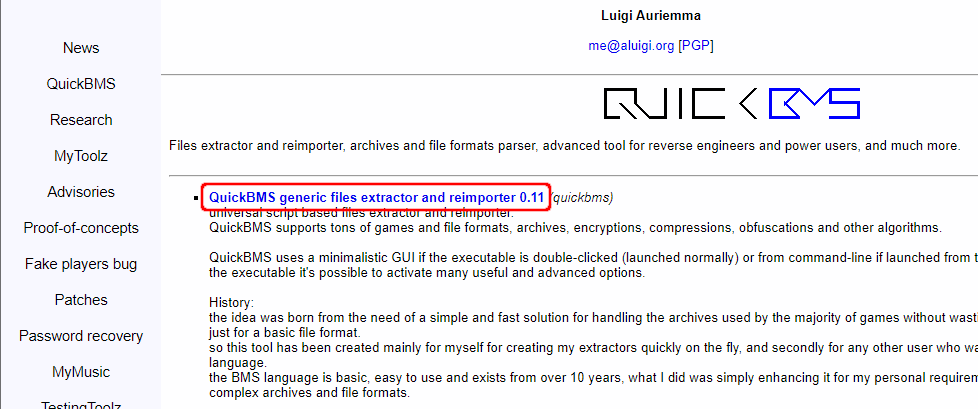
Download QuickBMS from its author's website.
The download is a zip file name quickbms.zip. Extract its contents to
Tools\QuickBMS\. Your Tools folder should have this structure.
- Tools\
- QuickBMS\
- changelog.txt
- quickbms_4gb_files.exe
- quickbms.exe
- quickbms.txt
- reimport_4gb_files.bat
- reimport.bat
- reimport2_4gb_files.bat
- reimport2.bat
- reimport3_localizations.bat
- QuickBMS\
Next, download the BMS script used for extracting the game
files. (You may need to right-click the link to save it.) This download is a BMS
script named ff7r.bms. Save it to your QuickBMS folder. Your Tools folder
should have this structure.
- Tools\
- QuickBMS\
- (Original QuickBMS files)
- ff7r.bms
- QuickBMS\
Run Tools\QuickBMS\quickbms_4gb_files.exe. A window will open, prompting you
to choose a BMS script. Select ff7r.bms in your QuickBMS folder, then press
Open.
Another window will open, prompting you to choose the *.pak files you want to
extract. Navigate to your game's Paks folder. (The default location is
C:\Program Files\Epic Games\FFVIIRemakeIntergrade\End\Content\Paks\.) Select
all of the game's *.pak files. They should start with pakchunk0. Do not
select any other *.pak files in case you have any mods installed. Finally,
press Open.
A third window will open, prompting you to choose where you want to save the
extracted files. Navigate to your Export folder, then press Save.
Each *.pak file will take several minutes to extract depending on your
computer's resources.
Now you're finally ready to make a mod. For this tutorial, we'll make a mod that
changes the stats of the Buster Sword so it gives Cloud an additional 99 Attack
Power instead of the default 22. We'll call this mod OPBusterSword.
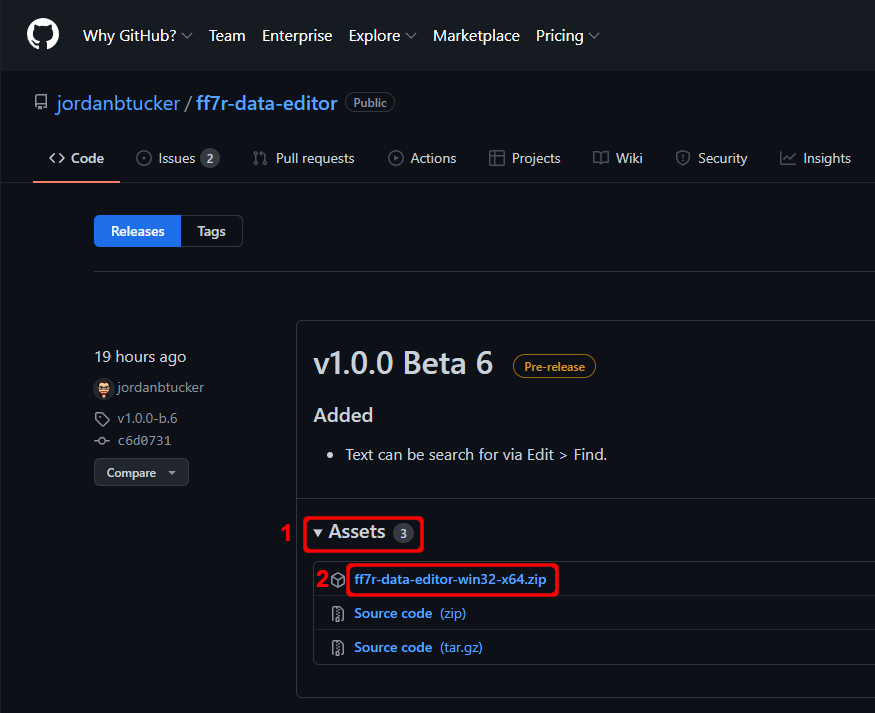
Download Final Fantasy VII Remake Data Editor from its
Releases page.
Expand the Assets section of the latest realease, then download the
ff7r-data-editor-win32-x64.zip file.
Extract the contents of the zip file to your Tools folder. Your Tools folder
should have this structure.
- Tools\
- (Other modding tools)
- ff7r-data-editor-win32-x64\
- ff7r-data-editor.exe
- (Other Data Editor files)
Next, we'll set up the mod folder. Create a folder named OPBusterSword in your
Workspace folder. Then, copy the *.uasset and *.uexp files you want to
modify from your Export folder into the OPBusterSword folder while keeping
the same folder structure where those *.uasset and *.uexp files are located.
Don't copy all of the *.uasset and *.uexp files. Only copy the ones you plan
on modifying and including in your mod.
We'll be modifying Equipment.uasset and Equipment.uexp, which are located in
End\Content\GameContents\DataObject\Resident\. Your Workspace folder should
have this structure.
- Workspace\
- OPBusterSword\
- End\
- Content\
- GameContents\
- DataObject\
- Resident\
- Equipment.uasset
- Equipment.uexp
- Resident\
- DataObject\
- GameContents\
- Content\
- End\
- OPBusterSword\
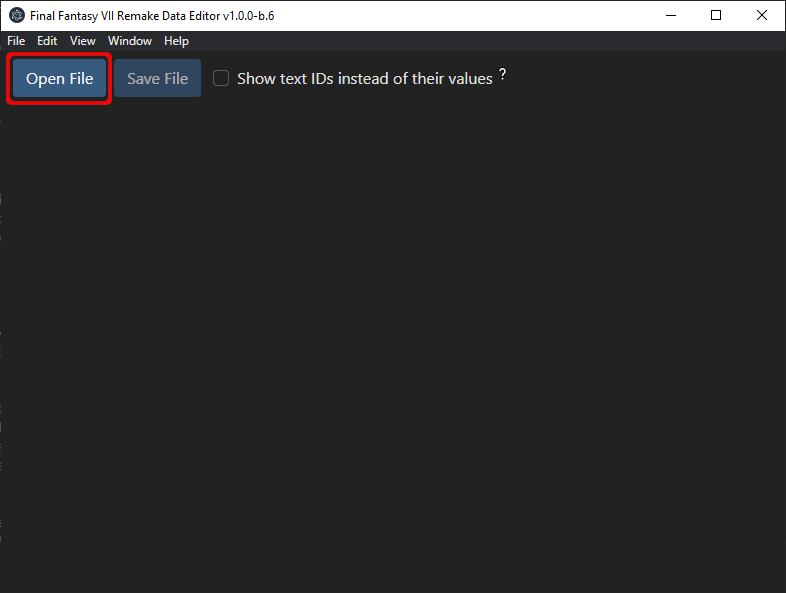
Run Tools\ff7r-data-editor-win32-x64\ff7r-data-editor.exe. You'll be presented
with a mostly blank window except for a few buttons. Press Open File. (You
can also open files via the File menu or by using the keyboard shortcut
CTRL+O.)
A window will open, prompting you to select a *.uasset file. Navigate to
Workspace\OPBusterSword\End\Content\GameContents\DataObject\Resident\, select
Equipment.uasset, then press Open.
Data Editor will read the entries from Equipment.uasset and Equipment.uexp
(the files are linked) and present them on screen.
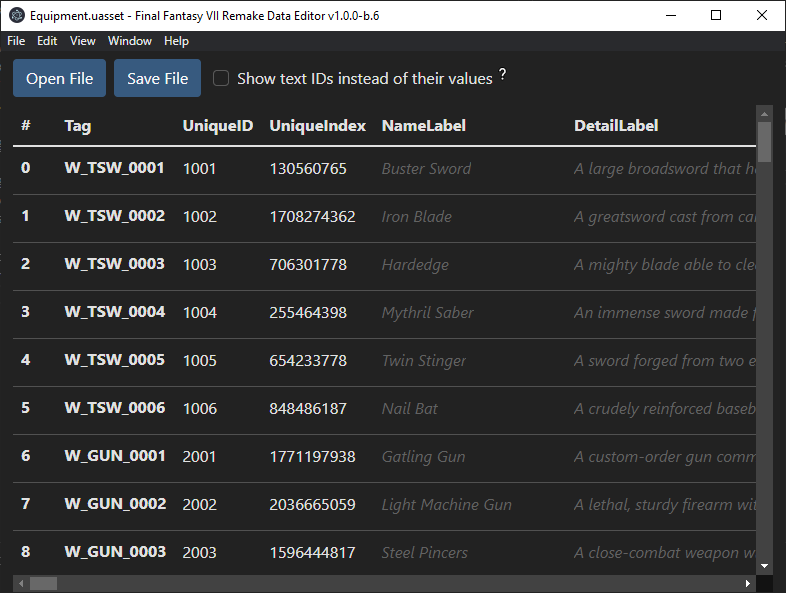
Equipment.uexp contains a DataObject, which is a table of information. Each
row represents an entry in the DataObject, and each column represents a
property for that entry. Some properties are arrays (or lists) of information.
The first column, with the header #, represents the index of each entry.
Each entry in a DataObject also has a Tag, which Data Editor does not
support modifying. The remaining columns represent the properties of the entries
in the DataObject, and they may be different depending on *.uasset file you
open.
Each property has a name and a type. All entries in a DataObject share the
same property names and types, but each entry can have a different value for
each property. The type of the property determines what kinds of values it can
have.
Properties have three basic types:
- Strings (or text). These cannot be modified by Data Editor yet.
- Numbers of different allowed ranges. These can be modified within their allowed ranges, but Data Editor cannot change the number's range yet.
-
Names, which are text values restricted to a list contained in the
*.uassetfile. These can be changed to other names in the list, but Data Editor cannot add or remove names from the list yet. - Arrays (or lists). All values in an array share the same type. (i.e. an array can have numbers, or an array can have names, but an array cannot have both numbers and names.) Array property names end with _Array. Array values can be modified, but Data Editor cannot modify the size or type of arrays yet.
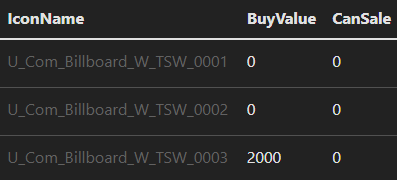
Values that cannot be modified are displayed with a dimmer color. Notice in this example that IconName cannot be modified while BuyValue and CanSale can.
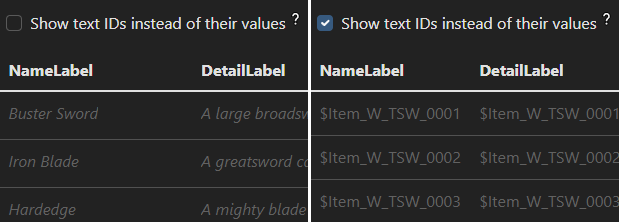
Some string values are stored as IDs that reference other text. (e.g. the ID
$Item_W_TSW_0001 references the text Buster Sword.) Data Editor
automatically displays the referenced text instead of the ID by default.
Referenced text is displayed in italics while IDs are not. You can switch
between displaying IDs and referenced text by checking or unchecking Show text
IDs instead of their values. You can also hover over the text to see its ID or
value.
Now that you understand how a DataObject is structured, let's make some
changes to Equipment.uexp. Find the entry for Buster Sword. (Ensure Show
text IDs instead of their values is unchecked.) Note that its index is 0.
Next, scroll to the right to find the AttackAdd column. The property headers
and index column will stay in place as you scroll to help you keep track of
which value you're modifying. You can also use TAB,
SHIFT+TAB, and the arrow keys to navigate the values.
Change the value to 99, then press TAB.

Notice that the value gets a green border indicating that the value has been changed from its original value (at least since the last time this file was opened).
Now, change the value to 3 billion (3000000000). Notice that that value gets a
red border indicating an error. Hover over the value to see that the value must
be within a specific range for that property.
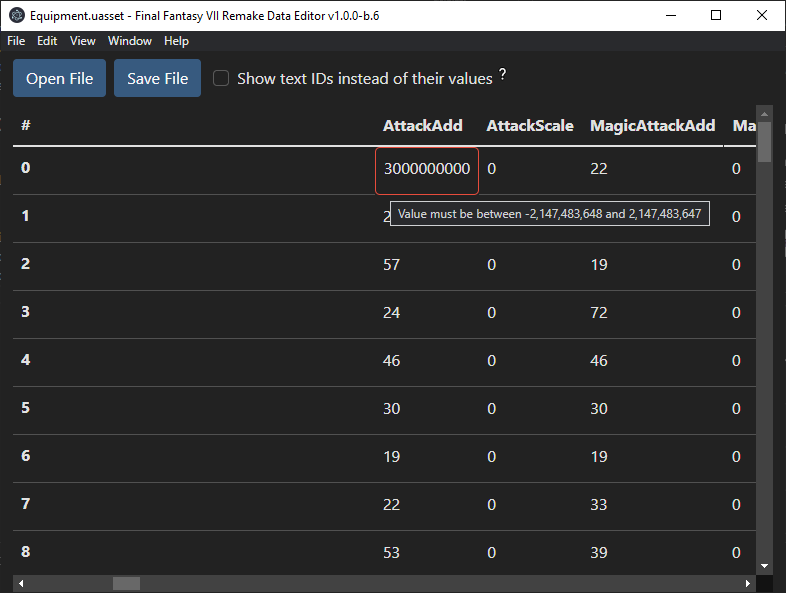
Change the value back to 99, then press Save File. (You can also use the
File menu or the keyboard shortcut CTRL+S.)
A window will open, prompting you to choose where to save your file. Ensure you
are in Workspace\OPBusterSword\End\Content\GameContents\DataObject\Resident\
and overwrite the Equipment.uexp file.
Now your mod is ready to package into a *.pak file.
In order for the game to recognize the changes you make to *.uasset and
*.uexp files, they must be packaged into a *.pak file and put into your
game's Paks folder. The primary tool for packing a mod is UnrealPak.
Download UnrealPak. The download is a zip file named
unrealpak.zip. (The file was originally a *.rar file from
FluffyQuack's website, but I've repackaged it as
a *.zip file so it can be extracted by Windows Explorer.) Extract the contents
of the zip file to Tools\UnrealPak\. Your Tools folder should have this
structure.
- Tools\
- (Other modding tools)
- UnrealPak\
- readme.txt
- UnrealPak-With-Compression.bat
- UnrealPak-Without-Compression.bat
- UnrealPak.exe
- UnrealUnpak.bat
Next, drag the mod folder inside your Workspace folder onto
UnrealPak-With-Compression.bat. (e.g. if your mod folder is
Workspace\OPBusterSword\, drag the OPBusterSword folder onto
UnrealPak-With-Compression.bat.)
This will create a *.pak file with the same name as your mod folder inside
your Workspace folder. (e.g. it will create Workspace\OPBusterSword.pak.)
Copy the *.pak file into your game's Paks\~mods\ folder. (The default
location is
C:\Program Files\Epic Games\FFVIIRemakeIntergrade\End\Content\Paks\~mods\.) If
the ~mods folder does not exist, create it.
Note: You can put *.pak files into any location beneath the game's Paks
folder, however the order of the files matters. Mod *.pak files should be
loaded after the game's *.pak files, so putting mod *.pak files inside
Paks\~mods\ ensures that they are loaded last.
Note: When creating a *.pak file with UnrealPak, a folder named Engine
will be created in your Modding folder (if you set up your folder structure as
recommended in
Setting Up Your Folder Structure). This is
a side effect, and you can safely delete the Engine folder.