EDKII Network Over QEMU - jljusten/tianocore GitHub Wiki
In order to validate the EDK II Network Stack via QEMU, you should review information on how to run the OVMF platform. OVMF can execute the EDK II network stack in a virtual platform. Please refer to the QEMU Networking documentation for additional information.
The OVMF platform includes the EDK II network stack by default. For additional info, please refer to the network support section of the OvmfPkg README. Several build flags are required to enable the network stack in the binary firmware image (OVMF.fd):
build -p OvmfPkg\OvmfPkgX64.dsc -a X64 -t VS2013x86 -b RELEASE -D E1000_ENABLE -D DEBUG_ON_SERIAL_PORT -D SOURCE_DEBUG_ENABLE
-D E1000_ENABLE enables the Intel E1000 NIC driver. -D DEBUG_ON_SERIAL_PORT enables serial port debug. -D SOURCE_DEBUG_ENABLE enables source level debug.
OVMF serves as the QEMU guest. From the introduction of networking within QEMU, you must select one virtual network device for the guest (e.g. e1000, virtio-net-pci, i82557b (e100)). Then, network backend is necessary to select for the packets interaction with the emulated NIC (e.g. tap). The tap network backend is recommended, since the guest needs to participate on the network for feature verification.
The example below specifies the network backend and virtual network device. The -netdev flag specifies one type of network backend, and the -device flag creates a virtual network device:
qemu-system-x86_64 \
-netdev tap,id=hostnet0,ifname=tap0,script=no,downscript=no \
-netdev tap,id=hostnet1,ifname=tap1,script=no,downscript=no \
-netdev tap,id=hostnet2,ifname=tap2,script=no,downscript=no \
-device e1000,netdev=hostnet0 \
-device virtio-net-pci,netdev=hostnet1 \
-device i82557b,netdev=hostnet2
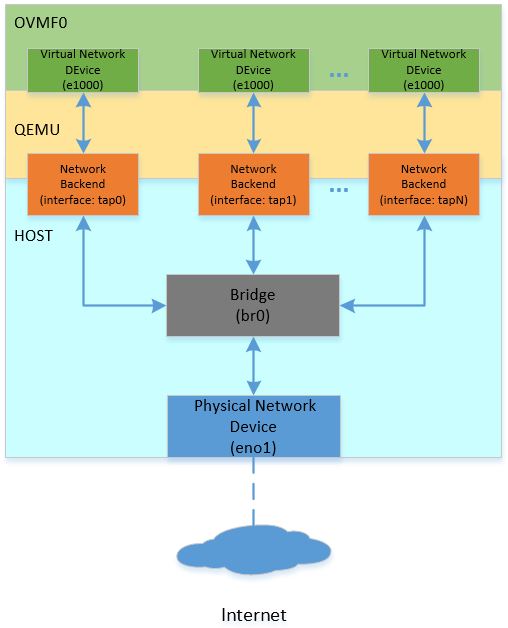
In order to verify EDKII network feature via QEMU, the following network topology can be leveraged.

The topology in the diagram creates three OVMF guests on one host system, and bridges all guests to the physical interface. Different host system has the different way to create the virtual interface for the network backend and setup the bridge connection for the traffic between OVMF and with the outside world. On Linux-based system, brctl and tunctl are recommended to you for such configuration. The example below is based on Ubuntu 16.04 LTS:
sudo apt-get install bridge-utils   /// Install brctl for the bridge creation.
sudo apt-get install uml-utilities  /// Install tunctl for the interface creation.

sudo brctl addbr br0                /// Create one bridge named as br0.
sudo brctl addif br0 eno1           /// Bridge eno1 (physical network) to br0.
sudo ifconfig eno1 up
sudo dhclient br0

sudo tunctl -t tap0 -u <username>   /// Create new interface named as tap0 for user.
sudo brctl addif br0 tap0           /// Bridge tap0 to br0.
sudo ifconfig tap0 up
...
You can also refer to the opensuse help page available at opensuse.org.
Serial through file, console or remote TCP port can be used to trace the issue. OVMF also supports source level debug using the Intel® UEFI Development Kit Debugger Tool.
For OVMF, each virtual network device (e.g. e1000, virtio-net-pci, i82557b) can utilize an included iPXE stack (ROMFILE) and UEFI networking. iPXE is enabled by default. You can use the "romfile=" to disable the iPXE support so OVMF only utilizes the EDK II network stack.
qemu-system-x86_64 \
-global e1000.romfile="" \
-global virtio-net-pci.romfile="" \
-global i82557b.romfile=""
The full QEMU command to run OVMF1 using the topology above is shown as follows:
qemu-system-x86_64 \
  \
  -machine q35 \
  -m 8192 \
  -hda fat:/var/qemuDir \
  -pflash OVMF1.fd \
  -global e1000.romfile=""\
  -netdev tap,id=hostnet0,ifname=tap0,script=no,downscript=no \
  -device e1000,netdev=hostnet0
The table below lists the stack modules:
| Virtual Network Device | virtio (iPXE) | virtio (Native) | e1000 (iPXE) | e1000 (Native) | i82557b (iPXE) | i82557b (Native) |
|---|---|---|---|---|---|---|
| UNDI | efi-virtio.rom | VirtioPciDeviceDxe | efi-e1000.rom | E3522X2.EFI | efi-eepro100.rom | UndiRuntimeDxe |
| SNP | efi-virtio.rom | VirtioNet | efi-e1000.rom | SnpDxe | efi-eepro100.rom | SnpDxe |
| MNP | MnpDxe | MnpDxe | MnpDxe | MnpDxe | MnpDxe | MnpDxe |
| HTTP Boot | Pass | Pass | Pass | Pass | Pass | Failure |
To run an i82557b native test, the UndiRuntimeDxe module must be included in the OVMF DSC/FDF files:
OptionRomPkg/UndiRuntimeDxe/UndiRuntimeDxe.inf
During i82557b native verification, you may encounter issues. For information on known issues, please refer to https://bugzilla.tianocore.org/show_bug.cgi?id=609.
The topology described above creates multiple OVMF guests to create a virtual cluster in one host. Another option creates multiple virtual network devices in one OVMF guest for verifying network scalability. The topology is shown as follows:

The QEMU command to create multiple virtual network devices in one OVMF session is shown as follows:
qemu-system-x86_64 \
-netdev tap,id=hostnet0,ifname=tap0,script=no,downscript=no \
-netdev tap,id=hostnet1,ifname=tap1,script=no,downscript=no \
-netdev tap,id=hostnet2,ifname=tap2,script=no,downscript=no \
...
-netdev tap,id=hostnetX,ifname=tapX,script=no,downscript=no \
\
-device e1000,netdev=hostnet0 \
-device e1000,netdev=hostnet1 \
-device e1000,netdev=hostnet2 \
...
-device e1000,netdev=hostnetX \
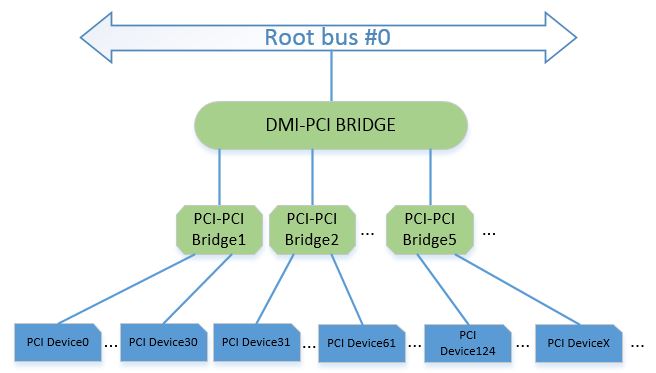
Due to a limit on PCI bus slots, there is a limit of less than 32 virtual network devices. There is a solution documented here: https://github.com/qemu/qemu/blob/master/docs/pcie.txt. PCI hierarchy is shown as follows:

This layout is reflected in the corresponding QEMU commands:
qemu-system-x86_64 \
-machine q35 \
\
-netdev tap,id=hostnet0,ifname=tap0,script=no,downscript=no \
-netdev tap,id=hostnet1,ifname=tap1,script=no,downscript=no \
-netdev tap,id=hostnet2,ifname=tap2,script=no,downscript=no \
...
-netdev tap,id=hostnetX,ifname=tapX,script=no,downscript=no \
\
-device i82801b11-bridge,id=dmi-pci-bridge \
-device pci-bridge,id=bridge-1,chassis_nr=1,bus=dmi-pci-bridge \
-device pci-bridge,id=bridge-2,chassis_nr=2,bus=dmi-pci-bridge \
-device pci-bridge,id=bridge-3,chassis_nr=3,bus=dmi-pci-bridge \
...
-device pci-bridge,id=bridge-X,chassis_nr=X,bus=dmi-pci-bridge \
\
-device e1000,netdev=hostnet0,bus=bridge-1,addr=0x1.0 \
-device e1000,netdev=hostnet1,bus=bridge-1,addr=0x2.0 \
-device e1000,netdev=hostnet2,bus=bridge-1,addr=0x3.0 \
...
-device e1000,netdev=hostnet30,bus=bridge-1,addr=0x1f.0 \
\
-device e1000,netdev=hostnet31,bus=bridge-2,addr=0x1.0 \
-device e1000,netdev=hostnet32,bus=bridge-2,addr=0x2.0 \
-device e1000,netdev=hostnet33,bus=bridge-2,addr=0x3.0 \
...
-device e1000,netdev=hostnet61,bus=bridge-2,addr=0x1f.0 \
\
...
The command above use Q35 for a larger IO space. In this PCI hierarchy, a DMI-PCI bridge is plugged into the root bridge, then PCI-PCI bridges are attached to the DMI-PCI bridge. The PCI-PCI bridges are used to attach all required PCI devices, so each PCI device has its own slot.
- EDKII Network Getting Started Guide: https://github.com/tianocore/tianocore.github.io/wiki/NetworkPkg-Getting-Started-Guide
- Networking within QEMU: https://wiki.qemu.org/Documentation/Networking
- QEMU Command: https://qemu.weilnetz.de/doc/qemu-doc.html
- OVMF Introduction: https://github.com/tianocore/tianocore.github.io/wiki/ovmf
- OvmfPkg README: https://github.com/tianocore/edk2/tree/master/OvmfPkg
- UEFI HTTP Boot with OVMF: https://en.opensuse.org/UEFI_HTTPBoot_with_OVMF
- Intel® UEFI Development Kit Debugger Tool: https://firmware.intel.com/develop/intel-uefi-tools-and-utilities/intel-uefi-development-kit-debugger-tool
- PCI hierarchy: https://github.com/qemu/qemu/blob/master/docs/pcie.txt
- QEMU Virtual Network Device (Mailing Thread): https://lists.gnu.org/archive/html/qemu-devel/2017-07/msg01251.html