Contributing - jlbcontrols/Flintium GitHub Wiki
Thank you for considering contributing to Flintium! Here are some of the many ways you can contribute to this project:
Ways to Contribute
Participating in discussions, answering questions
Help guide this project in the right direction by participating in discussions on the Issues Page. Start by introducing yourself on the Intro Issue!
Writing tutorials or examples
This project needs instructional content to help others get up to speed. Any format is welcome, but Flintium Wiki contributions are especially appreciated!
Working on the workflow
Development tools are critically important to the project, and need attention. Currently there are tools to export/import UDTs, roles & users, and to create UDTs from OPC drag/dropped AOI tags. Some sort of testing tools (or at least a test plan) would be a very welcome addition.
Creating tests, testing, or simply using the project and reporting back
Fixing typos, improving documentation, refactoring
Submitting bug reports and feature requests
Developing new features
Project governance
Please share your ideas about how to organize this project, encourage more contributors, promote its use, and help this community succeed. Your contributions to this document are also appreciated. This is a first draft and needs community input.
Issues
Issues are the primary way to collaborate on ideas and plan work on this project. Anyone who wants to help improve Flintium is welcome to create and comment on issues. Labels are added to issues to easily sort and visualize the types of issues. You won't add the label, it will be added for you.
Discussion
Feel free to create an issue to discuss any topic related to the Flintium library, workflow, community, etc. No strict rules other than being respectful and appropriate. These issues will be labeled: 
Feature Issues
New features typically start as issues to decide if/how they should be implemented. Once there is a clear path forward, a much more prescriptive  issue gets created, which is used to plan the work.
Bug Issues
Report bugs by creating a new issue. Please be as descriptive as possible, and always provide a screenshot of the problem if applicable. These issues will be labeled: 
Coordinating Work
Many Ignition project files are stored as binaries, so it can be difficult to merge changes. For that reason, it's best to avoid working on the same template, window, or other binary file, at the same time as another contributor. With that in mind, here are some guidelines that will make coordination easier:
Coordination Guidelines
- If you would like to work on an issue, please mention that in the issue so it can be assigned to you. Also say when you'd like to work on it (roughly).
- List any existing project files (especially binaries) that will be impacted by your work. Update the list if it changes.
- When you actually start working on the issue, write a comment "started work on this issue" to let other contributors know.
- Try to avoid starting work on an issue that you won't have time to finish.
- If you need to stop working on an issue, write a comment "stopped work on this issue" to allow others to work on the impacted files instead.
- If your issue impacts a binary file that someone else is working on, coordinate with them, or avoid making changes to that file.
- Be comfortable repeatedly asking and answering questions like "When do you think you'll be done with issue #123?", or "Do you still need file XYZ?".
- Focus on improving template and code reuse. If a feature exists in multiple templates, create a feature template and re-use it. If there is a slight difference in the feature between templates, make the feature template configurable. That way, when a change to that feature is required, impact is limited to one template. Of course, this strategy needs to be weighed against flexibility and readability, but it is a particularly important consideration for this project.
What if you completed work without creating an issue?
Perhaps you were just testing a concept, or didn't intend to merge your feature into the library. No problem! Create an issue now, and still follow the guidelines above. Ensure your code is based on the latest version, and nobody else is working on any impacted binary files. Then submit a pull request.
Not Familiar with Git?
If you'd like to contribute to this project and make it better, your help is very welcome. Don't worry if you aren't familiar with Git. The majority of industrial automation programmers have never used it. We can help get you up to speed, or incorporate your input another way.
How to Make a Pull Request
Fork Flintium (if you haven't already)
- Create a personal fork by clicking "Fork" on Flintium's Github page: https://github.com/jlbcontrols/Flintium
- Clone the fork on your local machine. Open Git Bash in your local /Ignition/data/projects folder, and run
git clone https://github.com/YOUR_USERNAME/Flintium.git - Note: Your remote repo on Github is called origin.
- Add the Flintium repository as a remote called upstream
git remote add upstream https://github.com/jlbcontrols/Flintium.git
Update your local repo
- If changes have been made upstream since you created your fork, be sure to pull upstream changes into your local repository. Ensure you are on your local master branch, and pull from upstream:
git checkout master
git pull upstream master - Import gateway resources into your local Ignition Gateway (UDTs, instance tags, tag groups, roles, users). See the README for more info. Note: when importing instance tags, please delete all existing instance tags first. Not required for UDTs - existing UDTs are automatically deleted before import when using the ExportImportTag Window.
Implement your changes
- Create a new branch to work on. Branch from master.
git checkout -b "Your-Feature-Branch" - Implement your feature, comment your code.
- Follow the naming conventions of the project.
- Test (we still need to work out how testing should be done).
- Add or change the documentation as needed. Currently, the only documentation is the README.md and Wiki. The Wiki is located in a separate repository. If this is confusing enough for you already, don't worry about the Wiki.
- If your change includes updates to gateway resources (UDTs, instance tags, tag groups, roles, users), export them from Ignition to the appropriate files in your local repository.
- Stage & commit your changes to Your-Feature-Branch. Do this when you are done with changes, or as you make smaller changes along the way. See more details in the Staging and Committing section below, but the basic commands are:
git add PATH/TO/YOUR_CHANGED_FILE
git commit -m "your commit message"
Push to your fork
- Push Your-Feature-Branch to your fork on Github, the remote origin.
git push origin "Your-Feature-Branch"
Create a pull request
- Navigate to the correct branch in your fork on Github
https://github.com/YOUR_USERNAME/Flintium/tree/Your-Feature-Branch - Open a pull request that targets Flintium's master branch.
- Give your pull request a short, descriptive name. This description will show on Flintium's main page commit history.
- Reference the Issue that prompted your change in the pull request description using the "Closes" keyword followed by the issue (ex: Closes #109). Try to maintain a strict 1-to-1 relationship between issues and pull requests.
- Create the pull request.
Pull the change into your local repo
- Once the pull request is approved and merged you can pull the changes from upstream to your local repo and delete
your extra branch(es).
git checkout master
git pull upstream master
git branch -d "Your-Feature-Branch"
Staging and Committing
Staging your changes
When a file in your repository is changed, Git detects the changes, and you have the option to stage the changes.
You can stage changes to a particular file using
git add PATH/TO/YOUR_CHANGED_FILE
The same command works for all changed files in a folder (and child folders, recursive)
git add PATH/TO/YOUR_CHANGES_FOLDER
The path is relative, so sometimes it may be easier to navigate to the folder with changes, open Git Bash in that folder, and run the following command, which stages all the changes in the current folder.
git add .
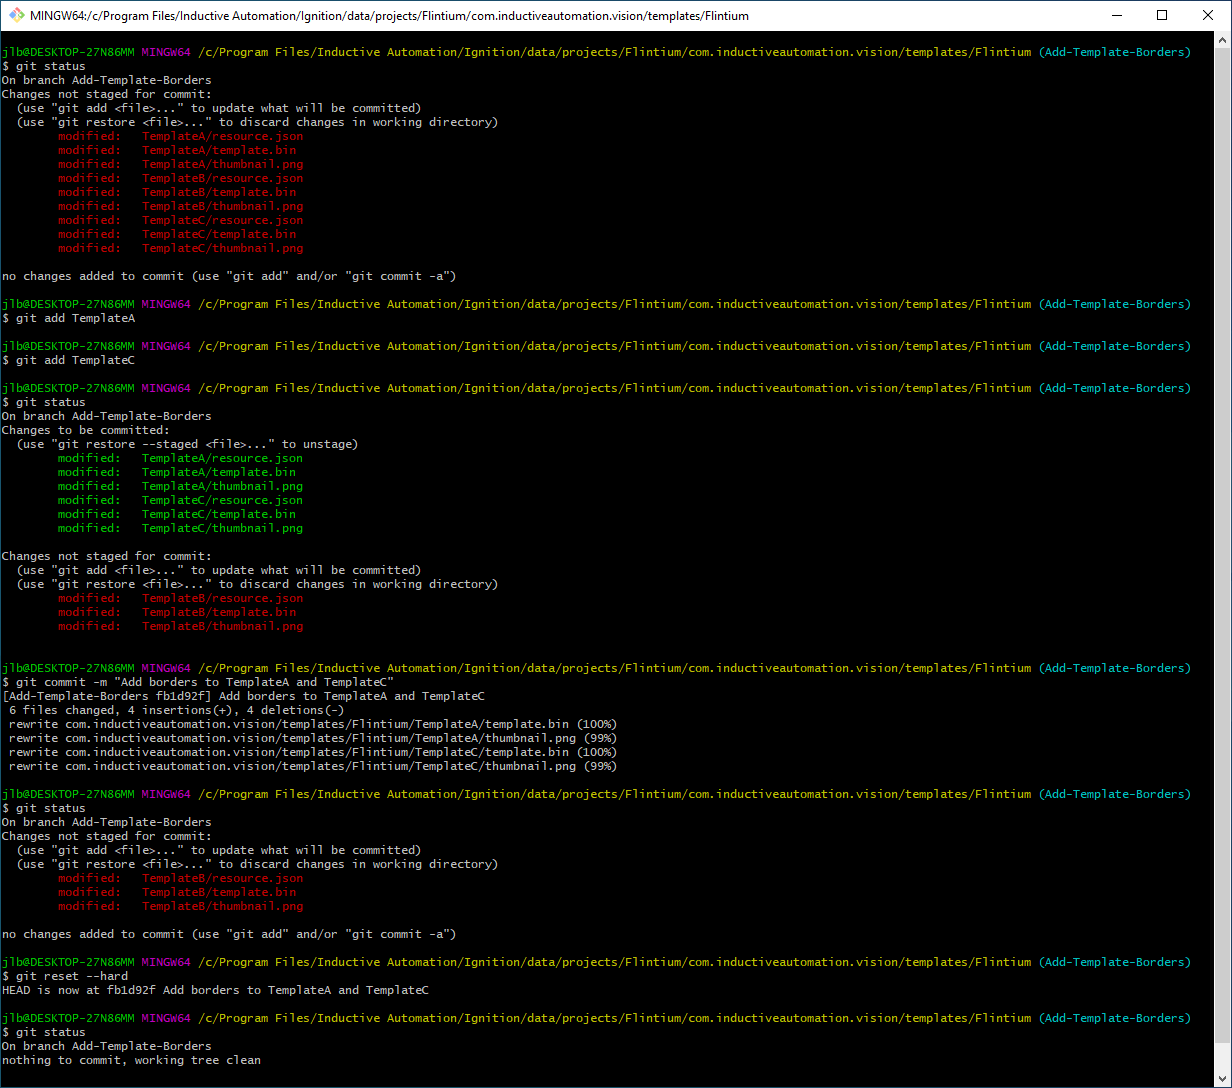
GOTCHA: When you've completed your work, it sounds reasonable to run git add . in your repo's root folder to stage all your changes. Don't do that. Sometimes, Ignition updates files that you didn't make changes to. For instance, if I have TemplateA and TemplateB open, and make changes to TemplateA only, and save the project, I will find changes to both TemplateA and TemplateB in my repository. Make sure you only stage TemplateA files (and any other files that you intended to change).
Using git status
Use the git status command to check for changes to your working files. In Git Bash, unstaged changes will appear in red, and staged changes will appear in green. It helps visualize changes when you are staging files to include in your commit. Its also useful to check status before starting work to ensure your working directory is clean (no changes).
Ignition Files
Ignition will save a resource (like a template) in a folder with multiple files. Template folders contain three files (example below). You can treat the folder as a single unit. If you make a change to TemplateA, just run git add PATH/TO/TemplateA, which will stage any files that were updated.
+-- TemplateA
| +-- resource.json
| +-- template.bin
| +-- thumbnail.png
Committing
To commit all staged changes to your current branch, run
git commit -m "description of what the commit will do, when applied"
Commit messages should be in the present tense. For example "add borders to TemplateA".
Stage and commit example in Git Bash
Code Review
After you've submitted a pull request, you should expect to hear at least a comment within a couple of days. Changes, improvements or alternatives may be suggested. Some things that will increase the chance that your pull request is accepted quickly:
- Write a good and detailed description of what the PR does. If the issue that your PR closes already contains a detailed description, you don't need to repeat it, but add any clarifying details.
- Readable code is better than clever code (even with comments).
- Include comments in scripts, expressions, template properties, and UDTs.
- Include an example of new features using images, or create an example window.