_SKU__DFR0523_Gravity_Peristaltic_Pump - jimaobian/DFRobotWikiCn GitHub Wiki
蠕动泵通过对弹性泵管交替挤压和释放来输送流体,除泵管以外,流体不与泵的任何部件接触,不会污染输送的液体,因此可用来输送各种液体,甚至输送一些带颗粒物的液体。 蠕动泵作为一种计量泵可以方便的进行定量输送,具有广泛的应用场景和使用量,不仅在公民科学等diy项目中有大量应用,且在各种涉水项目中均有相应的应用需求。如水培、滴灌,热带鱼养殖,虾缸环境控制等常规使用。 同时,蠕动泵在食品、医疗等行业中也有着广泛的应用。 我们的这款蠕动泵套件,提供简单易用的Gravity接口、舵机PPM信号的驱动方式,大大简化了使用难度,因此可以方便的使用Arduino、树莓派、micro:bit等控制器进行控制。泵头中的泵管材质为BPT,抗酸碱,寿命长,非普通硅胶管能比。 有了这款蠕动泵,可以实现非常有趣的应用,如酸碱滴定、溶液定量等。在实验室应用中,大量的滴定试验可以用蠕动泵这样的计量泵完成自动化改造,如:水电位滴定、基于指示剂的颜色滴定、基于pH剂的滴定等。
- 驱动板
- 输入电压: 5V-6V
- 最大连续工作电流:1.8A
- 峰值电流:2.5A
- 静态电流:<1mA (无PPM控制信号输入)
- PPM信号分辨率:1us
- PPM信号正脉宽范围:500us-2500us
- 正转脉宽范围:500us-1400us (500us转速最大)
- 停止点脉宽范围:1400us-1600us
- 反转脉宽范围:1600us-2500us(2500us转速最大)
- PWM驱动频率:500 Hz
- 连线接口:Gravity PH2.0-3P
- 板子尺寸: 27.4mm x 28.7mm
- 蠕动泵
- 电机:直流有刷电机
- 工作电压:6V
- 额定功率:5W
- 泵管材质:BPT
- 泵管规格:内径2.5mm,外径4.5mm
- 泵头材质:工程塑料
- 脉动:三滚轮,脉动小
- 流量:≥45ml/min(最大转速)
- 工作条件:环境温度 0~40℃,相对湿度<80%
- 安装方式:平板式
| | |
| ------------------------------------------------------ | |
|
:
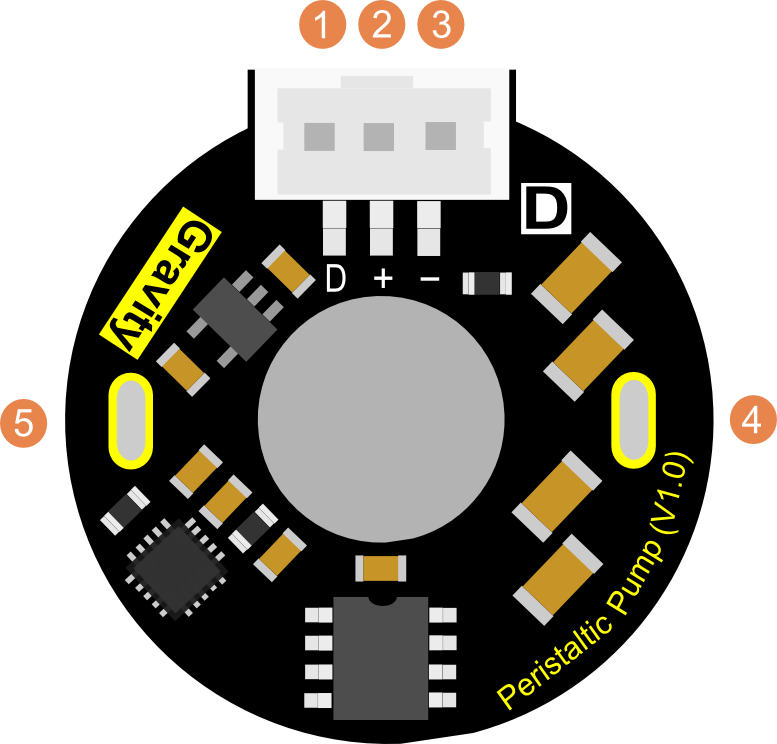
| 标号 | 名称 | 功能描述 |
| 1 | D | 控制信号输入(PPM信号) |
| 2 | + | 电源正极(5~6V) |
| 3 | - | 电源负极(0V) |
| 4 | M- | 电机负极 |
| 5 | M+ | 电机正极 |
蠕动泵驱动板引脚说明
 |
|
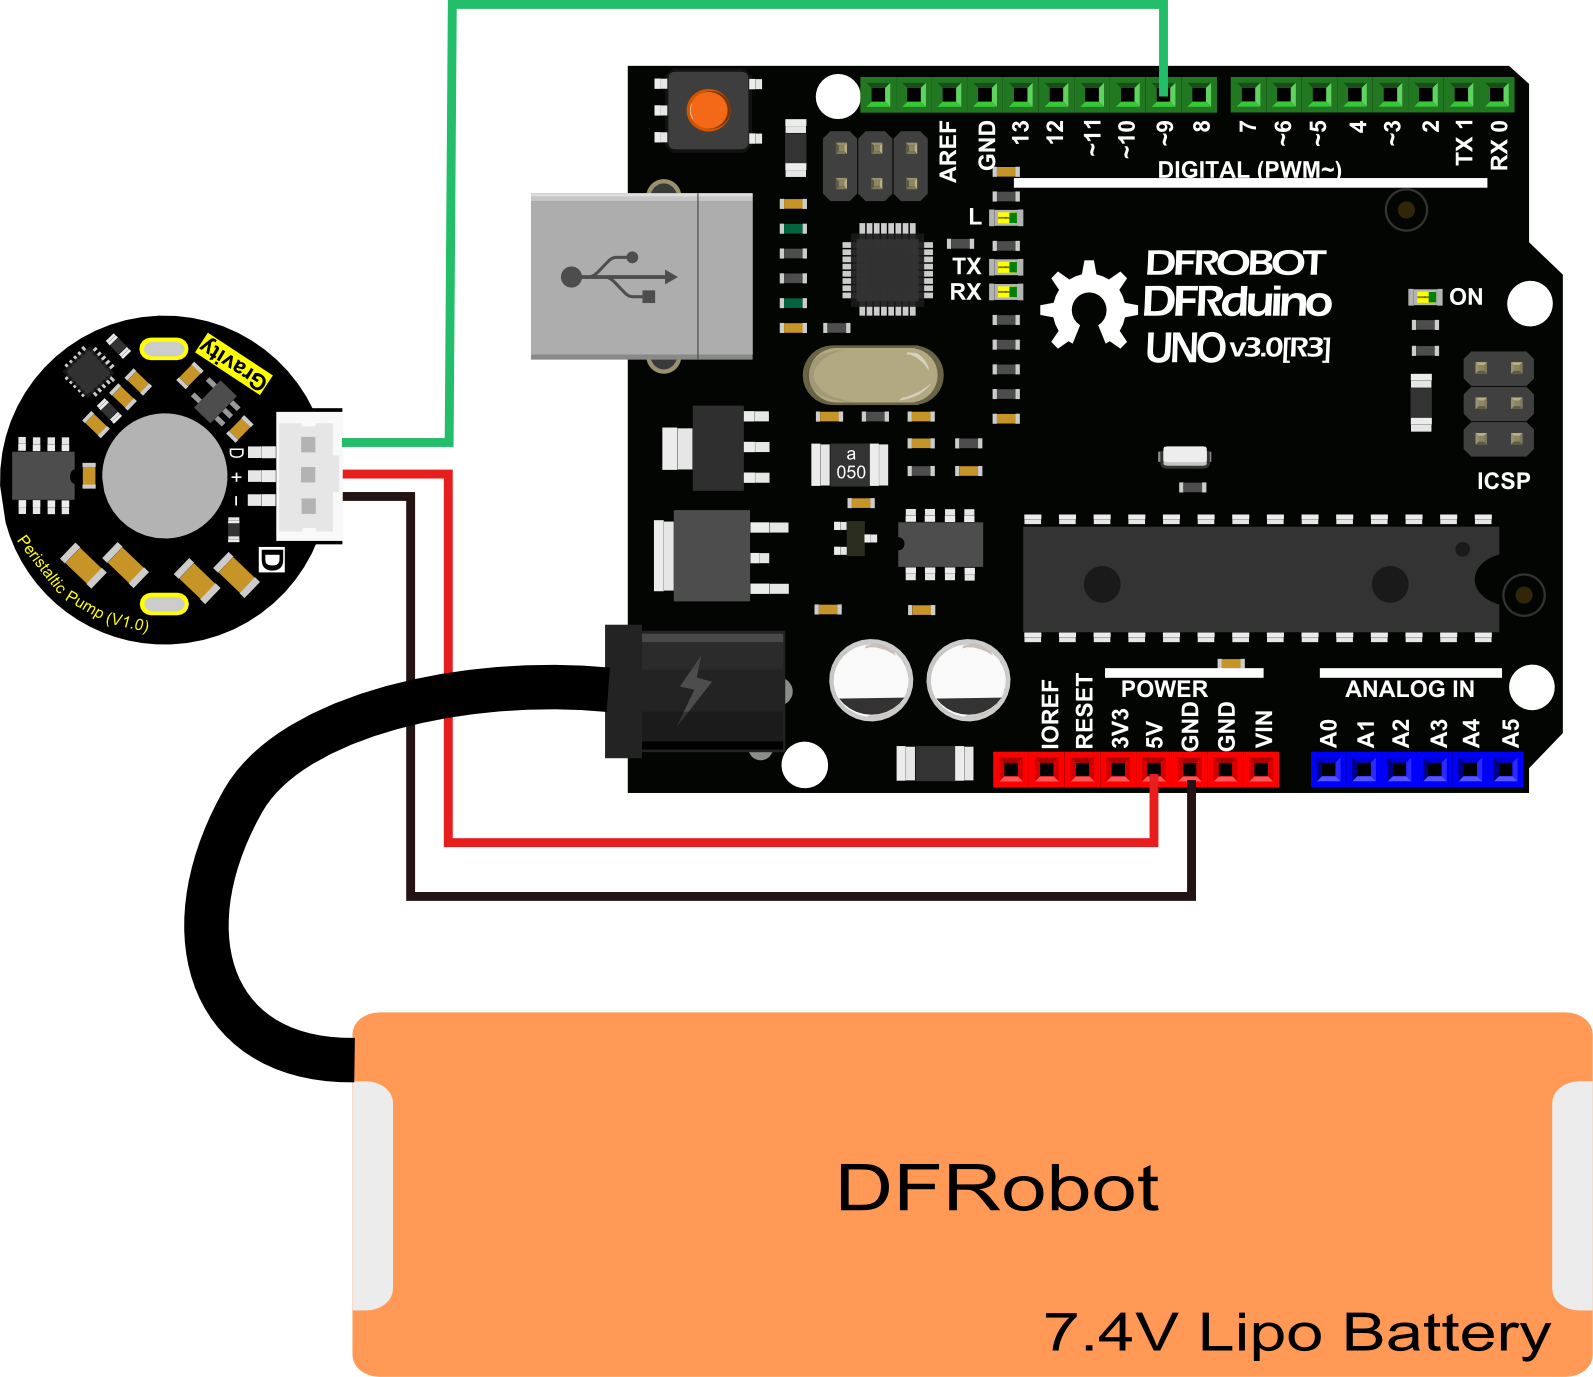
| 由于电机功率(5W)较大,为减小电源电压对电机转速的影响,请务必给主控板或扩展板外接电源! |
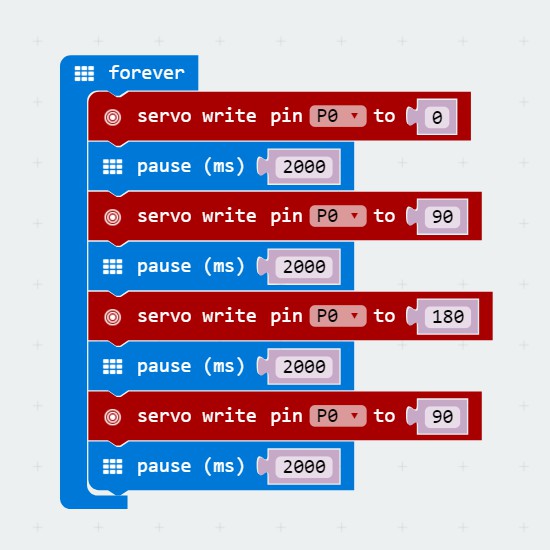
本教程将演示如何让这款蠕动泵产品进行顺时针旋转、停止旋转、逆时针旋转这三个基本功能。 电机驱动板采用舵机的PPM信号进行控制,对应关系如下:
| PPM信号 | 蠕动泵状态(正面观察泵头) |
| 0° | 顺时针最大速度旋转 |
| 90° | 停止 |
| 180° | 逆时针最大速度旋转 |
另外,PPM信号中设置的角度值越靠近0°或180°,则电机转速越快;越靠近90°,则电机转速越慢;因此可根据需要设置合适的角度值进行电机的调速,从而达到控制流速的目的。
-
硬件
- 1 x Arduino UNO控制板(或类似控制板)
- 1 x 蠕动泵电机
- 1 x 蠕动泵泵头
- 1 x 5~7V外接电源
- 1 x Gravity 3Pin数字连接线(或杜邦线)
-
软件
- Arduino IDE(1.0.x或1.8.x), 点击下载Arduino IDE
|
/***************************************************
 DFRobot Gravity: Peristaltic Pump
 <https://www.dfrobot.com/wiki/index.php/Gravitry: Peristaltic Pump SKU:DFR0523>

 ***************************************************
 This sample code shows 3 states: clockwise maximum speed rotation; stop; counterclockwise maximum speed rotation

 Created 2017-12-25
 By Jason <[email protected]@dfrobot.com>

 GNU Lesser General Public License.
 See <http://www.gnu.org/licenses/> for details.
 All above must be included in any redistribution
 ****************************************************/

 /***********Notice and Trouble shooting***************
0   -> clockwise maximum speed rotation
90  -> stop
180 -> counterclockwise maximum speed rotation
 ****************************************************/

#include <Servo.h>

Servo myservo;

#define PUMPPIN 9    //peristaltic pump control pin, connect to arduino digital pin 9
#define waitTime 2000 //interval time(ms) between every state

void setup()
{
  myservo.attach(PUMPPIN);
}

void loop()
{
    myservo.write(0);   //Clockwise maximum speed rotation
    delay(waitTime);
    myservo.write(90);  //Stop
    delay(waitTime);
    myservo.write(180); //Counterclockwise maximum speed rotation
    delay(waitTime);
    myservo.write(90);  //Stop
    delay(waitTime);
}
|}
上传样例代码后,可看到蠕动泵开始工作,每隔2秒,不断的在顺时针最大速度旋转、停止、逆时针最大速度旋转这三个状态之间切换。
本蠕动泵可以的专门库详见github链接
https://github.com/DFRobot/GravityPump
|
#include "GravityPump.h"
#include "Button.h"//https://github.com/DFRobot/Button

GravityPump pump;
Button button;
bool run = true;
int debug = 1;

void setup()
{
    pump.setPin(9);
    button.init(2);
    Serial.begin(115200);
    pump.getFlowRateAndSpeed();
}

void loop()
{
    pump.update();
    button.update();
    if (debug)
    //in debug mode the pump will do calibation.
    //if set the debug mode off then the function works.
    {
        pump.calFlowRate();
    }
    else
    {
        if(run)
        {
            //switch the function by using Comments.
            run = false;
            // Serial.println(pump.flowPump(6.6));
            //just put the number in ml then the pump will dosing the numbers of liquid to you.
            //and you can find the numbers from serial port.
            Serial.println(pump.timerPump(120000));
            //just put the number in milisecend then the pump will dosing the time of numbers for you.
            //and you can find the numbers from serial port.
        }

    }
    if(button.click())
    {
        //Serial.println("click");
        //when you click the button the pump will stop immediately
        pump.stop();
    }
    if(button.press())
    {
        Serial.println(pump.flowPump(100));
        //when you press the button the pump will continue working.
        //Serial.println("press");
    }
}
- void update(); 蠕动泵状态更新
get the state from system, need to be put in the loop.
获取蠕动泵状态,必须放在主循环LOOP中。
- void setPin(int pin); 引脚设置
set the pin for GravityPump.
设置蠕动泵接线引脚。
- void calFlowRate(int speed = 180);校准功能
Calibration function.the speed parameter is running speed what you needed.
please input the "STARTCAL" in serial to start cal
Pump some liquid in some secs
please input the actual mumber in serial by "SETCAL:XX"
cal end
校准功能,参数中是当前速度下的校准值。
在串口窗口中输入STARTCAL启动校准。
蠕动泵将运行一段时间,请确保管子内液体呈满管状态。校准请使用提供的量筒或自行准备量筒。
输入SETCAL:XX,其中xx为量筒读取的数据。输入回车后即可完成校准。
- void pumpDriver(int speed, unsigned long runTime); 基本功能
the basic pump function, have to given speed in number(0 to 180. 90 for stop,
0 and 180 is max speed in each direction.)and runing time in milliseced.
基本功能,有两个参数,第一个是速度参数,0到180,其中90为停止,0和180为两个方向最大速度。
第二个是运行时间,以毫秒为单位。
- float timerPump(unsigned long runTime); 定时功能
timer pump function,base on the basic function.the function need to given the running time then the pump will dosing as long as your have given.
and return the quantitation. if you have Calibration, the number will be close to result.
定时功能,运行给定时间,并在串口给出输出体积,单位ML。
如果进行过校准,则给出的体积数将基本等于理论值。
- float flowPump(float quantitation);流量功能
quantification setting pump function,base on the basic function.the function need to given a quantification. Then the pump will dosing the quantification
in given number. if you have Calibration, the number will be close to result.
流量功能,给定体积数,泵将输出给定的流量,单位ML。
如果进行过校准,则给出的体积将基本等于理论值。
- void getFlowRateAndSpeed(); 读取流量值
flowrate and speed reading from EEPROM
读取功能,读取存储在EEPROM里的速度(0~180)和流量值(ML)
- void stop();停止功能
stop function. whenever you use this function the pump will stop immediately.
停止功能。使用这个功能将立刻停止水泵的运行。
该代码有两个模式,一个是调试模式,在调试模式下,debug赋值为1。
调试模式下,进入流量校准模式。
在串口调试串口,输入STARTCAL回车后进入校准模式。
蠕动泵将运行一段时间,请用我们提供的量筒接取泵出的水量。
读取量筒度数后,将数据用“SETCAL:XX”(XX表示读取数据、英文标点)输入后回车。
校准结束。
相关校准数据会存入arduino的E2PROM。
在正常使用模式下,请将debug赋值为0。
写入代码后,水泵会运行,按下按钮后,水泵会停止,再次按下后会继续运行。
长按按钮,则水泵持续运行。
还没有客户对此产品有任何问题,欢迎通过qq或者论坛联系我们!
| 更多问题及有趣的应用,可以 访问论坛 进行查阅或发帖! |


