_SKU_SEN0304_URM09_Ultrasonic_Sensor_Gravity_I²C__V1.0_超声波传感器 - jimaobian/DFRobotWikiCn GitHub Wiki

简介
这是一款开放式双探头超声波测距模块,通信方式为I2C,采用Gravity标准PH2.0-4P立式贴片座接口。该模块兼容arduino、树莓派等各种3.3V或5V逻辑电平的主控板。模块自带温度补偿,平整墙面的有效测距量程为2–500cm,分辨率为1cm,误差约为±1%。 设计150cm、300cm、500cm 三个测距量程可供程序选择切换,更短的量程设置会带来更短的测距周期和更低的测距灵敏度,用户可根据实际使用需求灵活设置。
技术规格
- 供电电压:3.3V~5.5V DC
- 工作电流:20mA
- 工作温度范围:-10℃~+70℃
- 有效测距量程:2cm~500cm(可设置,最大量程500CM)
- 分辨率:1cm
- 精度:1%
- 方向角:60°
- 测量频率:50Hz Max
- 模块尺寸:47mm × 22 mm
接口说明

| 引脚 | 引脚说明 |
| VCC | 电源输入(3.3V-5.5V) |
| GND | 电源地 |
| C | I2C时钟线SCL |
| D | I2C数据线SDA |
使用教程
URM09是一款简洁实用的超声波传感器,它采用的是I2C通信方式,可以方便的与具有I2C接口的主板时行通信
URM09 Ultrasonic Sensor(Gravity I²C)(V1.0)寄存器
| | | | | | | | | | | | | | | | | | | | | |
URM09 Ultrasonic Sensor(Gravity I²C)(V1.0)寄存器一览表
硬件连接
将模块通过I2C接口与UNO连接,如图: 
Arduino 距离及温度测量
模块出厂默认为被动测量模式,通过写命令寄存器发送测距命令,模块收到命令后便启动一次测距(测距时间与测距量程有关),当测距完成后,读取距离寄存器便可得到距离值。而温度测量直接读出温度寄存器后,经过简单处理就可以得到测得的温度值。
演示代码
|
/*!
 * PassiveMesure.ino
 *
 * Download this demo to test config to URM09, connect sensor through IIC interface
 * Data will print on your serial monitor
 *
 * This example is the ultrasonic passive measurement distance and the temperature of the module.
 *
 * Copyright   [DFRobot](http://www.dfrobot.com), 2016
 * Copyright   GNU Lesser General Public License
 *
 * version  V1.0
 * date  25/06/2019
 */
#include "DFRobot_URM09.h"

/* Create a URM09 object to communicate with IIC. */
DFRobot_URM09 URM09;

void setup() {
  Serial.begin(9600);
  while(!URM09.begin())
  {
    Serial.println("I2c device number error ");
    delay(1000);
  }
  /*
   The module is configured in automatic mode or passive ,
     MEASURE_MODE_AUTOMATIC       // automatic mode
     MEASURE_MODE_PASSIVE         // passive mode

   The measurement distance is set to 500,300,100
     MEASURE_RANG_500              // Ranging from 500
     MEASURE_RANG_300              // Ranging from 300
     MEASURE_RANG_150              // Ranging from 100
  */
  URM09.SetModeRange(MEASURE_MODE_PASSIVE ,MEASURE_RANG_500);
  delay(100);
}

void loop() {
  URM09.SetMeasurement();                          // Send ranging command
  delay(100);
  int16_t dist = URM09.i2cReadDistance();          // Read distance register
  int16_t temp = URM09.i2cReadTemperature();       // Read temperature register
  Serial.print(dist, DEC); Serial.print(" cm------"); Serial.print((float)temp / 10, 1); Serial.println(" C");

  delay(100);

}
|}
演示效果 
Mind+(基于Scratch3.0)图形化编程
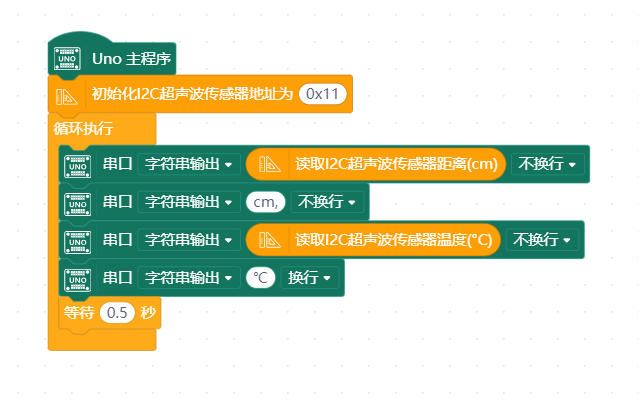
1、下载及安装软件。下载地址:http://www.mindplus.cc 详细教程:Mind+基础wiki教程-软件下载安装 2、切换到“上传模式”。 详细教程:Mind+基础wiki教程-上传模式编程流程 3、“扩展”中选择“主控板”中的“Arduino Uno”。 “传感器”中选择“SEN0304 I2C超声波测距传感器”。详细教程:Mind+基础wiki教程-加载扩展库流程 4、进行编程,程序如下图: 5、菜单“连接设备”,“上传到设备” 6、程序上传完毕后,打开串口即可看到数据输出。详细教程:Mind+基础wiki教程-串口打印
Raspberry 距离及温度测量
演示代码
- 下载URM09库文件
|
# -*- coding:utf-8 -*-
'''
  # PassiveMeasure.py
  #
  # Connect board with raspberryPi.
  # Make board power and URM09 connection correct.
  # Run this demo.
  #
  # Set the i2c communication device number.
  # Set test mode and distance.
  # Get temperature and distance data.
  #
  # Copyright   [DFRobot](http://www.dfrobot.com), 2016
  # Copyright   GNU Lesser General Public License
  #
  # version  V1.0
  # date  2019-6-25
'''
import sys
sys.path.append("../..")
import URM09
import time
''' Create a URM09 object to communicate with I2C. '''
URM09 = URM09.DFRobot_URM09()
''' Set the i2c device number '''
URM09.begin(0x11)
time.sleep(0.1)
'''
   # The module is configured in automatic mode or passive
   #  _MEASURE_MODE_AUTOMATIC        // automatic mode
   #  _MEASURE_MODE_PASSIVE          // passive mode

   # The measurement distance is set to 500,300,100
   #  _MEASURE_RANG_500              // Ranging from 500
   #  _MEASURE_RANG_300              // Ranging from 300
   #  _MEASURE_RANG_150              // Ranging from 100
'''
URM09.SetModeRange(URM09._MEASURE_MODE_PASSIVE ,URM09._MEASURE_RANG_500)
while(1):
  ''' Write command register and send ranging command '''
  URM09.SetMeasurement()
  time.sleep(0.1)
  ''' Read distance register '''
  dist = URM09.i2cReadDistance()
  ''' Read temperature register '''
  temp = URM09.i2cReadTemperature()

  print("Temperature is %.2f .c    " %(temp / 10))
  print("Distance is %d cm         " %dist)
  time.sleep(0.1)
|} 演示结果 
疑难解答
- 如果遇到技术问题,请登陆到我们的售后论坛留言,我们会尽快解答您的问题。
| 更多问题及有趣的应用,可以 访问论坛 进行查阅或发帖! |
