_SKU_ROB0116__Vortex可编程机器人 - jimaobian/DFRobotWikiCn GitHub Wiki
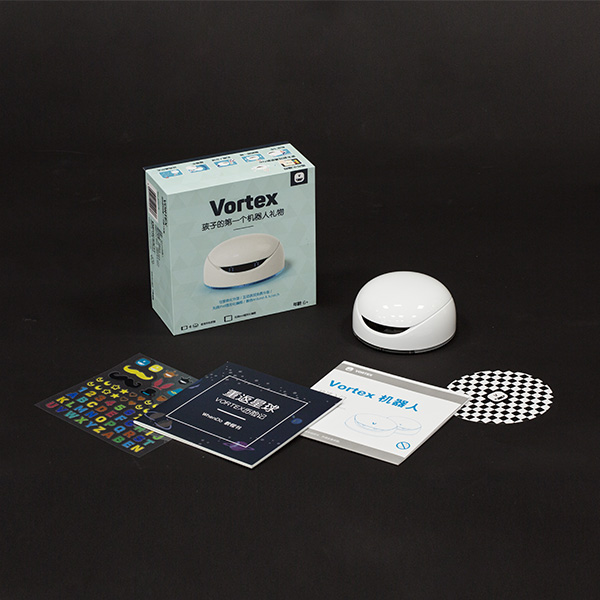
Vortex是DFRobot最新推出的一款寓教于乐的革新产品。通过配套的App操控Vortex机器人,小朋友可以一起玩各种有趣的游戏,学习机器人的相关知识,学习对机器人进行多种编程,充分培养小朋友的逻辑思维能力,发挥创造力,是小朋友很好的机器人启蒙伙伴。 Vortex通过配套App来让孩子学习基本的机器人及编码,同时有易用性界面。
- 主控芯片:Atmega 328p (Bootloader: Arduino UNO)
- 供电方式:microUSB/AA电池x4
- 工作电压:3.5--6V
- 驱动方式:两轮差速驱动
- 静态功耗:100mA
- 支持MP3播放
- 支持红外接收
- 支持互动表情板
- 支持巡线功能
- 支持红外壁障功能
- 支持编码器
- 支持RGB变色
- 支持蓝牙无线下载程序
- 全彩RGB LED
- 红外避障
- 巡线功能
- 电机驱动
- 编码器
- MP3播放
- 表情板子
Vortex集成一下主要部件:
- 2个 红外发射管
- 1个 红外接收管
- 2个 表情板
- 2个 小乌龟按钮(包括复位按键和boot按键)
- 12个 全彩RGB灯�
- 6个 红外巡线传感器
- 2个 N20直流减速电机
- 1个 3w喇叭
- 1个 蓝牙芯片
- 2个 编码器
vortex为初学者提供8节课程,从入门到实现避障等测试,使用户通过教程轻松掌握。
- 表情板接口
- 灰度传感器测试
- 红外壁障测试
- RGB灯测试
- mp3测试
- 电机驱动测试
- 编码器测试
- 表情测试
- 灰度传感器:6个灰度传感器采用模拟量输入
- 蓝牙电路:CC2540f256芯片控制
- N20电机:采用N20电机及1:75减速箱组成
- 电机驱动电路:双H桥驱动电路
- 壁障传感器:采用38KHz红外接收头
- 表情板接口:用于控制表情板及驱动两个红外发射管
- 电源电路:自适应升降压电路
- 顶板接口:采用间距1.27mm接口
- 编码器:2路编码传感器,用于检测轮子转速
- 电源接口:DC接口,输入电源电压范围3.5~6V
- 壁障传感器:2路红外发射管,用于左右壁障
- 表情板:5*5RGB点阵组成
- 接插口:插接在主板上
| ===灰度传感器测试=== |
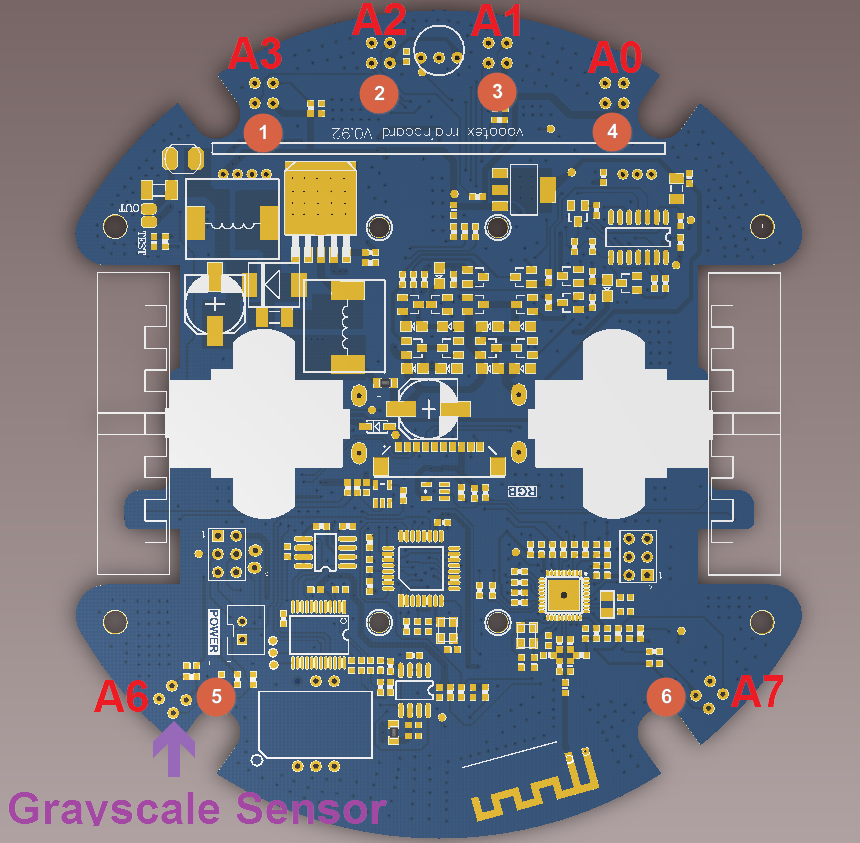
灰度传感器由一组红外发射接受管组成,利用不同颜色对红外光的反射程度不同,来鉴别颜色的深浅。在机器人领域中,可应用于轨迹巡线,边界防跌落功能等。
| | |
| -------------------------------------------------------------------------------- | |
|

| 序号 | 管脚 | 标号 |
| 1 | A3 | D |
| 2 | A2 | C |
| 3 | A1 | B |
| 4 | A0 | A |
| 5 | A6 | F |
| 6 | A7 | E |
驱动管脚
VORTEX Arduino 灰度传感器驱动代码:读取6个灰度传感器数值
 |
|
| 请将顶板的Music/Program开关拨到Program端。 |
/***************************************************
 Vortex V1.0 (Small robots like bread)
 <http://www.dfrobot.com.cn/goods-1199.html>

 ***************************************************
 This example show how to use Gray sensor on vortex.

 Created 2016-2-3
 By Andy zhou <[email protected]>
 version:V1.0
 ****************************************************/

/***********Notice and Trouble shooting***************
 1.Connection and Diagram can be found here
 <http://wiki.dfrobot.com.cn/index.php?title=(SKU:ROB0116)_Vortex%E5%8F%AF%E7%BC%96%E7%A8%8B%E6%9C%BA%E5%99%A8%E4%BA%BA#.E6.A0.B7.E4.BE.8B.E4.BB.A3.E7.A0.81>
 2.This code is tested on vortex V1.0.
 ****************************************************/

void setup(void){
 Serial.begin(9600);
}

int analogBuf[6] = {'\0'};

void loop(void){
  analogBuf[0] = analogRead(3);
  analogBuf[1] = analogRead(2);
  analogBuf[2] = analogRead(1);
  analogBuf[3] = analogRead(0);
  analogBuf[4] = analogRead(6);
  analogBuf[5] = analogRead(7);
  for(int i=0;i<6;i++){
    Serial.print(i+1);
    Serial.print(": ");
    Serial.print(analogBuf[i]);
    Serial.print("   ");
  }
  Serial.println();
  delay(500);
}
烧入样例代码之后可以通过Arduino IDE的串口监视器查看当前的灰度数值,为了实验效果明显,可以准备一张白纸和一个黑色的胶带,并将黑色胶带贴在白纸上。看准各个灰度传感器的位置,依次将灰度传感器从没贴胶带的白纸上面移到黑色胶带上面,可以很明显的看到,在白纸上面返回的模拟值远远大于黑色胶带上面的值。这是因为在白色返回绝大部分的红外光,而黑色吸收了大部分的红外光,导致返回数值远远小于白纸上面的模拟值。
image:ROB0116-RESUALT1.jpg|VORTEX摆放举例 image:ROB0116-RESUALT2.png|全部传感器都在白纸上 image:ROB0116-RESUALT3.png|第一个传感器在黑色胶带上,其余在白纸上
| ===红外壁障测试=== |
红外壁障传感器由两个红外发射管和接收管组成,发射管以38KHz频率连续发射20个脉冲,并在一定时间内检测接收到的脉冲数量,来判断小车距离障碍物的距离。在机器人领域中,可应用于避开障碍物等。
image:壁障.png|红外传感器接收位置 image:壁障发射.png|红外传感器发射位置
VORTEX Arduino 红外壁障传感器驱动代码:测试壁障效果
 |
|
| 请将顶板的Music/Program开关拨到Program端。 |
/***************************************************
 Vortex V1.0 (Small robots like bread)
 <http://www.dfrobot.com.cn/goods-1199.html>

 ***************************************************
 This example show how to use Infrared sensor to avoid obstacles.

 Created 2016-2-3
 By Andy zhou <[email protected]>
 version:V1.0
 ****************************************************/

/***********Notice and Trouble shooting***************
 1.Connection and Diagram can be found here
 <http://wiki.dfrobot.com.cn/index.php?title=(SKU:ROB0116)_Vortex%E5%8F%AF%E7%BC%96%E7%A8%8B%E6%9C%BA%E5%99%A8%E4%BA%BA#.E6.A0.B7.E4.BE.8B.E4.BB.A3.E7.A0.81>
 2.This code is tested on vortex V1.0.
 ****************************************************/

#define IR_IN  7//IR receiver pin
#define L_IR 8  //left ir transmitter pin
#define R_IR 12 //right ir transmitter pin

int count;

void leftSend38KHZ(void){//left ir transmitter sends 38kHZ pulse
  int i;
  for(i=0;i<24;i++){
    digitalWrite(L_IR,LOW);
    delayMicroseconds(8);
    digitalWrite(L_IR,HIGH);
    delayMicroseconds(8);
  }
}
void rightSend38KHZ(void){//right ir transmitter sends 38kHZ pulse
  int i;
  for(i=0;i<24;i++){
    digitalWrite(R_IR,LOW);
    delayMicroseconds(8);
    digitalWrite(R_IR,HIGH);
    delayMicroseconds(8);
  }
}

void pcint0Init(void){//init the interrupt
    PCICR |= 1 << PCIE2;
    PCMSK2 |= 1 << PCINT23;
}

ISR(PCINT2_vect){//motor encoder interrupt
  count++;
}

void obstacleAvoidance(void){
  char i;
  count=0;
  for(i=0;i<20;i++){  //left transmitter sends 20 pulses
    leftSend38KHZ();
    delayMicroseconds(600);
  }
  if(count>20){//if recieved a lot pulse , it means there's a obstacle
    Serial.println("Left");
    delay(100);
  }
  count=0;
  for(i=0;i<20;i++){//right transmitter sends 20 pulses
    rightSend38KHZ();
    delayMicroseconds(600);
  }
  if(count>20){//if recieved a lot pulse , it means there's a obstacle
    Serial.println("Right");
    delay(100);
  }
}

void setup(void){
  pinMode(L_IR,OUTPUT);//init the left transmitter pin
  pinMode(R_IR,OUTPUT);//init the right transmitter pin
  pinMode(IR_IN,INPUT);//init the ir receiver pin
  Serial.begin(9600);
  pcint0Init();
  sei();               //enable the interrupt
}

void loop(void){
  obstacleAvoidance();
}
烧入样例代码之后可以通过Arduino IDE的串口监视器查看当前的障碍物检测结果,把手在放左侧表情板的前方3-20cm处。可以看到串口不停的打印Left,表明左侧的红外检测到了障碍物。把手在放右侧表情板的前方3-20cm处。可以看到串口不停的打印Righ,表明右侧的红外检测到了障碍物。把手在放表情板的正前方3-20cm处。可以看到串口不停的交替打印Left,Righ。
image:壁障效果.png|避障接收
| ===RGB灯测试=== |
RGB灯带是用6个内置IC芯片的RGB灯珠组成,通过单总线控制灯带颜色及亮度。在机器人领域中,可让小车更加炫酷。
- RGB灯分布:主板6个+顶板6个,采用单线数据控制,控制口连接到uno的D13
 |
|
| 相关库文件下载:Vortex库文件 |
测试代码如下:
/***************************************************
 Vortex V1.0 (Small robots like bread)
 <http://www.dfrobot.com.cn/goods-1199.html>

 ***************************************************
 This example show how to use RGB-leds.

 Created 2016-2-3
 By Andy zhou <[email protected]>
 version:V1.0
 ****************************************************/

/***********Notice and Trouble shooting***************
 1.Connection and Diagram can be found here
 <http://wiki.dfrobot.com.cn/index.php?title=(SKU:ROB0116)_Vortex%E5%8F%AF%E7%BC%96%E7%A8%8B%E6%9C%BA%E5%99%A8%E4%BA%BA#.E6.A0.B7.E4.BE.8B.E4.BB.A3.E7.A0.81>
 2.This code is tested on vortex V1.0.
 ****************************************************/
// Use if you want to force the software SPI subsystem to be used for some reason (generally, you don't)
// #define FORCE_SOFTWARE_SPI
// Use if you want to force non-accelerated pin access (hint: you really don't, it breaks lots of things)
// #define FORCE_SOFTWARE_SPI
// #define FORCE_SOFTWARE_PINS
#include "FastLED.h"

///////////////////////////////////////////////////////////////////////////////////////////
//
// Move a white dot along the strip of leds.  This program simply shows how to configure the leds,
// and then how to turn a single pixel white and then off, moving down the line of pixels.
//

// How many leds are in the strip?
#define NUM_LEDS 12

// Data pin that led data will be written out over
#define DATA_PIN 13

// Clock pin only needed for SPI based chipsets when not using hardware SPI
//#define CLOCK_PIN 8

// This is an array of leds.  One item for each led in your strip.
CRGB leds[NUM_LEDS];

// This function sets up the ledsand tells the controller about them
void setup() {
    // sanity check delay - allows reprogramming if accidently blowing power w/leds
    delay(2000);
    // Uncomment one of the following lines for your leds arrangement.
    // FastLED.addLeds<TM1803, DATA_PIN, RGB>(leds, NUM_LEDS);
    // FastLED.addLeds<TM1804, DATA_PIN, RGB>(leds, NUM_LEDS);
    // FastLED.addLeds<TM1809, DATA_PIN, RGB>(leds, NUM_LEDS);
    FastLED.addLeds<WS2811, DATA_PIN, RGB>(leds, NUM_LEDS);
    // FastLED.addLeds<WS2812, DATA_PIN, RGB>(leds, NUM_LEDS);
    // FastLED.addLeds<WS2812B, DATA_PIN, RGB>(leds, NUM_LEDS);
    // FastLED.addLeds<NEOPIXEL, DATA_PIN>(leds, NUM_LEDS);
    // FastLED.addLeds<WS2811_400, DATA_PIN, RGB>(leds, NUM_LEDS);
    // FastLED.addLeds<GW6205, DATA_PIN, RGB>(leds, NUM_LEDS);
    // FastLED.addLeds<GW6205_400, DATA_PIN, RGB>(leds, NUM_LEDS);
    // FastLED.addLeds<UCS1903, DATA_PIN, RGB>(leds, NUM_LEDS);
    // FastLED.addLeds<UCS1903B, DATA_PIN, RGB>(leds, NUM_LEDS);
    // FastLED.addLeds<WS2801, RGB>(leds, NUM_LEDS);
    // FastLED.addLeds<SM16716, RGB>(leds, NUM_LEDS);
    // FastLED.addLeds<LPD8806, RGB>(leds, NUM_LEDS);
    // FastLED.addLeds<P9813, RGB>(leds, NUM_LEDS);
    // FastLED.addLeds<WS2801, DATA_PIN, CLOCK_PIN, RGB>(leds, NUM_LEDS);
    // FastLED.addLeds<SM16716, DATA_PIN, CLOCK_PIN, RGB>(leds, NUM_LEDS);
    // FastLED.addLeds<LPD8806, DATA_PIN, CLOCK_PIN, RGB>(leds, NUM_LEDS);
}

// This function runs over and over, and is where you do the magic to light
// your leds.
void loop() {
   // Move a single white led
   for(int whiteLed = 0; whiteLed < NUM_LEDS; whiteLed = whiteLed + 1) {
      // Turn our current led on to white, then show the leds
      leds[whiteLed] = CRGB::White;
      // Show the leds (only one of which is set to white, from above)
      FastLED.show();
      // Wait a little bit
      delay(100);
      // Turn our current led back to black for the next loop around
      leds[whiteLed] = CRGB::Black;
   }
}
烧入样例代码之后可以看到底部的6个RGB灯亮并以白色跑马灯点亮,当然可以用RGB任意组合成很多种颜色,非常炫酷。
image:RGB white.png
| ===mp3测试=== |
- mp3控制端口采用模拟Serial与mp3通信,控制mp3播放功能
- 内置24种音乐
- 支持USB在线拷贝mp3文件,拷贝方法是:将顶板的切换开关切换到music端,插上电脑拷贝即可。
通过D11引脚与mp3相连
测试代码如下:
/***************************************************
 Vortex V1.0 (Small robots like bread)
 <http://www.dfrobot.com.cn/goods-1199.html>

 ***************************************************
 This example show how to device mp3 player.

 Created 2016-2-3
 By Andy zhou <[email protected]>
 version:V1.0
 ****************************************************/

/***********Notice and Trouble shooting***************
 1.Connection and Diagram can be found here
 <http://wiki.dfrobot.com.cn/index.php?title=(SKU:ROB0116)_Vortex%E5%8F%AF%E7%BC%96%E7%A8%8B%E6%9C%BA%E5%99%A8%E4%BA%BA#.E6.A0.B7.E4.BE.8B.E4.BB.A3.E7.A0.81>
 2.This code is tested on vortex V1.0.
 ****************************************************/
#include <SoftwareSerial.h>
#include <VortexMp3.h>

#define MP3_VOLUME 0x10

void init(){
    mp3.Init();
    mp3.setVolume(MP3_VOLUME);
}

void setup() {
  // put your setup code here, to run once:
  init();
}
static int musicState = 1;
void loop(){
  // put your main code here, to run repeatedly:
  mp3.player(musicState);
  musicState++;
  if (musicState>=20){
    musicState = 1;
  }
  delay(1000);
}
下载样列代码后,可以听到mp3播放相应的音乐文件的音效
| ===电机驱动测试=== |
通过4个I/O口,就能够控制小车的前进、后退、转弯、PWM调速的功能
- 左轮:使能端连接uno的D5(高电平有效),方向控制端连接uno的D9(高电平正转,低电平反转)
- 右轮:使能端连接uno的D6(高电平有效),方向控制端连接uno的D10(高电平正转,低电平反转)
示例代码如下:
/***************************************************
 Vortex V1.0 (Small robots like bread)
 <http://www.dfrobot.com.cn/goods-1199.html>

 ***************************************************
let the robots move.

 Created 2016-2-3
 By Andy zhou <[email protected]>
 version:V1.0
 ****************************************************/

/***********Notice and Trouble shooting***************
 1.Connection and Diagram can be found here
 <http://wiki.dfrobot.com.cn/index.php?title=(SKU:ROB0116)_Vortex%E5%8F%AF%E7%BC%96%E7%A8%8B%E6%9C%BA%E5%99%A8%E4%BA%BA#.E6.A0.B7.E4.BE.8B.E4.BB.A3.E7.A0.81>
 2.This code is tested on vortex V1.0.
 ****************************************************/
void setup() {
  pinMode(5,OUTPUT);
  pinMode(9,OUTPUT);
  pinMode(6,OUTPUT);
  pinMode(10,OUTPUT);
}

void loop() {
  digitalWrite(5,HIGH);
  digitalWrite(9,HIGH);
  digitalWrite(6,HIGH);
  digitalWrite(10,HIGH);
  delay(2000);
  digitalWrite(5,HIGH);
  digitalWrite(9,LOW);
  digitalWrite(6,HIGH);
  digitalWrite(10,LOW);
  delay(2000);
}
烧入样例代码之后可以看到,左轮和右轮同时正转2s后,再反转2s,一直循环
| ===编码器测试=== |
编码器是采用红外发射式传感器,将电机转速转换成数字信号的传感器。在机器人领域中,可以测得小车的具体转速
- 左轮编码器:连接uno中断口0,即数字引脚D2
- 右轮编码器:连接uno中端口1,即数字引脚D3
image:编码器位置.png|编码器位置图
/***************************************************
 Vortex V1.0 (Small robots like bread)
 <http://www.dfrobot.com.cn/goods-1199.html>

 ***************************************************
 This example show how to use encoder sensor.

 Created 2016-2-3
 By Andy zhou <[email protected]>
 version:V1.0
 ****************************************************/

/***********Notice and Trouble shooting***************
 1.Connection and Diagram can be found here
 <http://wiki.dfrobot.com.cn/index.php?title=(SKU:ROB0116)_Vortex%E5%8F%AF%E7%BC%96%E7%A8%8B%E6%9C%BA%E5%99%A8%E4%BA%BA#.E6.A0.B7.E4.BE.8B.E4.BB.A3.E7.A0.81>
 2.This code is tested on vortex V1.0.
 ****************************************************/
#define pinInputLeft 0
#define pinInputRight 1
long leftPul,rightPul;

void leftCallBack(){
  leftPul++;
}

void rightCallBack(){
  rightPul++;
}

void initDdevice(){
    pinMode(5,OUTPUT);
    pinMode(6,OUTPUT);
    pinMode(9,OUTPUT);
    pinMode(10,OUTPUT);
    attachInterrupt(pinInputLeft,leftCallBack,CHANGE);
    attachInterrupt(pinInputRight,rightCallBack,CHANGE);
    sei();
}

void motorDebug(){
  digitalWrite(5,HIGH);
  digitalWrite(6,HIGH);
  digitalWrite(9,HIGH);
  digitalWrite(10,HIGH);
}

void printPul(){
  Serial.print(leftPul);
  Serial.print(" ");
  Serial.println(rightPul);
  leftPul = 0;
  rightPul = 0;
}

void setup() {
  initDdevice();
  Serial.begin(9600);
  motorDebug();
}

void loop() {
  printPul();
  delay(500);
}
烧入样例代码之后可以看到电机正转,通过Arduino IDE的串口监视器查看当前的电机的转速
image:编码器效果图.png|编码器效果图
| ===表情测试=== |
表情板采用两个5*5 RGB点阵屏组成,通过IIC发送命令控制表情。在机器人应用领域中,可以让小车显示各种表�
image:表情板显示屏.png|表情板位置图
/***************************************************
 Vortex V1.0 (Small robots like bread)
 <http://www.dfrobot.com.cn/goods-1199.html>

 ***************************************************
 This example show how to use Gray sensor on vortex.

 Created 2016-2-3
 By Andy zhou <[email protected]>
 version:V1.0
 ****************************************************/

/***********Notice and Trouble shooting***************
 1.Connection and Diagram can be found here
 <http://wiki.dfrobot.com.cn/index.php?title=(SKU:ROB0116)_Vortex%E5%8F%AF%E7%BC%96%E7%A8%8B%E6%9C%BA%E5%99%A8%E4%BA%BA#.E6.A0.B7.E4.BE.8B.E4.BB.A3.E7.A0.81>
 2.This code is tested on vortex V1.0.
 ****************************************************/
#include <Wire.h>

#define I2C_LED_ADDRESS 0b1100000
#define I2C_WRITE   0x00
uint8_t serial=0;

void setup(){
  Wire.begin(); // join i2c bus (address optional for master)
}

void loop(){
  Wire.beginTransmission(I2C_LED_ADDRESS << 1 | I2C_WRITE); // transmit to device #4

  Wire.write(0x01);
  Wire.write(serial);
  /*Wire.write(0x55);
  Wire.write(0xAA);
  Wire.write(0x07);         //color set

  //1  2  3  4  5      25 24 23 22 21
  //6  7  8  9  10     20 19 18 17 16
  //11 12 13 14 15     15 14 13 12 11
  //16 17 18 19 20     10 9  8  7  6
  //21 22 23 24 25     5  4  3  2  1

  Wire.write(0x07);
  Wire.write(0x18);
  Wire.write(0x00);
  Wire.write(0x04);
  Wire.write(0x00);

  Wire.write(0x07);
  Wire.write(0x18);
  Wire.write(0x00);
  Wire.write(0x04);
  Wire.write(0x00);

  Wire.endTransmission();    // stop transmitting

  serial++;
  if(serial==35) serial=0;
  delay(500);
}
烧入样列代码后,可以看到,表情板依次显示多个表情


